This is the multi-page printable view of this section. Click here to print.
Securing Dapr deployments
- 1: Setup & configure mTLS certificates
- 2: Configure endpoint authorization with OAuth
- 3: Enable API token authentication in Dapr
- 4: Authenticate requests from Dapr using token authentication
1 - Setup & configure mTLS certificates
Dapr supports in-transit encryption of communication between Dapr instances using the Dapr control plane, Sentry service, which is a central Certificate Authority (CA).
Dapr allows operators and developers to bring in their own certificates, or instead let Dapr automatically create and persist self-signed root and issuer certificates.
For detailed information on mTLS, read the security concepts section.
If custom certificates have not been provided, Dapr automatically creates and persist self-signed certs valid for one year. In Kubernetes, the certs are persisted to a secret that resides in the namespace of the Dapr system pods, accessible only to them. In self-hosted mode, the certs are persisted to disk.
Control plane Sentry service configuration
The mTLS settings reside in a Dapr control plane configuration file. For example when you deploy the Dapr control plane to Kubernetes this configuration file is automatically created and then you can edit this. The following file shows the available settings for mTLS in a configuration resource, deployed in the daprsystem namespace:
apiVersion: dapr.io/v1alpha1
kind: Configuration
metadata:
  name: daprsystem
  namespace: default
spec:
  mtls:
    enabled: true
    workloadCertTTL: "24h"
    allowedClockSkew: "15m"
The file here shows the default daprsystem configuration settings. The examples below show you how to change and apply this configuration to the control plane Sentry service either in Kubernetes and self-hosted modes.
Kubernetes
Setting up mTLS with the configuration resource
In Kubernetes, Dapr creates a default control plane configuration resource with mTLS enabled.
The Sentry service, the certificate authority system pod, is installed both with Helm and with the Dapr CLI using dapr init --kubernetes.
You can view the control plane configuration resource with the following command:
kubectl get configurations/daprsystem --namespace <DAPR_NAMESPACE> -o yaml.
To make changes to the control plane configuration resource, run the following command to edit it:
kubectl edit configurations/daprsystem --namespace <DAPR_NAMESPACE>
Once the changes are saved, perform a rolling update to the control plane:
kubectl rollout restart deploy/dapr-sentry -n <DAPR_NAMESPACE>
kubectl rollout restart deploy/dapr-operator -n <DAPR_NAMESPACE>
kubectl rollout restart statefulsets/dapr-placement-server -n <DAPR_NAMESPACE>
Note: the control plane Sidecar Injector service does not need to be redeployed
Disabling mTLS with Helm
The control plane will continue to use mTLS
kubectl create ns dapr-system

helm install \
  --set global.mtls.enabled=false \
  --namespace dapr-system \
  dapr \
  dapr/dapr
Disabling mTLS with the CLI
The control plane will continue to use mTLS
dapr init --kubernetes --enable-mtls=false
Viewing logs
In order to view the Sentry service logs, run the following command:
kubectl logs --selector=app=dapr-sentry --namespace <DAPR_NAMESPACE>
Bringing your own certificates
Using Helm, you can provide the PEM encoded root cert, issuer cert and private key that will be populated into the Kubernetes secret used by the Sentry service.
Avoiding downtime
To avoid downtime when rotating expiring certificates always sign your certificates with the same private root key.Note: This example uses the OpenSSL command line tool, this is a widely distributed package, easily installed on Linux via the package manager. On Windows OpenSSL can be installed using chocolatey. On MacOS it can be installed using brew brew install openssl
Create config files for generating the certificates, this is necessary for generating v3 certificates with the SAN (Subject Alt Name) extension fields. First save the following to a file named root.conf:
[req]
distinguished_name = req_distinguished_name
x509_extensions = v3_req
prompt = no
[req_distinguished_name]
C = US
ST = VA
L = Daprville
O = dapr.io/sentry
OU = dapr.io/sentry
CN = cluster.local
[v3_req]
basicConstraints = critical, CA:true
keyUsage = critical, digitalSignature, cRLSign, keyCertSign
extendedKeyUsage = serverAuth, clientAuth
subjectAltName = @alt_names
[alt_names]
DNS.1 = cluster.local
Repeat this for issuer.conf, paste the same contents into the file, but add pathlen:0 to the end of the basicConstraints line, as shown below:
basicConstraints = critical, CA:true, pathlen:0
Run the following to generate the root cert and key
# skip the following line to reuse an existing root key, required for rotating expiring certificates
openssl ecparam -genkey -name prime256v1 | openssl ec -out root.key
openssl req -new -nodes -sha256 -key root.key -out root.csr -config root.conf -extensions v3_req
openssl x509 -req -sha256 -days 365 -in root.csr -signkey root.key -outform PEM -out root.pem -extfile root.conf -extensions v3_req
Next run the following to generate the issuer cert and key:
# skip the following line to reuse an existing issuer key, required for rotating expiring certificates
openssl ecparam -genkey -name prime256v1 | openssl ec -out issuer.key
openssl req -new -sha256 -key issuer.key -out issuer.csr -config issuer.conf -extensions v3_req
openssl x509 -req -in issuer.csr -CA root.pem -CAkey root.key -CAcreateserial -outform PEM -out issuer.pem -days 365 -sha256 -extfile issuer.conf -extensions v3_req
Install Helm and pass the root cert, issuer cert and issuer key to Sentry via configuration:
kubectl create ns dapr-system

helm install \
  --set-file dapr_sentry.tls.issuer.certPEM=issuer.pem \
  --set-file dapr_sentry.tls.issuer.keyPEM=issuer.key \
  --set-file dapr_sentry.tls.root.certPEM=root.pem \
  --namespace dapr-system \
  dapr \
  dapr/dapr
Root and issuer certificate upgrade using CLI (Recommended)
The CLI commands below can be used to renew root and issuer certificates in your Kubernetes cluster.
Generate brand new certificates
- The command below generates brand new root and issuer certificates, signed by a newly generated private root key.
Note: The
Dapr sentry servicefollowed by rest of the control plane services must be restarted for them to be able to read the new certificates. This can be done by supplying--restartflag to the command.
dapr mtls renew-certificate -k --valid-until <days> --restart
- The command below generates brand new root and issuer certificates, signed by provided private root key.
Note: If your existing deployed certificates are signed by this same private root key, the
Dapr Sentry servicecan then read these new certificates without restarting.
dapr mtls renew-certificate -k --private-key <private_key_file_path> --valid-until <days>
Renew certificates by using provided custom certificates
To update the provided certificates in the Kubernetes cluster, the CLI command below can be used.
Note - It does not support
valid-untilflag to specify validity for new certificates.
dapr mtls renew-certificate -k --ca-root-certificate <ca.crt> --issuer-private-key <issuer.key> --issuer-public-certificate <issuer.crt> --restart
Restart Dapr-enabled pods
Irrespective of which command was used to renew the certificates, you must restart all Dapr-enabled pods. Due to certificate mismatches, you might experience some downtime till all deployments have successfully been restarted.kubectl rollout restart deploy/myapp
Updating root or issuer certs using Kubectl
If the Root or Issuer certs are about to expire, you can update them and restart the required system services.
Avoiding downtime when rotating certificates
To avoid downtime when rotating expiring certificates your new certificates must be signed with the same private root key as the previous certificates. This is not currently possible using self-signed certificates generated by Dapr.Dapr-generated self-signed certificates
- Clear the existing Dapr Trust Bundle secret by saving the following YAML to a file (e.g.
clear-trust-bundle.yaml) and applying this secret.
apiVersion: v1
kind: Secret
metadata:
  name: dapr-trust-bundle
  labels:
    app: dapr-sentry
data:
kubectl apply -f `clear-trust-bundle.yaml` -n <DAPR_NAMESPACE>
- Restart the Dapr Sentry service. This will generate a new certificate bundle and update the
dapr-trust-bundleKubernetes secret.
kubectl rollout restart -n <DAPR_NAMESPACE> deployment/dapr-sentry
- Once the Sentry service has been restarted, restart the rest of the Dapr control plane to pick up the new Dapr Trust Bundle.
kubectl rollout restart deploy/dapr-operator -n <DAPR_NAMESPACE>
kubectl rollout restart statefulsets/dapr-placement-server -n <DAPR_NAMESPACE>
kubectl rollout restart deploy/dapr-sidecar-injector -n <DAPR_NAMESPACE>
kubectl rollout restart deploy/dapr-scheduler-server -n <DAPR_NAMESPACE>
- Restart your Dapr applications to pick up the latest trust bundle.
Potential application downtime with mTLS enabled.
Restarts of deployments using service to service invocation using mTLS will fail until the callee service has also been restarted (thereby loading the new Dapr Trust Bundle). Additionally, the placement service will not be able to assign new actors (while existing actors remain unaffected) until applications have been restarted to load the new Dapr Trust Bundle.kubectl rollout restart deployment/mydaprservice1 kubectl deployment/myotherdaprservice2
Custom certificates (bring your own)
First, issue new certificates using the step above in Bringing your own certificates.
Now that you have the new certificates, use Helm to upgrade the certificates:
helm upgrade \
  --set-file dapr_sentry.tls.issuer.certPEM=issuer.pem \
  --set-file dapr_sentry.tls.issuer.keyPEM=issuer.key \
  --set-file dapr_sentry.tls.root.certPEM=root.pem \
  --namespace dapr-system \
  dapr \
  dapr/dapr
Alternatively, you can update the Kubernetes secret that holds them:
kubectl edit secret dapr-trust-bundle -n <DAPR_NAMESPACE>
Replace the ca.crt, issuer.crt and issuer.key keys in the Kubernetes secret with their corresponding values from the new certificates.
Note: The values must be base64 encoded
If you signed the new cert root with the same private key the Dapr Sentry service will pick up the new certificates automatically. You can restart your application deployments using kubectl rollout restart with zero downtime. It is not necessary to restart all deployments at once, as long as deployments are restarted before original certificate expiration.
If you signed the new cert root with a different private key, you must restart the Dapr Sentry service, followed by the remainder of the Dapr control plane service.
kubectl rollout restart deploy/dapr-sentry -n <DAPR_NAMESPACE>
Once Sentry has been completely restarted run:
kubectl rollout restart deploy/dapr-operator -n <DAPR_NAMESPACE>
kubectl rollout restart statefulsets/dapr-placement-server -n <DAPR_NAMESPACE>
Next, you must restart all Dapr-enabled pods. The recommended way to do this is to perform a rollout restart of your deployment:
kubectl rollout restart deploy/myapp
You will experience potential downtime due to mismatching certificates until all deployments have successfully been restarted (and hence loaded the new Dapr certificates).
Kubernetes video demo
Watch this video to show how to update mTLS certificates on Kubernetes
Set up monitoring for Dapr control plane mTLS certificate expiration
Beginning 30 days prior to mTLS root certificate expiration the Dapr sentry service will emit hourly warning level logs indicating that the root certificate is about to expire.
As an operational best practice for running Dapr in production we recommend configuring monitoring for these particular sentry service logs so that you are aware of the upcoming certificate expiration.
"Dapr root certificate expiration warning: certificate expires in 2 days and 15 hours"
Once the certificate has expired you will see the following message:
"Dapr root certificate expiration warning: certificate has expired."
In Kubernetes you can view the sentry service logs like so:
kubectl logs deployment/dapr-sentry -n dapr-system
The log output will appear like the following:"
{"instance":"dapr-sentry-68cbf79bb9-gdqdv","level":"warning","msg":"Dapr root certificate expiration warning: certificate expires in 2 days and 15 hours","scope":"dapr.sentry","time":"2022-04-01T23:43:35.931825236Z","type":"log","ver":"1.6.0"}
As an additional tool to alert you to the upcoming certificate expiration beginning with release 1.7.0 the CLI now prints the certificate expiration status whenever you interact with a Kubernetes-based deployment.
Example:
dapr status -k

  NAME                   NAMESPACE    HEALTHY  STATUS   REPLICAS  VERSION   AGE  CREATED
  dapr-operator          dapr-system  True     Running  1         1.15.1    4m   2025-02-19 17:36.26
  dapr-placement-server  dapr-system  True     Running  1         1.15.1    4m   2025-02-19 17:36.27
  dapr-dashboard         dapr-system  True     Running  1         0.15.0    4m   2025-02-19 17:36.27
  dapr-sentry            dapr-system  True     Running  1         1.15.1    4m   2025-02-19 17:36.26
  dapr-scheduler-server  dapr-system  True     Running  3         1.15.1    4m   2025-02-19 17:36.27
  dapr-sidecar-injector  dapr-system  True     Running  1         1.15.1    4m   2025-02-19 17:36.26
⚠  Dapr root certificate of your Kubernetes cluster expires in 2 days. Expiry date: Mon, 04 Apr 2025 15:01:03 UTC.
 Please see docs.dapr.io for certificate renewal instructions to avoid service interruptions.
Self hosted
Running the control plane Sentry service
In order to run the Sentry service, you can either build from source, or download a release binary from here.
When building from source, please refer to this guide on how to build Dapr.
Second, create a directory for the Sentry service to create the self signed root certs:
mkdir -p $HOME/.dapr/certs
Run the Sentry service locally with the following command:
./sentry --issuer-credentials $HOME/.dapr/certs --trust-domain cluster.local
If successful, the Sentry service runs and creates the root certs in the given directory. This command uses default configuration values as no custom config file was given. See below on how to start the Sentry service with a custom configuration.
Setting up mTLS with the configuration resource
Dapr instance configuration
When running Dapr in self hosted mode, mTLS is disabled by default. you can enable it by creating the following configuration file:
apiVersion: dapr.io/v1alpha1
kind: Configuration
metadata:
  name: daprsystem
  namespace: default
spec:
  mtls:
    enabled: true
In addition to the Dapr configuration, you also need to provide the TLS certificates to each Dapr sidecar instance. You can do so by setting the following environment variables before running the Dapr instance:
export DAPR_TRUST_ANCHORS=`cat $HOME/.dapr/certs/ca.crt`
export DAPR_CERT_CHAIN=`cat $HOME/.dapr/certs/issuer.crt`
export DAPR_CERT_KEY=`cat $HOME/.dapr/certs/issuer.key`
export NAMESPACE=default
$env:DAPR_TRUST_ANCHORS=$(Get-Content -raw $env:USERPROFILE\.dapr\certs\ca.crt)
$env:DAPR_CERT_CHAIN=$(Get-Content -raw $env:USERPROFILE\.dapr\certs\issuer.crt)
$env:DAPR_CERT_KEY=$(Get-Content -raw $env:USERPROFILE\.dapr\certs\issuer.key)
$env:NAMESPACE="default"
If using the Dapr CLI, point Dapr to the config file above to run the Dapr instance with mTLS enabled:
dapr run --app-id myapp --config ./config.yaml node myapp.js
If using daprd directly, use the following flags to enable mTLS:
daprd --app-id myapp --enable-mtls --sentry-address localhost:50001 --config=./config.yaml
Sentry service configuration
Here’s an example of a configuration for Sentry that changes the workload cert TTL to 25 seconds:
apiVersion: dapr.io/v1alpha1
kind: Configuration
metadata:
  name: daprsystem
  namespace: default
spec:
  mtls:
    enabled: true
    workloadCertTTL: "25s"
In order to start Sentry service with a custom config, use the following flag:
./sentry --issuer-credentials $HOME/.dapr/certs --trust-domain cluster.local --config=./config.yaml
Bringing your own certificates
In order to provide your own credentials, create ECDSA PEM encoded root and issuer certificates and place them on the file system.
Tell the Sentry service where to load the certificates from using the --issuer-credentials flag.
The next examples creates root and issuer certs and loads them with the Sentry service.
Note: This example uses the step tool to create the certificates. You can install step tool from here. Windows binaries available here
Create the root certificate:
step certificate create cluster.local ca.crt ca.key --profile root-ca --no-password --insecure
Create the issuer certificate:
step certificate create cluster.local issuer.crt issuer.key --ca ca.crt --ca-key ca.key --profile intermediate-ca --not-after 8760h --no-password --insecure
This creates the root and issuer certs and keys.
Place ca.crt, issuer.crt and issuer.key in a desired path ($HOME/.dapr/certs in the example below), and launch Sentry:
./sentry --issuer-credentials $HOME/.dapr/certs --trust-domain cluster.local
Updating root or issuer certificates
If the Root or Issuer certs are about to expire, you can update them and restart the required system services.
To have Dapr generate new certificates, delete the existing certificates at $HOME/.dapr/certs and restart the sentry service to generate new certificates.
./sentry --issuer-credentials $HOME/.dapr/certs --trust-domain cluster.local --config=./config.yaml
To replace with your own certificates, first generate new certificates using the step above in Bringing your own certificates.
Copy ca.crt, issuer.crt and issuer.key to the filesystem path of every configured system service, and restart the process or container.
By default, system services will look for the credentials in /var/run/dapr/credentials. The examples above use $HOME/.dapr/certs as a custom location.
Note: If you signed the cert root with a different private key, restart the Dapr instances.
Community call video on certificate rotation
Watch this video on how to perform certificate rotation if your certificates are expiring.
Sentry Token Validators
Tokens are often used for authentication and authorization purposes. Token validators are components responsible for verifying the validity and authenticity of these tokens. For example in Kubernetes environments, a common approach to token validation is through the Kubernetes bound service account mechanism. This validator checks bound service account tokens against Kubernetes to ensure their legitimacy.
Sentry service can be configured to:
- Enable extra token validators beyond the Kubernetes bound Service Account validator
- Replace the
insecurevalidator enabled by default in self hosted mode
Sentry token validators are used for joining extra non-Kubernetes clients to the Dapr cluster running in Kubernetes mode, or replace the insecure “allow all” validator in self hosted mode to enable proper identity validation. It is not expected that you will need to configure a token validator unless you are using an exotic deployment scenario.
The only token validator currently supported is the
jwksvalidator.
JWKS
The jwks validator enables Sentry service to validate JWT tokens using a JWKS endpoint.
The contents of the token must contain the sub claim which matches the SPIFFE identity of the Dapr client, in the same Dapr format spiffe://<trust-domain>/ns/<namespace>/<app-id>.
The audience of the token must by the SPIFFE ID of the Sentry identity, For example, spiffe://cluster.local/ns/dapr-system/dapr-sentry.
Other basic JWT rules regarding signature, expiry etc. apply.
The jwks validator can accept either a remote source to fetch the public key list or a static array for public keys.
The configuration below enables the jwks token validator with a remote source.
This remote source uses HTTPS so the caCertificate field contains the root of trust for the remote source.
kind: Configuration
apiVersion: dapr.io/v1alpha1
metadata:
  name: sentryconfig
spec:
  mtls:
    enabled: true
    tokenValidators:
      - name: jwks
        options:
          minRefreshInterval: 2m
          requestTimeout: 1m
          source: "https://localhost:1234/"
          caCertificate: "<optional ca certificate bundle string>"
The configuration below enables the jwks token validator with a static array of public keys.
kind: Configuration
apiVersion: dapr.io/v1alpha1
metadata:
  name: sentryconfig
spec:
  mtls:
    enabled: true
    tokenValidators:
      - name: jwks
        options:
          minRefreshInterval: 2m
          requestTimeout: 1m
          source: |
            {"keys":[ "12345.." ]}
2 - Configure endpoint authorization with OAuth
Dapr OAuth 2.0 middleware allows you to enable OAuth authorization on Dapr endpoints for your web APIs using the Authorization Code Grant flow. You can also inject authorization tokens into your endpoint APIs which can be used for authorization towards external APIs called by your APIs using the Client Credentials Grant flow. When the middleware is enabled any method invocation through Dapr needs to be authorized before getting passed to the user code.
The main difference between the two flows is that the Authorization Code Grant flow needs user interaction and authorizes a user where the Client Credentials Grant flow doesn’t need a user interaction and authorizes a service/application.
Register your application with an authorization server
Different authorization servers provide different application registration experiences. Here are some samples:
To configure the Dapr OAuth middleware, you’ll need to collect the following information:
Authorization/Token URLs of some of the popular authorization servers:
Define the middleware component definition
Define an Authorization Code Grant component
An OAuth middleware (Authorization Code) is defined by a component:
apiVersion: dapr.io/v1alpha1
kind: Component
metadata:
  name: oauth2
  namespace: default
spec:
  type: middleware.http.oauth2
  version: v1
  metadata:
  - name: clientId
    value: "<your client ID>"
  - name: clientSecret
    value: "<your client secret>"
  - name: scopes
    value: "<comma-separated scope names>"
  - name: authURL
    value: "<authorization URL>"
  - name: tokenURL
    value: "<token exchange URL>"
  - name: redirectURL
    value: "<redirect URL>"
  - name: authHeaderName
    value: "<header name under which the secret token is saved>"
    # forceHTTPS:
    # This key is used to set HTTPS schema on redirect to your API method
    # after Dapr successfully received Access Token from Identity Provider.
    # By default, Dapr will use HTTP on this redirect.
  - name: forceHTTPS
    value: "<set to true if you invoke an API method through Dapr from https origin>"
Define a custom pipeline for an Authorization Code Grant
To use the OAuth middleware (Authorization Code), you should create a custom pipeline using Dapr configuration, as shown in the following sample:
apiVersion: dapr.io/v1alpha1
kind: Configuration
metadata:
  name: pipeline
  namespace: default
spec:
  httpPipeline:
    handlers:
    - name: oauth2
      type: middleware.http.oauth2
Define a Client Credentials Grant component
An OAuth (Client Credentials) middleware is defined by a component:
apiVersion: dapr.io/v1alpha1
kind: Component
metadata:
  name: myComponent
spec:
  type: middleware.http.oauth2clientcredentials
  version: v1
  metadata:
  - name: clientId
    value: "<your client ID>"
  - name: clientSecret
    value: "<your client secret>"
  - name: scopes
    value: "<comma-separated scope names>"
  - name: tokenURL
    value: "<token issuing URL>"
  - name: headerName
    value: "<header name under which the secret token is saved>"
  - name: endpointParamsQuery
    value: "<list of additional key=value settings separated by ampersands or semicolons forwarded to the token issuing service>"
    # authStyle:
    # "0" means to auto-detect which authentication
    # style the provider wants by trying both ways and caching
    # the successful way for the future.

    # "1" sends the "client_id" and "client_secret"
    # in the POST body as application/x-www-form-urlencoded parameters.

    # "2" sends the client_id and client_password
    # using HTTP Basic Authorization. This is an optional style
    # described in the OAuth2 RFC 6749 section 2.3.1.
  - name: authStyle
    value: "<see comment>"
Define a custom pipeline for a Client Credentials Grant
To use the OAuth middleware (Client Credentials), you should create a custom pipeline using Dapr configuration, as shown in the following sample:
apiVersion: dapr.io/v1alpha1
kind: Configuration
metadata:
  name: pipeline
  namespace: default
spec:
  httpPipeline:
    handlers:
    - name: myComponent
      type: middleware.http.oauth2clientcredentials
Apply the configuration
To apply the above configuration (regardless of grant type)
to your Dapr sidecar, add a dapr.io/config annotation to your pod spec:
apiVersion: apps/v1
kind: Deployment
...
spec:
  ...
  template:
    metadata:
      ...
      annotations:
        dapr.io/enabled: "true"
        ...
        dapr.io/config: "pipeline"
...
Accessing the access token
Authorization Code Grant
Once everything is in place, whenever a client tries to invoke an API method through Dapr sidecar (such as calling the v1.0/invoke/ endpoint), it will be redirected to the authorization’s consent page if an access token is not found. Otherwise, the access token is written to the authHeaderName header and made available to the app code.
Client Credentials Grant
Once everything is in place, whenever a client tries to invoke an API method through Dapr sidecar (such as calling the v1.0/invoke/ endpoint), it will retrieve a new access token if an existing valid one is not found. The access token is written to the headerName header and made available to the app code. In that way the app can forward the token in the authorization header in calls towards the external API requesting that token.
3 - Enable API token authentication in Dapr
By default, Dapr relies on the network boundary to limit access to its public API. If you plan on exposing the Dapr API outside of that boundary, or if your deployment demands an additional level of security, consider enabling the token authentication for Dapr APIs. This will cause Dapr to require every incoming gRPC and HTTP request for its APIs for to include authentication token, before allowing that request to pass through.
Create a token
Dapr uses shared tokens for API authentication. You are free to define the API token to use.
Although Dapr does not impose any format for the shared token, a good idea is to generate a random byte sequence and encode it to Base64. For example, this command generates a random 32-byte key and encodes that as Base64:
openssl rand 16 | base64
Configure API token authentication in Dapr
The token authentication configuration is slightly different for either Kubernetes or self-hosted Dapr deployments:
Self-hosted
In self-hosting scenario, Dapr looks for the presence of DAPR_API_TOKEN environment variable. If that environment variable is set when the daprd process launches, Dapr enforces authentication on its public APIs:
export DAPR_API_TOKEN=<token>
To rotate the configured token, update the DAPR_API_TOKEN environment variable to the new value and restart the daprd process.
Kubernetes
In a Kubernetes deployment, Dapr leverages Kubernetes secrets store to hold the shared token. To configure Dapr APIs authentication, start by creating a new secret:
kubectl create secret generic dapr-api-token --from-literal=token=<token>
Note, the above secret needs to be created in each namespace in which you want to enable Dapr token authentication.
To indicate to Dapr to use that secret to secure its public APIs, add an annotation to your Deployment template spec:
annotations:
  dapr.io/enabled: "true"
  dapr.io/api-token-secret: "dapr-api-token" # name of the Kubernetes secret
When deployed, Dapr sidecar injector will automatically create a secret reference and inject the actual value into DAPR_API_TOKEN environment variable.
Rotate a token
Self-hosted
To rotate the configured token in self-hosted, update the DAPR_API_TOKEN environment variable to the new value and restart the daprd process.
Kubernetes
To rotate the configured token in Kubernetes, update the previously-created secret with the new token in each namespace. You can do that using kubectl patch command, but a simpler way to update these in each namespace is by using a manifest:
apiVersion: v1
kind: Secret
metadata:
  name: dapr-api-token
type: Opaque
data:
  token: <your-new-token>
And then apply it to each namespace:
kubectl apply --file token-secret.yaml --namespace <namespace-name>
To tell Dapr to start using the new token, trigger a rolling upgrade to each one of your deployments:
kubectl rollout restart deployment/<deployment-name> --namespace <namespace-name>
Assuming your service is configured with more than one replica, the key rotation process does not result in any downtime.
Adding API token to client API invocations
Once token authentication is configured in Dapr, all clients invoking Dapr API need to append the dapr-api-token token to every request.
Note: The Dapr SDKs read the DAPR_API_TOKEN environment variable and set it for you by default.
HTTP
In case of HTTP, Dapr requires the API token in the dapr-api-token header. For example:
GET http://<daprAddress>/v1.0/metadata
dapr-api-token: <token>
Using curl, you can pass the header using the --header (or -H) option. For example:
curl http://localhost:3500/v1.0/metadata \
  --header "dapr-api-token: my-token"
gRPC
When using gRPC protocol, Dapr will inspect the incoming calls for the API token on the gRPC metadata:
dapr-api-token[0].
Accessing the token from the app
Kubernetes
In Kubernetes, it’s recommended to mount the secret to your pod as an environment variable, as shown in the example below, where a Kubernetes secret with the name dapr-api-token is used to hold the token.
containers:
  - name: mycontainer
    image: myregistry/myapp
    envFrom:
    - secretRef:
      name: dapr-api-token
Self-hosted
In self-hosted mode, you can set the token as an environment variable for your app:
export DAPR_API_TOKEN=<my-dapr-token>
Related Links
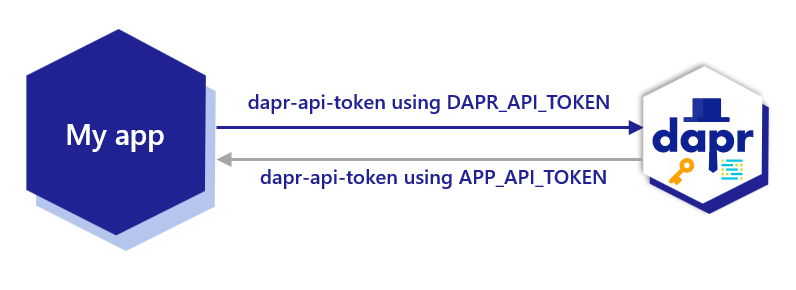
4 - Authenticate requests from Dapr using token authentication
For some building blocks such as pub/sub, service invocation and input bindings, Dapr communicates with an app over HTTP or gRPC. To enable the application to authenticate requests that are arriving from the Dapr sidecar, you can configure Dapr to send an API token as a header (in HTTP requests) or metadata (in gRPC requests).
Create a token
Dapr uses shared tokens for API authentication. You are free to define the API token to use.
Although Dapr does not impose any format for the shared token, a good idea is to generate a random byte sequence and encode it to Base64. For example, this command generates a random 32-byte key and encodes that as Base64:
openssl rand 16 | base64
Configure app API token authentication in Dapr
The token authentication configuration is slightly different for either Kubernetes or self-hosted Dapr deployments:
Self-hosted
In self-hosting scenario, Dapr looks for the presence of APP_API_TOKEN environment variable. If that environment variable is set when the daprd process launches, Dapr includes the token when calling an app:
export APP_API_TOKEN=<token>
To rotate the configured token, update the APP_API_TOKEN environment variable to the new value and restart the daprd process.
Kubernetes
In a Kubernetes deployment, Dapr leverages Kubernetes secrets store to hold the shared token. To start, create a new secret:
kubectl create secret generic app-api-token --from-literal=token=<token>
Note, the above secret needs to be created in each namespace in which you want to enable app token authentication
To indicate to Dapr to use the token in the secret when sending requests to the app, add an annotation to your Deployment template spec:
annotations:
  dapr.io/enabled: "true"
  dapr.io/app-token-secret: "app-api-token" # name of the Kubernetes secret
When deployed, the Dapr Sidecar Injector automatically creates a secret reference and injects the actual value into APP_API_TOKEN environment variable.
Rotate a token
Self-hosted
To rotate the configured token in self-hosted, update the APP_API_TOKEN environment variable to the new value and restart the daprd process.
Kubernetes
To rotate the configured token in Kubernetes, update the previously-created secret with the new token in each namespace. You can do that using kubectl patch command, but a simpler way to update these in each namespace is by using a manifest:
apiVersion: v1
kind: Secret
metadata:
  name: app-api-token
type: Opaque
data:
  token: <your-new-token>
And then apply it to each namespace:
kubectl apply --file token-secret.yaml --namespace <namespace-name>
To tell Dapr to start using the new token, trigger a rolling upgrade to each one of your deployments:
kubectl rollout restart deployment/<deployment-name> --namespace <namespace-name>
Assuming your service is configured with more than one replica, the key rotation process does not result in any downtime.
Authenticating requests from Dapr
Once app token authentication is configured using the environment variable or Kubernetes secret app-api-token, the Dapr sidecar always includes the HTTP header/gRPC metadata dapr-api-token: <token> in the calls to the app. From the app side, ensure you are authenticating using the dapr-api-token value which uses the app-api-token you set to authenticate requests from Dapr.
HTTP
In your code, look for the HTTP header dapr-api-token in incoming requests:
dapr-api-token: <token>
gRPC
When using gRPC protocol, inspect the incoming calls for the API token on the gRPC metadata:
dapr-api-token[0].
Accessing the token from the app
Kubernetes
In Kubernetes, it’s recommended to mount the secret to your pod as an environment variable.
Assuming we created a secret with the name app-api-token to hold the token:
containers:
  - name: mycontainer
    image: myregistry/myapp
    envFrom:
    - secretRef:
      name: app-api-token
Self-hosted
In self-hosted mode, you can set the token as an environment variable for your app:
export APP_API_TOKEN=<my-app-token>
Related Links
- Learn about Dapr security concepts
- Learn HowTo Enable API token authentication in Dapr