This is the multi-page printable view of this section. Click here to print.
Run Dapr in self-hosted mode
- 1: Overview of Dapr in self-hosted mode
- 2: How-To: Run Dapr in self-hosted mode with Docker
- 3: How-To: Run Dapr in self-hosted mode with Podman
- 4: How-To: Run Dapr in an offline or airgap environment
- 5: How-To: Run Dapr in self-hosted mode without Docker
- 6: How-to: Persist Scheduler Jobs
- 7: Steps to upgrade Dapr in a self-hosted environment
- 8: Uninstall Dapr in a self-hosted environment
1 - Overview of Dapr in self-hosted mode
Overview
Dapr can be configured to run in self-hosted mode on your local developer machine or on production VMs. Each running service has a Dapr runtime process (or sidecar) which is configured to use state stores, pub/sub, binding components and the other building blocks.
Initialization
Dapr can be initialized with Docker (default) or in slim-init mode. It can also be initialized and run in offline or airgap environments.
Note
You can also use Podman in place of Docker as container runtime. Please refer dapr init with Podman for more details. It can be useful in the scenarios where docker cannot be installed due to various networking constraints.The default Docker setup provides out of the box functionality with the following containers and configuration:
- A Redis container configured to serve as the default component for both state management and publish/subscribe.
- A Zipkin container for diagnostics and tracing.
- A default Dapr configuration and components installed in
$HOME/.dapr/(Mac/Linux) or%USERPROFILE%\.dapr\(Windows).
The dapr-placement service is responsible for managing the actor distribution scheme and key range settings. This service is not launched as a container and is only required if you are using Dapr actors. For more information on the actor Placement service read actor overview.
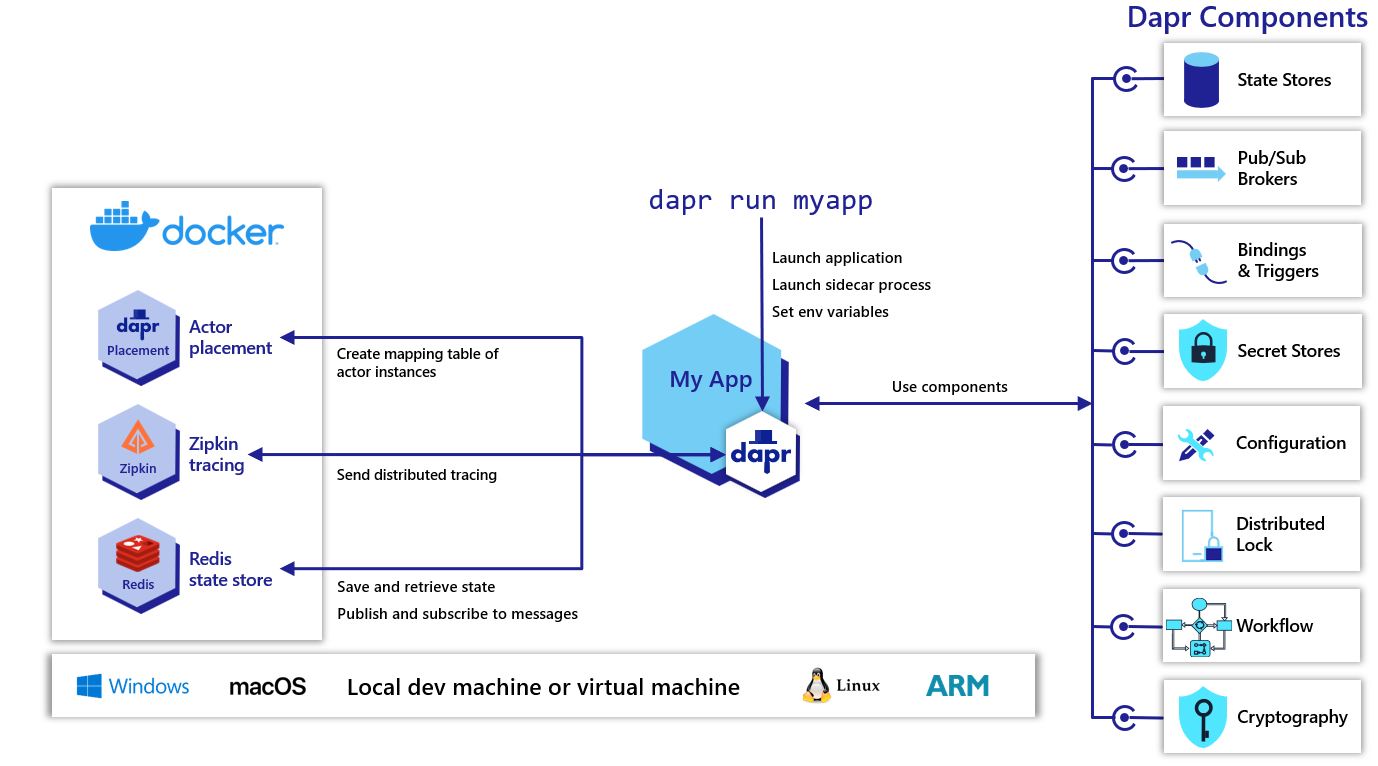
Launching applications with Dapr
You can use the dapr run CLI command to a Dapr sidecar process along with your application. Additional arguments and flags can be found here.
Name resolution
Dapr uses a name resolution component for service discovery within the service invocation building block. By default Dapr uses mDNS when in self-hosted mode.
If you are running Dapr on virtual machines or where mDNS is not available, then you can use the HashiCorp Consul component for name resolution.
2 - How-To: Run Dapr in self-hosted mode with Docker
This article provides guidance on running Dapr with Docker on a Windows/Linux/macOS machine or VM.
Prerequisites
- Dapr CLI
- Docker
- Docker-Compose (optional)
Initialize Dapr environment
To initialize the Dapr control plane containers and create a default configuration file, run:
dapr init
Run both app and sidecar as a process
The dapr run CLI command can be used to launch a Dapr sidecar along with your application:
dapr run --app-id myapp --app-port 5000 -- dotnet run
This command will launch both the daprd sidecar binary and run dotnet run, launching your application.
Run app as a process and sidecar as a Docker container
Alternately, if you are running Dapr in a Docker container and your app as a process on the host machine, then you need to configure Docker to use the host network so that Dapr and the app can share a localhost network interface.
Note
The host networking driver for Docker is only supported on Linux hosts.If you are running your Docker daemon on a Linux host, you can run the following to launch Dapr:
docker run --net="host" --mount type=bind,source="$(pwd)"/components,target=/components daprio/daprd:edge ./daprd -app-id <my-app-id> -app-port <my-app-port>
Then you can run your app on the host and they should connect over the localhost network interface.
Run both app and Dapr in a single Docker container
For development purposes ONLY
It is not recommended to run both the Dapr runtime and an application inside the same container. However, it is possible to do so for local development scenarios.
In order to do this, you’ll need to write a Dockerfile that installs the Dapr runtime, Dapr CLI and your app code. You can then invoke both the Dapr runtime and your app code using the Dapr CLI.
Below is an example of a Dockerfile which achieves this:
FROM python:3.7.1
# Install dapr CLI
RUN wget -q https://raw.githubusercontent.com/dapr/cli/master/install/install.sh -O - | /bin/bash

# Install daprd
ARG DAPR_BUILD_DIR
COPY $DAPR_BUILD_DIR /opt/dapr
ENV PATH="/opt/dapr/:${PATH}"
RUN dapr init --slim

# Install your app
WORKDIR /app
COPY python .
RUN pip install requests
ENTRYPOINT ["dapr"]
CMD ["run", "--app-id", "nodeapp", "--app-port", "3000", "node", "app.js"]
Remember that if Dapr needs to communicate with other components i.e. Redis, these also need to be made accessible to it.
Run on a Docker network
If you have multiple instances of Dapr running in Docker containers and want them to be able to communicate with each other i.e. for service invocation, then you’ll need to create a shared Docker network and make sure those Dapr containers are attached to it.
You can create a simple Docker network using:
docker network create my-dapr-network
When running your Docker containers, you can attach them to the network using:
docker run --net=my-dapr-network ...
Each container will receive a unique IP on that network and be able to communicate with other containers on that network.
Run using Docker-Compose
Docker Compose can be used to define multi-container application configurations. If you wish to run multiple apps with Dapr sidecars locally without Kubernetes then it is recommended to use a Docker Compose definition (docker-compose.yml).
The syntax and tooling of Docker Compose is outside the scope of this article, however, it is recommended you refer to the official Docker documentation for further details.
In order to run your applications using Dapr and Docker Compose you’ll need to define the sidecar pattern in your docker-compose.yml. For example:
version: '3'
services:
  nodeapp:
    build: ./node
    ports:
      - "50001:50001" # Dapr instances communicate over gRPC so we need to expose the gRPC port
    depends_on:
      - redis
      - placement
    networks:
      - hello-dapr
  nodeapp-dapr:
    image: "daprio/daprd:edge"
    command: [
      "./daprd",
     "--app-id", "nodeapp",
     "--app-port", "3000",
     "--placement-host-address", "placement:50006", # Dapr's placement service can be reach via the docker DNS entry
     "--scheduler-host-address", "scheduler:50007", # Dapr's scheduler service can be reach via the docker DNS entry
     "--resources-path", "./components"
     ]
    volumes:
        - "./components/:/components" # Mount our components folder for the runtime to use. The mounted location must match the --resources-path argument.
    depends_on:
      - nodeapp
    network_mode: "service:nodeapp" # Attach the nodeapp-dapr service to the nodeapp network namespace

  ... # Deploy other daprized services and components (i.e. Redis)

  placement:
    image: "daprio/placement"
    command: ["./placement", "--port", "50006"]
    ports:
      - "50006:50006"

  scheduler:
    image: "daprio/scheduler"
    command: ["./scheduler", "--port", "50007", "--etcd-data-dir", "/data"]
    ports:
      - "50007:50007"
    user: root
    volumes:
    - "./dapr-etcd-data/:/data"

  networks:
    hello-dapr: null
For those running the Docker daemon on a Linux host, you can also use
network_mode: hostto leverage host networking if needed.
To further learn how to run Dapr with Docker Compose, see the Docker-Compose Sample.
The above example also includes a scheduler definition that uses a non-persistent data store for testing and development purposes.
Run on Kubernetes
If your deployment target is Kubernetes please use Dapr’s first-class integration. Refer to the Dapr on Kubernetes docs.
Name resolution
Dapr by default uses mDNS as the name resolution component in self-hosted mode for service invocation. If you are running Dapr on virtual machines or where mDNS is not available, then you can use the HashiCorp Consul component for name resolution.
Docker images
Dapr provides a number of prebuilt Docker images for different components, you should select the relevant image for your desired binary, architecture, and tag/version.
Images
There are published Docker images for each of the Dapr components available on Docker Hub.
- daprio/dapr (contains all Dapr binaries)
- daprio/daprd
- daprio/placement
- daprio/sentry
- daprio/dapr-dev
Tags
Linux/amd64
latest: The latest release version, ONLY use for development purposes.edge: The latest edge build (master).major.minor.patch: A release version.major.minor.patch-rc.iteration: A release candidate.
Linux/arm/v7
latest-arm: The latest release version for ARM, ONLY use for development purposes.edge-arm: The latest edge build for ARM (master).major.minor.patch-arm: A release version for ARM.major.minor.patch-rc.iteration-arm: A release candidate for ARM.
3 - How-To: Run Dapr in self-hosted mode with Podman
This article provides guidance on running Dapr with Podman on a Windows/Linux/macOS machine or VM.
Prerequisites
Initialize Dapr environment
To initialize the Dapr control plane containers and create a default configuration file, run:
dapr init --container-runtime podman
Run both app and sidecar as a process
The dapr run CLI command can be used to launch a Dapr sidecar along with your application:
dapr run --app-id myapp --app-port 5000 -- dotnet run
This command launches both the daprd sidecar and your application.
Run app as a process and sidecar as a Docker container
Alternately, if you are running Dapr in a Docker container and your app as a process on the host machine, then you need to configure Podman to use the host network so that Dapr and the app can share a localhost network interface.
If you are running Podman on Linux host then you can run the following to launch Dapr:
podman run --network="host" --mount type=bind,source="$(pwd)"/components,target=/components daprio/daprd:edge ./daprd -app-id <my-app-id> -app-port <my-app-port>
Then you can run your app on the host and they should connect over the localhost network interface.
Uninstall Dapr environment
To uninstall Dapr completely, run:
dapr uninstall --container-runtime podman --all
4 - How-To: Run Dapr in an offline or airgap environment
Overview
By default, Dapr initialization downloads binaries and pulls images from the network to setup the development environment. However, Dapr also supports offline or airgap installation using pre-downloaded artifacts, either with a Docker or slim environment. The artifacts for each Dapr release are built into a Dapr Installer Bundle which can be downloaded. By using this installer bundle with the Dapr CLI init command, you can install Dapr into environments that do not have any network access.
Setup
Before airgap initialization, it is required to download a Dapr Installer Bundle beforehand, containing the CLI, runtime and dashboard packaged together. This eliminates the need to download binaries as well as Docker images when initializing Dapr locally.
Download the Dapr Installer Bundle for the specific release version. For example, daprbundle_linux_amd64.tar.gz, daprbundle_windows_amd64.zip.
Unpack it.
To install Dapr CLI copy the
daprbundle/dapr (dapr.exe for Windows)binary to the desired location:- For Linux/MacOS -
/usr/local/bin - For Windows, create a directory and add this to your System PATH. For example create a directory called
c:\daprand add this directory to your path, by editing your system environment variable.
Note: If Dapr CLI is not moved to the desired location, you can use local
daprCLI binary in the bundle. The steps above is to move it to the usual location and add it to the path.- For Linux/MacOS -
Initialize Dapr environment
Dapr can be initialized in an airgap environment with or without Docker containers.
Initialize Dapr with Docker
(Prerequisite: Docker is available in the environment)
Move to the bundle directory and run the following command:
dapr init --from-dir .
For linux users, if you run your Docker cmds with sudo, you need to use “sudo dapr init”
If you are not running the above cmd from the bundle directory, provide the full path to bundle directory as input. For example, assuming the bundle directory path is $HOME/daprbundle, run
dapr init --from-dir $HOME/daprbundleto have the same behavior.
The output should look similar to the following:
  Making the jump to hyperspace...
ℹ️  Installing runtime version latest
↘  Extracting binaries and setting up components... Loaded image: daprio/dapr:$version
✅  Extracting binaries and setting up components...
✅  Extracted binaries and completed components set up.
ℹ️  daprd binary has been installed to $HOME/.dapr/bin.
ℹ️  dapr_placement container is running.
ℹ️  Use `docker ps` to check running containers.
✅  Success! Dapr is up and running. To get started, go here: https://aka.ms/dapr-getting-started
Note: To emulate online Dapr initialization using
dapr init, you can also run Redis and Zipkin containers as follows:
1. docker run --name "dapr_zipkin" --restart always -d -p 9411:9411 openzipkin/zipkin
2. docker run --name "dapr_redis" --restart always -d -p 6379:6379 redislabs/rejson
Initialize Dapr without Docker
Alternatively to have the CLI not install any default configuration files or run any Docker containers, use the --slim flag with the init command. Only the Dapr binaries will be installed.
dapr init --slim --from-dir .
The output should look similar to the following:
⌛  Making the jump to hyperspace...
ℹ️  Installing runtime version latest
↙  Extracting binaries and setting up components...
✅  Extracting binaries and setting up components...
✅  Extracted binaries and completed components set up.
ℹ️  daprd binary has been installed to $HOME.dapr/bin.
ℹ️  placement binary has been installed to $HOME/.dapr/bin.
✅  Success! Dapr is up and running. To get started, go here: https://aka.ms/dapr-getting-started
5 - How-To: Run Dapr in self-hosted mode without Docker
Prerequisites
Initialize Dapr without containers
The Dapr CLI provides an option to initialize Dapr using slim init, without the default creation of a development environment with a dependency on Docker. To initialize Dapr with slim init, after installing the Dapr CLI, use the following command:
dapr init --slim
Two different binaries are installed:
daprdplacement
The placement binary is needed to enable actors in a Dapr self-hosted installation.
In slim init mode, no default components (such as Redis) are installed for state management or pub/sub. This means that, aside from service invocation, no other building block functionality is available “out-of-the-box” on install. Instead, you can set up your own environment and custom components.
Actor-based service invocation is possible if a state store is configured, as explained in the following sections.
Perform service invocation
See the Hello Dapr slim sample for an example on how to perform service invocation in slim init mode.
Enable state management or pub/sub
See documentation around configuring Redis in self-hosted mode without Docker to enable a local state store or pub/sub broker for messaging.
Enable actors
To enable actor placement:
- Run the placement service locally.
- Enable a transactional state store that supports ETags to use actors. For example, Redis configured in self-hosted mode.
By default, the placement binary is installed in:
- For Linux/MacOS:
/$HOME/.dapr/bin - For Windows:
%USERPROFILE%\.dapr\bin
$ $HOME/.dapr/bin/placement

INFO[0000] starting Dapr Placement Service -- version 1.0.0-rc.1 -- commit 13ae49d  instance=Nicoletaz-L10.redmond.corp.microsoft.com scope=dapr.placement type=log ver=1.0.0-rc.1
INFO[0000] log level set to: info                        instance=Nicoletaz-L10.redmond.corp.microsoft.com scope=dapr.placement type=log ver=1.0.0-rc.1
INFO[0000] metrics server started on :9090/              instance=Nicoletaz-L10.redmond.corp.microsoft.com scope=dapr.metrics type=log ver=1.0.0-rc.1
INFO[0000] Raft server is starting on 127.0.0.1:8201...  instance=Nicoletaz-L10.redmond.corp.microsoft.com scope=dapr.placement.raft type=log ver=1.0.0-rc.1
INFO[0000] placement service started on port 50005       instance=Nicoletaz-L10.redmond.corp.microsoft.com scope=dapr.placement type=log ver=1.0.0-rc.1
INFO[0000] Healthz server is listening on :8080          instance=Nicoletaz-L10.redmond.corp.microsoft.com scope=dapr.placement type=log ver=1.0.0-rc.1
INFO[0001] cluster leadership acquired                   instance=Nicoletaz-L10.redmond.corp.microsoft.com scope=dapr.placement type=log ver=1.0.0-rc.1
INFO[0001] leader is established.                        instance=Nicoletaz-L10.redmond.corp.microsoft.com scope=dapr.placement type=log ver=1.0.0-rc.1
When running standalone placement on Windows, specify port 6050:
%USERPROFILE%/.dapr/bin/placement.exe -port 6050

time="2022-10-17T14:56:55.4055836-05:00" level=info msg="starting Dapr Placement Service -- version 1.9.0 -- commit fdce5f1f1b76012291c888113169aee845f25ef8" instance=LAPTOP-OMK50S19 scope=dapr.placement type=log ver=1.9.0
time="2022-10-17T14:56:55.4066226-05:00" level=info msg="log level set to: info" instance=LAPTOP-OMK50S19 scope=dapr.placement type=log ver=1.9.0
time="2022-10-17T14:56:55.4067306-05:00" level=info msg="metrics server started on :9090/" instance=LAPTOP-OMK50S19 scope=dapr.metrics type=log ver=1.9.0
time="2022-10-17T14:56:55.4077529-05:00" level=info msg="Raft server is starting on 127.0.0.1:8201..." instance=LAPTOP-OMK50S19 scope=dapr.placement.raft type=log ver=1.9.0
time="2022-10-17T14:56:55.4077529-05:00" level=info msg="placement service started on port 6050" instance=LAPTOP-OMK50S19 scope=dapr.placement type=log ver=1.9.0
time="2022-10-17T14:56:55.4082772-05:00" level=info msg="Healthz server is listening on :8080" instance=LAPTOP-OMK50S19 scope=dapr.placement type=log ver=1.9.0
time="2022-10-17T14:56:56.8232286-05:00" level=info msg="cluster leadership acquired" instance=LAPTOP-OMK50S19 scope=dapr.placement type=log ver=1.9.0
time="2022-10-17T14:56:56.8232286-05:00" level=info msg="leader is established." instance=LAPTOP-OMK50S19 scope=dapr.placement type=log ver=1.9.0
Now, to run an application with actors enabled, you can follow the sample example created for:
Update the state store configuration files to match the Redis host and password with your setup.
Enable it as a actor state store by making the metadata piece similar to the sample Java Redis component definition.
  - name: actorStateStore
    value: "true"
Clean up
When finished, remove the binaries by following Uninstall Dapr in a self-hosted environment to remove the binaries.
Next steps
- Run Dapr with Podman, using the default Docker, or in an airgap environment
- Upgrade Dapr in self-hosted mode
6 - How-to: Persist Scheduler Jobs
The Scheduler service is responsible for writing jobs to its Etcd database and scheduling them for execution.
By default, the Scheduler service database writes this data to the local volume dapr_scheduler, meaning that this data is persisted across restarts.
The host file location for this local volume is typically located at either /var/lib/docker/volumes/dapr_scheduler/_data or ~/.local/share/containers/storage/volumes/dapr_scheduler/_data, depending on your container runtime.
Note that if you are using Docker Desktop, this volume is located in the Docker Desktop VM’s filesystem, which can be accessed using:
docker run -it --privileged --pid=host debian nsenter -t 1 -m -u -n -i sh
The Scheduler persistent volume can be modified with a custom volume that is pre-existing, or is created by Dapr.
Note
By defaultdapr init creates a local persistent volume on your drive called dapr_scheduler. If Dapr is already installed, the control plane needs to be completely uninstalled in order for the Scheduler container to be recreated with the new persistent volume.dapr init --scheduler-volume my-scheduler-volume
7 - Steps to upgrade Dapr in a self-hosted environment
Uninstall the current Dapr deployment:
Note
This will remove the default$HOME/.daprdirectory, binaries and all containers (dapr_redis, dapr_placement and dapr_zipkin). Linux users need to runsudoif docker command needs sudo.dapr uninstall --allDownload and install the latest CLI by visiting this guide.
Initialize the Dapr runtime:
dapr initEnsure you are using the latest version of Dapr (v1.15.5)) with:
$ dapr --version

CLI version: 1.15
Runtime version: 1.15
8 - Uninstall Dapr in a self-hosted environment
The following CLI command removes the Dapr sidecar binaries and the placement container:
dapr uninstall
The above command will not remove the Redis or Zipkin containers that were installed during dapr init by default, just in case you were using them for other purposes. To remove Redis, Zipkin, Actor Placement container, as well as the default Dapr directory located at $HOME/.dapr or %USERPROFILE%\.dapr\, run:
dapr uninstall --all
Note
For Linux/MacOS users, if you run your docker cmds with sudo or the install path is/usr/local/bin(default install path), you need to use sudo dapr uninstall to remove dapr binaries and/or the containers.