This is the multi-page printable view of this section. Click here to print.
Hosting options for Dapr
- 1: Run Dapr in self-hosted mode
- 1.1: Overview of Dapr in self-hosted mode
- 1.2: How-To: Run Dapr in self-hosted mode with Docker
- 1.3: How-To: Run Dapr in self-hosted mode with Podman
- 1.4: How-To: Run Dapr in an offline or airgap environment
- 1.5: How-To: Run Dapr in self-hosted mode without Docker
- 1.6: How-to: Persist Scheduler Jobs
- 1.7: Steps to upgrade Dapr in a self-hosted environment
- 1.8: Uninstall Dapr in a self-hosted environment
- 2: Deploy and run Dapr in Kubernetes mode
- 2.1: Overview of Dapr on Kubernetes
- 2.2: Kubernetes cluster setup
- 2.2.1: Set up a Minikube cluster
- 2.2.2: Set up a KiND cluster
- 2.2.3: Set up an Azure Kubernetes Service (AKS) cluster
- 2.2.4: Set up a Google Kubernetes Engine (GKE) cluster
- 2.2.5: Set up an Elastic Kubernetes Service (EKS) cluster
- 2.3: Deploy Dapr on a Kubernetes cluster
- 2.4: Upgrade Dapr on a Kubernetes cluster
- 2.5: Production guidelines on Kubernetes
- 2.6: Deploy Dapr per-node or per-cluster with Dapr Shared
- 2.7: How-to: Persist Scheduler Jobs
- 2.8: Deploy to hybrid Linux/Windows Kubernetes clusters
- 2.9: Running Dapr with a Kubernetes Job
- 2.10: How-to: Mount Pod volumes to the Dapr sidecar
- 3: Run Dapr in a serverless offering
- 3.1: Azure Container Apps
1 - Run Dapr in self-hosted mode
1.1 - Overview of Dapr in self-hosted mode
Overview
Dapr can be configured to run in self-hosted mode on your local developer machine or on production VMs. Each running service has a Dapr runtime process (or sidecar) which is configured to use state stores, pub/sub, binding components and the other building blocks.
Initialization
Dapr can be initialized with Docker (default) or in slim-init mode. It can also be initialized and run in offline or airgap environments.
Note
You can also use Podman in place of Docker as container runtime. Please refer dapr init with Podman for more details. It can be useful in the scenarios where docker cannot be installed due to various networking constraints.The default Docker setup provides out of the box functionality with the following containers and configuration:
- A Redis container configured to serve as the default component for both state management and publish/subscribe.
- A Zipkin container for diagnostics and tracing.
- A default Dapr configuration and components installed in
$HOME/.dapr/(Mac/Linux) or%USERPROFILE%\.dapr\(Windows).
The dapr-placement service is responsible for managing the actor distribution scheme and key range settings. This service is not launched as a container and is only required if you are using Dapr actors. For more information on the actor Placement service read actor overview.
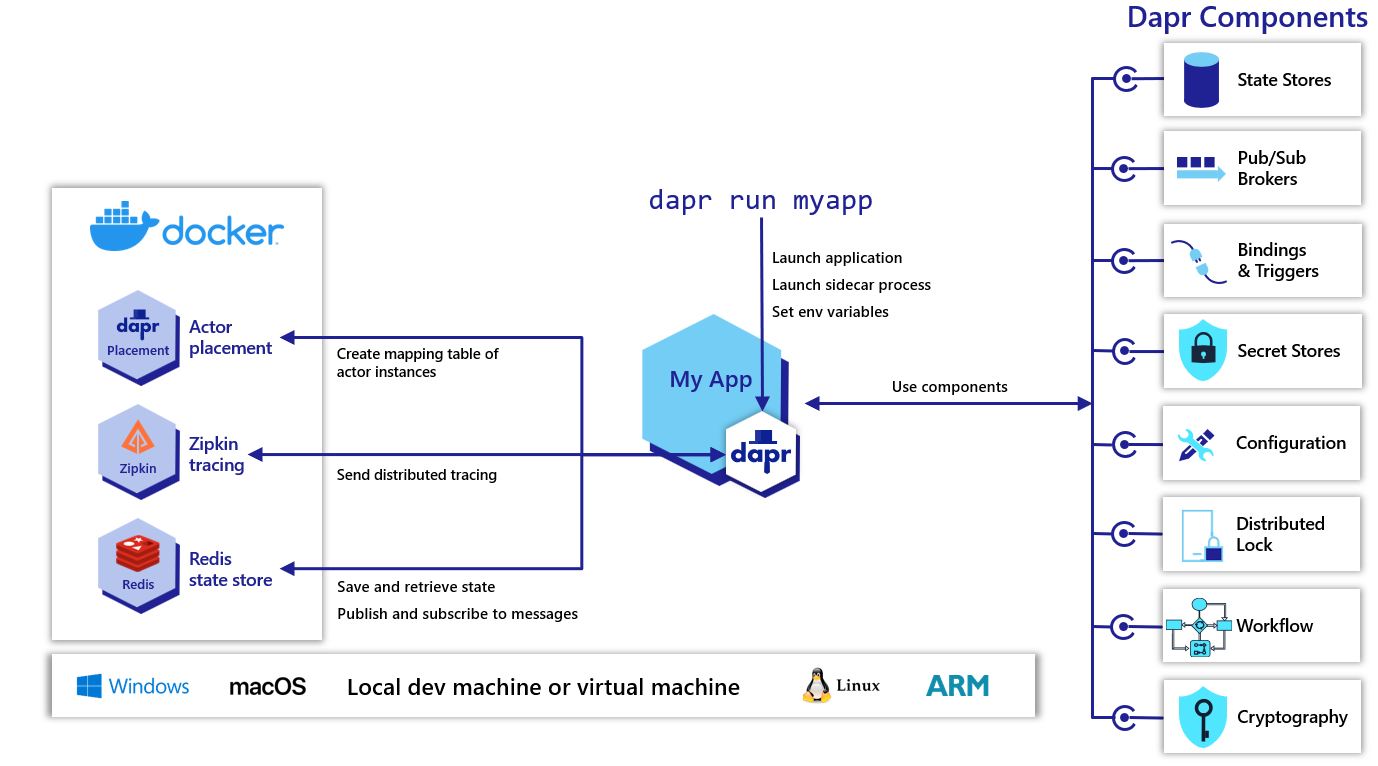
Launching applications with Dapr
You can use the dapr run CLI command to a Dapr sidecar process along with your application. Additional arguments and flags can be found here.
Name resolution
Dapr uses a name resolution component for service discovery within the service invocation building block. By default Dapr uses mDNS when in self-hosted mode.
If you are running Dapr on virtual machines or where mDNS is not available, then you can use the HashiCorp Consul component for name resolution.
1.2 - How-To: Run Dapr in self-hosted mode with Docker
This article provides guidance on running Dapr with Docker on a Windows/Linux/macOS machine or VM.
Prerequisites
- Dapr CLI
- Docker
- Docker-Compose (optional)
Initialize Dapr environment
To initialize the Dapr control plane containers and create a default configuration file, run:
dapr init
Run both app and sidecar as a process
The dapr run CLI command can be used to launch a Dapr sidecar along with your application:
dapr run --app-id myapp --app-port 5000 -- dotnet run
This command will launch both the daprd sidecar binary and run dotnet run, launching your application.
Run app as a process and sidecar as a Docker container
Alternately, if you are running Dapr in a Docker container and your app as a process on the host machine, then you need to configure Docker to use the host network so that Dapr and the app can share a localhost network interface.
Note
The host networking driver for Docker is only supported on Linux hosts.If you are running your Docker daemon on a Linux host, you can run the following to launch Dapr:
docker run --net="host" --mount type=bind,source="$(pwd)"/components,target=/components daprio/daprd:edge ./daprd -app-id <my-app-id> -app-port <my-app-port>
Then you can run your app on the host and they should connect over the localhost network interface.
Run both app and Dapr in a single Docker container
For development purposes ONLY
It is not recommended to run both the Dapr runtime and an application inside the same container. However, it is possible to do so for local development scenarios.
In order to do this, you’ll need to write a Dockerfile that installs the Dapr runtime, Dapr CLI and your app code. You can then invoke both the Dapr runtime and your app code using the Dapr CLI.
Below is an example of a Dockerfile which achieves this:
FROM python:3.7.1
# Install dapr CLI
RUN wget -q https://raw.githubusercontent.com/dapr/cli/master/install/install.sh -O - | /bin/bash

# Install daprd
ARG DAPR_BUILD_DIR
COPY $DAPR_BUILD_DIR /opt/dapr
ENV PATH="/opt/dapr/:${PATH}"
RUN dapr init --slim

# Install your app
WORKDIR /app
COPY python .
RUN pip install requests
ENTRYPOINT ["dapr"]
CMD ["run", "--app-id", "nodeapp", "--app-port", "3000", "node", "app.js"]
Remember that if Dapr needs to communicate with other components i.e. Redis, these also need to be made accessible to it.
Run on a Docker network
If you have multiple instances of Dapr running in Docker containers and want them to be able to communicate with each other i.e. for service invocation, then you’ll need to create a shared Docker network and make sure those Dapr containers are attached to it.
You can create a simple Docker network using:
docker network create my-dapr-network
When running your Docker containers, you can attach them to the network using:
docker run --net=my-dapr-network ...
Each container will receive a unique IP on that network and be able to communicate with other containers on that network.
Run using Docker-Compose
Docker Compose can be used to define multi-container application configurations. If you wish to run multiple apps with Dapr sidecars locally without Kubernetes then it is recommended to use a Docker Compose definition (docker-compose.yml).
The syntax and tooling of Docker Compose is outside the scope of this article, however, it is recommended you refer to the official Docker documentation for further details.
In order to run your applications using Dapr and Docker Compose you’ll need to define the sidecar pattern in your docker-compose.yml. For example:
version: '3'
services:
  nodeapp:
    build: ./node
    ports:
      - "50001:50001" # Dapr instances communicate over gRPC so we need to expose the gRPC port
    depends_on:
      - redis
      - placement
    networks:
      - hello-dapr
  nodeapp-dapr:
    image: "daprio/daprd:edge"
    command: [
      "./daprd",
     "--app-id", "nodeapp",
     "--app-port", "3000",
     "--placement-host-address", "placement:50006", # Dapr's placement service can be reach via the docker DNS entry
     "--scheduler-host-address", "scheduler:50007", # Dapr's scheduler service can be reach via the docker DNS entry
     "--resources-path", "./components"
     ]
    volumes:
        - "./components/:/components" # Mount our components folder for the runtime to use. The mounted location must match the --resources-path argument.
    depends_on:
      - nodeapp
    network_mode: "service:nodeapp" # Attach the nodeapp-dapr service to the nodeapp network namespace

  ... # Deploy other daprized services and components (i.e. Redis)

  placement:
    image: "daprio/placement"
    command: ["./placement", "--port", "50006"]
    ports:
      - "50006:50006"

  scheduler:
    image: "daprio/scheduler"
    command: ["./scheduler", "--port", "50007", "--etcd-data-dir", "/data"]
    ports:
      - "50007:50007"
    user: root
    volumes:
    - "./dapr-etcd-data/:/data"

  networks:
    hello-dapr: null
For those running the Docker daemon on a Linux host, you can also use
network_mode: hostto leverage host networking if needed.
To further learn how to run Dapr with Docker Compose, see the Docker-Compose Sample.
The above example also includes a scheduler definition that uses a non-persistent data store for testing and development purposes.
Run on Kubernetes
If your deployment target is Kubernetes please use Dapr’s first-class integration. Refer to the Dapr on Kubernetes docs.
Name resolution
Dapr by default uses mDNS as the name resolution component in self-hosted mode for service invocation. If you are running Dapr on virtual machines or where mDNS is not available, then you can use the HashiCorp Consul component for name resolution.
Docker images
Dapr provides a number of prebuilt Docker images for different components, you should select the relevant image for your desired binary, architecture, and tag/version.
Images
There are published Docker images for each of the Dapr components available on Docker Hub.
- daprio/dapr (contains all Dapr binaries)
- daprio/daprd
- daprio/placement
- daprio/sentry
- daprio/dapr-dev
Tags
Linux/amd64
latest: The latest release version, ONLY use for development purposes.edge: The latest edge build (master).major.minor.patch: A release version.major.minor.patch-rc.iteration: A release candidate.
Linux/arm/v7
latest-arm: The latest release version for ARM, ONLY use for development purposes.edge-arm: The latest edge build for ARM (master).major.minor.patch-arm: A release version for ARM.major.minor.patch-rc.iteration-arm: A release candidate for ARM.
1.3 - How-To: Run Dapr in self-hosted mode with Podman
This article provides guidance on running Dapr with Podman on a Windows/Linux/macOS machine or VM.
Prerequisites
Initialize Dapr environment
To initialize the Dapr control plane containers and create a default configuration file, run:
dapr init --container-runtime podman
Run both app and sidecar as a process
The dapr run CLI command can be used to launch a Dapr sidecar along with your application:
dapr run --app-id myapp --app-port 5000 -- dotnet run
This command launches both the daprd sidecar and your application.
Run app as a process and sidecar as a Docker container
Alternately, if you are running Dapr in a Docker container and your app as a process on the host machine, then you need to configure Podman to use the host network so that Dapr and the app can share a localhost network interface.
If you are running Podman on Linux host then you can run the following to launch Dapr:
podman run --network="host" --mount type=bind,source="$(pwd)"/components,target=/components daprio/daprd:edge ./daprd -app-id <my-app-id> -app-port <my-app-port>
Then you can run your app on the host and they should connect over the localhost network interface.
Uninstall Dapr environment
To uninstall Dapr completely, run:
dapr uninstall --container-runtime podman --all
1.4 - How-To: Run Dapr in an offline or airgap environment
Overview
By default, Dapr initialization downloads binaries and pulls images from the network to setup the development environment. However, Dapr also supports offline or airgap installation using pre-downloaded artifacts, either with a Docker or slim environment. The artifacts for each Dapr release are built into a Dapr Installer Bundle which can be downloaded. By using this installer bundle with the Dapr CLI init command, you can install Dapr into environments that do not have any network access.
Setup
Before airgap initialization, it is required to download a Dapr Installer Bundle beforehand, containing the CLI, runtime and dashboard packaged together. This eliminates the need to download binaries as well as Docker images when initializing Dapr locally.
Download the Dapr Installer Bundle for the specific release version. For example, daprbundle_linux_amd64.tar.gz, daprbundle_windows_amd64.zip.
Unpack it.
To install Dapr CLI copy the
daprbundle/dapr (dapr.exe for Windows)binary to the desired location:- For Linux/MacOS -
/usr/local/bin - For Windows, create a directory and add this to your System PATH. For example create a directory called
c:\daprand add this directory to your path, by editing your system environment variable.
Note: If Dapr CLI is not moved to the desired location, you can use local
daprCLI binary in the bundle. The steps above is to move it to the usual location and add it to the path.- For Linux/MacOS -
Initialize Dapr environment
Dapr can be initialized in an airgap environment with or without Docker containers.
Initialize Dapr with Docker
(Prerequisite: Docker is available in the environment)
Move to the bundle directory and run the following command:
dapr init --from-dir .
For linux users, if you run your Docker cmds with sudo, you need to use “sudo dapr init”
If you are not running the above cmd from the bundle directory, provide the full path to bundle directory as input. For example, assuming the bundle directory path is $HOME/daprbundle, run
dapr init --from-dir $HOME/daprbundleto have the same behavior.
The output should look similar to the following:
  Making the jump to hyperspace...
ℹ️  Installing runtime version latest
↘  Extracting binaries and setting up components... Loaded image: daprio/dapr:$version
✅  Extracting binaries and setting up components...
✅  Extracted binaries and completed components set up.
ℹ️  daprd binary has been installed to $HOME/.dapr/bin.
ℹ️  dapr_placement container is running.
ℹ️  Use `docker ps` to check running containers.
✅  Success! Dapr is up and running. To get started, go here: https://aka.ms/dapr-getting-started
Note: To emulate online Dapr initialization using
dapr init, you can also run Redis and Zipkin containers as follows:
1. docker run --name "dapr_zipkin" --restart always -d -p 9411:9411 openzipkin/zipkin
2. docker run --name "dapr_redis" --restart always -d -p 6379:6379 redislabs/rejson
Initialize Dapr without Docker
Alternatively to have the CLI not install any default configuration files or run any Docker containers, use the --slim flag with the init command. Only the Dapr binaries will be installed.
dapr init --slim --from-dir .
The output should look similar to the following:
⌛  Making the jump to hyperspace...
ℹ️  Installing runtime version latest
↙  Extracting binaries and setting up components...
✅  Extracting binaries and setting up components...
✅  Extracted binaries and completed components set up.
ℹ️  daprd binary has been installed to $HOME.dapr/bin.
ℹ️  placement binary has been installed to $HOME/.dapr/bin.
✅  Success! Dapr is up and running. To get started, go here: https://aka.ms/dapr-getting-started
1.5 - How-To: Run Dapr in self-hosted mode without Docker
Prerequisites
Initialize Dapr without containers
The Dapr CLI provides an option to initialize Dapr using slim init, without the default creation of a development environment with a dependency on Docker. To initialize Dapr with slim init, after installing the Dapr CLI, use the following command:
dapr init --slim
Two different binaries are installed:
daprdplacement
The placement binary is needed to enable actors in a Dapr self-hosted installation.
In slim init mode, no default components (such as Redis) are installed for state management or pub/sub. This means that, aside from service invocation, no other building block functionality is available “out-of-the-box” on install. Instead, you can set up your own environment and custom components.
Actor-based service invocation is possible if a state store is configured, as explained in the following sections.
Perform service invocation
See the Hello Dapr slim sample for an example on how to perform service invocation in slim init mode.
Enable state management or pub/sub
See documentation around configuring Redis in self-hosted mode without Docker to enable a local state store or pub/sub broker for messaging.
Enable actors
To enable actor placement:
- Run the placement service locally.
- Enable a transactional state store that supports ETags to use actors. For example, Redis configured in self-hosted mode.
By default, the placement binary is installed in:
- For Linux/MacOS:
/$HOME/.dapr/bin - For Windows:
%USERPROFILE%\.dapr\bin
$ $HOME/.dapr/bin/placement

INFO[0000] starting Dapr Placement Service -- version 1.0.0-rc.1 -- commit 13ae49d  instance=Nicoletaz-L10.redmond.corp.microsoft.com scope=dapr.placement type=log ver=1.0.0-rc.1
INFO[0000] log level set to: info                        instance=Nicoletaz-L10.redmond.corp.microsoft.com scope=dapr.placement type=log ver=1.0.0-rc.1
INFO[0000] metrics server started on :9090/              instance=Nicoletaz-L10.redmond.corp.microsoft.com scope=dapr.metrics type=log ver=1.0.0-rc.1
INFO[0000] Raft server is starting on 127.0.0.1:8201...  instance=Nicoletaz-L10.redmond.corp.microsoft.com scope=dapr.placement.raft type=log ver=1.0.0-rc.1
INFO[0000] placement service started on port 50005       instance=Nicoletaz-L10.redmond.corp.microsoft.com scope=dapr.placement type=log ver=1.0.0-rc.1
INFO[0000] Healthz server is listening on :8080          instance=Nicoletaz-L10.redmond.corp.microsoft.com scope=dapr.placement type=log ver=1.0.0-rc.1
INFO[0001] cluster leadership acquired                   instance=Nicoletaz-L10.redmond.corp.microsoft.com scope=dapr.placement type=log ver=1.0.0-rc.1
INFO[0001] leader is established.                        instance=Nicoletaz-L10.redmond.corp.microsoft.com scope=dapr.placement type=log ver=1.0.0-rc.1
When running standalone placement on Windows, specify port 6050:
%USERPROFILE%/.dapr/bin/placement.exe -port 6050

time="2022-10-17T14:56:55.4055836-05:00" level=info msg="starting Dapr Placement Service -- version 1.9.0 -- commit fdce5f1f1b76012291c888113169aee845f25ef8" instance=LAPTOP-OMK50S19 scope=dapr.placement type=log ver=1.9.0
time="2022-10-17T14:56:55.4066226-05:00" level=info msg="log level set to: info" instance=LAPTOP-OMK50S19 scope=dapr.placement type=log ver=1.9.0
time="2022-10-17T14:56:55.4067306-05:00" level=info msg="metrics server started on :9090/" instance=LAPTOP-OMK50S19 scope=dapr.metrics type=log ver=1.9.0
time="2022-10-17T14:56:55.4077529-05:00" level=info msg="Raft server is starting on 127.0.0.1:8201..." instance=LAPTOP-OMK50S19 scope=dapr.placement.raft type=log ver=1.9.0
time="2022-10-17T14:56:55.4077529-05:00" level=info msg="placement service started on port 6050" instance=LAPTOP-OMK50S19 scope=dapr.placement type=log ver=1.9.0
time="2022-10-17T14:56:55.4082772-05:00" level=info msg="Healthz server is listening on :8080" instance=LAPTOP-OMK50S19 scope=dapr.placement type=log ver=1.9.0
time="2022-10-17T14:56:56.8232286-05:00" level=info msg="cluster leadership acquired" instance=LAPTOP-OMK50S19 scope=dapr.placement type=log ver=1.9.0
time="2022-10-17T14:56:56.8232286-05:00" level=info msg="leader is established." instance=LAPTOP-OMK50S19 scope=dapr.placement type=log ver=1.9.0
Now, to run an application with actors enabled, you can follow the sample example created for:
Update the state store configuration files to match the Redis host and password with your setup.
Enable it as a actor state store by making the metadata piece similar to the sample Java Redis component definition.
  - name: actorStateStore
    value: "true"
Clean up
When finished, remove the binaries by following Uninstall Dapr in a self-hosted environment to remove the binaries.
Next steps
- Run Dapr with Podman, using the default Docker, or in an airgap environment
- Upgrade Dapr in self-hosted mode
1.6 - How-to: Persist Scheduler Jobs
The Scheduler service is responsible for writing jobs to its Etcd database and scheduling them for execution.
By default, the Scheduler service database writes this data to the local volume dapr_scheduler, meaning that this data is persisted across restarts.
The host file location for this local volume is typically located at either /var/lib/docker/volumes/dapr_scheduler/_data or ~/.local/share/containers/storage/volumes/dapr_scheduler/_data, depending on your container runtime.
Note that if you are using Docker Desktop, this volume is located in the Docker Desktop VM’s filesystem, which can be accessed using:
docker run -it --privileged --pid=host debian nsenter -t 1 -m -u -n -i sh
The Scheduler persistent volume can be modified with a custom volume that is pre-existing, or is created by Dapr.
Note
By defaultdapr init creates a local persistent volume on your drive called dapr_scheduler. If Dapr is already installed, the control plane needs to be completely uninstalled in order for the Scheduler container to be recreated with the new persistent volume.dapr init --scheduler-volume my-scheduler-volume
1.7 - Steps to upgrade Dapr in a self-hosted environment
Uninstall the current Dapr deployment:
Note
This will remove the default$HOME/.daprdirectory, binaries and all containers (dapr_redis, dapr_placement and dapr_zipkin). Linux users need to runsudoif docker command needs sudo.dapr uninstall --allDownload and install the latest CLI by visiting this guide.
Initialize the Dapr runtime:
dapr initEnsure you are using the latest version of Dapr (v1.15.5)) with:
$ dapr --version

CLI version: 1.15
Runtime version: 1.15
1.8 - Uninstall Dapr in a self-hosted environment
The following CLI command removes the Dapr sidecar binaries and the placement container:
dapr uninstall
The above command will not remove the Redis or Zipkin containers that were installed during dapr init by default, just in case you were using them for other purposes. To remove Redis, Zipkin, Actor Placement container, as well as the default Dapr directory located at $HOME/.dapr or %USERPROFILE%\.dapr\, run:
dapr uninstall --all
Note
For Linux/MacOS users, if you run your docker cmds with sudo or the install path is/usr/local/bin(default install path), you need to use sudo dapr uninstall to remove dapr binaries and/or the containers.2 - Deploy and run Dapr in Kubernetes mode
2.1 - Overview of Dapr on Kubernetes
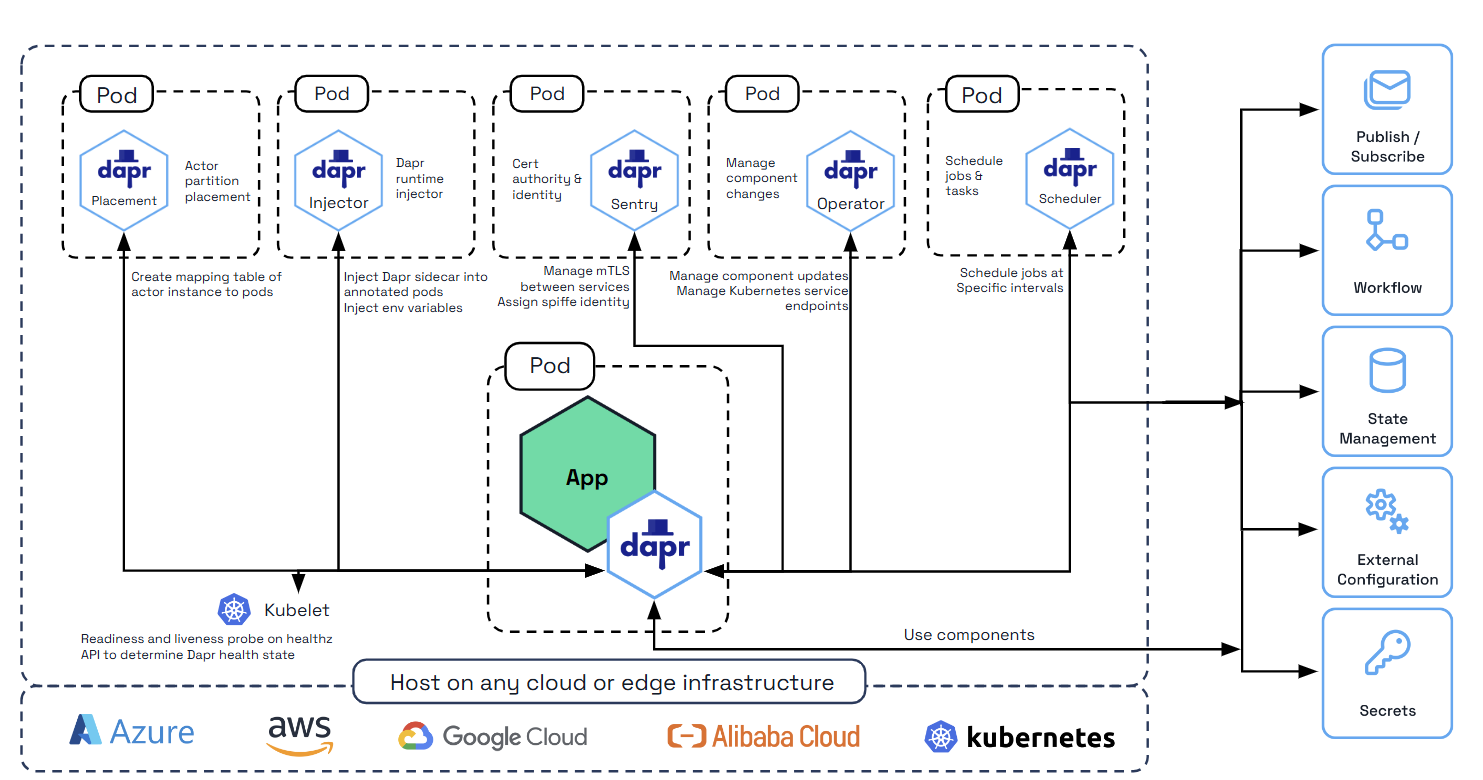
Dapr can be configured to run on any supported versions of Kubernetes. To achieve this, Dapr begins by deploying the following Kubernetes services, which provide first-class integration to make running applications with Dapr easy.
| Kubernetes services | Description |
|---|---|
dapr-operator | Manages component updates and Kubernetes services endpoints for Dapr (state stores, pub/subs, etc.) |
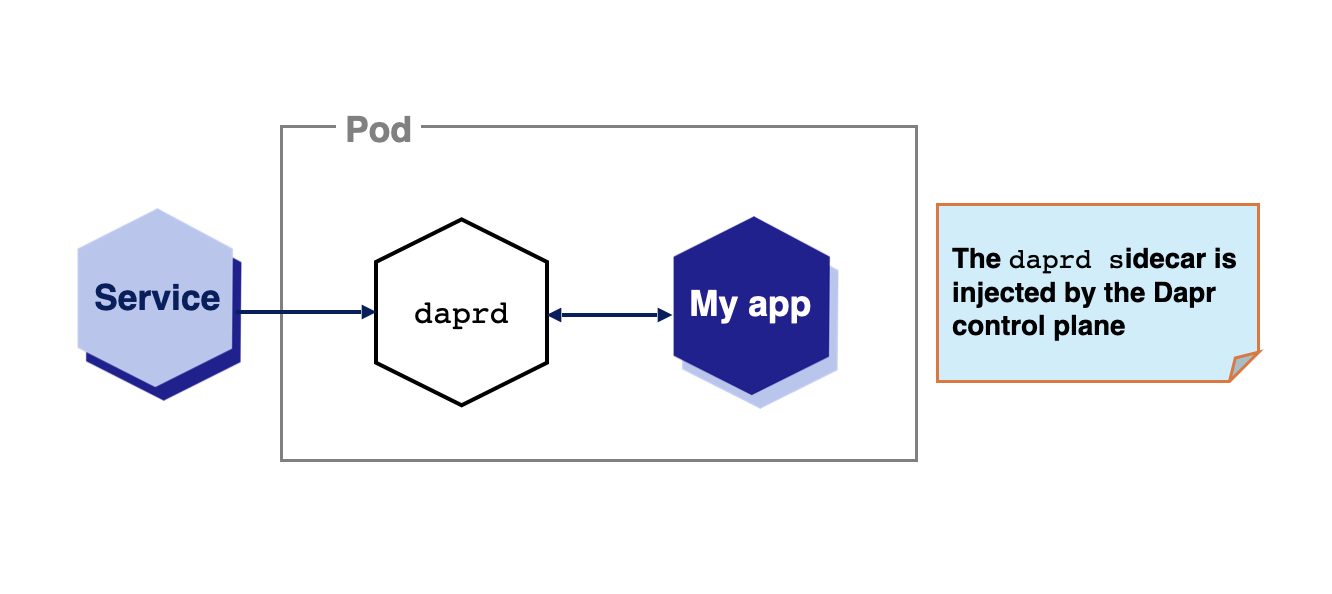
dapr-sidecar-injector | Injects Dapr into annotated deployment pods and adds the environment variables DAPR_HTTP_PORT and DAPR_GRPC_PORT to enable user-defined applications to easily communicate with Dapr without hard-coding Dapr port values. |
dapr-placement | Used for actors only. Creates mapping tables that map actor instances to pods |
dapr-sentry | Manages mTLS between services and acts as a certificate authority. For more information read the security overview |
dapr-scheduler | Provides distributed job scheduling capabilities used by the Jobs API, Workflow API, and Actor Reminders |
Supported versions
Dapr support for Kubernetes is aligned with Kubernetes Version Skew Policy.
Deploying Dapr to a Kubernetes cluster
Read Deploy Dapr on a Kubernetes cluster to learn how to deploy Dapr to your Kubernetes cluster.
Adding Dapr to a Kubernetes deployment
Deploying and running a Dapr-enabled application into your Kubernetes cluster is as simple as adding a few annotations to the pods schema. For example, in the following example, your Kubernetes pod is annotated to:
- Give your service an
idandportknown to Dapr - Turn on tracing through configuration
- Launch the Dapr sidecar container
  annotations:
    dapr.io/enabled: "true"
    dapr.io/app-id: "nodeapp"
    dapr.io/app-port: "3000"
    dapr.io/config: "tracing"
For more information, check Dapr annotations.
Pulling container images from private registries
Dapr works seamlessly with any user application container image, regardless of its origin. Simply initialize Dapr and add the Dapr annotations to your Kubernetes definition to add the Dapr sidecar.
The Dapr control plane and sidecar images come from the daprio Docker Hub container registry, which is a public registry.
For information about:
- Pulling your application images from a private registry, reference the official Kubernetes documentation.
- Using Azure Container Registry with Azure Kubernetes Service, reference the AKS documentation.
Tutorials
Work through the Hello Kubernetes tutorial to learn more about getting started with Dapr on your Kubernetes cluster.
Related links
2.2 - Kubernetes cluster setup
2.2.1 - Set up a Minikube cluster
Prerequisites
- Install:
- For Windows:
- Enable Virtualization in BIOS
- Install Hyper-V
Note
See the official Minikube documentation on drivers for details on supported drivers and how to install plugins.Start the Minikube cluster
If applicable for your project, set the default VM.
minikube config set vm-driver [driver_name]Start the cluster. If necessary, specify version 1.13.x or newer of Kubernetes with
--kubernetes-versionminikube start --cpus=4 --memory=4096Enable the Minikube dashboard and ingress add-ons.
# Enable dashboard
minikube addons enable dashboard

# Enable ingress
minikube addons enable ingress
Install Helm v3 (optional)
If you are using Helm, install the Helm v3 client.
Important
The latest Dapr Helm chart no longer supports Helm v2. Migrate from Helm v2 to Helm v3.Troubleshooting
The external IP address of load balancer is not shown from kubectl get svc.
In Minikube, EXTERNAL-IP in kubectl get svc shows <pending> state for your service. In this case, you can run minikube service [service_name] to open your service without external IP address.
$ kubectl get svc
NAME                        TYPE           CLUSTER-IP       EXTERNAL-IP   PORT(S)            AGE
...
calculator-front-end        LoadBalancer   10.103.98.37     <pending>     80:30534/TCP       25h
calculator-front-end-dapr   ClusterIP      10.107.128.226   <none>        80/TCP,50001/TCP   25h
...

$ minikube service calculator-front-end
|-----------|----------------------|-------------|---------------------------|
| NAMESPACE |         NAME         | TARGET PORT |            URL            |
|-----------|----------------------|-------------|---------------------------|
| default   | calculator-front-end |             | http://192.168.64.7:30534 |
|-----------|----------------------|-------------|---------------------------|
🎉  Opening kubernetes service  default/calculator-front-end in default browser...
Related links
2.2.2 - Set up a KiND cluster
Prerequisites
- Install:
- For Windows:
- Enable Virtualization in BIOS
- Install Hyper-V
Install and configure KiND
Refer to the KiND documentation to install.
If you are using Docker Desktop, verify that you have the recommended settings.
Configure and create the KiND cluster
Create a file named
kind-cluster-config.yaml, and paste the following:kind: Cluster apiVersion: kind.x-k8s.io/v1alpha4 nodes: - role: control-plane kubeadmConfigPatches: - | kind: InitConfiguration nodeRegistration: kubeletExtraArgs: node-labels: "ingress-ready=true" extraPortMappings: - containerPort: 80 hostPort: 8081 protocol: TCP - containerPort: 443 hostPort: 8443 protocol: TCP - role: worker - role: workerThis cluster configuration:
- Requests KiND to spin up a Kubernetes cluster comprised of a control plane and two worker nodes.
- Allows for future setup of ingresses.
- Exposes container ports to the host machine.
Run the
kind create clustercommand, providing the cluster configuration file:kind create cluster --config kind-cluster-config.yamlExpected output
Creating cluster "kind" ...
 ✓ Ensuring node image (kindest/node:v1.21.1) 🖼
 ✓ Preparing nodes 📦 📦 📦
 ✓ Writing configuration 📜
 ✓ Starting control-plane 🕹️
 ✓ Installing CNI 🔌
 ✓ Installing StorageClass 💾
 ✓ Joining worker nodes 🚜
Set kubectl context to "kind-kind"
You can now use your cluster with:

kubectl cluster-info --context kind-kind

Thanks for using kind! 😊
Initialize and run Dapr
Initialize Dapr in Kubernetes.
dapr init --kubernetesOnce Dapr finishes initializing, you can use its core components on the cluster.
Verify the status of the Dapr components:
dapr status -kExpected output
  NAME                   NAMESPACE    HEALTHY  STATUS   REPLICAS  VERSION  AGE  CREATED
  dapr-sentry            dapr-system  True     Running  1         1.5.1    53s  2021-12-10 09:27.17
  dapr-operator          dapr-system  True     Running  1         1.5.1    53s  2021-12-10 09:27.17
  dapr-sidecar-injector  dapr-system  True     Running  1         1.5.1    53s  2021-12-10 09:27.17
  dapr-dashboard         dapr-system  True     Running  1         0.9.0    53s  2021-12-10 09:27.17
  dapr-placement-server  dapr-system  True     Running  1         1.5.1    52s  2021-12-10 09:27.18
Forward a port to Dapr dashboard:
dapr dashboard -k -p 9999Navigate to
http://localhost:9999to validate a successful setup.
Install metrics-server on the Kind Kubernetes Cluster
Get metrics-server manifests
wget https://github.com/kubernetes-sigs/metrics-server/releases/latest/download/components.yamlAdd insecure TLS parameter to the components.yaml file
metadata:
   labels:
     k8s-app: metrics-server
 spec:
   containers:
   - args:
     - --cert-dir=/tmp
     - --secure-port=4443
     - --kubelet-preferred-address-types=InternalIP,ExternalIP,Hostname
     - --kubelet-use-node-status-port
     - --kubelet-insecure-tls   <==== Add this
     - --metric-resolution=15s
     image: k8s.gcr.io/metrics-server/metrics-server:v0.6.2
     imagePullPolicy: IfNotPresent
     livenessProbe:
       failureThreshold: 3
       httpGet:
         path: /livez
Apply modified manifest
kubectl apply -f components.yaml
Related links
2.2.3 - Set up an Azure Kubernetes Service (AKS) cluster
This guide walks you through installing an Azure Kubernetes Service (AKS) cluster. If you need more information, refer to Quickstart: Deploy an AKS cluster using the Azure CLI
Prerequisites
Deploy an AKS cluster
In the terminal, log into Azure.
az loginSet your default subscription:
az account set -s [your_subscription_id]Create a resource group.
az group create --name [your_resource_group] --location [region]Create an AKS cluster. To use a specific version of Kubernetes, use
--kubernetes-version(1.13.x or newer version required).az aks create --resource-group [your_resource_group] --name [your_aks_cluster_name] --location [region] --node-count 2 --enable-app-routing --generate-ssh-keysGet the access credentials for the AKS cluster.
az aks get-credentials -n [your_aks_cluster_name] -g [your_resource_group]
AKS Edge Essentials
To create a single-machine K8s/K3s Linux-only cluster using Azure Kubernetes Service (AKS) Edge Essentials, you can follow the quickstart guide available at AKS Edge Essentials quickstart guide.
Note
AKS Edge Essentials does not come with a default storage class, which may cause issues when deploying Dapr. To avoid this, make sure to enable the local-path-provisioner storage class on the cluster before deploying Dapr. If you need more information, refer to Local Path Provisioner on AKS EE.Related links
2.2.4 - Set up a Google Kubernetes Engine (GKE) cluster
Prerequisites
- Install:
Create a new cluster
Create a GKE cluster by running the following:
$ gcloud services enable container.googleapis.com && \
  gcloud container clusters create $CLUSTER_NAME \
  --zone $ZONE \
  --project $PROJECT_ID
For more options:
- Refer to the Google Cloud SDK docs.
- Create a cluster through the Cloud Console for a more interactive experience.
Sidecar injection for private GKE clusters
Sidecar injection for private clusters requires extra steps.
In private GKE clusters, an automatically created firewall rule for master access doesn’t open port 4000, which Dapr needs for sidecar injection.
Review the relevant firewall rule:
$ gcloud compute firewall-rules list --filter="name~gke-${CLUSTER_NAME}-[0-9a-z]*-master"
Replace the existing rule and allow Kubernetes master access to port 4000:
$ gcloud compute firewall-rules update <firewall-rule-name> --allow tcp:10250,tcp:443,tcp:4000
Retrieve your credentials for kubectl
Run the following command to retrieve your credentials:
$ gcloud container clusters get-credentials $CLUSTER_NAME \
    --zone $ZONE \
    --project $PROJECT_ID
Install Helm v3 (optional)
If you are using Helm, install the Helm v3 client.
Important
The latest Dapr Helm chart no longer supports Helm v2. Migrate from Helm v2 to Helm v3.Troubleshooting
Kubernetes dashboard permissions
Let’s say you receive an error message similar to the following:
configmaps is forbidden: User "system:serviceaccount:kube-system:kubernetes-dashboard" cannot list configmaps in the namespace "default"
Execute this command:
kubectl create clusterrolebinding kubernetes-dashboard -n kube-system --clusterrole=cluster-admin --serviceaccount=kube-system:kubernetes-dashboard
Related links
2.2.5 - Set up an Elastic Kubernetes Service (EKS) cluster
This guide walks you through installing an Elastic Kubernetes Service (EKS) cluster. If you need more information, refer to Create an Amazon EKS cluster
Prerequisites
Deploy an EKS cluster
In the terminal, log into AWS.
aws configureCreate a new file called
cluster-config.yamland add the content below to it, replacing[your_cluster_name],[your_cluster_region], and[your_k8s_version]with the appropriate values:apiVersion: eksctl.io/v1alpha5 kind: ClusterConfig metadata: name: [your_cluster_name] region: [your_cluster_region] version: [your_k8s_version] tags: karpenter.sh/discovery: [your_cluster_name] iam: withOIDC: true managedNodeGroups: - name: mng-od-4vcpu-8gb desiredCapacity: 2 minSize: 1 maxSize: 5 instanceType: c5.xlarge privateNetworking: true addons: - name: vpc-cni attachPolicyARNs: - arn:aws:iam::aws:policy/AmazonEKS_CNI_Policy - name: coredns version: latest - name: kube-proxy version: latest - name: aws-ebs-csi-driver wellKnownPolicies: ebsCSIController: trueCreate the cluster by running the following command:
eksctl create cluster -f cluster-config.yamlVerify the kubectl context:
kubectl config current-context
Add Dapr requirements for sidecar access and default storage class:
Update the security group rule to allow the EKS cluster to communicate with the Dapr Sidecar by creating an inbound rule for port 4000.
aws ec2 authorize-security-group-ingress --region [your_aws_region] \
--group-id [your_security_group] \
--protocol tcp \
--port 4000 \
--source-group [your_security_group]
Add a default storage class if you don’t have one:
kubectl patch storageclass gp2 -p '{"metadata": {"annotations":{"storageclass.kubernetes.io/is-default-class":"true"}}}'
Install Dapr
Install Dapr on your cluster by running:
dapr init -k
You should see the following response:
⌛  Making the jump to hyperspace...
ℹ️  Note: To install Dapr using Helm, see here: https://docs.dapr.io/getting-started/install-dapr-kubernetes/#install-with-helm-advanced

ℹ️  Container images will be pulled from Docker Hub
✅  Deploying the Dapr control plane with latest version to your cluster...
✅  Deploying the Dapr dashboard with latest version to your cluster...
✅  Success! Dapr has been installed to namespace dapr-system. To verify, run `dapr status -k' in your terminal. To get started, go here: https://docs.dapr.io/getting-started
Troubleshooting
Access permissions
If you face any access permissions, make sure you are using the same AWS profile that was used to create the cluster. If needed, update the kubectl configuration with the correct profile. More information here:
aws eks --region [your_aws_region] update-kubeconfig --name [your_eks_cluster_name] --profile [your_profile_name]
Related links
2.3 - Deploy Dapr on a Kubernetes cluster
When setting up Dapr on Kubernetes, you can use either the Dapr CLI or Helm.
Hybrid clusters
Both the Dapr CLI and the Dapr Helm chart automatically deploy with affinity for nodes with the labelkubernetes.io/os=linux. You can deploy Dapr to Windows nodes if your application requires it. For more information, see Deploying to a hybrid Linux/Windows Kubernetes cluster.Install with Dapr CLI
You can install Dapr on a Kubernetes cluster using the Dapr CLI.
Prerequisites
- Install:
- Create a Kubernetes cluster with Dapr. Here are some helpful links:
Installation options
You can install Dapr from an official Helm chart or a private chart, using a custom namespace, etc.
Install Dapr from an official Dapr Helm chart
The -k flag initializes Dapr on the Kubernetes cluster in your current context.
Verify the correct “target” cluster is set by checking
kubectl context (kubectl config get-contexts).- You can set a different context using
kubectl config use-context <CONTEXT>.
- You can set a different context using
Initialize Dapr on your cluster with the following command:
dapr init -kExpected output
⌛  Making the jump to hyperspace...

✅  Deploying the Dapr control plane to your cluster...
✅  Success! Dapr has been installed to namespace dapr-system. To verify, run "dapr status -k" in your terminal. To get started, go here: https://aka.ms/dapr-getting-started
Run the dashboard:
dapr dashboard -kIf you installed Dapr in a non-default namespace, run:
dapr dashboard -k -n <your-namespace>
Install Dapr from the offical Dapr Helm chart (with development flag)
Adding the --dev flag initializes Dapr on the Kubernetes cluster on your current context, with the addition of Redis and Zipkin deployments.
The steps are similar to installing from the Dapr Helm chart, except for appending the --dev flag to the init command:
dapr init -k --dev
Expected output:
⌛  Making the jump to hyperspace...
ℹ️  Note: To install Dapr using Helm, see here: https://docs.dapr.io/getting-started/install-dapr-kubernetes/#install-with-helm-advanced

ℹ️  Container images will be pulled from Docker Hub
✅  Deploying the Dapr control plane with latest version to your cluster...
✅  Deploying the Dapr dashboard with latest version to your cluster...
✅  Deploying the Dapr Redis with latest version to your cluster...
✅  Deploying the Dapr Zipkin with latest version to your cluster...
ℹ️  Applying "statestore" component to Kubernetes "default" namespace.
ℹ️  Applying "pubsub" component to Kubernetes "default" namespace.
ℹ️  Applying "appconfig" zipkin configuration to Kubernetes "default" namespace.
✅  Success! Dapr has been installed to namespace dapr-system. To verify, run `dapr status -k' in your terminal. To get started, go here: https://aka.ms/dapr-getting-started
After a short period of time (or using the --wait flag and specifying an amount of time to wait), you can check that the Redis and Zipkin components have been deployed to the cluster.
kubectl get pods --namespace default
Expected output:
NAME                              READY   STATUS    RESTARTS   AGE
dapr-dev-zipkin-bfb4b45bb-sttz7   1/1     Running   0          159m
dapr-dev-redis-master-0           1/1     Running   0          159m
dapr-dev-redis-replicas-0         1/1     Running   0          159m
dapr-dev-redis-replicas-1         1/1     Running   0          159m
dapr-dev-redis-replicas-2         1/1     Running   0          158m
Install Dapr from a private Dapr Helm chart
Installing Dapr from a private Helm chart can be helpful for when you:
- Need more granular control of the Dapr Helm chart
- Have a custom Dapr deployment
- Pull Helm charts from trusted registries that are managed and maintained by your organization
Set the following parameters to allow dapr init -k to install Dapr images from the configured Helm repository.
export DAPR_HELM_REPO_URL="https://helm.custom-domain.com/dapr/dapr"
export DAPR_HELM_REPO_USERNAME="username_xxx"
export DAPR_HELM_REPO_PASSWORD="passwd_xxx"
Install in high availability mode
You can run Dapr with three replicas of each control plane pod in the dapr-system namespace for production scenarios.
dapr init -k --enable-ha=true
Install in custom namespace
The default namespace when initializing Dapr is dapr-system. You can override this with the -n flag.
dapr init -k -n mynamespace
Disable mTLS
Dapr is initialized by default with mTLS. You can disable it with:
dapr init -k --enable-mtls=false
Wait for the installation to complete
You can wait for the installation to complete its deployment with the --wait flag. The default timeout is 300s (5 min), but can be customized with the --timeout flag.
dapr init -k --wait --timeout 600
Uninstall Dapr on Kubernetes with CLI
Run the following command on your local machine to uninstall Dapr on your cluster:
dapr uninstall -k
Install with Helm
You can install Dapr on Kubernetes using a Helm v3 chart.
❗Important: The latest Dapr Helm chart no longer supports Helm v2. Migrate from Helm v2 to Helm v3.
Prerequisites
- Install:
- Create a Kubernetes cluster with Dapr. Here are some helpful links:
Add and install Dapr Helm chart
Add the Helm repo and update:
// Add the official Dapr Helm chart.
helm repo add dapr https://dapr.github.io/helm-charts/
// Or also add a private Dapr Helm chart.
helm repo add dapr http://helm.custom-domain.com/dapr/dapr/ \
   --username=xxx --password=xxx
helm repo update
// See which chart versions are available
helm search repo dapr --devel --versions
Install the Dapr chart on your cluster in the
dapr-systemnamespace.helm upgrade --install dapr dapr/dapr \ --version=1.15 \ --namespace dapr-system \ --create-namespace \ --waitTo install in high availability mode:
helm upgrade --install dapr dapr/dapr \
--version=1.15 \
--namespace dapr-system \
--create-namespace \
--set global.ha.enabled=true \
--wait
To install in high availability mode and scale select services independently of global:
    helm upgrade --install dapr dapr/dapr \
 --version=1.15 \
 --namespace dapr-system \
 --create-namespace \
 --set global.ha.enabled=false \
 --set dapr_scheduler.ha=true \
 --set dapr_placement.ha=true \
 --wait
See Guidelines for production ready deployments on Kubernetes for more information on installing and upgrading Dapr using Helm.
(optional) Install the Dapr dashboard as part of the control plane
If you want to install the Dapr dashboard, use this Helm chart with the additional settings of your choice:
helm install dapr dapr/dapr-dashboard --namespace dapr-system
For example:
helm repo add dapr https://dapr.github.io/helm-charts/
helm repo update
kubectl create namespace dapr-system
# Install the Dapr dashboard
helm install dapr-dashboard dapr/dapr-dashboard --namespace dapr-system
Verify installation
Once the installation is complete, verify that the dapr-operator, dapr-placement, dapr-sidecar-injector, and dapr-sentry pods are running in the dapr-system namespace:
kubectl get pods --namespace dapr-system
NAME                                     READY     STATUS    RESTARTS   AGE
dapr-dashboard-7bd6cbf5bf-xglsr          1/1       Running   0          40s
dapr-operator-7bd6cbf5bf-xglsr           1/1       Running   0          40s
dapr-placement-7f8f76778f-6vhl2          1/1       Running   0          40s
dapr-sidecar-injector-8555576b6f-29cqm   1/1       Running   0          40s
dapr-sentry-9435776c7f-8f7yd             1/1       Running   0          40s
Uninstall Dapr on Kubernetes
helm uninstall dapr --namespace dapr-system
More information
- Read the Kubernetes productions guidelines for recommended Helm chart values for production setups
- More details on Dapr Helm charts
Use Mariner-based images
The default container images pulled on Kubernetes are based on distroless.
Alternatively, you can use Dapr container images based on Mariner 2 (minimal distroless). Mariner, officially known as CBL-Mariner, is a free and open-source Linux distribution and container base image maintained by Microsoft. For some Dapr users, leveraging container images based on Mariner can help you meet compliance requirements.
To use Mariner-based images for Dapr, you need to add -mariner to your Docker tags. For example, while ghcr.io/dapr/dapr:latest is the Docker image based on distroless, ghcr.io/dapr/dapr:latest-mariner is based on Mariner. Tags pinned to a specific version are also available, such as 1.15-mariner.
In the Dapr CLI, you can switch to using Mariner-based images with the --image-variant flag.
dapr init -k --image-variant mariner
With Kubernetes and Helm, you can use Mariner-based images by setting the global.tag option and adding -mariner. For example:
helm upgrade --install dapr dapr/dapr \
  --version=1.15 \
  --namespace dapr-system \
  --create-namespace \
  --set global.tag=1.15.5-mariner \
  --wait
Related links
2.4 - Upgrade Dapr on a Kubernetes cluster
You can upgrade the Dapr control plane on a Kubernetes cluster using either the Dapr CLI or Helm.
Note
Refer to the Dapr version policy for guidance on Dapr’s upgrade path.Upgrade using the Dapr CLI
You can upgrade Dapr using the Dapr CLI.
Prerequisites
Upgrade existing cluster to 1.15.5
dapr upgrade -k --runtime-version=1.15.5
You can provide all the available Helm chart configurations using the Dapr CLI.
Troubleshoot upgrading via the CLI
There is a known issue running upgrades on clusters that may have previously had a version prior to 1.0.0-rc.2 installed on a cluster.
While this issue is uncommon, a few upgrade path edge cases may leave an incompatible CustomResourceDefinition installed on your cluster. If this is your scenario, you may see an error message like the following:
❌  Failed to upgrade Dapr: Warning: kubectl apply should be used on resource created by either kubectl create --save-config or kubectl apply
The CustomResourceDefinition "configurations.dapr.io" is invalid: spec.preserveUnknownFields: Invalid value: true: must be false in order to use defaults in the schema
Solution
Run the following command to upgrade the
CustomResourceDefinitionto a compatible version:kubectl replace -f https://raw.githubusercontent.com/dapr/dapr/release-1.15/charts/dapr/crds/configuration.yamlProceed with the
dapr upgrade --runtime-version 1.15.5 -kcommand.
Upgrade using Helm
You can upgrade Dapr using a Helm v3 chart.
❗Important: The latest Dapr Helm chart no longer supports Helm v2. Migrate from Helm v2 to Helm v3.
Prerequisites
Upgrade existing cluster to 1.15.5
As of version 1.0.0 onwards, existing certificate values will automatically be reused when upgrading Dapr using Helm.
Note Helm does not handle upgrading resources, so you need to perform that manually. Resources are backward-compatible and should only be installed forward.
Upgrade Dapr to version 1.15.5:
kubectl replace -f https://raw.githubusercontent.com/dapr/dapr/v1.15.5/charts/dapr/crds/components.yaml
kubectl replace -f https://raw.githubusercontent.com/dapr/dapr/v1.15.5/charts/dapr/crds/configuration.yaml
kubectl replace -f https://raw.githubusercontent.com/dapr/dapr/v1.15.5/charts/dapr/crds/subscription.yaml
kubectl apply -f https://raw.githubusercontent.com/dapr/dapr/v1.15.5/charts/dapr/crds/resiliency.yaml
kubectl apply -f https://raw.githubusercontent.com/dapr/dapr/v1.15.5/charts/dapr/crds/httpendpoints.yaml
helm repo updatehelm upgrade dapr dapr/dapr --version 1.15.5 --namespace dapr-system --waitIf you’re using a values file, remember to add the
--valuesoption when running the upgrade command.*Ensure all pods are running:
kubectl get pods -n dapr-system -w

NAME                                     READY   STATUS    RESTARTS   AGE
dapr-dashboard-69f5c5c867-mqhg4          1/1     Running   0          42s
dapr-operator-5cdd6b7f9c-9sl7g           1/1     Running   0          41s
dapr-placement-server-0                  1/1     Running   0          41s
dapr-sentry-84565c747b-7bh8h             1/1     Running   0          35s
dapr-sidecar-injector-68f868668f-6xnbt   1/1     Running   0          41s
Restart your application deployments to update the Dapr runtime:
kubectl rollout restart deploy/<DEPLOYMENT-NAME>
Upgrade existing Dapr deployment to enable high availability mode
Enable high availability mode in an existing Dapr deployment with a few additional steps.
Related links
2.5 - Production guidelines on Kubernetes
Cluster and capacity requirements
Dapr support for Kubernetes is aligned with Kubernetes Version Skew Policy.
Use the following resource settings as a starting point. Requirements vary depending on cluster size, number of pods, and other factors. Perform individual testing to find the right values for your environment. In production, it’s recommended to not add memory limits to the Dapr control plane components to avoid OOMKilled pod statuses.
| Deployment | CPU | Memory |
|---|---|---|
| Operator | Limit: 1, Request: 100m | Request: 100Mi |
| Sidecar Injector | Limit: 1, Request: 100m | Request: 30Mi |
| Sentry | Limit: 1, Request: 100m | Request: 30Mi |
| Placement | Limit: 1, Request: 250m | Request: 75Mi |
Note
For more information, refer to the Kubernetes documentation on CPU and Memory resource units and their meaning.Helm
When installing Dapr using Helm, no default limit/request values are set. Each component has a resources option (for example, dapr_dashboard.resources), which you can use to tune the Dapr control plane to fit your environment.
The Helm chart readme has detailed information and examples.
For local/dev installations, you might want to skip configuring the resources options.
Optional components
The following Dapr control plane deployments are optional:
- Placement: For using Dapr Actors
- Sentry: For mTLS for service-to-service invocation
- Dashboard: For an operational view of the cluster
Sidecar resource settings
Set the resource assignments for the Dapr sidecar using the supported annotations. The specific annotations related to resource constraints are:
dapr.io/sidecar-cpu-limitdapr.io/sidecar-memory-limitdapr.io/sidecar-cpu-requestdapr.io/sidecar-memory-request
If not set, the Dapr sidecar runs without resource settings, which may lead to issues. For a production-ready setup, it’s strongly recommended to configure these settings.
Example settings for the Dapr sidecar in a production-ready setup:
| CPU | Memory |
|---|---|
| Limit: 300m, Request: 100m | Limit: 1000Mi, Request: 250Mi |
The CPU and memory limits above account for Dapr supporting a high number of I/O bound operations. Use a monitoring tool to get a baseline for the sidecar (and app) containers and tune these settings based on those baselines.
For more details on configuring resource in Kubernetes, see the following Kubernetes guides:
Note
Since Dapr is intended to do much of the I/O heavy lifting for your app, the resources given to Dapr drastically reduce the resource allocations for the application.Setting soft memory limits on Dapr sidecar
Set soft memory limits on the Dapr sidecar when you’ve set up memory limits. With soft memory limits, the sidecar garbage collector frees up memory once it exceeds the limit instead of waiting for it to be double of the last amount of memory present in the heap when it was run. Waiting is the default behavior of the garbage collector used in Go, and can lead to OOM Kill events.
For example, for an app with app-id nodeapp with memory limit set to 1000Mi, you can use the following in your pod annotations:
  annotations:
    dapr.io/enabled: "true"
    dapr.io/app-id: "nodeapp"
    # our daprd memory settings
    dapr.io/sidecar-memory-limit: "1000Mi"   # your memory limit
    dapr.io/env: "GOMEMLIMIT=900MiB"         # 90% of your memory limit. Also notice the suffix "MiB" instead of "Mi"
In this example, the soft limit has been set to be 90% to leave 5-10% for other services, as recommended.
The GOMEMLIMIT environment variable allows certain suffixes for the memory size: B, KiB, MiB, GiB, and TiB.
High availability mode
When deploying Dapr in a production-ready configuration, it’s best to deploy with a high availability (HA) configuration of the control plane. This creates three replicas of each control plane pod in the dapr-system namespace, allowing the Dapr control plane to retain three running instances and survive individual node failures and other outages.
For a new Dapr deployment, HA mode can be set with both:
- The Dapr CLI, and
- Helm charts
For an existing Dapr deployment, you can enable HA mode in a few extra steps.
Individual service HA Helm configuration
You can configure HA mode via Helm across all services by setting the global.ha.enabled flag to true. By default, --set global.ha.enabled=true is fully respected and cannot be overridden, making it impossible to simultaneously have either the placement or scheduler service as a single instance.
Note: HA for scheduler and placement services is not the default setting.
To scale scheduler and placement to three instances independently of the global.ha.enabled flag, set global.ha.enabled to false and dapr_scheduler.ha and dapr_placement.ha to true. For example:
helm upgrade --install dapr dapr/dapr \
 --version=1.15 \
 --namespace dapr-system \
 --create-namespace \
 --set global.ha.enabled=false \
 --set dapr_scheduler.ha=true \
 --set dapr_placement.ha=true \
 --wait
Setting cluster critical priority class name for control plane services
In some scenarios, nodes may have memory and/or cpu pressure and the Dapr control plane pods might get selected for eviction. To prevent this, you can set a critical priority class name for the Dapr control plane pods. This ensures that the Dapr control plane pods are not evicted unless all other pods with lower priority are evicted.
It’s particularly important to protect the Dapr control plane components from eviction, especially the Scheduler service. When Schedulers are rescheduled or restarted, it can be highly disruptive to inflight jobs, potentially causing them to fire duplicate times. To prevent such disruptions, you should ensure the Dapr control plane components have a higher priority class than your application workloads.
Learn more about Protecting Mission-Critical Pods.
There are two built-in critical priority classes in Kubernetes:
system-cluster-criticalsystem-node-critical(highest priority)
It’s recommended to set the priorityClassName to system-cluster-critical for the Dapr control plane pods. If you have your own custom priority classes for your applications, ensure they have a lower priority value than the one assigned to the Dapr control plane to maintain system stability and prevent disruption of core Dapr services.
For a new Dapr control plane deployment, the system-cluster-critical priority class mode can be set via the helm value global.priorityClassName.
This priority class can be set with both the Dapr CLI and Helm charts,
using the helm --set global.priorityClassName=system-cluster-critical argument.
Dapr version < 1.14
For versions of Dapr below v1.14, it’s recommended that you add a ResourceQuota to the Dapr control plane namespace. This prevents
problems associated with scheduling pods where the cluster may be configured
with limitations on which pods can be assigned high priority classes. For v1.14 onwards the Helm chart adds this automatically.
If you have Dapr installed in namespace dapr-system, you can create a ResourceQuota with the following content:
apiVersion: v1
kind: ResourceQuota
metadata:
  name: dapr-system-critical-quota
  namespace: dapr-system
spec:
  scopeSelector:
    matchExpressions:
      - operator : In
        scopeName: PriorityClass
        values: [system-cluster-critical]
Deploy Dapr with Helm
Visit the full guide on deploying Dapr with Helm.
Parameters file
It’s recommended to create a values file, instead of specifying parameters on the command. Check the values file into source control so that you can track its changes.
See a full list of available parameters and settings.
The following command runs three replicas of each control plane service in the dapr-system namespace.
# Add/update a official Dapr Helm repo.
helm repo add dapr https://dapr.github.io/helm-charts/
# or add/update a private Dapr Helm repo.
helm repo add dapr http://helm.custom-domain.com/dapr/dapr/ \
   --username=xxx --password=xxx
helm repo update

# See which chart versions are available
helm search repo dapr --devel --versions

# create a values file to store variables
touch values.yml
cat << EOF >> values.yml
global:
  ha:
    enabled: true
EOF

# run install/upgrade
helm install dapr dapr/dapr \
  --version=<Dapr chart version> \
  --namespace dapr-system \
  --create-namespace \
  --values values.yml \
  --wait

# verify the installation
kubectl get pods --namespace dapr-system
Note
The example above useshelm install and helm upgrade. You can also run helm upgrade --install to dynamically determine whether to install or upgrade.The Dapr Helm chart automatically deploys with affinity for nodes with the label kubernetes.io/os=linux. You can deploy the Dapr control plane to Windows nodes. For more information, see Deploying to a Hybrid Linux/Windows K8s Cluster.
Upgrade Dapr with Helm
Dapr supports zero-downtime upgrades in the following steps.
Upgrade the CLI (recommended)
Upgrading the CLI is optional, but recommended.
- Download the latest version of the CLI.
- Verify the Dapr CLI is in your path.
Upgrade the control plane
Upgrade Dapr on a Kubernetes cluster.
Update the data plane (sidecars)
Update pods that are running Dapr to pick up the new version of the Dapr runtime.
Issue a rollout restart command for any deployment that has the
dapr.io/enabledannotation:kubectl rollout restart deploy/<Application deployment name>View a list of all your Dapr enabled deployments via either:
The Dapr Dashboard
Running the following command using the Dapr CLI:
dapr list -k

APP ID     APP PORT  AGE  CREATED
nodeapp    3000      16h  2020-07-29 17:16.22
Enable high availability in an existing Dapr deployment
Enabling HA mode for an existing Dapr deployment requires two steps:
Delete the existing placement stateful set.
kubectl delete statefulset.apps/dapr-placement-server -n dapr-systemYou delete the placement stateful set because, in HA mode, the placement service adds Raft for leader election. However, Kubernetes only allows for limited fields in stateful sets to be patched, subsequently failing upgrade of the placement service.
Deletion of the existing placement stateful set is safe. The agents reconnect and re-register with the newly created placement service, which persist its table in Raft.
Issue the upgrade command.
helm upgrade dapr ./charts/dapr -n dapr-system --set global.ha.enabled=true
Recommended security configuration
When properly configured, Dapr ensures secure communication and can make your application more secure with a number of built-in features.
Verify your production-ready deployment includes the following settings:
Mutual Authentication (mTLS) is enabled. Dapr has mTLS on by default. Learn more about how to bring your own certificates.
App to Dapr API authentication is enabled. This is the communication between your application and the Dapr sidecar. To secure the Dapr API from unauthorized application access, enable Dapr’s token-based authentication.
Dapr to App API authentication is enabled. This is the communication between Dapr and your application. Let Dapr know that it is communicating with an authorized application using token authentication.
Component secret data is configured in a secret store and not hard-coded in the component YAML file. Learn how to use secrets with Dapr components.
The Dapr control plane is installed on a dedicated namespace, such as
dapr-system.Dapr supports and is enabled to scope components for certain applications. This is not a required practice. Learn more about component scopes.
Recommended Placement service configuration
The Placement service is a component in Dapr, responsible for disseminating information about actor addresses to all Dapr sidecars via a placement table (more information on this can be found here).
When running in production, it’s recommended to configure the Placement service with the following values:
- High availability. Ensure the Placement service is highly available (three replicas) and can survive individual node failures. Helm chart value:
dapr_placement.ha=true - In-memory logs. Use in-memory Raft log store for faster writes. The tradeoff is more placement table disseminations (and thus, network traffic) in an eventual Placement service pod failure. Helm chart value:
dapr_placement.cluster.forceInMemoryLog=true - No metadata endpoint. Disable the unauthenticated
/placement/stateendpoint which exposes placement table information for the Placement service. Helm chart value:dapr_placement.metadataEnabled=false - Timeouts Control the sensitivity of network connectivity between the Placement service and the sidecars using the below timeout values. Default values are set, but you can adjust these based on your network conditions.
dapr_placement.keepAliveTimesets the interval at which the Placement service sends keep alive pings to Dapr sidecars on the gRPC stream to check if the connection is still alive. Lower values will lead to shorter actor rebalancing time in case of pod loss/restart, but higher network traffic during normal operation. Accepts values between1sand10s. Default is2s.dapr_placement.keepAliveTimeoutsets the timeout period for Dapr sidecars to respond to the Placement service’s keep alive pings before the Placement service closes the connection. Lower values will lead to shorter actor rebalancing time in case of pod loss/restart, but higher network traffic during normal operation. Accepts values between1sand10s. Default is3s.dapr_placement.disseminateTimeoutsets the timeout period for dissemination to be delayed after actor membership change (usually related to pod restarts) to avoid excessive dissemination during multiple pod restarts. Higher values will reduce the frequency of dissemination, but delay the table dissemination. Accepts values between1sand3s. Default is2s.
Service account tokens
By default, Kubernetes mounts a volume containing a Service Account token in each container. Applications can use this token, whose permissions vary depending on the configuration of the cluster and namespace, among other things, to perform API calls against the Kubernetes control plane.
When creating a new Pod (or a Deployment, StatefulSet, Job, etc), you can disable auto-mounting the Service Account token by setting automountServiceAccountToken: false in your pod’s spec.
It’s recommended that you consider deploying your apps with automountServiceAccountToken: false to improve the security posture of your pods, unless your apps depend on having a Service Account token. For example, you may need a Service Account token if:
- Your application needs to interact with the Kubernetes APIs.
- You are using Dapr components that interact with the Kubernetes APIs; for example, the Kubernetes secret store or the Kubernetes Events binding.
Thus, Dapr does not set automountServiceAccountToken: false automatically for you. However, in all situations where the Service Account is not required by your solution, it’s recommended that you set this option in the pods spec.
Note
Initializing Dapr components using component secrets stored as Kubernetes secrets does not require a Service Account token, so you can still setautomountServiceAccountToken: false in this case. Only calling the Kubernetes secret store at runtime, using the Secrets management building block, is impacted.Tracing and metrics configuration
Tracing and metrics are enabled in Dapr by default. It’s recommended that you set up distributed tracing and metrics for your applications and the Dapr control plane in production.
If you already have your own observability setup, you can disable tracing and metrics for Dapr.
Tracing
Configure a tracing backend for Dapr.
Metrics
For metrics, Dapr exposes a Prometheus endpoint listening on port 9090, which can be scraped by Prometheus.
Set up Prometheus, Grafana, and other monitoring tools with Dapr.
Injector watchdog
The Dapr Operator service includes an injector watchdog, which can be used to detect and remediate situations where your application’s pods may be deployed without the Dapr sidecar (the daprd container). For example, it can assist with recovering the applications after a total cluster failure.
The injector watchdog is disabled by default when running Dapr in Kubernetes mode. However, you should consider enabling it with the appropriate values for your specific situation.
Refer to the Dapr operator service documentation for more details on the injector watchdog and how to enable it.
Configure seccompProfile for sidecar containers
By default, the Dapr sidecar injector injects a sidecar without any seccompProfile. However, for the Dapr sidecar container to run successfully in a namespace with the Restricted profile, the sidecar container needs securityContext.seccompProfile.Type to not be nil.
Refer to the Arguments and Annotations overview to set the appropriate seccompProfile on the sidecar container.
Best Practices
Watch this video for a deep dive into the best practices for running Dapr in production with Kubernetes.
Related links
2.6 - Deploy Dapr per-node or per-cluster with Dapr Shared
Dapr automatically injects a sidecar to enable the Dapr APIs for your applications for the best availability and reliability.
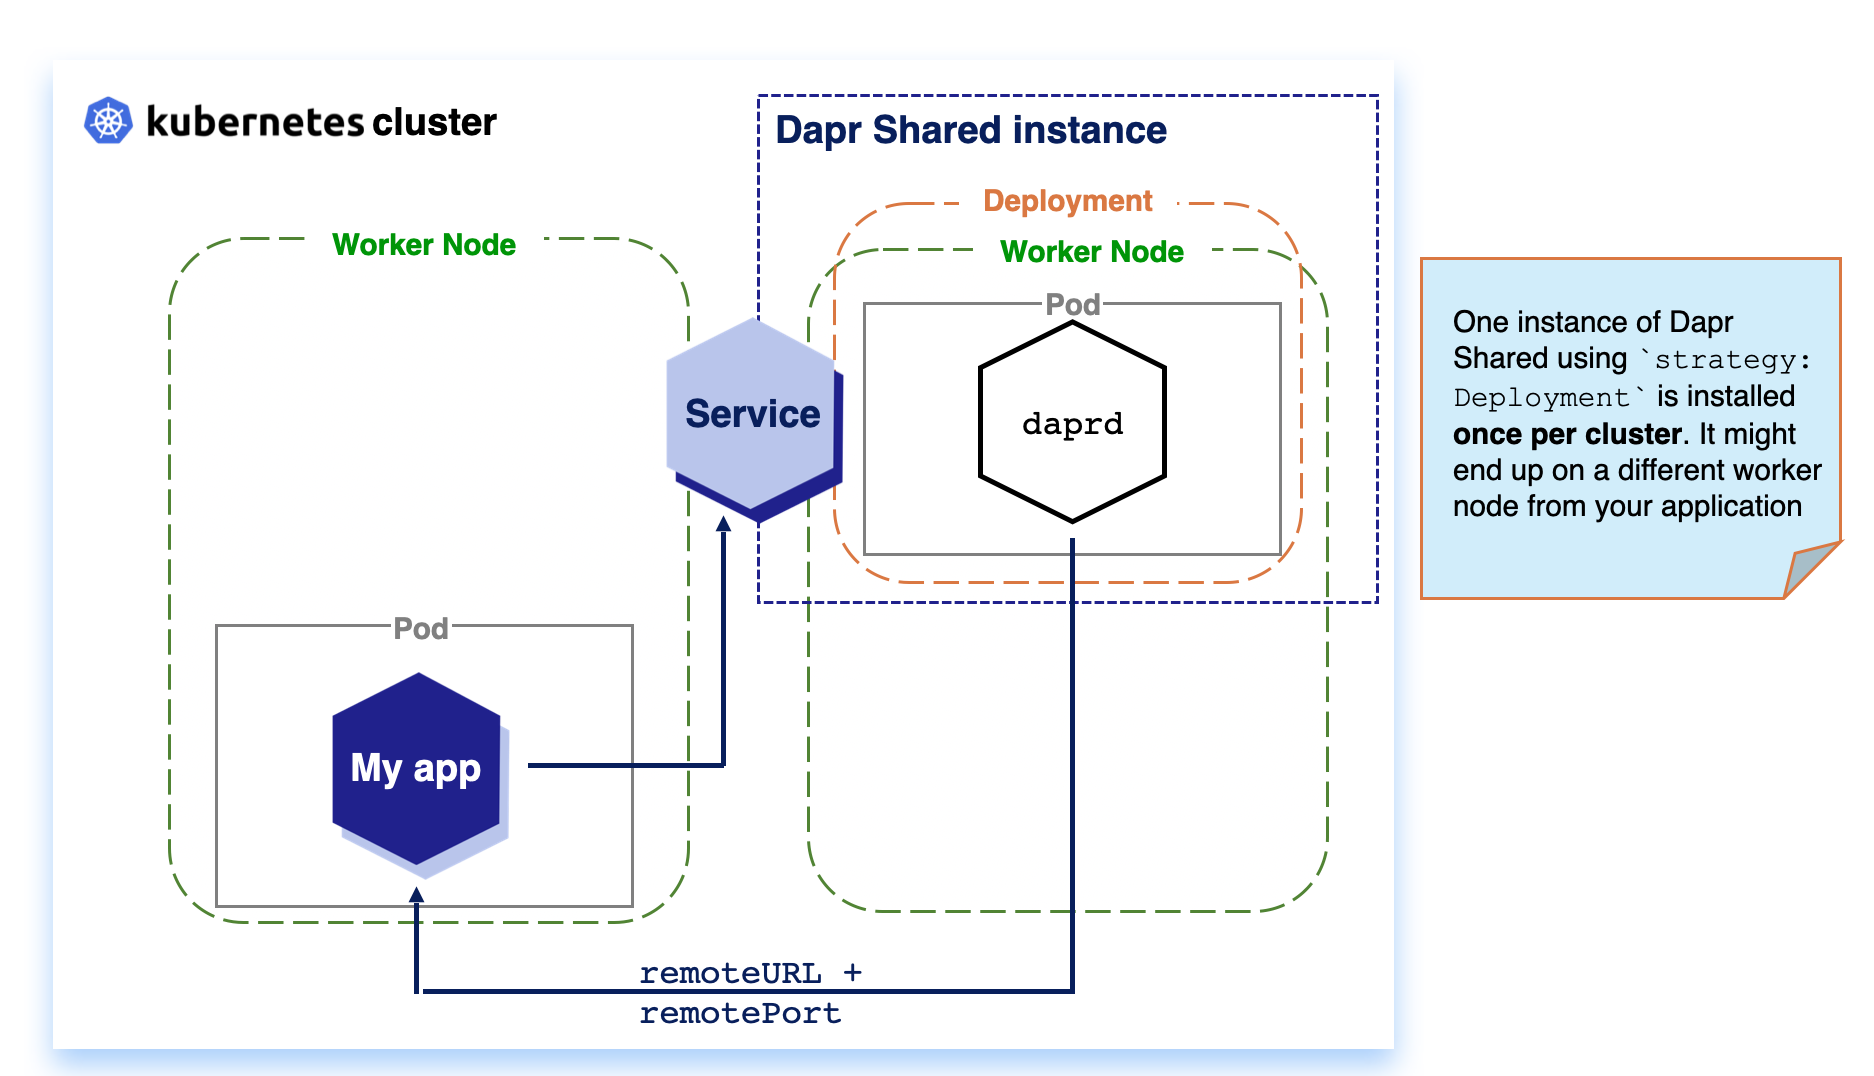
Dapr Shared enables two alternative deployment strategies to create Dapr applications using a Kubernetes Daemonset for a per-node deployment or a Deployment for a per-cluster deployment.
DaemonSet: When running Dapr Shared as a KubernetesDaemonSetresource, the daprd container runs on each Kubernetes node in the cluster. This can reduce network hops between the applications and Dapr.Deployment: When running Dapr Shared as a KubernetesDeployment, the Kubernetes scheduler decides on which single node in the cluster the daprd container instance runs.
Dapr Shared deployments
For each Dapr application you deploy, you need to deploy the Dapr Shared Helm chart using differentshared.appIds.Why Dapr Shared?
By default, when Dapr is installed into a Kubernetes cluster, the Dapr control plane injects Dapr as a sidecar to applications annotated with Dapr annotations ( dapr.io/enabled: "true"). Sidecars offer many advantages, including improved resiliency, since there is an instance per application and all communication between the application and the sidecar happens without involving the network.
While sidecars are Dapr’s default deployment, some use cases require other approaches. Let’s say you want to decouple the lifecycle of your workloads from the Dapr APIs. A typical example of this is functions, or function-as-a-service runtimes, which might automatically downscale your idle workloads to free up resources. For such cases, keeping the Dapr APIs and all the Dapr async functionalities (such as subscriptions) separate might be required.
Dapr Shared was created for these scenarios, extending the Dapr sidecar model with two new deployment approaches: DaemonSet (per-node) and Deployment (per-cluster).
Important
No matter which deployment approach you choose, it is important to understand that in most use cases, you have one instance of Dapr Shared (Helm release) per service (app-id). This means that if you have an application composed of three microservices, each service is recommended to have its own Dapr Shared instance. You can see this in action by trying the Hello Kubernetes with Dapr Shared tutorial.DaemonSet(Per-node)
With Kubernetes DaemonSet, you can define applications that need to be deployed once per node in the cluster. This enables applications that are running on the same node to communicate with local Dapr APIs, no matter where the Kubernetes Scheduler schedules your workload.

Note
SinceDaemonSet installs one instance per node, it consumes more resources in your cluster, compared to Deployment for a per cluster deployment, with the advantage of improved resiliency.Deployment (Per-cluster)
Kubernetes Deployments are installed once per cluster. Based on available resources, the Kubernetes Scheduler decides on which node the workload is scheduled. For Dapr Shared, this means that your workload and the Dapr instance might be located on separate nodes, which can introduce considerable network latency with the trade-off of reduce resource usage.
Getting Started with Dapr Shared
Prerequisites
Before installing Dapr Shared, make ensure you have Dapr installed in your cluster.If you want to get started with Dapr Shared, you can create a new Dapr Shared instance by installing the official Helm Chart:
helm install my-shared-instance oci://registry-1.docker.io/daprio/dapr-shared-chart --set shared.appId=<DAPR_APP_ID> --set shared.remoteURL=<REMOTE_URL> --set shared.remotePort=<REMOTE_PORT> --set shared.strategy=deployment
Your Dapr-enabled applications can now make use of the Dapr Shared instance by pointing the Dapr SDKs to or sending requests to the my-shared-instance-dapr Kubernetes service exposed by the Dapr Shared instance.
The
my-shared-instanceabove is the Helm Chart release name.
If you are using the Dapr SDKs, you can set the following environment variables for your application to connect to the Dapr Shared instance (in this case, running on the default namespace):
        env:
        - name: DAPR_HTTP_ENDPOINT
          value: http://my-shared-instance-dapr.default.svc.cluster.local:3500
        - name: DAPR_GRPC_ENDPOINT
          value: http://my-shared-instance-dapr.default.svc.cluster.local:50001
If you are not using the SDKs, you can send HTTP or gRPC requests to those endpoints.
Next steps
- Try the Hello Kubernetes tutorial with Dapr Shared.
- Read more in the Dapr Shared repo
2.7 - How-to: Persist Scheduler Jobs
The Scheduler service is responsible for writing jobs to its Etcd database and scheduling them for execution.
By default, the Scheduler service database embeds Etcd and writes data to a Persistent Volume Claim volume of size 1Gb, using the cluster’s default storage class.
This means that there is no additional parameter required to run the scheduler service reliably on most Kubernetes deployments, although you will need additional configuration if a default StorageClass is not available or when running a production environment.
Warning
The default storage size for the Scheduler is1Gi, which is likely not sufficient for most production deployments.
Remember that the Scheduler is used for Actor Reminders & Workflows, and the Jobs API.
You may want to consider reinstalling Dapr with a larger Scheduler storage of at least 16Gi or more.
For more information, see the ETCD Storage Disk Size section below.Production Setup
ETCD Storage Disk Size
The default storage size for the Scheduler is 1Gb.
This size is likely not sufficient for most production deployments.
When the storage size is exceeded, the Scheduler will log an error similar to the following:
error running scheduler: etcdserver: mvcc: database space exceeded
Knowing the safe upper bound for your storage size is not an exact science, and relies heavily on the number, persistence, and the data payload size of your application jobs. The Job API and Actor Reminders transparently maps one to one to the usage of your applications. Workflows create a large number of jobs as Actor Reminders, however these jobs are short lived- matching the lifecycle of each workflow execution. The data payload of jobs created by Workflows is typically empty or small.
The Scheduler uses Etcd as its storage backend database. By design, Etcd persists historical transactions and data in form of Write-Ahead Logs (WAL) and snapshots. This means the actual disk usage of Scheduler will be higher than the current observable database state, often by a number of multiples.
Setting the Storage Size on Installation
If you need to increase an existing Scheduler storage size, see the Increase Scheduler Storage Size section below.
To increase the storage size (in this example- 16Gi) for a fresh Dapr installation, you can use the following command:
dapr init -k --set dapr_scheduler.cluster.storageSize=16Gi --set dapr_scheduler.etcdSpaceQuota=16Gi
helm upgrade --install dapr dapr/dapr \
--version=1.15 \
--namespace dapr-system \
--create-namespace \
--set dapr_scheduler.cluster.storageSize=16Gi \
--set dapr_scheduler.etcdSpaceQuota=16Gi \
--wait
Note
For storage providers that do NOT support dynamic volume expansion: If Dapr has ever been installed on the cluster before, the Scheduler’s Persistent Volume Claims must be manually uninstalled in order for new ones with increased storage size to be created.
kubectl delete pvc -n dapr-system dapr-scheduler-data-dir-dapr-scheduler-server-0 dapr-scheduler-data-dir-dapr-scheduler-server-1 dapr-scheduler-data-dir-dapr-scheduler-server-2
Persistent Volume Claims are not deleted automatically with an uninstall. This is a deliberate safety measure to prevent accidental data loss.
Increase existing Scheduler Storage Size
Warning
Not all storage providers support dynamic volume expansion. Please see your storage provider documentation to determine if this feature is supported, and what to do if it is not.By default, each Scheduler will create a Persistent Volume and Persistent Volume Claim of size 1Gi against the default standard storage class for each Scheduler replica.
These will look similar to the following, where in this example we are running Scheduler in HA mode.
NAMESPACE     NAME                                              STATUS   VOLUME                                     CAPACITY   ACCESS MODES   STORAGECLASS   VOLUMEATTRIBUTESCLASS   AGE
dapr-system   dapr-scheduler-data-dir-dapr-scheduler-server-0   Bound    pvc-9f699d2e-f347-43b0-aa98-57dcf38229c5   1Gi        RWO            standard       <unset>                 3m25s
dapr-system   dapr-scheduler-data-dir-dapr-scheduler-server-1   Bound    pvc-f4c8be7b-ffbe-407b-954e-7688f2482caa   1Gi        RWO            standard       <unset>                 3m25s
dapr-system   dapr-scheduler-data-dir-dapr-scheduler-server-2   Bound    pvc-eaad5fb1-98e9-42a5-bcc8-d45dba1c4b9f   1Gi        RWO            standard       <unset>                 3m25s
NAME                                       CAPACITY   ACCESS MODES   RECLAIM POLICY   STATUS   CLAIM                                                         STORAGECLASS   VOLUMEATTRIBUTESCLASS   REASON   AGE
pvc-9f699d2e-f347-43b0-aa98-57dcf38229c5   1Gi        RWO            Delete           Bound    dapr-system/dapr-scheduler-data-dir-dapr-scheduler-server-0   standard       <unset>                          4m24s
pvc-eaad5fb1-98e9-42a5-bcc8-d45dba1c4b9f   1Gi        RWO            Delete           Bound    dapr-system/dapr-scheduler-data-dir-dapr-scheduler-server-2   standard       <unset>                          4m24s
pvc-f4c8be7b-ffbe-407b-954e-7688f2482caa   1Gi        RWO            Delete           Bound    dapr-system/dapr-scheduler-data-dir-dapr-scheduler-server-1   standard       <unset>                          4m24s
To expand the storage size of the Scheduler, follow these steps:
- First, ensure that the storage class supports volume expansion, and that the
allowVolumeExpansionfield is set totrueif it is not already.
apiVersion: storage.k8s.io/v1
kind: StorageClass
metadata:
  name: standard
provisioner: my.driver
allowVolumeExpansion: true
...
- Delete the Scheduler StatefulSet whilst preserving the Bound Persistent Volume Claims.
kubectl delete sts -n dapr-system dapr-scheduler-server --cascade=orphan
- Increase the size of the Persistent Volume Claims to the desired size by editing the
spec.resources.requests.storagefield. Again in this case, we are assuming that the Scheduler is running in HA mode with 3 replicas.
kubectl edit pvc -n dapr-system dapr-scheduler-data-dir-dapr-scheduler-server-0 dapr-scheduler-data-dir-dapr-scheduler-server-1 dapr-scheduler-data-dir-dapr-scheduler-server-2
- Recreate the Scheduler StatefulSet by installing Dapr with the desired storage size.
Storage Class
In case your Kubernetes deployment does not have a default storage class or you are configuring a production cluster, defining a storage class is required.
A persistent volume is backed by a real disk that is provided by the hosted Cloud Provider or Kubernetes infrastructure platform. Disk size is determined by how many jobs are expected to be persisted at once; however, 64Gb should be more than sufficient for most production scenarios. Some Kubernetes providers recommend using a CSI driver to provision the underlying disks. Below are a list of useful links to the relevant documentation for creating a persistent disk for the major cloud providers:
- Google Cloud Persistent Disk
- Amazon EBS Volumes
- Azure AKS Storage Options
- Digital Ocean Block Storage
- VMWare vSphere Storage
- OpenShift Persistent Storage
- Alibaba Cloud Disk Storage
Once the storage class is available, you can install Dapr using the following command, with Scheduler configured to use the storage class (replace my-storage-class with the name of the storage class):
Note
If Dapr is already installed, the control plane needs to be completely uninstalled in order for the SchedulerStatefulSet to be recreated with the new persistent volume.dapr init -k --set dapr_scheduler.cluster.storageClassName=my-storage-class
helm upgrade --install dapr dapr/dapr \
--version=1.15 \
--namespace dapr-system \
--create-namespace \
--set dapr_scheduler.cluster.storageClassName=my-storage-class \
--wait
Ephemeral Storage
When running in non-HA mode, the Scheduler can be optionally made to use ephemeral storage, which is in-memory storage that is not resilient to restarts. For example, all jobs data is lost after a Scheduler restart. This is useful in non-production deployments or for testing where storage is not available or required.
Note
If Dapr is already installed, the control plane needs to be completely uninstalled in order for the SchedulerStatefulSet to be recreated without the persistent volume.dapr init -k --set dapr_scheduler.cluster.inMemoryStorage=true
helm upgrade --install dapr dapr/dapr \
--version=1.15 \
--namespace dapr-system \
--create-namespace \
--set dapr_scheduler.cluster.inMemoryStorage=true \
--wait
2.8 - Deploy to hybrid Linux/Windows Kubernetes clusters
Dapr supports running your microservices on Kubernetes clusters on:
- Windows
- Linux
- A combination of both
This is especially helpful during a piecemeal migration of a legacy application into a Dapr Kubernetes cluster.
Kubernetes uses a concept called node affinity to denote whether you want your application to be launched on a Linux node or a Windows node. When deploying to a cluster which has both Windows and Linux nodes, you must provide affinity rules for your applications, otherwise the Kubernetes scheduler might launch your application on the wrong type of node.
Prerequisites
Before you begin, set up a Kubernetes cluster with Windows nodes. Many Kubernetes providers support the automatic provisioning of Windows enabled Kubernetes clusters.
Follow your preferred provider’s instructions for setting up a cluster with Windows enabled.
Once you have set up the cluster, verify that both Windows and Linux nodes are available.
kubectl get nodes -o wide

NAME                                STATUS   ROLES   AGE     VERSION   INTERNAL-IP    EXTERNAL-IP      OS-IMAGE                         KERNEL-VERSION      CONTAINER-RUNTIME
aks-nodepool1-11819434-vmss000000   Ready    agent   6d      v1.17.9   10.240.0.4     <none>        Ubuntu 16.04.6    LTS               4.15.0-1092-azure   docker://3.0.10+azure
aks-nodepool1-11819434-vmss000001   Ready    agent   6d      v1.17.9   10.240.0.35    <none>        Ubuntu 16.04.6    LTS               4.15.0-1092-azure   docker://3.0.10+azure
aks-nodepool1-11819434-vmss000002   Ready    agent   5d10h   v1.17.9   10.240.0.129   <none>        Ubuntu 16.04.6    LTS               4.15.0-1092-azure   docker://3.0.10+azure
akswin000000                        Ready    agent   6d      v1.17.9   10.240.0.66    <none>        Windows Server 2019    Datacenter   10.0.17763.1339     docker://19.3.5
akswin000001                        Ready    agent   6d      v1.17.9   10.240.0.97    <none>        Windows Server 2019    Datacenter   10.0.17763.1339     docker://19.3.5
Install the Dapr control plane
If you are installing using the Dapr CLI or via a Helm chart, simply follow the normal deployment procedures: Installing Dapr on a Kubernetes cluster
Affinity will be automatically set for kubernetes.io/os=linux. This will be sufficient for most users, as Kubernetes requires at least one Linux node pool.
Note
Dapr control plane containers are built and tested for both Windows and Linux. However, it’s recommended to use the Linux control plane containers, which tend to be smaller and have a much larger user base.
If you understand the above, but want to deploy the Dapr control plane to Windows, you can do so by setting:
helm install dapr dapr/dapr --set global.daprControlPlaneOs=windows
Install Dapr applications
Windows applications
Once you’ve created a Docker container with your application, create a deployment YAML file with the node affinity set to
kubernetes.io/os: windows. In the exampledeploy_windows.yamldeployment file below:apiVersion: apps/v1 kind: Deployment metadata: name: yourwinapp labels: app: applabel spec: replicas: 1 selector: matchLabels: app: applablel template: metadata: labels: app: applabel annotations: dapr.io/enabled: "true" dapr.io/id: "addapp" dapr.io/port: "6000" dapr.io/config: "appconfig" spec: containers: - name: add image: yourreponsitory/your-windows-dapr-container:your-tag ports: - containerPort: 6000 imagePullPolicy: Always affinity: nodeAffinity: requiredDuringSchedulingIgnoredDuringExecution: nodeSelectorTerms: - matchExpressions: - key: kubernetes.io/os operator: In values: - windowsDeploy the YAML file to your Kubernetes cluster.
kubectl apply -f deploy_windows.yaml
Linux applications
If you already have a Dapr application that runs on Linux, you still need to add affinity rules.
Create a deployment YAML file with the node affinity set to
kubernetes.io/os: linux. In the exampledeploy_linux.yamldeployment file below:apiVersion: apps/v1 kind: Deployment metadata: name: yourlinuxapp labels: app: yourlabel spec: replicas: 1 selector: matchLabels: app: yourlabel template: metadata: labels: app: yourlabel annotations: dapr.io/enabled: "true" dapr.io/id: "addapp" dapr.io/port: "6000" dapr.io/config: "appconfig" spec: containers: - name: add image: yourreponsitory/your-application:your-tag ports: - containerPort: 6000 imagePullPolicy: Always affinity: nodeAffinity: requiredDuringSchedulingIgnoredDuringExecution: nodeSelectorTerms: - matchExpressions: - key: kubernetes.io/os operator: In values: - linuxDeploy the YAML to your Kubernetes cluster.
kubectl apply -f deploy_linux.yaml
That’s it!
Clean up
To remove the deployments from this guide, run the following commands:
kubectl delete -f deploy_linux.yaml
kubectl delete -f deploy_windows.yaml
helm uninstall dapr
Related links
- See the official Kubernetes documentation for examples of more advanced configuration via node affinity
- Get started: Prep Windows for containers
- Setting up a Windows enabled Kubernetes cluster on Azure AKS
- Setting up a Windows enabled Kubernetes cluster on AWS EKS
- Setting up Windows on Google Cloud GKE
2.9 - Running Dapr with a Kubernetes Job
The Dapr sidecar is designed to be a long running process. In the context of a Kubernetes Job this behavior can block your job completion.
To address this issue, the Dapr sidecar has an endpoint to Shutdown the sidecar.
When running a basic Kubernetes Job, you need to call the /shutdown endpoint for the sidecar to gracefully stop and the job to be considered Completed.
When a job is finished without calling Shutdown, your job is in a NotReady state with only the daprd container running endlessly.
Stopping the Dapr sidecar causes its readiness and liveness probes to fail in your container.
To prevent Kubernetes from trying to restart your job, set your job’s restartPolicy to Never.
Be sure to use the POST HTTP verb when calling the shutdown HTTP API. For example:
apiVersion: batch/v1
kind: Job
metadata:
  name: job-with-shutdown
spec:
  template:
    metadata:
      annotations:
        dapr.io/enabled: "true"
        dapr.io/app-id: "with-shutdown"
    spec:
      containers:
      - name: job
        image: alpine
        command: ["/bin/sh", "-c", "apk --no-cache add curl && sleep 20 && curl -X POST localhost:3500/v1.0/shutdown"]
      restartPolicy: Never
You can also call the Shutdown from any of the Dapr SDKs. For example, for the Go SDK:
package main

import (
	"context"
	"log"
	"os"

	dapr "github.com/dapr/go-sdk/client"
)

func main() {
  client, err := dapr.NewClient()
  if err != nil {
    log.Panic(err)
  }
  defer client.Close()
  defer client.Shutdown()
  // Job
}
Related links
2.10 - How-to: Mount Pod volumes to the Dapr sidecar
The Dapr sidecar can be configured to mount any Kubernetes Volume attached to the application Pod. These Volumes can be accessed by the daprd (sidecar) container in read-only or read-write modes. If a Volume is configured to be mounted but it does not exist in the Pod, Dapr logs a warning and ignores it.
For more information on different types of Volumes, check the Kubernetes documentation.
Configuration
You can set the following annotations in your deployment YAML:
| Annotation | Description |
|---|---|
dapr.io/volume-mounts | For read-only volume mounts |
dapr.io/volume-mounts-rw | For read-write volume mounts |
These annotations are comma separated pairs of volume-name:path/in/container. Verify the corresponding Volumes exist in the Pod spec.
Within the official container images, Dapr runs as a process with user ID (UID) 65532. Make sure that folders and files inside the mounted Volume are writable or readable by user 65532 as appropriate.
Although you can mount a Volume in any folder within the Dapr sidecar container, prevent conflicts and ensure smooth operations going forward by placing all mountpoints within one of the following locations, or in a subfolder within them:
| Location | Description |
|---|---|
/mnt | Recommended for Volumes containing persistent data that the Dapr sidecar process can read and/or write. |
/tmp | Recommended for Volumes containing temporary data, such as scratch disks. |
Examples
Basic deployment resource example
In the example Deployment resource below:
my-volume1is available inside the sidecar container at/mnt/sample1in read-only modemy-volume2is available inside the sidecar container at/mnt/sample2in read-only modemy-volume3is available inside the sidecar container at/tmp/sample3in read-write mode
apiVersion: apps/v1
kind: Deployment
metadata:
  name: myapp
  namespace: default
  labels:
    app: myapp
spec:
  replicas: 1
  selector:
    matchLabels:
      app: myapp
  template:
    metadata:
      labels:
        app: myapp
      annotations:
        dapr.io/enabled: "true"
        dapr.io/app-id: "myapp"
        dapr.io/app-port: "8000"
        dapr.io/volume-mounts: "my-volume1:/mnt/sample1,my-volume2:/mnt/sample2"
        dapr.io/volume-mounts-rw: "my-volume3:/tmp/sample3"
    spec:
      volumes:
        - name: my-volume1
          hostPath:
            path: /sample
        - name: my-volume2
          persistentVolumeClaim:
            claimName: pv-sample
        - name: my-volume3
          emptyDir: {}
...
Custom secrets storage using local file secret store
Since any type of Kubernetes Volume can be attached to the sidecar, you can use the local file secret store to read secrets from a variety of places. For example, if you have a Network File Share (NFS) server running at 10.201.202.203, with secrets stored at /secrets/stage/secrets.json, you can use that as a secrets storage.
Configure the application pod to mount the NFS and attach it to the Dapr sidecar.
apiVersion: apps/v1
kind: Deployment
metadata:
  name: myapp
...
spec:
  ...
  template:
    ...
      annotations:
        dapr.io/enabled: "true"
        dapr.io/app-id: "myapp"
        dapr.io/app-port: "8000"
        dapr.io/volume-mounts: "nfs-secrets-vol:/mnt/secrets"
    spec:
      volumes:
        - name: nfs-secrets-vol
          nfs:
            server: 10.201.202.203
            path: /secrets/stage
...
Point the local file secret store component to the attached file.
apiVersion: dapr.io/v1alpha1
kind: Component
metadata:
  name: local-secret-store
spec:
  type: secretstores.local.file
  version: v1
  metadata:
  - name: secretsFile
    value: /mnt/secrets/secrets.json
Use the secrets.
GET http://localhost:<daprPort>/v1.0/secrets/local-secret-store/my-secret
Related links
3 - Run Dapr in a serverless offering
If you’d like to run your Dapr applications without managing any of the underlying infrastructure such as VMs or Kubernetes, you can choose a serverless cloud offering. These platforms integrate with Dapr to make it easy to deploy and manage your applications.
Offerings
3.1 - Azure Container Apps
Azure Container Apps is a serverless application hosting service where users do not see nor manage any underlying VMs, orchestrators, or other cloud infrastructure. Azure Container Apps enables you to run your application code packaged in multiple containers and is unopinionated about runtimes or programming models that are used.
Dapr is built-in to Container Apps, enabling you to use the Dapr API building blocks without any manual deployment of the Dapr runtime. You simply deploy your services with their Dapr components.
Learn moreTutorial
Visit the Azure docs to try out a microservices tutorial, where you’ll deploy two Dapr-enabled applications to Azure Container Apps.
 Try out Dapr on Container Apps