This is the multi-page printable view of this section.
Click here to print.
Return to the regular view of this page.
Pub/Sub brokers
Guidance on setting up different message brokers for Dapr Pub/Sub
Dapr integrates with pub/sub message buses to provide applications with the ability to create event-driven, loosely coupled architectures where producers send events to consumers via topics.
Dapr supports the configuration of multiple, named, pub/sub components per application. Each pub/sub component has a name and this name is used when publishing a message topic. Read the API reference for details on how to publish and subscribe to topics.
Pub/sub components are extensible. A list of support pub/sub components is here and the implementations can be found in the components-contrib repo.
Component files
A pub/sub is described using a Component file:
apiVersion: dapr.io/v1alpha1
kind: Component
metadata:
  name: pubsub
  namespace: default
spec:
  type: pubsub.<NAME>
  version: v1
  metadata:
  - name: <KEY>
    value: <VALUE>
  - name: <KEY>
    value: <VALUE>
...
The type of pub/sub is determined by the type field, and properties such as connection strings and other metadata are put in the .metadata section.
Even though metadata values can contain secrets in plain text, it is recommended you use a secret store using a secretKeyRef.
Topic creation
Depending on the pub/sub message bus you are using and how it is configured, topics may be created automatically. Even if the message bus supports automatic topic creation, it is a common governance practice to disable it in production environments. You may still need to use a CLI, admin console, or request form to manually create the topics required by your application.
While all pub/sub components support consumerID metadata, the runtime creates a consumer ID if you do not supply one. All component metadata field values can carry templated metadata values, which are resolved on Dapr sidecar startup.
For example, you can choose to use {namespace} as the consumerGroup to enable using the same appId in different namespaces using the same topics as described in this article.
Visit this guide for instructions on configuring and using pub/sub components.
1 - HowTo: Configure Pub/Sub components with multiple namespaces
Use Dapr Pub/Sub with multiple namespaces
In some scenarios, applications can be spread across namespaces and share a queue or topic via PubSub. In this case, the PubSub component must be provisioned on each namespace.
Note
Namespaces are a Dapr concept used for scoping applications and components. This example uses Kubernetes namespaces, however the Dapr component namespace scoping can be used on any supported platform. Read
How-To: Scope components to one or more applications for more information on scoping components.
This example uses the PubSub sample. The Redis installation and the subscribers are in namespace-a while the publisher UI is in namespace-b. This solution will also work if Redis is installed on another namespace or if you use a managed cloud service like Azure ServiceBus, AWS SNS/SQS or GCP PubSub.
This is a diagram of the example using namespaces.
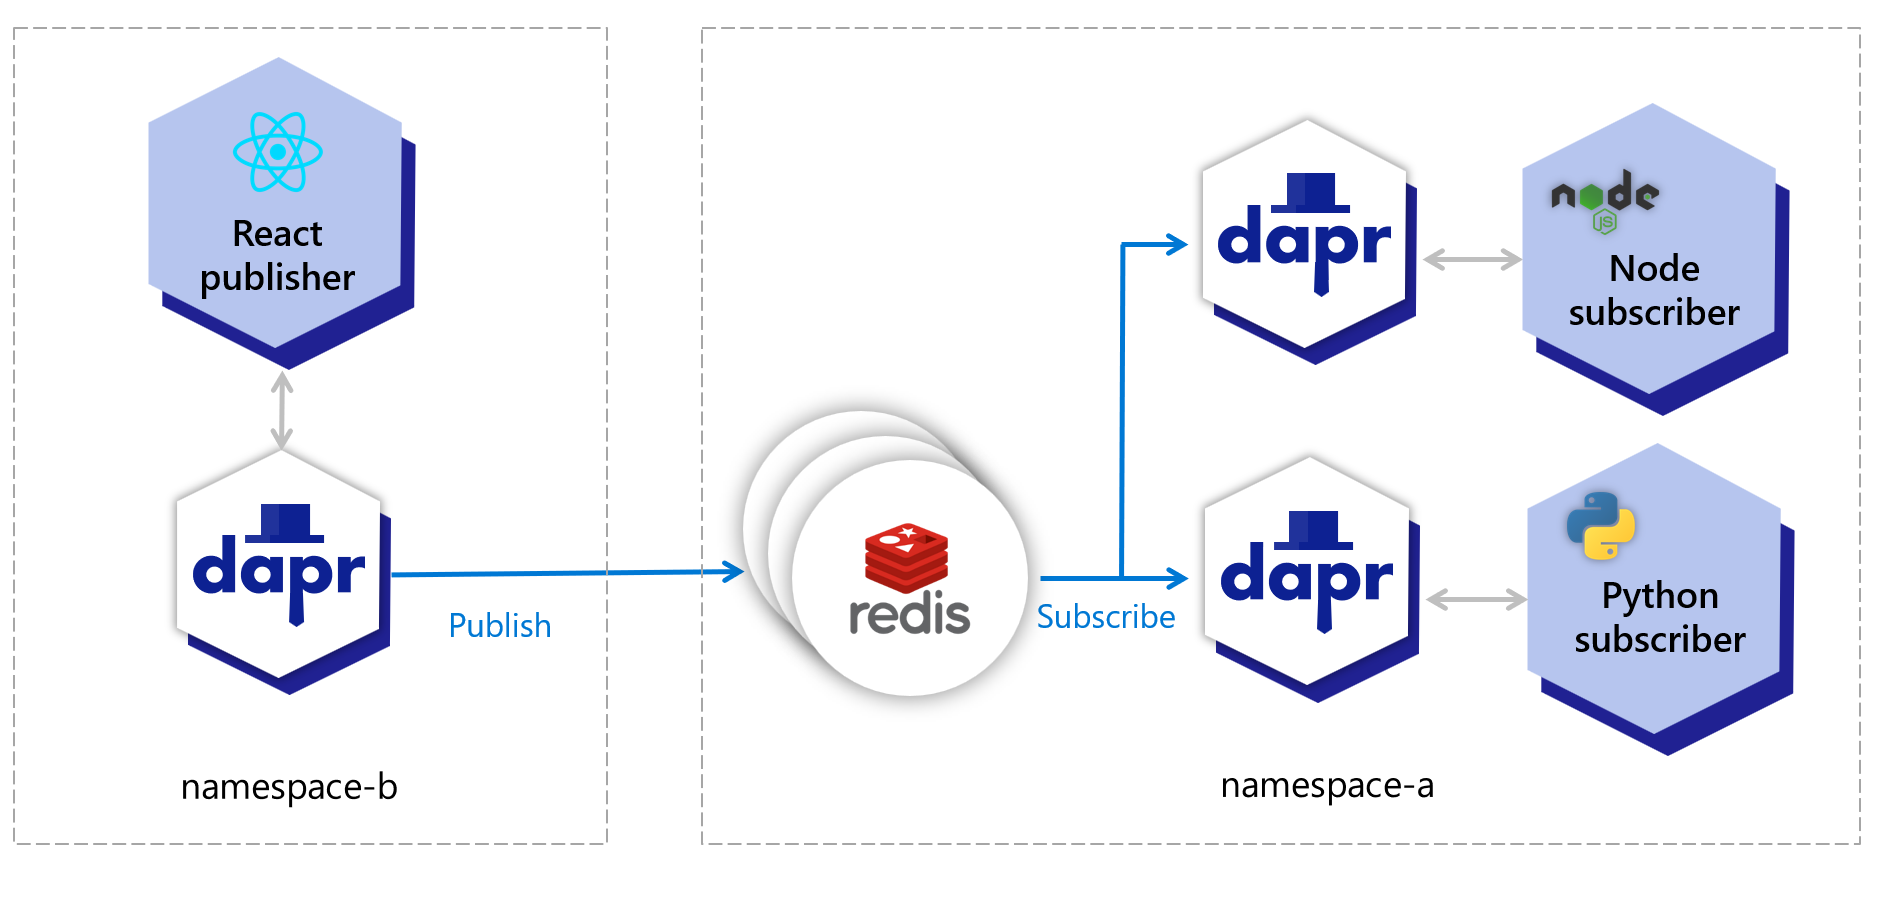
The table below shows which resources are deployed to which namespaces:
| Resource |
namespace-a |
namespace-b |
| Redis master |
✅ |
❌ |
| Redis replicas |
✅ |
❌ |
| Dapr’s PubSub component |
✅ |
✅ |
| Node subscriber |
✅ |
❌ |
| Python subscriber |
✅ |
❌ |
| React UI publisher |
❌ |
✅ |
Pre-requisites
Setup namespace-a
Create namespace and switch kubectl to use it.
kubectl create namespace namespace-a
kubectl config set-context --current --namespace=namespace-a
Install Redis (master and slave) on namespace-a, following these instructions.
Now, configure deploy/redis.yaml, paying attention to the hostname containing namespace-a.
apiVersion: dapr.io/v1alpha1
kind: Component
metadata:
  name: pubsub
spec:
  type: pubsub.redis
  version: v1
  metadata:
  - name: "redisHost"
    value: "redis-master.namespace-a.svc:6379"
  - name: "redisPassword"
    value: "YOUR_PASSWORD"
Deploy resources to namespace-a:
kubectl apply -f deploy/redis.yaml
kubectl apply -f deploy/node-subscriber.yaml
kubectl apply -f deploy/python-subscriber.yaml
Setup namespace-b
Create namespace and switch kubectl to use it.
kubectl create namespace namespace-b
kubectl config set-context --current --namespace=namespace-b
Deploy resources to namespace-b, including the Redis component:
kubectl apply -f deploy/redis.yaml
kubectl apply -f deploy/react-form.yaml
Now, find the IP address for react-form, open it on your browser and publish messages to each topic (A, B and C).
kubectl get service -A
Confirm subscribers received the messages.
Switch back to namespace-a:
kubectl config set-context --current --namespace=namespace-a
Find the POD names:
kubectl get pod # Copy POD names and use in the next commands.
Display logs:
kubectl logs node-subscriber-XYZ node-subscriber
kubectl logs python-subscriber-XYZ python-subscriber
The messages published on the browser should show in the corresponding subscriber’s logs. The Node.js subscriber receives messages of type “A” and “B”, while the Python subscriber receives messages of type “A” and “C”.
Clean up
kubectl delete -f deploy/redis.yaml  --namespace namespace-a
kubectl delete -f deploy/node-subscriber.yaml  --namespace namespace-a
kubectl delete -f deploy/python-subscriber.yaml  --namespace namespace-a
kubectl delete -f deploy/react-form.yaml  --namespace namespace-b
kubectl delete -f deploy/redis.yaml  --namespace namespace-b
kubectl config set-context --current --namespace=default
kubectl delete namespace namespace-a
kubectl delete namespace namespace-b