This is the multi-page printable view of this section. Click here to print.
Managing components in Dapr
- 1: Certification lifecycle
- 2: Updating components
- 3: How-To: Scope components to one or more applications
- 4: How-To: Reference secrets in components
- 5: State stores components
- 6: Pub/Sub brokers
- 7: Secret store components
- 8: Bindings components
- 9: How-To: Register a pluggable component
- 10: Configure middleware components
1 - Certification lifecycle
Note
Certification lifecycle only applies to built-in components and does not apply to pluggable components.Overview
Dapr uses a modular design where functionality is delivered as a component. Each component has an interface definition. All of the components are interchangeable, so that in ideal scenarios, you can swap out one component with the same interface for another. Each component used in production maintains a certain set of technical requirements to ensure functional compatibility and robustness.
In general a component needs to be:
- Compliant with the defined Dapr interfaces
- Functionally correct and robust
- Well documented and maintained
To make sure a component conforms to the standards set by Dapr, there are a set of tests run against a component in a Dapr maintainers managed environment. Once the tests pass consistently, the maturity level can be determined for a component.
Certification levels
The levels are as follows:
Alpha
- The component implements the required interface and works as described in the specification
- The component has documentation
- The component might be buggy or might expose bugs on integration
- The component may not pass all conformance tests
- The component may not have conformance tests
- Recommended for only non-business-critical uses because of potential for incompatible changes in subsequent releases
All components start at the Alpha stage.
Beta
- The component must pass all the component conformance tests defined to satisfy the component specification
- The component conformance tests have been run in a Dapr maintainers managed environment
- The component contains a record of the conformance test result reviewed and approved by Dapr maintainers with specific components-contrib version
- Recommended for only non-business-critical uses because of potential for incompatible changes in subsequent releases
Note
A component may skip the Beta stage and conformance test requirement per the discretion of the Maintainer if:
- The component is a binding
- The certification tests are comprehensive
Stable
- The component must have component certification tests validating functionality and resiliency
- The component is maintained by Dapr maintainers and supported by the community
- The component is well documented and tested
- The component has been available as Alpha or Beta for at least 1 minor version release of Dapr runtime prior
- A maintainer will address component security, core functionality and test issues according to the Dapr support policy and issue a patch release that includes the patched stable component
Note
Stable Dapr components are based on Dapr certification and conformance tests and are not a guarantee of support by any specific vendor, where the vendor’s SDK is used as part of the component.
Dapr component tests guarantee the stability of a component independent of a third party vendor’s declared stability status for any SDKs used. This is because the meaning of stable (for example alpha, beta, stable) can vary for each vendor.
Previous Generally Available (GA) components
Any component that was previously certified as GA is allowed into Stable even if the new requirements are not met.
Conformance tests
Each component in the components-contrib repository needs to adhere to a set of interfaces defined by Dapr. Conformance tests are tests that are run on these component definitions with their associated backing services such that the component is tested to be conformant with the Dapr interface specifications and behavior.
The conformance tests are defined for the following building blocks:
- State store
- Secret store
- Bindings
- Pub/Sub
To understand more about them see the readme here.
Test requirements
- The tests should validate the functional behavior and robustness of component based on the component specification
- All the details needed to reproduce the tests are added as part of the component conformance test documentation
Certification tests
Each stable component in the components-contrib repository must have a certification test plan and automated certification tests validating all features supported by the component via Dapr.
Test plan for stable components should include the following scenarios:
- Client reconnection: in case the client library cannot connect to the service for a moment, Dapr sidecar should not require a restart once the service is back online.
- Authentication options: validate the component can authenticate with all the supported options.
- Validate resource provisioning: validate if the component automatically provisions resources on initialization, if applicable.
- All scenarios relevant to the corresponding building block and component.
The test plan must be approved by a Dapr maintainer and be published in a README.md file along with the component code.
Test requirements
- The tests should validate the functional behavior and robustness of the component based on the component specification, reflecting the scenarios from the test plan
- The tests must run successfully as part of the continuous integration of the components-contrib repository
Component certification process
In order for a component to be certified, tests are run in an environment maintained by the Dapr project.
New component certification: Alpha->Beta
For a new component requiring a certification change from Alpha to Beta, a request for component certification follows these steps:
- Requestor creates an issue in the components-contrib repository for certification of the component with the current and the new certification levels
- Requestor submits a PR to integrate the component with the defined conformance test suite, if not already included
- The user details the environment setup in the issue created, so a Dapr maintainer can setup the service in a managed environment
- After the environment setup is complete, Dapr maintainers review the PR and if approved merges that PR
- Requestor submits a PR in the docs repository, updating the component’s certification level
New component certification: Beta->Stable
For a new component requiring a certification change from Beta to Stable, a request for component certification follows these steps:
- Requestor creates an issue in the components-contrib repository for certification of the component with the current and the new certification levels
- Requestor submits a PR for the test plan as a
README.mdfile in the component’s source code directory- The requestor details the test environment requirements in the created PR, including any manual steps or credentials needed
- A Dapr maintainer reviews the test plan, provides feedback or approves it, and eventually merges the PR
- Requestor submits a PR for the automated certification tests, including scripts to provision resources when applicable
- After the test environment setup is completed and credentials provisioned, Dapr maintainers review the PR and, if approved, merges the PR
- Requestor submits a PR in the docs repository, updating the component’s certification level
2 - Updating components
When making an update to an existing deployed component used by an application, Dapr does not update the component automatically unless the HotReload feature gate is enabled.
The Dapr sidecar needs to be restarted in order to pick up the latest version of the component.
How this is done depends on the hosting environment.
Kubernetes
When running in Kubernetes, the process of updating a component involves two steps:
- Apply the new component YAML to the desired namespace
- Unless the
HotReloadfeature gate is enabled, perform a rollout restart operation on your deployments to pick up the latest component
Self Hosted
Unless the HotReload feature gate is enabled, the process of updating a component involves a single step of stopping and restarting the daprd process to pick up the latest component.
Hot Reloading (Preview Feature)
This feature is currently in preview. Hot reloading is enabled by via the
HotReloadfeature gate.
Dapr can be made to “hot reload” components whereby component updates are picked up automatically without the need to restart the Dapr sidecar process or Kubernetes pod. This means creating, updating, or deleting a component manifest will be reflected in the Dapr sidecar during runtime.
Updating Components
When a component is updated it is first closed, and then re-initialized using the new configuration. This causes the component to be unavailable for a short period of time during this process.Initialization Errors
If the initialization processes errors when a component is created or updated through hot reloading, the Dapr sidecar respects the component field spec.ignoreErrors.
That is, the behaviour is the same as when the sidecar loads components on boot.
spec.ignoreErrors=false(default): the sidecar gracefully shuts down.spec.ignoreErrors=true: the sidecar continues to run with neither the old or new component configuration registered.
All components are supported for hot reloading except for the following types. Any create, update, or deletion of these component types is ignored by the sidecar with a restart required to pick up changes.
Further reading
3 - How-To: Scope components to one or more applications
Dapr components are namespaced (separate from the Kubernetes namespace concept), meaning a Dapr runtime instance can only access components that have been deployed to the same namespace.
When Dapr runs, it matches it’s own configured namespace with the namespace of the components that it loads and initializes only the ones matching its namespaces. All other components in a different namespace are not loaded.
Namespaces
Namespaces can be used to limit component access to particular Dapr instances.
In self hosted mode, a developer can specify the namespace to a Dapr instance by setting the NAMESPACE environment variable.
If the NAMESPACE environment variable is set, Dapr does not load any component that does not specify the same namespace in its metadata.
For example given this component in the production namespace
apiVersion: dapr.io/v1alpha1
kind: Component
metadata:
  name: statestore
  namespace: production
spec:
  type: state.redis
  version: v1
  metadata:
  - name: redisHost
    value: redis-master:6379
To tell Dapr which namespace it is deployed to, set the environment variable:
MacOS/Linux:
export NAMESPACE=production
# run Dapr as usual
Windows:
setx NAMESPACE "production"
# run Dapr as usual
Let’s consider the following component in Kubernetes:
apiVersion: dapr.io/v1alpha1
kind: Component
metadata:
  name: statestore
  namespace: production
spec:
  type: state.redis
  version: v1
  metadata:
  - name: redisHost
    value: redis-master:6379
In this example, the Redis component is only accessible to Dapr instances running inside the production namespace.
Note
The component YAML applied to namespace “A” can reference the implementation in namespace “B”. For example, a component YAML for Redis in namespace “production-A” can point the Redis host address to the Redis instance deployed in namespace “production-B”.
See Configure Pub/Sub components with multiple namespaces for an example.
Application access to components with scopes
Developers and operators might want to limit access to one database from a certain application, or a specific set of applications.
To achieve this, Dapr allows you to specify scopes on the component YAML. Application scopes added to a component limit only the applications with specific IDs from using the component.
The following example shows how to give access to two Dapr enabled apps, with the app IDs of app1 and app2 to the Redis component named statestore which itself is in the production namespace
apiVersion: dapr.io/v1alpha1
kind: Component
metadata:
  name: statestore
  namespace: production
spec:
  type: state.redis
  version: v1
  metadata:
  - name: redisHost
    value: redis-master:6379
scopes:
- app1
- app2
Community call demo
Using namespaces with service invocation
Read Service invocation across namespaces for more information on using namespaces when calling between services.
Using namespaces with pub/sub
Read Configure Pub/Sub components with multiple namespaces for more information on using namespaces with pub/sub.
Related links
4 - How-To: Reference secrets in components
Overview
Components can reference secrets for the spec.metadata section within the components definition.
In order to reference a secret, you need to set the auth.secretStore field to specify the name of the secret store that holds the secrets.
When running in Kubernetes, if the auth.secretStore is empty, the Kubernetes secret store is assumed.
Supported secret stores
Go to this link to see all the secret stores supported by Dapr, along with information on how to configure and use them.
Referencing secrets
While you have the option to use plain text secrets (like MyPassword), as shown in the yaml below for the value of redisPassword, this is not recommended for production:
apiVersion: dapr.io/v1alpha1
kind: Component
metadata:
  name: statestore
spec:
  type: state.redis
  version: v1
  metadata:
  - name: redisHost
    value: localhost:6379
  - name: redisPassword
    value: MyPassword
Instead create the secret in your secret store and reference it in the component definition. There are two cases for this shown below – the “Secret contains an embedded key” and the “Secret is a string”.
The “Secret contains an embedded key” case applies when there is a key embedded within the secret, i.e. the secret is not an entire connection string. This is shown in the following component definition yaml.
apiVersion: dapr.io/v1alpha1
kind: Component
metadata:
  name: statestore
spec:
  type: state.redis
  version: v1
  metadata:
  - name: redisHost
    value: localhost:6379
  - name: redisPassword
    secretKeyRef:
      name: redis-secret
      key:  redis-password
auth:
  secretStore: <SECRET_STORE_NAME>
SECRET_STORE_NAME is the name of the configured secret store component. When running in Kubernetes and using a Kubernetes secret store, the field auth.SecretStore defaults to kubernetes and can be left empty.
The above component definition tells Dapr to extract a secret named redis-secret from the defined secretStore and assign the value associated with the redis-password key embedded in the secret to the redisPassword field in the component. One use of this case is when your code is constructing a connection string, for example putting together a URL, a secret, plus other information as necessary, into a string.
On the other hand, the below “Secret is a string” case applies when there is NOT a key embedded in the secret. Rather, the secret is just a string. Therefore, in the secretKeyRef section both the secret name and the secret key will be identical. This is the case when the secret itself is an entire connection string with no embedded key whose value needs to be extracted. Typically a connection string consists of connection information, some sort of secret to allow connection, plus perhaps other information and does not require a separate “secret”. This case is shown in the below component definition yaml.
apiVersion: dapr.io/v1alpha1
kind: Component
metadata:
  name: servicec-inputq-azkvsecret-asbqueue
spec:
  type: bindings.azure.servicebusqueues
  version: v1
  metadata:
  - name: connectionString
    secretKeyRef:
      name: asbNsConnString
      key: asbNsConnString
  - name: queueName
    value: servicec-inputq
auth:
  secretStore: <SECRET_STORE_NAME>
The above “Secret is a string” case yaml tells Dapr to extract a connection string named asbNsConnstring from the defined secretStore and assign the value to the connectionString field in the component since there is no key embedded in the “secret” from the secretStore because it is a plain string. This requires the secret name and secret key to be identical.
Example
Referencing a Kubernetes secret
The following example shows you how to create a Kubernetes secret to hold the connection string for an Event Hubs binding.
First, create the Kubernetes secret:
kubectl create secret generic eventhubs-secret --from-literal=connectionString=*********Next, reference the secret in your binding:
apiVersion: dapr.io/v1alpha1
kind: Component
metadata:
  name: eventhubs
spec:
  type: bindings.azure.eventhubs
  version: v1
  metadata:
  - name: connectionString
    secretKeyRef:
      name: eventhubs-secret
      key: connectionString
Finally, apply the component to the Kubernetes cluster:
kubectl apply -f ./eventhubs.yaml
Scoping access to secrets
Dapr can restrict access to secrets in a secret store using its configuration. Read How To: Use secret scoping and How-To: Limit the secrets that can be read from secret stores for more information. This is the recommended way to limit access to secrets using Dapr.
Kubernetes permissions
Default namespace
When running in Kubernetes, Dapr, during installation, defines default Role and RoleBinding for secrets access from Kubernetes secret store in the default namespace. For Dapr enabled apps that fetch secrets from default namespace, a secret can be defined and referenced in components as shown in the example above.
Non-default namespaces
If your Dapr enabled apps are using components that fetch secrets from non-default namespaces, apply the following resources to that namespace:
---
apiVersion: rbac.authorization.k8s.io/v1
kind: Role
metadata:
  name: secret-reader
  namespace: <NAMESPACE>
rules:
- apiGroups: [""]
  resources: ["secrets"]
  verbs: ["get", "list"]
---

kind: RoleBinding
apiVersion: rbac.authorization.k8s.io/v1
metadata:
  name: dapr-secret-reader
  namespace: <NAMESPACE>
subjects:
- kind: ServiceAccount
  name: default
roleRef:
  kind: Role
  name: secret-reader
  apiGroup: rbac.authorization.k8s.io
These resources grant Dapr permissions to get secrets from the Kubernetes secret store for the namespace defined in the Role and RoleBinding.
Note
In production scenario to limit Dapr’s access to certain secret resources alone, you can use theresourceNames field. See this link for further explanation.Related links
5 - State stores components
Dapr integrates with existing databases to provide apps with state management capabilities for CRUD operations, transactions and more. It also supports the configuration of multiple, named, state store components per application.
State stores are extensible and can be found in the components-contrib repo.
A state store in Dapr is described using a Component file:
apiVersion: dapr.io/v1alpha1
kind: Component
metadata:
  name: statestore
spec:
  type: state.<DATABASE>
  version: v1
  metadata:
  - name: <KEY>
    value: <VALUE>
  - name: <KEY>
    value: <VALUE>
...
The type of database is determined by the type field, and things like connection strings and other metadata are put in the .metadata section.
Even though metadata values can contain secrets in plain text, it is recommended you use a secret store.
Visit this guide on how to configure a state store component.
Supported state stores
Visit this reference to see all of the supported state stores in Dapr.
Related topics
6 - Pub/Sub brokers
Dapr integrates with pub/sub message buses to provide applications with the ability to create event-driven, loosely coupled architectures where producers send events to consumers via topics.
Dapr supports the configuration of multiple, named, pub/sub components per application. Each pub/sub component has a name and this name is used when publishing a message topic. Read the API reference for details on how to publish and subscribe to topics.
Pub/sub components are extensible. A list of support pub/sub components is here and the implementations can be found in the components-contrib repo.
Component files
A pub/sub is described using a Component file:
apiVersion: dapr.io/v1alpha1
kind: Component
metadata:
  name: pubsub
  namespace: default
spec:
  type: pubsub.<NAME>
  version: v1
  metadata:
  - name: <KEY>
    value: <VALUE>
  - name: <KEY>
    value: <VALUE>
...
The type of pub/sub is determined by the type field, and properties such as connection strings and other metadata are put in the .metadata section.
Even though metadata values can contain secrets in plain text, it is recommended you use a secret store using a secretKeyRef.
Topic creation
Depending on the pub/sub message bus you are using and how it is configured, topics may be created automatically. Even if the message bus supports automatic topic creation, it is a common governance practice to disable it in production environments. You may still need to use a CLI, admin console, or request form to manually create the topics required by your application.While all pub/sub components support consumerID metadata, the runtime creates a consumer ID if you do not supply one. All component metadata field values can carry templated metadata values, which are resolved on Dapr sidecar startup.
For example, you can choose to use {namespace} as the consumerGroup to enable using the same appId in different namespaces using the same topics as described in this article.
Visit this guide for instructions on configuring and using pub/sub components.
Related links
- Overview of the Dapr Pub/Sub building block
- Try the Pub/Sub quickstart sample
- Read the guide on publishing and subscribing
- Learn about topic scoping
- Learn about message time-to-live
- Learn how to configure Pub/Sub components with multiple namespaces
- List of pub/sub components
- Read the API reference
6.1 - HowTo: Configure Pub/Sub components with multiple namespaces
In some scenarios, applications can be spread across namespaces and share a queue or topic via PubSub. In this case, the PubSub component must be provisioned on each namespace.
Note
Namespaces are a Dapr concept used for scoping applications and components. This example uses Kubernetes namespaces, however the Dapr component namespace scoping can be used on any supported platform. Read How-To: Scope components to one or more applications for more information on scoping components.This example uses the PubSub sample. The Redis installation and the subscribers are in namespace-a while the publisher UI is in namespace-b. This solution will also work if Redis is installed on another namespace or if you use a managed cloud service like Azure ServiceBus, AWS SNS/SQS or GCP PubSub.
This is a diagram of the example using namespaces.
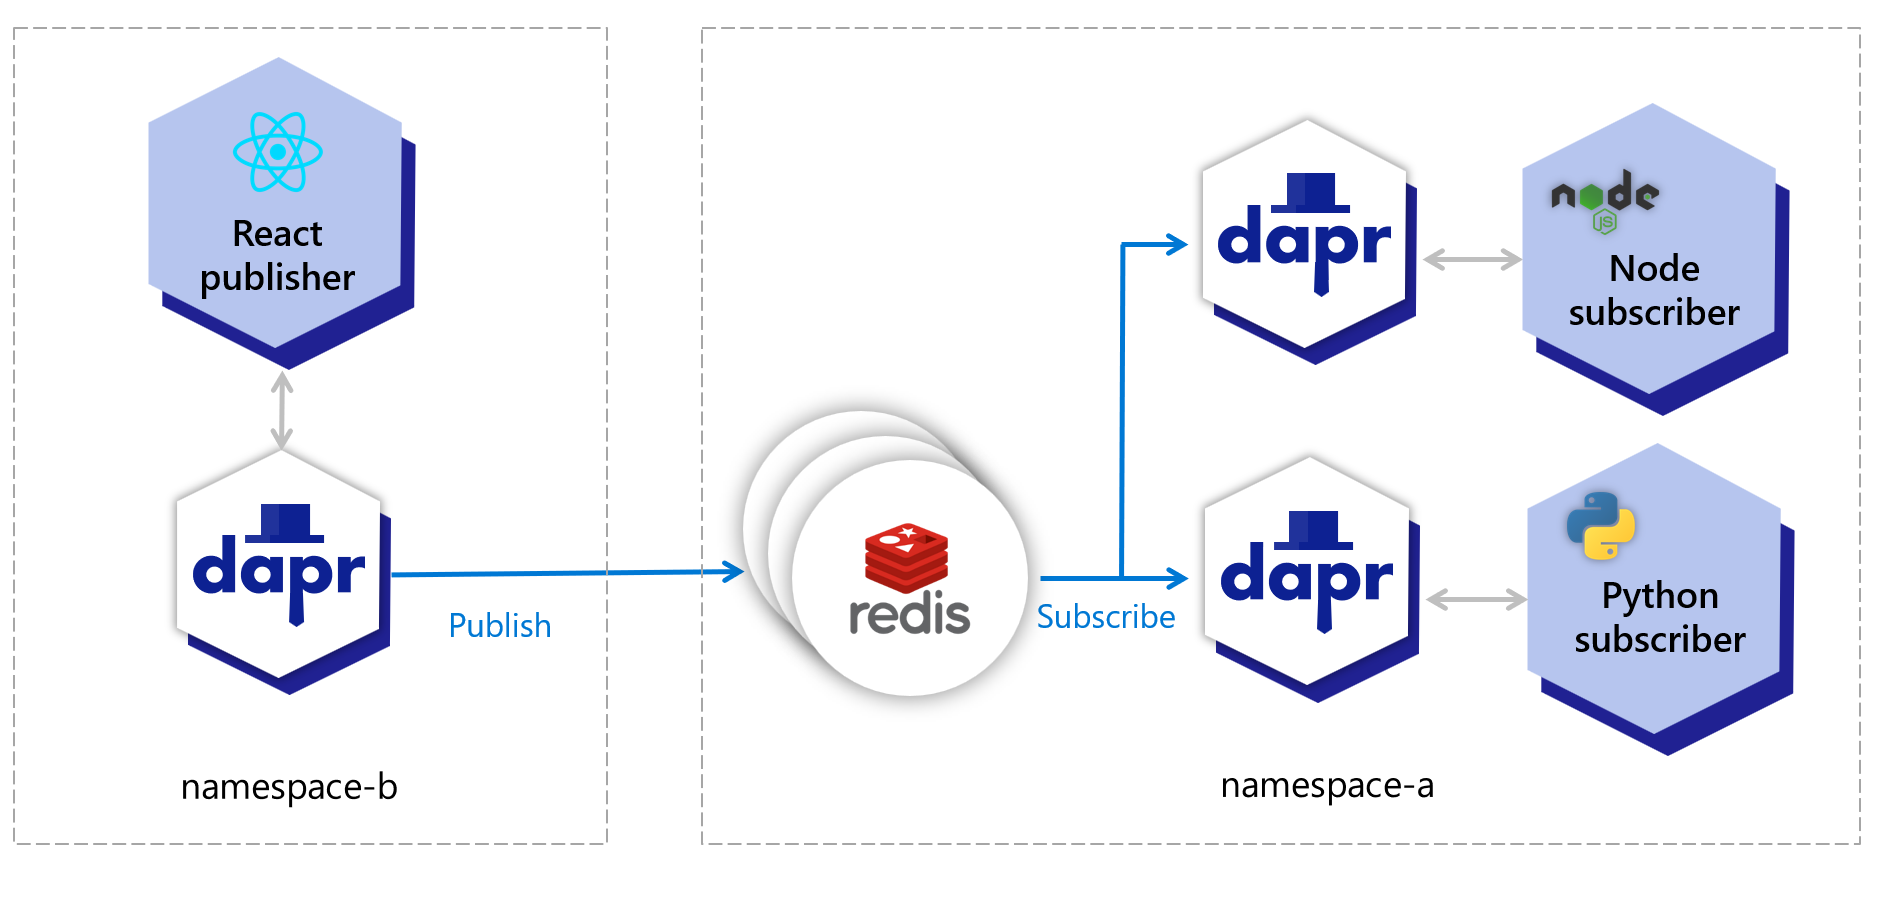
The table below shows which resources are deployed to which namespaces:
| Resource | namespace-a | namespace-b |
|---|---|---|
| Redis master | ✅ | ❌ |
| Redis replicas | ✅ | ❌ |
| Dapr’s PubSub component | ✅ | ✅ |
| Node subscriber | ✅ | ❌ |
| Python subscriber | ✅ | ❌ |
| React UI publisher | ❌ | ✅ |
Note
All pub/sub components support limiting pub/sub topics to specific applications using namespace or component scopes.Pre-requisites
- Dapr installed on Kubernetes in any namespace since Dapr works at the cluster level.
- Checkout and cd into the directory for PubSub quickstart.
Setup namespace-a
Create namespace and switch kubectl to use it.
kubectl create namespace namespace-a
kubectl config set-context --current --namespace=namespace-a
Install Redis (master and slave) on namespace-a, following these instructions.
Now, configure deploy/redis.yaml, paying attention to the hostname containing namespace-a.
apiVersion: dapr.io/v1alpha1
kind: Component
metadata:
  name: pubsub
spec:
  type: pubsub.redis
  version: v1
  metadata:
  - name: "redisHost"
    value: "redis-master.namespace-a.svc:6379"
  - name: "redisPassword"
    value: "YOUR_PASSWORD"
Deploy resources to namespace-a:
kubectl apply -f deploy/redis.yaml
kubectl apply -f deploy/node-subscriber.yaml
kubectl apply -f deploy/python-subscriber.yaml
Setup namespace-b
Create namespace and switch kubectl to use it.
kubectl create namespace namespace-b
kubectl config set-context --current --namespace=namespace-b
Deploy resources to namespace-b, including the Redis component:
kubectl apply -f deploy/redis.yaml
kubectl apply -f deploy/react-form.yaml
Now, find the IP address for react-form, open it on your browser and publish messages to each topic (A, B and C).
kubectl get service -A
Confirm subscribers received the messages.
Switch back to namespace-a:
kubectl config set-context --current --namespace=namespace-a
Find the POD names:
kubectl get pod # Copy POD names and use in the next commands.
Display logs:
kubectl logs node-subscriber-XYZ node-subscriber
kubectl logs python-subscriber-XYZ python-subscriber
The messages published on the browser should show in the corresponding subscriber’s logs. The Node.js subscriber receives messages of type “A” and “B”, while the Python subscriber receives messages of type “A” and “C”.
Clean up
kubectl delete -f deploy/redis.yaml  --namespace namespace-a
kubectl delete -f deploy/node-subscriber.yaml  --namespace namespace-a
kubectl delete -f deploy/python-subscriber.yaml  --namespace namespace-a
kubectl delete -f deploy/react-form.yaml  --namespace namespace-b
kubectl delete -f deploy/redis.yaml  --namespace namespace-b
kubectl config set-context --current --namespace=default
kubectl delete namespace namespace-a
kubectl delete namespace namespace-b
Related links
7 - Secret store components
Dapr integrates with secret stores to provide apps and other components with secure storage and access to secrets such as access keys and passwords. Each secret store component has a name and this name is used when accessing a secret.
As with other building block components, secret store components are extensible and can be found in the components-contrib repo.
A secret store in Dapr is described using a Component file with the following fields:
apiVersion: dapr.io/v1alpha1
kind: Component
metadata:
  name: secretstore
spec:
  type: secretstores.<NAME>
  version: v1
  metadata:
  - name: <KEY>
    value: <VALUE>
  - name: <KEY>
    value: <VALUE>
...
The type of secret store is determined by the type field, and things like connection strings and other metadata are put in the .metadata section.
Different supported secret stores will have different specific fields that would need to be configured. For example, when configuring a secret store which uses AWS Secrets Manager the file would look like this:
apiVersion: dapr.io/v1alpha1
kind: Component
metadata:
  name: awssecretmanager
spec:
  type: secretstores.aws.secretmanager
  version: v1
  metadata:
  - name: region
    value: "[aws_region]"
  - name: accessKey
    value: "[aws_access_key]"
  - name: secretKey
    value: "[aws_secret_key]"
  - name: sessionToken
    value: "[aws_session_token]"
Important
When running the Dapr sidecar (daprd) with your application on EKS (AWS Kubernetes), if you’re using a node/pod that has already been attached to an IAM policy defining access to AWS resources, you must not provide AWS access-key, secret-key, and tokens in the definition of the component spec you’re using.Apply the configuration
Once you have created the component’s YAML file, follow these instructions to apply it based on your hosting environment:
To run locally, create a components dir containing the YAML file and provide the path to the dapr run command with the flag --resources-path.
To deploy in Kubernetes, assuming your component file is named secret-store.yaml, run:
kubectl apply -f secret-store.yaml
Supported secret stores
Visit the secret stores reference for a full list of supported secret stores.
Related links
8 - Bindings components
Dapr integrates with external resources to allow apps to both be triggered by external events and interact with the resources. Each binding component has a name and this name is used when interacting with the resource.
As with other building block components, binding components are extensible and can be found in the components-contrib repo.
A binding in Dapr is described using a Component file with the following fields:
apiVersion: dapr.io/v1alpha1
kind: Component
metadata:
  name: <NAME>
  namespace: <NAMESPACE>
spec:
  type: bindings.<NAME>
  version: v1
  metadata:
  - name: <KEY>
    value: <VALUE>
  - name: <KEY>
    value: <VALUE>
...
The type of binding is determined by the type field, and things like connection strings and other metadata are put in the .metadata section.
Different supported bindings will have different specific fields that would need to be configured. For example, when configuring a binding for Azure Blob Storage, the file would look like this:
apiVersion: dapr.io/v1alpha1
kind: Component
metadata:
  name: <NAME>
spec:
  type: bindings.azure.blobstorage
  version: v1
  metadata:
  - name: storageAccount
    value: myStorageAccountName
  - name: storageAccessKey
    value: ***********
  - name: container
    value: container1
  - name: decodeBase64
    value: <bool>
  - name: getBlobRetryCount
    value: <integer>
Apply the configuration
Once you have created the component’s YAML file, follow these instructions to apply it based on your hosting environment:
To run locally, create a components dir containing the YAML file and provide the path to the dapr run command with the flag --resources-path.
To deploy in Kubernetes, assuming your component file is named mybinding.yaml, run:
kubectl apply -f mybinding.yaml
Supported bindings
Visit the bindings reference for a full list of supported resources.
Related links
9 - How-To: Register a pluggable component
Component registration process
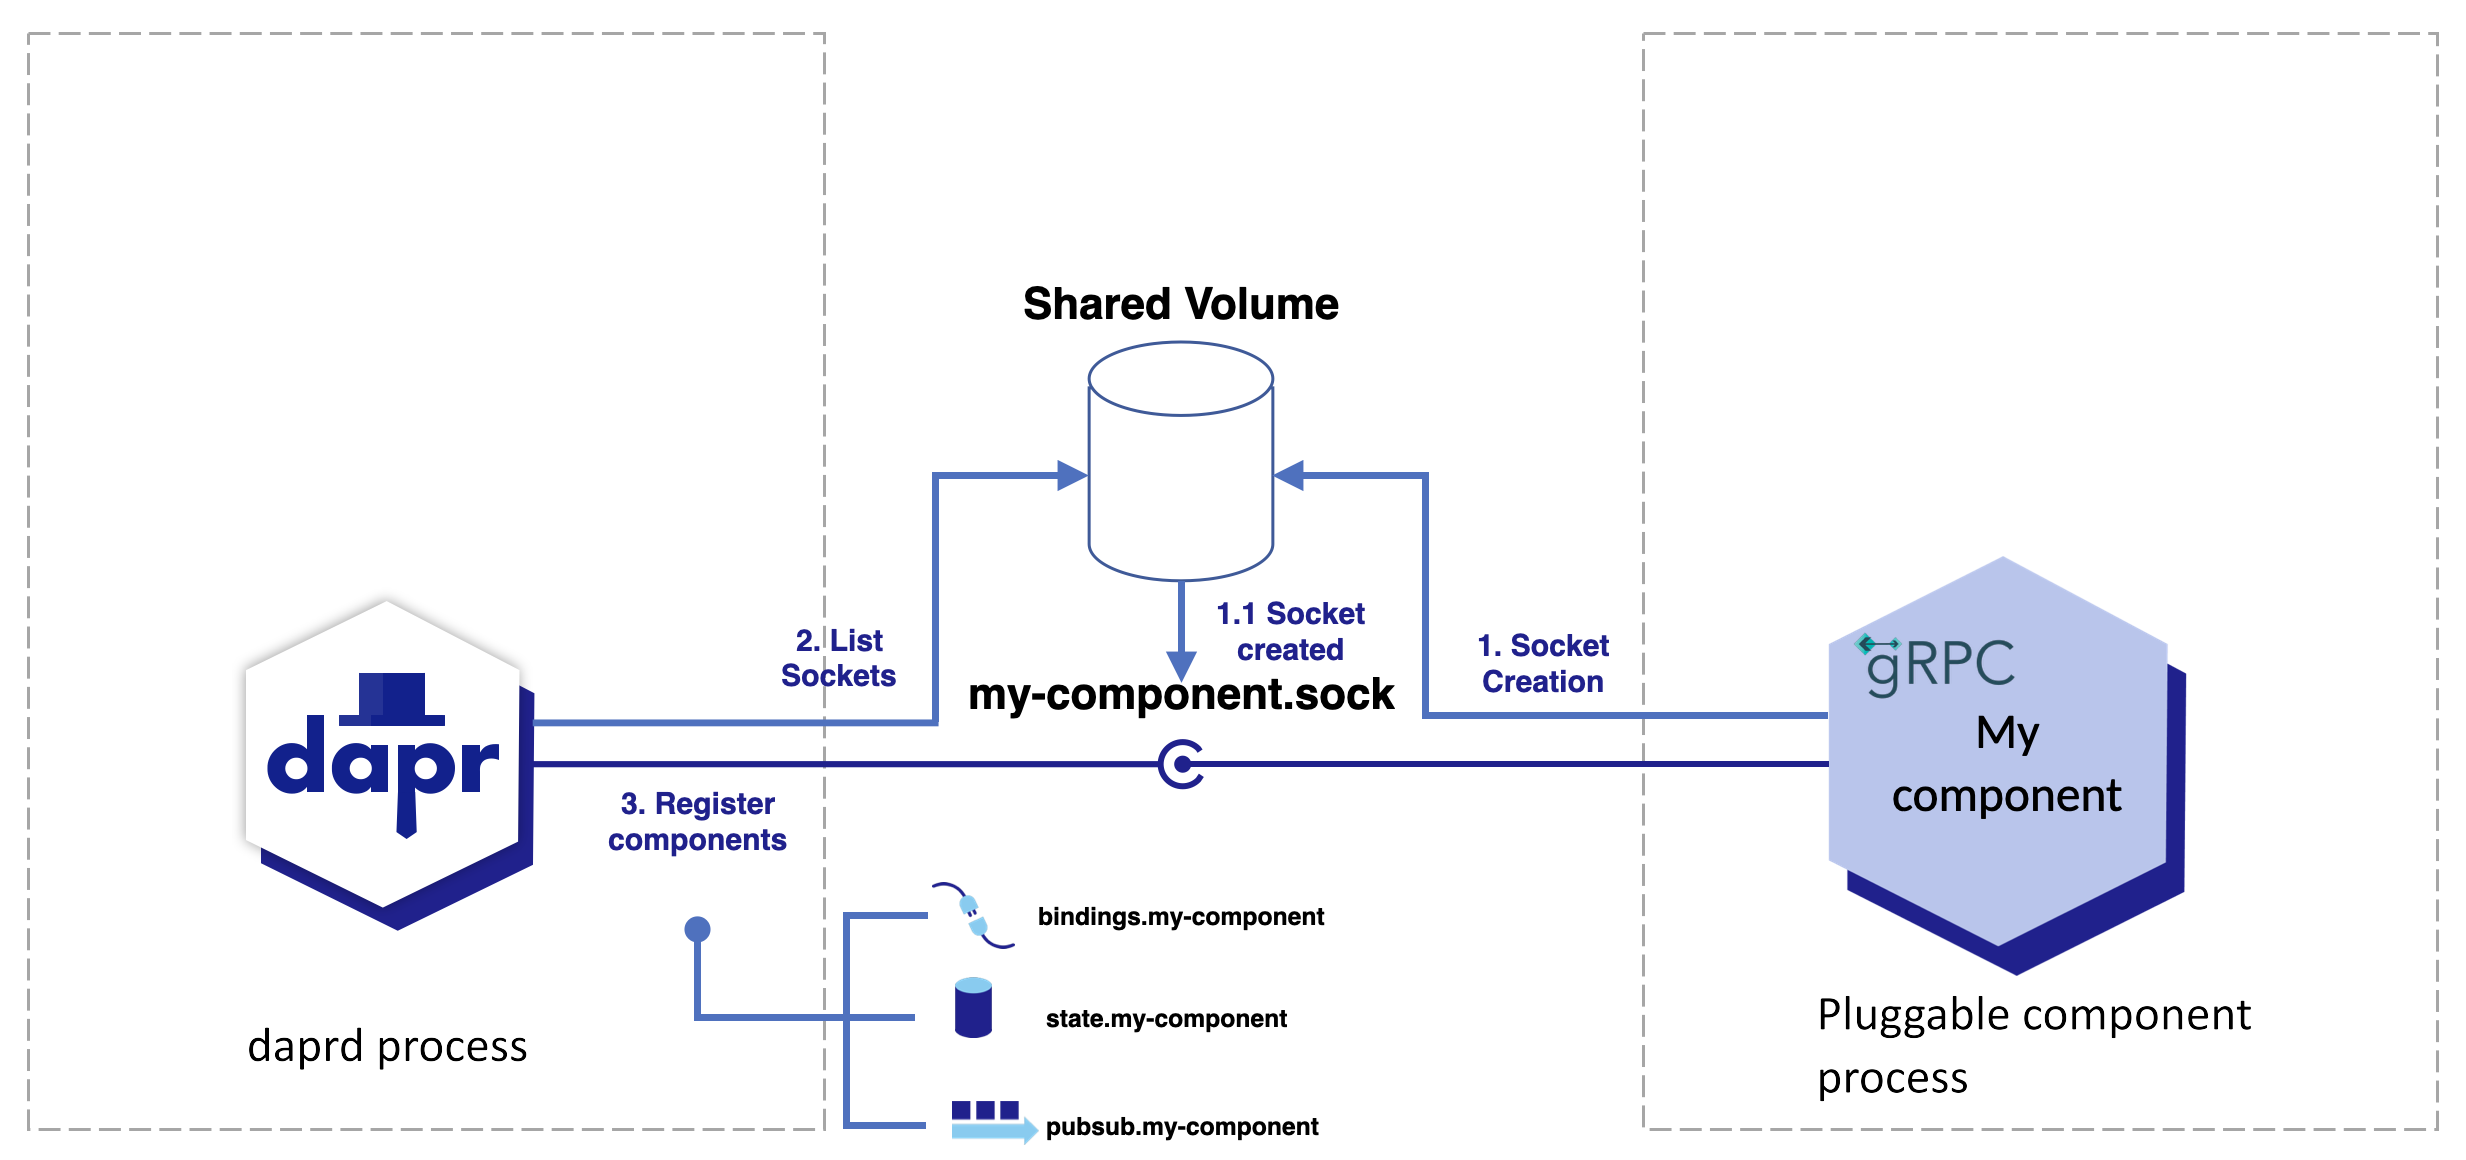
Pluggable, gRPC-based components are typically run as containers or processes that need to communicate with the Dapr runtime via Unix Domain Sockets (or UDS for short). They are automatically discovered and registered in the runtime with the following steps:
- The component listens to an Unix Domain Socket placed on the shared volume.
- The Dapr runtime lists all Unix Domain Socket in the shared volume.
- The Dapr runtime connects with each socket and uses gRPC reflection to discover all proto services from a given building block API that the component implements.
A single component can implement multiple component interfaces at once.
While Dapr’s built-in components come included with the runtime, pluggable components require a few setup steps before they can be used with Dapr.
- Pluggable components need to be started and ready to take requests before Dapr itself is started.
- The Unix Domain Socket file used for the pluggable component communication need to be made accessible to both Dapr and pluggable component.
In standalone mode, pluggable components run as processes or containers. On Kubernetes, pluggable components run as containers and are automatically injected to the application’s pod by Dapr’s sidecar injector, allowing customization via the standard Kubernetes Container spec.
This also changes the approach to share Unix Domain Socket files between Dapr and pluggable components.
Note
As a prerequisite the operating system must supports Unix Domain Sockets, any UNIX or UNIX-like system (Mac, Linux, or for local development WSL for Windows users) should be sufficient.Select your environment to begin making your component discoverable.
Run the component
Both your component and the Unix Socket must be running before Dapr starts.
By default, Dapr sidecar looks for components as Unix Domain Socket files in /tmp/dapr-components-sockets.
Filenames in this folder are significant for component registration. They must be formed by appending the component’s name with a file extension of your choice, more commonly .sock. For example, the filename my-component.sock is a valid Unix Domain Socket file name for a component named my-component.
Since you are running Dapr in the same host as the component, verify that this folder and the files within it are accessible and writable by both your component and Dapr. If you are using Dapr’s sidecar injector capability, this volume is created and mounted automatically.
Component discovery and multiplexing
A pluggable component accessible through a Unix Domain Socket (UDS) can host multiple distinct component APIs. During the components’ initial discovery process, Dapr uses reflection to enumerate all the component APIs behind a UDS. The my-component pluggable component in the example above can contain both state store (state) and a pub/sub (pubsub) component APIs.
Typically, a pluggable component implements a single component API for packaging and deployment. However, at the expense of increasing its dependencies and broadening its security attack surface, a pluggable component can have multiple component APIs implemented. This could be done to ease the deployment and monitoring burden. Best practice for isolation, fault tolerance, and security is a single component API implementation for each pluggable component.
Define the component
Define your component using a component spec. Your component’s spec.type value is made by concatenating the following 2 parts with a .:
- The component’s API (
state,pubsub,bindingsetc) - The component’s name, which is derived from the Unix Domain Socket filename, without the file extension.
You will need to define one component spec for each API exposed by your pluggable component’s Unix Domain Socket. The Unix Domain Socket my-component.sock from the previous example exposes a pluggable component named my-component with both a state and a pubsub API. Two components specs, each in their own YAML file, placed in the resources-path, will be required: one for state.my-component and another for pubsub.my-component.
For instance, the component spec for state.my-component could be:
apiVersion: dapr.io/v1alpha1
kind: Component
metadata:
  name: my-production-state-store
spec:
  type: state.my-component
  version: v1
  metadata:
In the sample above, notice the following:
- The contents of the field
spec.typeisstate.my-component, referring to a state store being exposed as a pluggable component namedmy-component. - The field
metadata.name, which is the name of the state store being defined here, is not related to the pluggable component name.
Save this file as component.yaml in Dapr’s component configuration folder. Just like the contents of metadata.name field, the filename for this YAML file has no impact and does not depend on the pluggable component name.
Run Dapr
Initialize Dapr, and make sure that your component file is placed in the right folder.
Note
Dapr 1.9.0 is the minimum version that supports pluggable components. As of version 1.11.0, automatic injection of the containers is supported for pluggable components.
That’s it! Now you’re able to call the state store APIs via Dapr API. See it in action by running the following. Replace $PORT with the Dapr HTTP port:
curl -X POST -H "Content-Type: application/json" -d '[{ "key": "name", "value": "Bruce Wayne", "metadata": {}}]' http://localhost:$PORT/v1.0/state/prod-mystore
Retrieve the value, replacing $PORT with the Dapr HTTP port:
curl http://localhost:$PORT/v1.0/state/prod-mystore/name
Build and publish a container for your pluggable component
Make sure your component is running as a container, published first and accessible to your Kubernetes cluster.
Deploy Dapr on a Kubernetes cluster
Follow the steps provided in the Deploy Dapr on a Kubernetes cluster docs.
Add the pluggable component container in your deployments
Pluggable components are deployed as containers in the same pod as your application.
Since pluggable components are backed by Unix Domain Sockets, make the socket created by your pluggable component accessible by Dapr runtime. Configure the deployment spec to:
- Mount volumes
- Hint to Dapr the mounted Unix socket volume location
- Attach volume to your pluggable component container
In the following example, your configured pluggable component is deployed as a container within the same pod as your application container.
apiVersion: apps/v1
kind: Deployment
metadata:
  name: app
  labels:
    app: app
spec:
  replicas: 1
  selector:
    matchLabels:
      app: app
  template:
    metadata:
      labels:
        app: app
      annotations:
        # Recommended to automatically inject pluggable components.
        dapr.io/inject-pluggable-components: "true"
        dapr.io/app-id: "my-app"
        dapr.io/enabled: "true"
    spec:
      containers:
      # Your application's container spec, as usual.
        - name: app
           image: YOUR_APP_IMAGE:YOUR_APP_IMAGE_VERSION
The dapr.io/inject-pluggable-components annotation is recommended to be set to “true”, indicating Dapr’s sidecar injector that this application’s pod will have additional containers for pluggable components.
Alternatively, you can skip Dapr’s sidecar injection capability and manually add the pluggable component’s container and annotate your pod, telling Dapr which containers within that pod are pluggable components, like in the example below:
apiVersion: apps/v1
kind: Deployment
metadata:
  name: app
  labels:
    app: app
spec:
  replicas: 1
  selector:
    matchLabels:
      app: app
  template:
    metadata:
      labels:
        app: app
      annotations:
        dapr.io/pluggable-components: "component" ## the name of the pluggable component container separated by `,`, e.g "componentA,componentB".
        dapr.io/app-id: "my-app"
        dapr.io/enabled: "true"
    spec:
      containers:
      ### --------------------- YOUR APPLICATION CONTAINER GOES HERE -----------
        - name: app
           image: YOUR_APP_IMAGE:YOUR_APP_IMAGE_VERSION
      ### --------------------- YOUR PLUGGABLE COMPONENT CONTAINER GOES HERE -----------
        - name: component
          image: YOUR_IMAGE_GOES_HERE:YOUR_IMAGE_VERSION
Before applying the deployment, let’s add one more configuration: the component spec.
Define a component
Pluggable components are defined using a component spec. The component type is derived from the socket name (without the file extension). In the following example YAML, replace:
your_socket_goes_herewith your component socket name (no extension)your_component_typewith your component type
apiVersion: dapr.io/v1alpha1
kind: Component
metadata:
  name: prod-mystore
  # When running on Kubernetes and automatic container injection, add annotation below:
  annotations:
    dapr.io/component-container: >
      {
        "name": "my-component",
        "image": "<registry>/<image_name>:<image_tag>"
      }
spec:
  type: your_component_type.your_socket_goes_here
  version: v1
  metadata:
scopes:
  - backend
The dapr.io/component-container annotation is mandatory on Kubernetes when you want Dapr’s sidecar injector to handle the container and volume injection for the pluggable component. At minimum, you’ll need the name and image attributes for the Dapr’s sidecar injector to successfully add the container to the Application’s pod. Volume for Unix Domain Socket is automatically created and mounted by Dapr’s sidecar injector.
Scope your component to make sure that only the target application can connect with the pluggable component, since it will only be running in its deployment. Otherwise the runtime fails when initializing the component.
That’s it! Apply the created manifests to your Kubernetes cluster, and call the state store APIs via Dapr API.
Use Kubernetes pod forwarder to access the daprd runtime.
See it in action by running the following. Replace $PORT with the Dapr HTTP port:
curl -X POST -H "Content-Type: application/json" -d '[{ "key": "name", "value": "Bruce Wayne", "metadata": {}}]' http://localhost:$PORT/v1.0/state/prod-mystore
Retrieve the value, replacing $PORT with the Dapr HTTP port:
curl http://localhost:$PORT/v1.0/state/prod-mystore/name
Next Steps
Get started with developing .NET pluggable component using this sample code
10 - Configure middleware components
Dapr allows custom processing pipelines to be defined by chaining a series of middleware components. There are two places that you can use a middleware pipeline:
- Building block APIs - HTTP middleware components are executed when invoking any Dapr HTTP APIs.
- Service-to-Service invocation - HTTP middleware components are applied to service-to-service invocation calls.
Configure API middleware pipelines
When launched, a Dapr sidecar constructs a middleware processing pipeline for incoming HTTP calls. By default, the pipeline consists of the tracing and CORS middlewares. Additional middlewares, configured by a Dapr Configuration, can be added to the pipeline in the order they are defined. The pipeline applies to all Dapr API endpoints, including state, pub/sub, service invocation, bindings, secrets, configuration, distributed lock, etc.
A request goes through all the defined middleware components before it’s routed to user code, and then goes through the defined middleware, in reverse order, before it’s returned to the client, as shown in the following diagram.
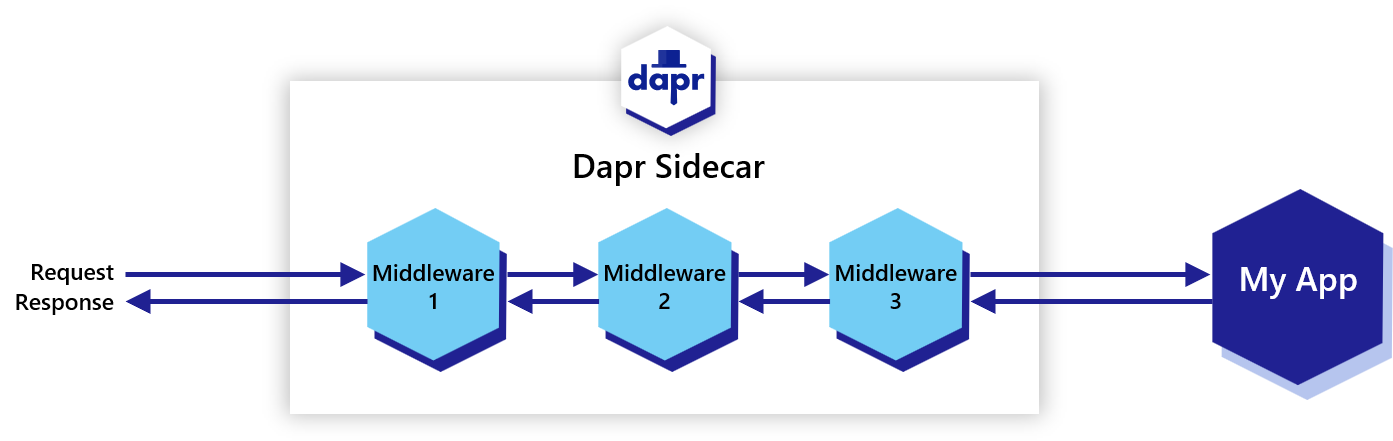
HTTP middleware components are executed when invoking Dapr HTTP APIs using the httpPipeline configuration.
The following configuration example defines a custom pipeline that uses an OAuth 2.0 middleware and an uppercase middleware component. In this case, all requests are authorized through the OAuth 2.0 protocol, and transformed to uppercase text, before they are forwarded to user code.
apiVersion: dapr.io/v1alpha1
kind: Configuration
metadata:
  name: pipeline
  namespace: default
spec:
  httpPipeline:
    handlers:
      - name: oauth2
        type: middleware.http.oauth2
      - name: uppercase
        type: middleware.http.uppercase
As with other components, middleware components can be found in the supported Middleware reference and in the dapr/components-contrib repo.
Configure app middleware pipelines
You can also use any middleware component when making service-to-service invocation calls. For example, to add token validation in a zero-trust environment, to transform a request for a specific app endpoint, or to apply OAuth policies.
Service-to-service invocation middleware components apply to all outgoing calls from a Dapr sidecar to the receiving application (service), as shown in the diagram below.
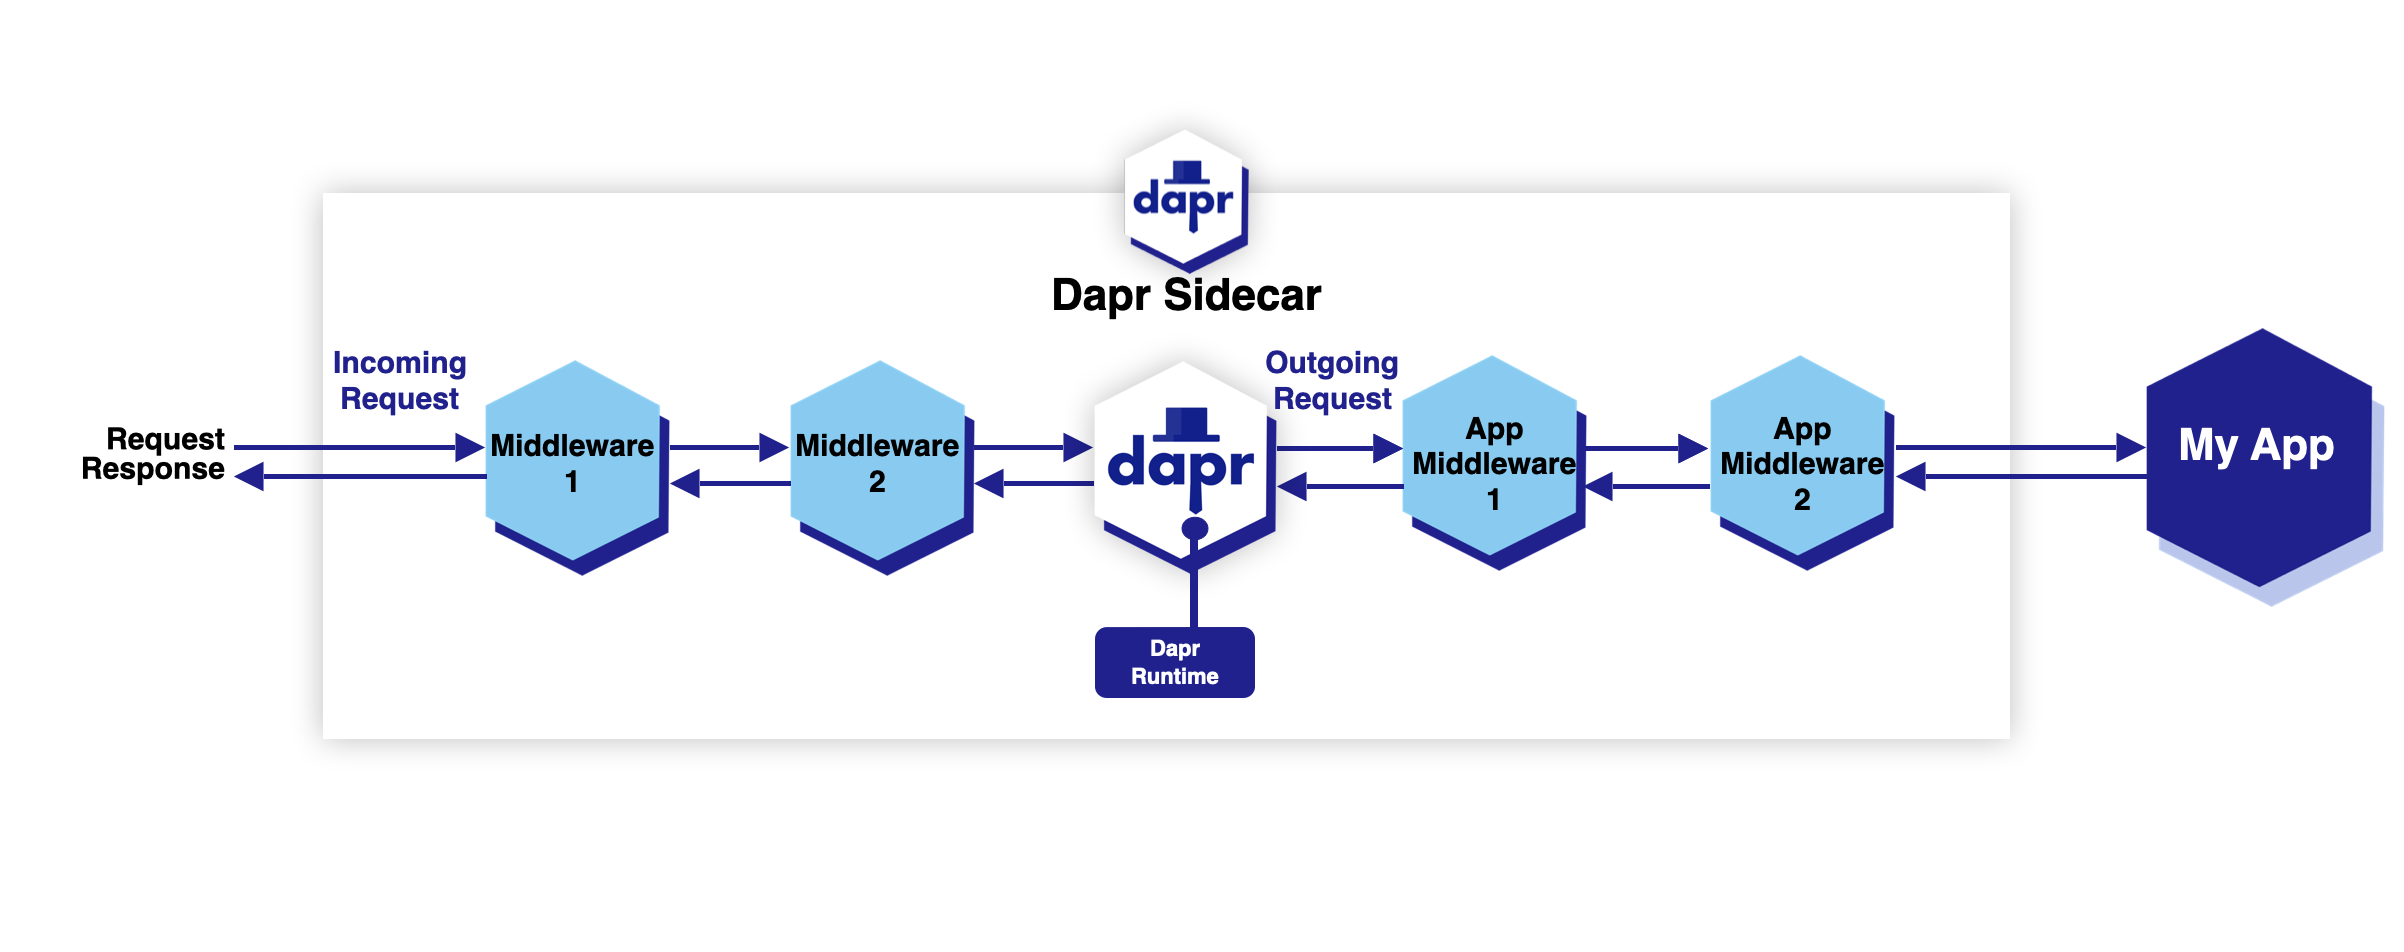
Any middleware component that can be used as HTTP middleware can also be applied to service-to-service invocation calls as a middleware component using the appHttpPipeline configuration. The example below adds the uppercase middleware component for all outgoing calls from the Dapr sidecar (target of service invocation) to the application that this configuration is applied to.
apiVersion: dapr.io/v1alpha1
kind: Configuration
metadata:
  name: pipeline
  namespace: default
spec:
  appHttpPipeline:
    handlers:
      - name: uppercase
        type: middleware.http.uppercase