This is the multi-page printable view of this section. Click here to print.

Return to the regular view of this page.

Dapr Quickstarts

Try out Dapr quickstarts with code samples that are aimed to get you started quickly with Dapr

Hit the ground running with our Dapr quickstarts, complete with code samples aimed to get you started quickly with Dapr.

Before you begin

Quickstarts

Quickstarts Description
Service Invocation Synchronous communication between two services using HTTP or gRPC.
Publish and Subscribe Asynchronous communication between two services using messaging.
Workflow Orchestrate business workflow activities in long running, fault-tolerant, stateful applications.
State Management Store a service’s data as key/value pairs in supported state stores.
Bindings Work with external systems using input bindings to respond to events and output bindings to call operations.
Actors Run a microservice and a simple console client to demonstrate stateful object patterns in Dapr Actors.
Secrets Management Securely fetch secrets.
Configuration Get configuration items and subscribe for configuration updates.
Resiliency Define and apply fault-tolerance policies to your Dapr API requests.
Cryptography Encrypt and decrypt data using Dapr’s cryptographic APIs.
Jobs Schedule, retrieve, and delete jobs using Dapr’s jobs APIs.
Conversation Securely and reliably interact with Large Language Models (LLMs).

1 - Quickstart: Service Invocation

Get started with Dapr’s Service Invocation building block

With Dapr’s Service Invocation building block, your application can communicate reliably and securely with other applications.

Diagram showing the steps of service invocation

Dapr offers several methods for service invocation, which you can choose depending on your scenario. For this Quickstart, you’ll enable the checkout service to invoke a method using HTTP proxy in the order-processor service and by either:

Learn more about Dapr’s methods for service invocation in the overview article.

Run using Multi-App Run

Select your preferred language before proceeding with the Quickstart.

Step 1: Pre-requisites

For this example, you will need:

Step 2: Set up the environment

Clone the sample provided in the Quickstarts repo.

git clone https://github.com/dapr/quickstarts.git

From the root of the Quickstart clone directory, navigate to the quickstart directory.

cd service_invocation/python/http

Install the dependencies for the order-processor and checkout apps:

cd ./order-processor
pip3 install -r requirements.txt
cd ../checkout
pip3 install -r requirements.txt
cd ..

Step 3: Run the order-processor and checkout services

With the following command, simultaneously run the following services alongside their own Dapr sidecars:

  • The order-processor service
  • The checkout service
dapr run -f .

Note: Since Python3.exe is not defined in Windows, you may need to change python3 to python in the dapr.yaml file before running dapr run -f .

Expected output

== APP - order-processor == Order received : Order { orderId = 1 }
== APP - checkout == Order passed: Order { OrderId = 1 }
== APP - order-processor == Order received : Order { orderId = 2 }
== APP - checkout == Order passed: Order { OrderId = 2 }
== APP - order-processor == Order received : Order { orderId = 3 }
== APP - checkout == Order passed: Order { OrderId = 3 }
== APP - order-processor == Order received : Order { orderId = 4 }
== APP - checkout == Order passed: Order { OrderId = 4 }
== APP - order-processor == Order received : Order { orderId = 5 }
== APP - checkout == Order passed: Order { OrderId = 5 }
== APP - order-processor == Order received : Order { orderId = 6 }
== APP - checkout == Order passed: Order { OrderId = 6 }
== APP - order-processor == Order received : Order { orderId = 7 }
== APP - checkout == Order passed: Order { OrderId = 7 }
== APP - order-processor == Order received : Order { orderId = 8 }
== APP - checkout == Order passed: Order { OrderId = 8 }
== APP - order-processor == Order received : Order { orderId = 9 }
== APP - checkout == Order passed: Order { OrderId = 9 }
== APP - order-processor == Order received : Order { orderId = 10 }
== APP - checkout == Order passed: Order { OrderId = 10 }
== APP - order-processor == Order received : Order { orderId = 11 }
== APP - checkout == Order passed: Order { OrderId = 11 }
== APP - order-processor == Order received : Order { orderId = 12 }
== APP - checkout == Order passed: Order { OrderId = 12 }
== APP - order-processor == Order received : Order { orderId = 13 }
== APP - checkout == Order passed: Order { OrderId = 13 }
== APP - order-processor == Order received : Order { orderId = 14 }
== APP - checkout == Order passed: Order { OrderId = 14 }
== APP - order-processor == Order received : Order { orderId = 15 }
== APP - checkout == Order passed: Order { OrderId = 15 }
== APP - order-processor == Order received : Order { orderId = 16 }
== APP - checkout == Order passed: Order { OrderId = 16 }
== APP - order-processor == Order received : Order { orderId = 17 }
== APP - checkout == Order passed: Order { OrderId = 17 }
== APP - order-processor == Order received : Order { orderId = 18 }
== APP - checkout == Order passed: Order { OrderId = 18 }
== APP - order-processor == Order received : Order { orderId = 19 }
== APP - checkout == Order passed: Order { OrderId = 19 }
== APP - order-processor == Order received : Order { orderId = 20 }
== APP - checkout == Order passed: Order { OrderId = 20 }
Exited App successfully

What happened?

Running dapr run -f . in this Quickstart started both the subscriber and publisher applications using the dapr.yaml Multi-App Run template file.

dapr.yaml Multi-App Run template file

Running the Multi-App Run template file with dapr run -f . starts all applications in your project. In this Quickstart, the dapr.yaml file contains the following:

version: 1
apps:
  - appDirPath: ./order-processor/
    appID: order-processor
    appPort: 8001
    command: ["python3", "app.py"]
  - appID: checkout
    appDirPath: ./checkout/
    command: ["python3", "app.py"]
order-processor service

The order-processor service receives the call from the checkout service:

@app.route('/orders', methods=['POST'])
def getOrder():
    data = request.json
    print('Order received : ' + json.dumps(data), flush=True)
    return json.dumps({'success': True}), 200, {
        'ContentType': 'application/json'}


app.run(port=8001)

checkout service

In the checkout service, you’ll notice there’s no need to rewrite your app code to use Dapr’s service invocation. You can enable service invocation by simply adding the dapr-app-id header, which specifies the ID of the target service.

headers = {'dapr-app-id': 'order-processor'}

result = requests.post(
    url='%s/orders' % (base_url),
    data=json.dumps(order),
    headers=headers
)

Step 1: Pre-requisites

For this example, you will need:

Step 2: Set up the environment

Clone the sample provided in the Quickstarts repo.

git clone https://github.com/dapr/quickstarts.git

From the root of the Quickstart clone directory, navigate to the quickstart directory.

cd service_invocation/javascript/http

Install the dependencies for the order-processor and checkout apps:

cd ./order-processor
npm install
cd ../checkout
npm install
cd ..

Step 3: Run the order-processor and checkout services

With the following command, simultaneously run the following services alongside their own Dapr sidecars:

  • The order-processor service
  • The checkout service
dapr run -f .

Expected output

== APP - order-processor == Order received : Order { orderId = 1 }
== APP - checkout == Order passed: Order { OrderId = 1 }
== APP - order-processor == Order received : Order { orderId = 2 }
== APP - checkout == Order passed: Order { OrderId = 2 }
== APP - order-processor == Order received : Order { orderId = 3 }
== APP - checkout == Order passed: Order { OrderId = 3 }
== APP - order-processor == Order received : Order { orderId = 4 }
== APP - checkout == Order passed: Order { OrderId = 4 }
== APP - order-processor == Order received : Order { orderId = 5 }
== APP - checkout == Order passed: Order { OrderId = 5 }
== APP - order-processor == Order received : Order { orderId = 6 }
== APP - checkout == Order passed: Order { OrderId = 6 }
== APP - order-processor == Order received : Order { orderId = 7 }
== APP - checkout == Order passed: Order { OrderId = 7 }
== APP - order-processor == Order received : Order { orderId = 8 }
== APP - checkout == Order passed: Order { OrderId = 8 }
== APP - order-processor == Order received : Order { orderId = 9 }
== APP - checkout == Order passed: Order { OrderId = 9 }
== APP - order-processor == Order received : Order { orderId = 10 }
== APP - checkout == Order passed: Order { OrderId = 10 }
== APP - order-processor == Order received : Order { orderId = 11 }
== APP - checkout == Order passed: Order { OrderId = 11 }
== APP - order-processor == Order received : Order { orderId = 12 }
== APP - checkout == Order passed: Order { OrderId = 12 }
== APP - order-processor == Order received : Order { orderId = 13 }
== APP - checkout == Order passed: Order { OrderId = 13 }
== APP - order-processor == Order received : Order { orderId = 14 }
== APP - checkout == Order passed: Order { OrderId = 14 }
== APP - order-processor == Order received : Order { orderId = 15 }
== APP - checkout == Order passed: Order { OrderId = 15 }
== APP - order-processor == Order received : Order { orderId = 16 }
== APP - checkout == Order passed: Order { OrderId = 16 }
== APP - order-processor == Order received : Order { orderId = 17 }
== APP - checkout == Order passed: Order { OrderId = 17 }
== APP - order-processor == Order received : Order { orderId = 18 }
== APP - checkout == Order passed: Order { OrderId = 18 }
== APP - order-processor == Order received : Order { orderId = 19 }
== APP - checkout == Order passed: Order { OrderId = 19 }
== APP - order-processor == Order received : Order { orderId = 20 }
== APP - checkout == Order passed: Order { OrderId = 20 }
Exited App successfully

What happened?

Running dapr run -f . in this Quickstart started both the subscriber and publisher applications using the dapr.yaml Multi-App Run template file.

dapr.yaml Multi-App Run template file

Running the Multi-App Run template file with dapr run -f . starts all applications in your project. In this Quickstart, the dapr.yaml file contains the following:

version: 1
apps:
  - appDirPath: ./order-processor/
    appID: order-processor
    appPort: 5001
    command: ["npm", "start"]
  - appID: checkout
    appDirPath: ./checkout/
    command: ["npm", "start"]
order-processor service

The order-processor service receives the call from the checkout service:

app.post('/orders', (req, res) => {
    console.log("Order received:", req.body);
    res.sendStatus(200);
});
checkout service

In the checkout service, you’ll notice there’s no need to rewrite your app code to use Dapr’s service invocation. You can enable service invocation by simply adding the dapr-app-id header, which specifies the ID of the target service.

let axiosConfig = {
  headers: {
      "dapr-app-id": "order-processor"
  }
};
const res = await axios.post(`${DAPR_HOST}:${DAPR_HTTP_PORT}/orders`, order , axiosConfig);
console.log("Order passed: " + res.config.data);

Step 1: Pre-requisites

For this example, you will need:

NOTE: .NET 6 is the minimally supported version of .NET for the Dapr .NET SDK packages in this release. Only .NET 8 and .NET 9 will be supported in Dapr v1.16 and later releases.

Step 2: Set up the environment

Clone the sample provided in the Quickstarts repo.

git clone https://github.com/dapr/quickstarts.git

From the root of the Quickstart clone directory, navigate to the quickstart directory.

cd service_invocation/csharp/http

Install the dependencies for the order-processor and checkout apps:

cd ./order-processor
dotnet restore
dotnet build
cd ../checkout
dotnet restore
dotnet build
cd ..

Step 3: Run the order-processor and checkout services

With the following command, simultaneously run the following services alongside their own Dapr sidecars:

  • The order-processor service
  • The checkout service
dapr run -f .

Expected output

== APP - order-processor == Order received : Order { orderId = 1 }
== APP - checkout == Order passed: Order { OrderId = 1 }
== APP - order-processor == Order received : Order { orderId = 2 }
== APP - checkout == Order passed: Order { OrderId = 2 }
== APP - order-processor == Order received : Order { orderId = 3 }
== APP - checkout == Order passed: Order { OrderId = 3 }
== APP - order-processor == Order received : Order { orderId = 4 }
== APP - checkout == Order passed: Order { OrderId = 4 }
== APP - order-processor == Order received : Order { orderId = 5 }
== APP - checkout == Order passed: Order { OrderId = 5 }
== APP - order-processor == Order received : Order { orderId = 6 }
== APP - checkout == Order passed: Order { OrderId = 6 }
== APP - order-processor == Order received : Order { orderId = 7 }
== APP - checkout == Order passed: Order { OrderId = 7 }
== APP - order-processor == Order received : Order { orderId = 8 }
== APP - checkout == Order passed: Order { OrderId = 8 }
== APP - order-processor == Order received : Order { orderId = 9 }
== APP - checkout == Order passed: Order { OrderId = 9 }
== APP - order-processor == Order received : Order { orderId = 10 }
== APP - checkout == Order passed: Order { OrderId = 10 }
== APP - order-processor == Order received : Order { orderId = 11 }
== APP - checkout == Order passed: Order { OrderId = 11 }
== APP - order-processor == Order received : Order { orderId = 12 }
== APP - checkout == Order passed: Order { OrderId = 12 }
== APP - order-processor == Order received : Order { orderId = 13 }
== APP - checkout == Order passed: Order { OrderId = 13 }
== APP - order-processor == Order received : Order { orderId = 14 }
== APP - checkout == Order passed: Order { OrderId = 14 }
== APP - order-processor == Order received : Order { orderId = 15 }
== APP - checkout == Order passed: Order { OrderId = 15 }
== APP - order-processor == Order received : Order { orderId = 16 }
== APP - checkout == Order passed: Order { OrderId = 16 }
== APP - order-processor == Order received : Order { orderId = 17 }
== APP - checkout == Order passed: Order { OrderId = 17 }
== APP - order-processor == Order received : Order { orderId = 18 }
== APP - checkout == Order passed: Order { OrderId = 18 }
== APP - order-processor == Order received : Order { orderId = 19 }
== APP - checkout == Order passed: Order { OrderId = 19 }
== APP - order-processor == Order received : Order { orderId = 20 }
== APP - checkout == Order passed: Order { OrderId = 20 }
Exited App successfully

What happened?

Running dapr run -f . in this Quickstart started both the subscriber and publisher applications using the dapr.yaml Multi-App Run template file.

dapr.yaml Multi-App Run template file

Running the Multi-App Run template file with dapr run -f . starts all applications in your project. In this Quickstart, the dapr.yaml file contains the following:

version: 1
apps:
  - appDirPath: ./order-processor/
    appID: order-processor
    appPort: 7001
    command: ["dotnet", "run"]
  - appID: checkout
    appDirPath: ./checkout/
    command: ["dotnet", "run"]
order-processor service

The order-processor service receives the call from the checkout service:

app.MapPost("/orders", (Order order) =>
{
    Console.WriteLine("Order received : " + order);
    return order.ToString();
});
checkout service

In the Program.cs file for the checkout service, you’ll notice there’s no need to rewrite your app code to use Dapr’s service invocation. You can enable service invocation by simply adding the dapr-app-id header, which specifies the ID of the target service.

var client = DaprClient.CreateInvokeHttpClient(appId: "order-processor");
var cts = new CancellationTokenSource();

var response = await client.PostAsJsonAsync("/orders", order, cts.Token);
Console.WriteLine("Order passed: " + order);

Step 1: Pre-requisites

For this example, you will need:

Step 2: Set up the environment

Clone the sample provided in the Quickstarts repo.

git clone https://github.com/dapr/quickstarts.git

From the root of the Quickstart clone directory, navigate to the quickstart directory.

cd service_invocation/java/http

Install the dependencies for the order-processor and checkout apps:

cd ./order-processor
mvn clean install
cd ../checkout
mvn clean install
cd ..

Step 3: Run the order-processor and checkout services

With the following command, simultaneously run the following services alongside their own Dapr sidecars:

  • The order-processor service
  • The checkout service
dapr run -f .

Expected output

== APP - order-processor == Order received : Order { orderId = 1 }
== APP - checkout == Order passed: Order { OrderId = 1 }
== APP - order-processor == Order received : Order { orderId = 2 }
== APP - checkout == Order passed: Order { OrderId = 2 }
== APP - order-processor == Order received : Order { orderId = 3 }
== APP - checkout == Order passed: Order { OrderId = 3 }
== APP - order-processor == Order received : Order { orderId = 4 }
== APP - checkout == Order passed: Order { OrderId = 4 }
== APP - order-processor == Order received : Order { orderId = 5 }
== APP - checkout == Order passed: Order { OrderId = 5 }
== APP - order-processor == Order received : Order { orderId = 6 }
== APP - checkout == Order passed: Order { OrderId = 6 }
== APP - order-processor == Order received : Order { orderId = 7 }
== APP - checkout == Order passed: Order { OrderId = 7 }
== APP - order-processor == Order received : Order { orderId = 8 }
== APP - checkout == Order passed: Order { OrderId = 8 }
== APP - order-processor == Order received : Order { orderId = 9 }
== APP - checkout == Order passed: Order { OrderId = 9 }
== APP - order-processor == Order received : Order { orderId = 10 }
== APP - checkout == Order passed: Order { OrderId = 10 }
== APP - order-processor == Order received : Order { orderId = 11 }
== APP - checkout == Order passed: Order { OrderId = 11 }
== APP - order-processor == Order received : Order { orderId = 12 }
== APP - checkout == Order passed: Order { OrderId = 12 }
== APP - order-processor == Order received : Order { orderId = 13 }
== APP - checkout == Order passed: Order { OrderId = 13 }
== APP - order-processor == Order received : Order { orderId = 14 }
== APP - checkout == Order passed: Order { OrderId = 14 }
== APP - order-processor == Order received : Order { orderId = 15 }
== APP - checkout == Order passed: Order { OrderId = 15 }
== APP - order-processor == Order received : Order { orderId = 16 }
== APP - checkout == Order passed: Order { OrderId = 16 }
== APP - order-processor == Order received : Order { orderId = 17 }
== APP - checkout == Order passed: Order { OrderId = 17 }
== APP - order-processor == Order received : Order { orderId = 18 }
== APP - checkout == Order passed: Order { OrderId = 18 }
== APP - order-processor == Order received : Order { orderId = 19 }
== APP - checkout == Order passed: Order { OrderId = 19 }
== APP - order-processor == Order received : Order { orderId = 20 }
== APP - checkout == Order passed: Order { OrderId = 20 }
Exited App successfully

What happened?

Running dapr run -f . in this Quickstart started both the subscriber and publisher applications using the dapr.yaml Multi-App Run template file.

dapr.yaml Multi-App Run template file

Running the Multi-App Run template file with dapr run -f . starts all applications in your project. In this Quickstart, the dapr.yaml file contains the following:

version: 1
apps:
  - appDirPath: ./order-processor/
    appID: order-processor
    appPort: 9001
    command: ["java", "-jar", "target/OrderProcessingService-0.0.1-SNAPSHOT.jar"]
  - appID: checkout
    appDirPath: ./checkout/
    command: ["java", "-jar", "target/CheckoutService-0.0.1-SNAPSHOT.jar"]
order-processor service

The order-processor service receives the call from the checkout service:

public String processOrders(@RequestBody Order body) {
        System.out.println("Order received: "+ body.getOrderId());
        return "CID" + body.getOrderId();
    }
checkout service

In the checkout service, you’ll notice there’s no need to rewrite your app code to use Dapr’s service invocation. You can enable service invocation by simply adding the dapr-app-id header, which specifies the ID of the target service.

.header("Content-Type", "application/json")
.header("dapr-app-id", "order-processor")

HttpResponse<String> response = httpClient.send(request, HttpResponse.BodyHandlers.ofString());
System.out.println("Order passed: "+ orderId)

Step 1: Pre-requisites

For this example, you will need:

Step 2: Set up the environment

Clone the sample provided in the Quickstarts repo.

git clone https://github.com/dapr/quickstarts.git

From the root of the Quickstart clone directory, navigate to the quickstart directory.

cd service_invocation/go/http

Install the dependencies for the order-processor and checkout apps:

cd ./order-processor
go build .
cd ../checkout
go build .
cd ..

Step 3: Run the order-processor and checkout services

With the following command, simultaneously run the following services alongside their own Dapr sidecars:

  • The order-processor service
  • The checkout service
dapr run -f .

Expected output

== APP - order-processor == Order received : Order { orderId = 1 }
== APP - checkout == Order passed: Order { OrderId = 1 }
== APP - order-processor == Order received : Order { orderId = 2 }
== APP - checkout == Order passed: Order { OrderId = 2 }
== APP - order-processor == Order received : Order { orderId = 3 }
== APP - checkout == Order passed: Order { OrderId = 3 }
== APP - order-processor == Order received : Order { orderId = 4 }
== APP - checkout == Order passed: Order { OrderId = 4 }
== APP - order-processor == Order received : Order { orderId = 5 }
== APP - checkout == Order passed: Order { OrderId = 5 }
== APP - order-processor == Order received : Order { orderId = 6 }
== APP - checkout == Order passed: Order { OrderId = 6 }
== APP - order-processor == Order received : Order { orderId = 7 }
== APP - checkout == Order passed: Order { OrderId = 7 }
== APP - order-processor == Order received : Order { orderId = 8 }
== APP - checkout == Order passed: Order { OrderId = 8 }
== APP - order-processor == Order received : Order { orderId = 9 }
== APP - checkout == Order passed: Order { OrderId = 9 }
== APP - order-processor == Order received : Order { orderId = 10 }
== APP - checkout == Order passed: Order { OrderId = 10 }
== APP - order-processor == Order received : Order { orderId = 11 }
== APP - checkout == Order passed: Order { OrderId = 11 }
== APP - order-processor == Order received : Order { orderId = 12 }
== APP - checkout == Order passed: Order { OrderId = 12 }
== APP - order-processor == Order received : Order { orderId = 13 }
== APP - checkout == Order passed: Order { OrderId = 13 }
== APP - order-processor == Order received : Order { orderId = 14 }
== APP - checkout == Order passed: Order { OrderId = 14 }
== APP - order-processor == Order received : Order { orderId = 15 }
== APP - checkout == Order passed: Order { OrderId = 15 }
== APP - order-processor == Order received : Order { orderId = 16 }
== APP - checkout == Order passed: Order { OrderId = 16 }
== APP - order-processor == Order received : Order { orderId = 17 }
== APP - checkout == Order passed: Order { OrderId = 17 }
== APP - order-processor == Order received : Order { orderId = 18 }
== APP - checkout == Order passed: Order { OrderId = 18 }
== APP - order-processor == Order received : Order { orderId = 19 }
== APP - checkout == Order passed: Order { OrderId = 19 }
== APP - order-processor == Order received : Order { orderId = 20 }
== APP - checkout == Order passed: Order { OrderId = 20 }
Exited App successfully

What happened?

Running dapr run -f . in this Quickstart started both the subscriber and publisher applications using the dapr.yaml Multi-App Run template file.

dapr.yaml Multi-App Run template file

Running the Multi-App Run template file with dapr run -f . starts all applications in your project. In this Quickstart, the dapr.yaml file contains the following:

version: 1
apps:
  - appDirPath: ./order-processor/
    appID: order-processor
    appPort: 6006
    command: ["go", "run", "."]
  - appID: checkout
    appDirPath: ./checkout/
    command: ["go", "run", "."]
order-processor service

In the order-processor service, each order is received via an HTTP POST request and processed by the getOrder function.

func getOrder(w http.ResponseWriter, r *http.Request) {
	data, err := ioutil.ReadAll(r.Body)
	if err != nil {
		log.Fatal(err)
	}
	log.Printf("Order received : %s", string(data))
}
checkout service

In the checkout service, you’ll notice there’s no need to rewrite your app code to use Dapr’s service invocation. You can enable service invocation by simply adding the dapr-app-id header, which specifies the ID of the target service.

req.Header.Add("dapr-app-id", "order-processor")

response, err := client.Do(req)

Run one application at a time

Select your preferred language before proceeding with the Quickstart.

Step 1: Pre-requisites

For this example, you will need:

Step 2: Set up the environment

Clone the sample provided in the Quickstarts repo.

git clone https://github.com/dapr/quickstarts.git

Step 3: Run order-processor service

In a terminal window, from the root of the Quickstart clone directory navigate to order-processor directory.

cd service_invocation/python/http/order-processor

Install the dependencies and build the application:

pip3 install -r requirements.txt 

Run the order-processor service alongside a Dapr sidecar.

dapr run --app-port 8001 --app-id order-processor --app-protocol http --dapr-http-port 3501 -- python3 app.py

Note: Since Python3.exe is not defined in Windows, you may need to use python app.py instead of python3 app.py.

@app.route('/orders', methods=['POST'])
def getOrder():
    data = request.json
    print('Order received : ' + json.dumps(data), flush=True)
    return json.dumps({'success': True}), 200, {
        'ContentType': 'application/json'}


app.run(port=8001)

Step 4: Run checkout service

In a new terminal window, from the root of the Quickstart clone directory navigate to the checkout directory.

cd service_invocation/python/http/checkout

Install the dependencies and build the application:

pip3 install -r requirements.txt 

Run the checkout service alongside a Dapr sidecar.

dapr run --app-id checkout --app-protocol http --dapr-http-port 3500 -- python3 app.py

Note: Since Python3.exe is not defined in Windows, you may need to use python app.py instead of python3 app.py.

In the checkout service, you’ll notice there’s no need to rewrite your app code to use Dapr’s service invocation. You can enable service invocation by simply adding the dapr-app-id header, which specifies the ID of the target service.

headers = {'dapr-app-id': 'order-processor'}

result = requests.post(
    url='%s/orders' % (base_url),
    data=json.dumps(order),
    headers=headers
)

Step 5: Use with Multi-App Run

You can run the Dapr applications in this quickstart with the Multi-App Run template. Instead of running two separate dapr run commands for the order-processor and checkout applications, run the following command:

dapr run -f .

To stop all applications, run:

dapr stop -f .

Step 6: View the Service Invocation outputs

Dapr invokes an application on any Dapr instance. In the code, the sidecar programming model encourages each application to talk to its own instance of Dapr. The Dapr instances then discover and communicate with one another.

checkout service output:

== APP == Order passed: {"orderId": 1}
== APP == Order passed: {"orderId": 2}
== APP == Order passed: {"orderId": 3}
== APP == Order passed: {"orderId": 4}
== APP == Order passed: {"orderId": 5}
== APP == Order passed: {"orderId": 6}
== APP == Order passed: {"orderId": 7}
== APP == Order passed: {"orderId": 8}
== APP == Order passed: {"orderId": 9}
== APP == Order passed: {"orderId": 10}

order-processor service output:

== APP == Order received: {"orderId": 1}
== APP == Order received: {"orderId": 2}
== APP == Order received: {"orderId": 3}
== APP == Order received: {"orderId": 4}
== APP == Order received: {"orderId": 5}
== APP == Order received: {"orderId": 6}
== APP == Order received: {"orderId": 7}
== APP == Order received: {"orderId": 8}
== APP == Order received: {"orderId": 9}
== APP == Order received: {"orderId": 10}

Step 1: Pre-requisites

For this example, you will need:

Step 2: Set up the environment

Clone the sample provided in the Quickstarts repo.

git clone https://github.com/dapr/quickstarts.git

Step 3: Run order-processor service

In a terminal window, from the root of the Quickstart clone directory navigate to order-processor directory.

cd service_invocation/javascript/http/order-processor

Install the dependencies:

npm install

Run the order-processor service alongside a Dapr sidecar.

dapr run --app-port 5001 --app-id order-processor --app-protocol http --dapr-http-port 3501 -- npm start
app.post('/orders', (req, res) => {
    console.log("Order received:", req.body);
    res.sendStatus(200);
});

Step 4: Run checkout service

In a new terminal window, from the root of the Quickstart clone directory navigate to the checkout directory.

cd service_invocation/javascript/http/checkout

Install the dependencies:

npm install

Run the checkout service alongside a Dapr sidecar.

dapr run --app-id checkout --app-protocol http --dapr-http-port 3500 -- npm start

In the checkout service, you’ll notice there’s no need to rewrite your app code to use Dapr’s service invocation. You can enable service invocation by simply adding the dapr-app-id header, which specifies the ID of the target service.

let axiosConfig = {
  headers: {
      "dapr-app-id": "order-processor"
  }
};
const res = await axios.post(`${DAPR_HOST}:${DAPR_HTTP_PORT}/orders`, order , axiosConfig);
console.log("Order passed: " + res.config.data);

Step 5: Use with Multi-App Run

You can run the Dapr applications in this quickstart with the Multi-App Run template. Instead of running two separate dapr run commands for the order-processor and checkout applications, run the following command:

dapr run -f .

To stop all applications, run:

dapr stop -f .

Step 6: View the Service Invocation outputs

Dapr invokes an application on any Dapr instance. In the code, the sidecar programming model encourages each application to talk to its own instance of Dapr. The Dapr instances then discover and communicate with one another.

checkout service output:

== APP == Order passed: {"orderId": 1}
== APP == Order passed: {"orderId": 2}
== APP == Order passed: {"orderId": 3}
== APP == Order passed: {"orderId": 4}
== APP == Order passed: {"orderId": 5}
== APP == Order passed: {"orderId": 6}
== APP == Order passed: {"orderId": 7}
== APP == Order passed: {"orderId": 8}
== APP == Order passed: {"orderId": 9}
== APP == Order passed: {"orderId": 10}

order-processor service output:

== APP == Order received: {"orderId": 1}
== APP == Order received: {"orderId": 2}
== APP == Order received: {"orderId": 3}
== APP == Order received: {"orderId": 4}
== APP == Order received: {"orderId": 5}
== APP == Order received: {"orderId": 6}
== APP == Order received: {"orderId": 7}
== APP == Order received: {"orderId": 8}
== APP == Order received: {"orderId": 9}
== APP == Order received: {"orderId": 10}

Step 1: Pre-requisites

For this example, you will need:

Step 2: Set up the environment

Clone the sample provided in the Quickstarts repo.

git clone https://github.com/dapr/quickstarts.git

Step 3: Run order-processor service

In a terminal window, from the root of the Quickstart clone directory navigate to order-processor directory.

cd service_invocation/csharp/http/order-processor

Install the dependencies:

dotnet restore
dotnet build

Run the order-processor service alongside a Dapr sidecar.

dapr run --app-port 7001 --app-id order-processor --app-protocol http --dapr-http-port 3501 -- dotnet run

Below is the working code block from the order processor’s Program.cs file.

app.MapPost("/orders", (Order order) =>
{
    Console.WriteLine("Order received : " + order);
    return order.ToString();
});

Step 4: Run checkout service

In a new terminal window, from the root of the Quickstart clone directory navigate to the checkout directory.

cd service_invocation/csharp/http/checkout

Install the dependencies:

dotnet restore
dotnet build

Run the checkout service alongside a Dapr sidecar.

dapr run --app-id checkout --app-protocol http --dapr-http-port 3500 -- dotnet run

In the Program.cs file for the checkout service, you’ll notice there’s no need to rewrite your app code to use Dapr’s service invocation. You can enable service invocation by simply adding the dapr-app-id header, which specifies the ID of the target service.

var client = DaprClient.CreateInvokeHttpClient(appId: "order-processor");
var cts = new CancellationTokenSource();

var response = await client.PostAsJsonAsync("/orders", order, cts.Token);
Console.WriteLine("Order passed: " + order);

Step 5: Use with Multi-App Run

You can run the Dapr applications in this quickstart with the Multi-App Run template. Instead of running two separate dapr run commands for the order-processor and checkout applications, run the following command:

dapr run -f .

To stop all applications, run:

dapr stop -f .

Step 6: View the Service Invocation outputs

Dapr invokes an application on any Dapr instance. In the code, the sidecar programming model encourages each application to talk to its own instance of Dapr. The Dapr instances then discover and communicate with one another.

checkout service output:

== APP == Order passed: Order { OrderId: 1 }
== APP == Order passed: Order { OrderId: 2 }
== APP == Order passed: Order { OrderId: 3 }
== APP == Order passed: Order { OrderId: 4 }
== APP == Order passed: Order { OrderId: 5 }
== APP == Order passed: Order { OrderId: 6 }
== APP == Order passed: Order { OrderId: 7 }
== APP == Order passed: Order { OrderId: 8 }
== APP == Order passed: Order { OrderId: 9 }
== APP == Order passed: Order { OrderId: 10 }

order-processor service output:

== APP == Order received: Order { OrderId: 1 }
== APP == Order received: Order { OrderId: 2 }
== APP == Order received: Order { OrderId: 3 }
== APP == Order received: Order { OrderId: 4 }
== APP == Order received: Order { OrderId: 5 }
== APP == Order received: Order { OrderId: 6 }
== APP == Order received: Order { OrderId: 7 }
== APP == Order received: Order { OrderId: 8 }
== APP == Order received: Order { OrderId: 9 }
== APP == Order received: Order { OrderId: 10 }

Step 1: Pre-requisites

For this example, you will need:

Step 2: Set up the environment

Clone the sample provided in the Quickstarts repo.

git clone https://github.com/dapr/quickstarts.git

Step 3: Run order-processor service

In a terminal window, from the root of the Quickstart clone directory navigate to order-processor directory.

cd service_invocation/java/http/order-processor

Install the dependencies:

mvn clean install

Run the order-processor service alongside a Dapr sidecar.

dapr run --app-id order-processor --app-port 9001 --app-protocol http --dapr-http-port 3501 -- java -jar target/OrderProcessingService-0.0.1-SNAPSHOT.jar
public String processOrders(@RequestBody Order body) {
        System.out.println("Order received: "+ body.getOrderId());
        return "CID" + body.getOrderId();
    }

Step 4: Run checkout service

In a new terminal window, from the root of the Quickstart clone directory navigate to the checkout directory.

cd service_invocation/java/http/checkout

Install the dependencies:

mvn clean install

Run the checkout service alongside a Dapr sidecar.

dapr run --app-id checkout --app-protocol http --dapr-http-port 3500 -- java -jar target/CheckoutService-0.0.1-SNAPSHOT.jar

In the checkout service, you’ll notice there’s no need to rewrite your app code to use Dapr’s service invocation. You can enable service invocation by simply adding the dapr-app-id header, which specifies the ID of the target service.

.header("Content-Type", "application/json")
.header("dapr-app-id", "order-processor")

HttpResponse<String> response = httpClient.send(request, HttpResponse.BodyHandlers.ofString());
System.out.println("Order passed: "+ orderId)

Step 5: Use with Multi-App Run

You can run the Dapr applications in this quickstart with the Multi-App Run template. Instead of running two separate dapr run commands for the order-processor and checkout applications, run the following command:

dapr run -f .

To stop all applications, run:

dapr stop -f .

Step 6: View the Service Invocation outputs

Dapr invokes an application on any Dapr instance. In the code, the sidecar programming model encourages each application to talk to its own instance of Dapr. The Dapr instances then discover and communicate with one another.

checkout service output:

== APP == Order passed: 1
== APP == Order passed: 2
== APP == Order passed: 3
== APP == Order passed: 4
== APP == Order passed: 5
== APP == Order passed: 6
== APP == Order passed: 7
== APP == Order passed: 8
== APP == Order passed: 9
== APP == Order passed: 10

order-processor service output:

== APP == Order received: 1
== APP == Order received: 2
== APP == Order received: 3
== APP == Order received: 4
== APP == Order received: 5
== APP == Order received: 6
== APP == Order received: 7
== APP == Order received: 8
== APP == Order received: 9
== APP == Order received: 10

Step 1: Pre-requisites

For this example, you will need:

Step 2: Set up the environment

Clone the sample provided in the Quickstarts repo.

git clone https://github.com/dapr/quickstarts.git

Step 3: Run order-processor service

In a terminal window, from the root of the Quickstart clone directory navigate to order-processor directory.

cd service_invocation/go/http/order-processor

Install the dependencies:

go build .

Run the order-processor service alongside a Dapr sidecar.

dapr run --app-port 6006 --app-id order-processor --app-protocol http --dapr-http-port 3501 -- go run .

Each order is received via an HTTP POST request and processed by the getOrder function.

func getOrder(w http.ResponseWriter, r *http.Request) {
	data, err := ioutil.ReadAll(r.Body)
	if err != nil {
		log.Fatal(err)
	}
	log.Printf("Order received : %s", string(data))
}

Step 4: Run checkout service

In a new terminal window, from the root of the Quickstart clone directory navigate to the checkout directory.

cd service_invocation/go/http/checkout

Install the dependencies:

go build .

Run the checkout service alongside a Dapr sidecar.

dapr run --app-id checkout --app-protocol http --dapr-http-port 3500 -- go run .

In the checkout service, you’ll notice there’s no need to rewrite your app code to use Dapr’s service invocation. You can enable service invocation by simply adding the dapr-app-id header, which specifies the ID of the target service.

req.Header.Add("dapr-app-id", "order-processor")

response, err := client.Do(req)

Step 5: Use with Multi-App Run

You can run the Dapr applications in this quickstart with the Multi-App Run template. Instead of running two separate dapr run commands for the order-processor and checkout applications, run the following command:

dapr run -f .

To stop all applications, run:

dapr stop -f .

Step 6: View the Service Invocation outputs

Dapr invokes an application on any Dapr instance. In the code, the sidecar programming model encourages each application to talk to its own instance of Dapr. The Dapr instances then discover and communicate with one another.

checkout service output:

== APP == Order passed:  {"orderId":1}
== APP == Order passed:  {"orderId":2}
== APP == Order passed:  {"orderId":3}
== APP == Order passed:  {"orderId":4}
== APP == Order passed:  {"orderId":5}
== APP == Order passed:  {"orderId":6}
== APP == Order passed:  {"orderId":7}
== APP == Order passed:  {"orderId":8}
== APP == Order passed:  {"orderId":9}
== APP == Order passed:  {"orderId":10}

order-processor service output:

== APP == Order received :  {"orderId":1}
== APP == Order received :  {"orderId":2}
== APP == Order received :  {"orderId":3}
== APP == Order received :  {"orderId":4}
== APP == Order received :  {"orderId":5}
== APP == Order received :  {"orderId":6}
== APP == Order received :  {"orderId":7}
== APP == Order received :  {"orderId":8}
== APP == Order received :  {"orderId":9}
== APP == Order received :  {"orderId":10}

Tell us what you think!

We’re continuously working to improve our Quickstart examples and value your feedback. Did you find this Quickstart helpful? Do you have suggestions for improvement?

Join the discussion in our discord channel.

Next Steps

Explore Dapr tutorials >>

2 - Quickstart: Publish and Subscribe

Get started with Dapr’s Publish and Subscribe building block

Let’s take a look at Dapr’s Publish and Subscribe (Pub/sub) building block. In this Quickstart, you will run a publisher microservice and a subscriber microservice to demonstrate how Dapr enables a Pub/sub pattern.

  1. Using a publisher service, developers can repeatedly publish messages to a topic.
  2. A Pub/sub component queues or brokers those messages. Our example below uses Redis, you can use RabbitMQ, Kafka, etc.
  3. The subscriber to that topic pulls messages from the queue and processes them.

You can try out this pub/sub quickstart by either:

Run using Multi-App Run

Select your preferred language-specific Dapr SDK before proceeding with the Quickstart.

Step 1: Pre-requisites

For this example, you will need:

Step 2: Set up the environment

Clone the sample provided in the Quickstarts repo.

git clone https://github.com/dapr/quickstarts.git

From the root of the Quickstarts directory, navigate into the pub/sub directory:

cd pub_sub/python/sdk

Install the dependencies for the order-processor and checkout apps:

cd ./checkout
pip3 install -r requirements.txt
cd ..
cd ./order-processor
pip3 install -r requirements.txt
cd ..
cd ./order-processor-fastapi
pip3 install -r requirements.txt
cd ..

Step 3: Run the publisher and subscriber

With the following command, simultaneously run the following services alongside their own Dapr sidecars:

  • The order-processor subscriber
  • The checkout publisher
dapr run -f .

Note: Since Python3.exe is not defined in Windows, you may need to change python3 to python in the dapr.yaml file before running dapr run -f .

Expected output

== APP - checkout-sdk == Published data: Order { OrderId = 1 }
== APP - order-processor == Subscriber received : Order { OrderId = 1 }
== APP - checkout-sdk == Published data: Order { OrderId = 2 }
== APP - order-processor == Subscriber received : Order { OrderId = 2 }
== APP - checkout-sdk == Published data: Order { OrderId = 3 }
== APP - order-processor == Subscriber received : Order { OrderId = 3 }
== APP - checkout-sdk == Published data: Order { OrderId = 4 }
== APP - order-processor == Subscriber received : Order { OrderId = 4 }
== APP - checkout-sdk == Published data: Order { OrderId = 5 }
== APP - order-processor == Subscriber received : Order { OrderId = 5 }
== APP - checkout-sdk == Published data: Order { OrderId = 6 }
== APP - order-processor == Subscriber received : Order { OrderId = 6 }
== APP - checkout-sdk == Published data: Order { OrderId = 7 }
== APP - order-processor == Subscriber received : Order { OrderId = 7 }
== APP - checkout-sdk == Published data: Order { OrderId = 8 }
== APP - order-processor == Subscriber received : Order { OrderId = 8 }
== APP - checkout-sdk == Published data: Order { OrderId = 9 }
== APP - order-processor == Subscriber received : Order { OrderId = 9 }
== APP - checkout-sdk == Published data: Order { OrderId = 10 }
== APP - order-processor == Subscriber received : Order { OrderId = 10 }
Exited App successfully

What happened?

When you ran dapr init during Dapr install, the following YAML files were generated in the .dapr/components directory:

Running dapr run -f . in this Quickstart started both the subscriber and publisher applications.

dapr.yaml Multi-App Run template file

Running the Multi-App Run template file with dapr run -f . starts all applications in your project. In this Quickstart, the dapr.yaml file contains the following:

version: 1
common:
  resourcesPath: ../../components/
apps:
  - appID: order-processor-sdk
    appDirPath: ./order-processor/
    appPort: 6001
    command: ["uvicorn", "app:app"]
  - appID: checkout-sdk
    appDirPath: ./checkout/
    command: ["python3", "app.py"]
pubsub.yaml component file

With the pubsub.yaml component, you can easily swap out underlying components without application code changes.

The Redis pubsub.yaml file included for this Quickstart contains the following:

apiVersion: dapr.io/v1alpha1
kind: Component
metadata:
  name: orderpubsub
spec:
  type: pubsub.redis
  version: v1
  metadata:
  - name: redisHost
    value: localhost:6379
  - name: redisPassword
    value: ""

In the component YAML file:

  • metadata/name is how your application talks to the component.
  • spec/metadata defines the connection to the instance of the component.
  • scopes specify which application can use the component.
order-processor subscriber

In the order-processor subscriber, you subscribe to the Redis instance called orderpubsub (as defined in the pubsub.yaml component) and topic orders. This enables your app code to talk to the Redis component instance through the Dapr sidecar.

# Register Dapr pub/sub subscriptions
@app.route('/dapr/subscribe', methods=['GET'])
def subscribe():
    subscriptions = [{
        'pubsubname': 'orderpubsub',
        'topic': 'orders',
        'route': 'orders'
    }]
    print('Dapr pub/sub is subscribed to: ' + json.dumps(subscriptions))
    return jsonify(subscriptions)


# Dapr subscription in /dapr/subscribe sets up this route
@app.route('/orders', methods=['POST'])
def orders_subscriber():
    event = from_http(request.headers, request.get_data())
    print('Subscriber received : ' + event.data['orderid'], flush=True)
    return json.dumps({'success': True}), 200, {
        'ContentType': 'application/json'}


app.run(port=5001)
checkout publisher

In the checkout publisher, you publish the orderId message to the Redis instance called orderpubsub (as defined in the pubsub.yaml component) and topic orders. As soon as the service starts, it publishes in a loop:

with DaprClient() as client:
    # Publish an event/message using Dapr PubSub
    result = client.publish_event(
        pubsub_name='orderpubsub',
        topic_name='orders',
        data=json.dumps(order),
        data_content_type='application/json',
    )

Step 1: Pre-requisites

For this example, you will need:

Step 2: Set up the environment

Clone the sample provided in the Quickstarts repo.

git clone https://github.com/dapr/quickstarts.git

From the root of the Quickstarts directory, navigate into the pub/sub directory:

cd pub_sub/javascript/sdk

Install the dependencies for the order-processor and checkout apps:

cd ./order-processor
npm install
cd ..
cd ./checkout
npm install
cd ..

Step 3: Run the publisher and subscriber

With the following command, simultaneously run the following services alongside their own Dapr sidecars:

  • The order-processor subscriber
  • The checkout publisher
dapr run -f .

Expected output

== APP - checkout-sdk == Published data: Order { OrderId = 1 }
== APP - order-processor == Subscriber received : Order { OrderId = 1 }
== APP - checkout-sdk == Published data: Order { OrderId = 2 }
== APP - order-processor == Subscriber received : Order { OrderId = 2 }
== APP - checkout-sdk == Published data: Order { OrderId = 3 }
== APP - order-processor == Subscriber received : Order { OrderId = 3 }
== APP - checkout-sdk == Published data: Order { OrderId = 4 }
== APP - order-processor == Subscriber received : Order { OrderId = 4 }
== APP - checkout-sdk == Published data: Order { OrderId = 5 }
== APP - order-processor == Subscriber received : Order { OrderId = 5 }
== APP - checkout-sdk == Published data: Order { OrderId = 6 }
== APP - order-processor == Subscriber received : Order { OrderId = 6 }
== APP - checkout-sdk == Published data: Order { OrderId = 7 }
== APP - order-processor == Subscriber received : Order { OrderId = 7 }
== APP - checkout-sdk == Published data: Order { OrderId = 8 }
== APP - order-processor == Subscriber received : Order { OrderId = 8 }
== APP - checkout-sdk == Published data: Order { OrderId = 9 }
== APP - order-processor == Subscriber received : Order { OrderId = 9 }
== APP - checkout-sdk == Published data: Order { OrderId = 10 }
== APP - order-processor == Subscriber received : Order { OrderId = 10 }
Exited App successfully

What happened?

When you ran dapr init during Dapr install, the following YAML files were generated in the .dapr/components directory:

Running dapr run -f . in this Quickstart started both the subscriber and publisher applications.

dapr.yaml Multi-App Run template file

Running the Multi-App Run template file with dapr run -f . starts all applications in your project. In this Quickstart, the dapr.yaml file contains the following:

version: 1
common:
  resourcesPath: ../../components/
apps:
  - appID: order-processor
    appDirPath: ./order-processor/
    appPort: 5002
    command: ["npm", "run", "start"]
  - appID: checkout-sdk
    appDirPath: ./checkout/
    command: ["npm", "run", "start"]
pubsub.yaml component file

With the pubsub.yaml component, you can easily swap out underlying components without application code changes.

The Redis pubsub.yaml file included for this Quickstart contains the following:

apiVersion: dapr.io/v1alpha1
kind: Component
metadata:
  name: orderpubsub
spec:
  type: pubsub.redis
  version: v1
  metadata:
  - name: redisHost
    value: localhost:6379
  - name: redisPassword
    value: ""

In the component YAML file:

  • metadata/name is how your application talks to the component.
  • spec/metadata defines the connection to the instance of the component.
  • scopes specify which application can use the component.
order-processor subscriber

In the order-processor subscriber, you subscribe to the Redis instance called orderpubsub (as defined in the pubsub.yaml component) and topic orders. This enables your app code to talk to the Redis component instance through the Dapr sidecar.

server.pubsub.subscribe("orderpubsub", "orders", (data) => console.log("Subscriber received: " + JSON.stringify(data)));
checkout publisher

In the checkout publisher service, you publish the orderId message to the Redis instance called orderpubsub (as defined in the pubsub.yaml component) and topic orders. As soon as the service starts, it publishes in a loop:

const client = new DaprClient();

await client.pubsub.publish(PUBSUB_NAME, PUBSUB_TOPIC, order);
console.log("Published data: " + JSON.stringify(order));

Step 1: Pre-requisites

For this example, you will need:

NOTE: .NET 6 is the minimally supported version of .NET for the Dapr .NET SDK packages in this release. Only .NET 8 and .NET 9 will be supported in Dapr v1.16 and later releases.

Step 2: Set up the environment

Clone the sample provided in the Quickstarts repo.

git clone https://github.com/dapr/quickstarts.git

From the root of the Quickstarts directory, navigate into the pub/sub directory:

cd pub_sub/csharp/sdk

Install the dependencies for the order-processor and checkout apps:

cd ./order-processor
dotnet restore
dotnet build
cd ../checkout
dotnet restore
dotnet build
cd ..

Step 3: Run the publisher and subscriber

With the following command, simultaneously run the following services alongside their own Dapr sidecars:

  • The order-processor subscriber
  • The checkout publisher
dapr run -f .

Expected output

== APP - checkout-sdk == Published data: Order { OrderId = 1 }
== APP - order-processor == Subscriber received : Order { OrderId = 1 }
== APP - checkout-sdk == Published data: Order { OrderId = 2 }
== APP - order-processor == Subscriber received : Order { OrderId = 2 }
== APP - checkout-sdk == Published data: Order { OrderId = 3 }
== APP - order-processor == Subscriber received : Order { OrderId = 3 }
== APP - checkout-sdk == Published data: Order { OrderId = 4 }
== APP - order-processor == Subscriber received : Order { OrderId = 4 }
== APP - checkout-sdk == Published data: Order { OrderId = 5 }
== APP - order-processor == Subscriber received : Order { OrderId = 5 }
== APP - checkout-sdk == Published data: Order { OrderId = 6 }
== APP - order-processor == Subscriber received : Order { OrderId = 6 }
== APP - checkout-sdk == Published data: Order { OrderId = 7 }
== APP - order-processor == Subscriber received : Order { OrderId = 7 }
== APP - checkout-sdk == Published data: Order { OrderId = 8 }
== APP - order-processor == Subscriber received : Order { OrderId = 8 }
== APP - checkout-sdk == Published data: Order { OrderId = 9 }
== APP - order-processor == Subscriber received : Order { OrderId = 9 }
== APP - checkout-sdk == Published data: Order { OrderId = 10 }
== APP - order-processor == Subscriber received : Order { OrderId = 10 }
Exited App successfully

What happened?

When you ran dapr init during Dapr install, the following YAML files were generated in the .dapr/components directory:

Running dapr run -f . in this Quickstart started both the subscriber and publisher applications.

dapr.yaml Multi-App Run template file

Running the Multi-App Run template file with dapr run -f . starts all applications in your project. In this Quickstart, the dapr.yaml file contains the following:

version: 1
common:
  resourcesPath: ../../components/
apps:
  - appID: order-processor
    appDirPath: ./order-processor/
    appPort: 7006
    command: ["dotnet", "run"]
  - appID: checkout-sdk
    appDirPath: ./checkout/
    command: ["dotnet", "run"]
pubsub.yaml component file

With the pubsub.yaml component, you can easily swap out underlying components without application code changes.

The Redis pubsub.yaml file included for this Quickstart contains the following:

apiVersion: dapr.io/v1alpha1
kind: Component
metadata:
  name: orderpubsub
spec:
  type: pubsub.redis
  version: v1
  metadata:
  - name: redisHost
    value: localhost:6379
  - name: redisPassword
    value: ""

In the component YAML file:

  • metadata/name is how your application talks to the component.
  • spec/metadata defines the connection to the instance of the component.
  • scopes specify which application can use the component.
order-processor subscriber

In the order-processor subscriber, you subscribe to the Redis instance called orderpubsub (as defined in the pubsub.yaml component) and topic orders. This enables your app code to talk to the Redis component instance through the Dapr sidecar.

// Dapr subscription in [Topic] routes orders topic to this route
app.MapPost("/orders", [Topic("orderpubsub", "orders")] (Order order) => {
    Console.WriteLine("Subscriber received : " + order);
    return Results.Ok(order);
});

public record Order([property: JsonPropertyName("orderId")] int OrderId);
checkout publisher

In the checkout publisher, you publish the orderId message to the Redis instance called orderpubsub (as defined in the pubsub.yaml component) and topic orders. As soon as the service starts, it publishes in a loop:

using var client = new DaprClientBuilder().Build();
await client.PublishEventAsync("orderpubsub", "orders", order);
Console.WriteLine("Published data: " + order);

Step 1: Pre-requisites

For this example, you will need:

Step 2: Set up the environment

Clone the sample provided in the Quickstarts repo.

git clone https://github.com/dapr/quickstarts.git

From the root of the Quickstarts directory, navigate into the pub/sub directory:

cd pub_sub/java/sdk

Install the dependencies for the order-processor and checkout apps:

cd ./order-processor
mvn clean install
cd ..
cd ./checkout
mvn clean install
cd ..

Step 3: Run the publisher and subscriber

With the following command, simultaneously run the following services alongside their own Dapr sidecars:

  • The order-processor subscriber
  • The checkout publisher
dapr run -f .

Expected output

== APP - checkout-sdk == Published data: Order { OrderId = 1 }
== APP - order-processor == Subscriber received : Order { OrderId = 1 }
== APP - checkout-sdk == Published data: Order { OrderId = 2 }
== APP - order-processor == Subscriber received : Order { OrderId = 2 }
== APP - checkout-sdk == Published data: Order { OrderId = 3 }
== APP - order-processor == Subscriber received : Order { OrderId = 3 }
== APP - checkout-sdk == Published data: Order { OrderId = 4 }
== APP - order-processor == Subscriber received : Order { OrderId = 4 }
== APP - checkout-sdk == Published data: Order { OrderId = 5 }
== APP - order-processor == Subscriber received : Order { OrderId = 5 }
== APP - checkout-sdk == Published data: Order { OrderId = 6 }
== APP - order-processor == Subscriber received : Order { OrderId = 6 }
== APP - checkout-sdk == Published data: Order { OrderId = 7 }
== APP - order-processor == Subscriber received : Order { OrderId = 7 }
== APP - checkout-sdk == Published data: Order { OrderId = 8 }
== APP - order-processor == Subscriber received : Order { OrderId = 8 }
== APP - checkout-sdk == Published data: Order { OrderId = 9 }
== APP - order-processor == Subscriber received : Order { OrderId = 9 }
== APP - checkout-sdk == Published data: Order { OrderId = 10 }
== APP - order-processor == Subscriber received : Order { OrderId = 10 }
Exited App successfully

What happened?

When you ran dapr init during Dapr install, the following YAML files were generated in the .dapr/components directory:

Running dapr run -f . in this Quickstart started both the subscriber and publisher applications.

dapr.yaml Multi-App Run template file

Running the Multi-App Run template file with dapr run -f . starts all applications in your project. In this Quickstart, the dapr.yaml file contains the following:

version: 1
common:
  resourcesPath: ../../components/
apps:
  - appID: order-processor-sdk
    appDirPath: ./order-processor/target/
    appPort: 8080
    command: ["java", "-jar", "OrderProcessingService-0.0.1-SNAPSHOT.jar"]
  - appID: checkout-sdk
    appDirPath: ./checkout/target/
    command: ["java", "-jar", "CheckoutService-0.0.1-SNAPSHOT.jar"]
pubsub.yaml component file

With the pubsub.yaml component, you can easily swap out underlying components without application code changes.

The Redis pubsub.yaml file included for this Quickstart contains the following:

apiVersion: dapr.io/v1alpha1
kind: Component
metadata:
  name: orderpubsub
spec:
  type: pubsub.redis
  version: v1
  metadata:
  - name: redisHost
    value: localhost:6379
  - name: redisPassword
    value: ""

In the component YAML file:

  • metadata/name is how your application talks to the component.
  • spec/metadata defines the connection to the instance of the component.
  • scopes specify which application can use the component.
order-processor subscriber

In the order-processor subscriber, you subscribe to the Redis instance called orderpubsub (as defined in the pubsub.yaml component) and topic orders. This enables your app code to talk to the Redis component instance through the Dapr sidecar.

@Topic(name = "orders", pubsubName = "orderpubsub")
@PostMapping(path = "/orders", consumes = MediaType.ALL_VALUE)
public Mono<ResponseEntity> getCheckout(@RequestBody(required = false) CloudEvent<Order> cloudEvent) {
    return Mono.fromSupplier(() -> {
        try {
            logger.info("Subscriber received: " + cloudEvent.getData().getOrderId());
            return ResponseEntity.ok("SUCCESS");
        } catch (Exception e) {
            throw new RuntimeException(e);
        }
    });
}
checkout publisher

In the checkout publisher, you publish the orderId message to the Redis instance called orderpubsub (as defined in the pubsub.yaml component) and topic orders. As soon as the service starts, it publishes in a loop:

DaprClient client = new DaprClientBuilder().build();
client.publishEvent(
		PUBSUB_NAME,
		TOPIC_NAME,
		order).block();
logger.info("Published data: " + order.getOrderId());

Step 1: Pre-requisites

For this example, you will need:

Step 2: Set up the environment

Clone the sample provided in the Quickstarts repo.

git clone https://github.com/dapr/quickstarts.git

From the root of the Quickstarts directory, navigate into the pub/sub directory:

cd pub_sub/go/sdk

Install the dependencies for the order-processor and checkout apps:

cd ./order-processor
go build .
cd ../checkout
go build .
cd ..

Step 3: Run the publisher and subscriber

With the following command, simultaneously run the following services alongside their own Dapr sidecars:

  • The order-processor subscriber
  • The checkout publisher
dapr run -f .

Expected output

== APP - checkout-sdk == Published data: Order { OrderId = 1 }
== APP - order-processor == Subscriber received : Order { OrderId = 1 }
== APP - checkout-sdk == Published data: Order { OrderId = 2 }
== APP - order-processor == Subscriber received : Order { OrderId = 2 }
== APP - checkout-sdk == Published data: Order { OrderId = 3 }
== APP - order-processor == Subscriber received : Order { OrderId = 3 }
== APP - checkout-sdk == Published data: Order { OrderId = 4 }
== APP - order-processor == Subscriber received : Order { OrderId = 4 }
== APP - checkout-sdk == Published data: Order { OrderId = 5 }
== APP - order-processor == Subscriber received : Order { OrderId = 5 }
== APP - checkout-sdk == Published data: Order { OrderId = 6 }
== APP - order-processor == Subscriber received : Order { OrderId = 6 }
== APP - checkout-sdk == Published data: Order { OrderId = 7 }
== APP - order-processor == Subscriber received : Order { OrderId = 7 }
== APP - checkout-sdk == Published data: Order { OrderId = 8 }
== APP - order-processor == Subscriber received : Order { OrderId = 8 }
== APP - checkout-sdk == Published data: Order { OrderId = 9 }
== APP - order-processor == Subscriber received : Order { OrderId = 9 }
== APP - checkout-sdk == Published data: Order { OrderId = 10 }
== APP - order-processor == Subscriber received : Order { OrderId = 10 }
Exited App successfully

What happened?

When you ran dapr init during Dapr install, the following YAML files were generated in the .dapr/components directory:

Running dapr run -f . in this Quickstart started both the subscriber and publisher applications.

dapr.yaml Multi-App Run template file

Running the Multi-App Run template file with dapr run -f . starts all applications in your project. In this Quickstart, the dapr.yaml file contains the following:

version: 1
common:
  resourcesPath: ../../components/
apps:
  - appID: order-processor
    appDirPath: ./order-processor/
    appPort: 6005
    command: ["go", "run", "."]
  - appID: checkout-sdk
    appDirPath: ./checkout/
    command: ["go", "run", "."]
pubsub.yaml component file

With the pubsub.yaml component, you can easily swap out underlying components without application code changes.

The Redis pubsub.yaml file included for this Quickstart contains the following:

apiVersion: dapr.io/v1alpha1
kind: Component
metadata:
  name: orderpubsub
spec:
  type: pubsub.redis
  version: v1
  metadata:
  - name: redisHost
    value: localhost:6379
  - name: redisPassword
    value: ""

In the component YAML file:

  • metadata/name is how your application talks to the component.
  • spec/metadata defines the connection to the instance of the component.
  • scopes specify which application can use the component.
order-processor subscriber

In the order-processor subscriber, you subscribe to the Redis instance called orderpubsub (as defined in the pubsub.yaml component) and topic orders. This enables your app code to talk to the Redis component instance through the Dapr sidecar.

func eventHandler(ctx context.Context, e *common.TopicEvent) (retry bool, err error) {
	fmt.Println("Subscriber received: ", e.Data)
	return false, nil
}
checkout publisher

In the checkout publisher, you publish the orderId message to the Redis instance called orderpubsub (as defined in the pubsub.yaml component) and topic orders. As soon as the service starts, it publishes in a loop:

client, err := dapr.NewClient()

if err := client.PublishEvent(ctx, PUBSUB_NAME, PUBSUB_TOPIC, []byte(order)); err != nil {
    panic(err)
}

fmt.Println("Published data: ", order)

Run one application at a time

Select your preferred language-specific Dapr SDK before proceeding with the Quickstart.

Step 1: Pre-requisites

For this example, you will need:

Step 2: Set up the environment

Clone the sample provided in the Quickstarts repo.

git clone https://github.com/dapr/quickstarts.git

Step 3: Subscribe to topics

In a terminal window, from the root of the Quickstarts clone directory navigate to the order-processor directory.

cd pub_sub/python/sdk/order-processor

Install the dependencies:

pip3 install -r requirements.txt

Run the order-processor subscriber service alongside a Dapr sidecar.

dapr run --app-id order-processor --resources-path ../../../components/ --app-port 6002 -- python3 app.py

Note: Since Python3.exe is not defined in Windows, you may need to use python app.py instead of python3 app.py.

In the order-processor subscriber, we’re subscribing to the Redis instance called orderpubsub (as defined in the pubsub.yaml component) and topic orders. This enables your app code to talk to the Redis component instance through the Dapr sidecar.

# Register Dapr pub/sub subscriptions
@app.route('/dapr/subscribe', methods=['GET'])
def subscribe():
    subscriptions = [{
        'pubsubname': 'orderpubsub',
        'topic': 'orders',
        'route': 'orders'
    }]
    print('Dapr pub/sub is subscribed to: ' + json.dumps(subscriptions))
    return jsonify(subscriptions)


# Dapr subscription in /dapr/subscribe sets up this route
@app.route('/orders', methods=['POST'])
def orders_subscriber():
    event = from_http(request.headers, request.get_data())
    print('Subscriber received : ' + event.data['orderid'], flush=True)
    return json.dumps({'success': True}), 200, {
        'ContentType': 'application/json'}


app.run(port=5001)

Step 4: Publish a topic

In a new terminal window, navigate to the checkout directory.

cd pub_sub/python/sdk/checkout

Install the dependencies:

pip3 install -r requirements.txt

Run the checkout publisher service alongside a Dapr sidecar.

dapr run --app-id checkout --resources-path ../../../components/ -- python3 app.py

Note: Since Python3.exe is not defined in Windows, you may need to use python app.py instead of python3 app.py.

In the checkout publisher, we’re publishing the orderId message to the Redis instance called orderpubsub (as defined in the pubsub.yaml component) and topic orders. As soon as the service starts, it publishes in a loop:

with DaprClient() as client:
    # Publish an event/message using Dapr PubSub
    result = client.publish_event(
        pubsub_name='orderpubsub',
        topic_name='orders',
        data=json.dumps(order),
        data_content_type='application/json',
    )

Step 5: View the Pub/sub outputs

The publisher sends orders to the Dapr sidecar while the subscriber receives them.

Publisher output:

== APP == INFO:root:Published data: {"orderId": 1}
== APP == INFO:root:Published data: {"orderId": 2}
== APP == INFO:root:Published data: {"orderId": 3}
== APP == INFO:root:Published data: {"orderId": 4}
== APP == INFO:root:Published data: {"orderId": 5}
== APP == INFO:root:Published data: {"orderId": 6}
== APP == INFO:root:Published data: {"orderId": 7}
== APP == INFO:root:Published data: {"orderId": 8}
== APP == INFO:root:Published data: {"orderId": 9}
== APP == INFO:root:Published data: {"orderId": 10}

Subscriber output:

== APP == INFO:root:Subscriber received: {"orderId": 1}
== APP == INFO:root:Subscriber received: {"orderId": 2}
== APP == INFO:root:Subscriber received: {"orderId": 3}
== APP == INFO:root:Subscriber received: {"orderId": 4}
== APP == INFO:root:Subscriber received: {"orderId": 5}
== APP == INFO:root:Subscriber received: {"orderId": 6}
== APP == INFO:root:Subscriber received: {"orderId": 7}
== APP == INFO:root:Subscriber received: {"orderId": 8}
== APP == INFO:root:Subscriber received: {"orderId": 9}
== APP == INFO:root:Subscriber received: {"orderId": 10}
pubsub.yaml component file

When you run dapr init, Dapr creates a default Redis pubsub.yaml and runs a Redis container on your local machine, located:

  • On Windows, under %UserProfile%\.dapr\components\pubsub.yaml
  • On Linux/MacOS, under ~/.dapr/components/pubsub.yaml

With the pubsub.yaml component, you can easily swap out underlying components without application code changes.

The Redis pubsub.yaml file included for this Quickstart contains the following:

apiVersion: dapr.io/v1alpha1
kind: Component
metadata:
  name: orderpubsub
spec:
  type: pubsub.redis
  version: v1
  metadata:
  - name: redisHost
    value: localhost:6379
  - name: redisPassword
    value: ""

In the YAML file:

  • metadata/name is how your application talks to the component.
  • spec/metadata defines the connection to the instance of the component.
  • scopes specify which application can use the component.

Step 1: Pre-requisites

For this example, you will need:

Step 2: Set up the environment

Clone the sample provided in the Quickstarts repo.

git clone https://github.com/dapr/quickstarts.git

Step 3: Subscribe to topics

In a terminal window, from the root of the Quickstarts clone directory navigate to the order-processor directory.

cd pub_sub/javascript/sdk/order-processor

Install dependencies, which will include the @dapr/dapr package from the JavaScript SDK:

npm install

Verify you have the following files included in the service directory:

  • package.json
  • package-lock.json

Run the order-processor subscriber service alongside a Dapr sidecar.

dapr run --app-port 5002 --app-id order-processing --app-protocol http --dapr-http-port 3501 --resources-path ../../../components -- npm run start

In the order-processor subscriber, we’re subscribing to the Redis instance called orderpubsub (as defined in the pubsub.yaml component) and topic orders. This enables your app code to talk to the Redis component instance through the Dapr sidecar.

server.pubsub.subscribe("orderpubsub", "orders", (data) => console.log("Subscriber received: " + JSON.stringify(data)));

Step 4: Publish a topic

In a new terminal window, from the root of the Quickstarts clone directory, navigate to the checkout directory.

cd pub_sub/javascript/sdk/checkout

Install dependencies, which will include the @dapr/dapr package from the JavaScript SDK:

npm install

Verify you have the following files included in the service directory:

  • package.json
  • package-lock.json

Run the checkout publisher service alongside a Dapr sidecar.

dapr run --app-id checkout --app-protocol http --dapr-http-port 3500 --resources-path ../../../components -- npm run start

In the checkout publisher service, we’re publishing the orderId message to the Redis instance called orderpubsub (as defined in the pubsub.yaml component) and topic orders. As soon as the service starts, it publishes in a loop:

const client = new DaprClient();

await client.pubsub.publish(PUBSUB_NAME, PUBSUB_TOPIC, order);
console.log("Published data: " + JSON.stringify(order));

Step 5: View the Pub/sub outputs

Notice, as specified in the code above, the publisher pushes a random number to the Dapr sidecar while the subscriber receives it.

Publisher output:

== APP == Published data: {"orderId":1}
== APP == Published data: {"orderId":2}
== APP == Published data: {"orderId":3}
== APP == Published data: {"orderId":4}
== APP == Published data: {"orderId":5}
== APP == Published data: {"orderId":6}
== APP == Published data: {"orderId":7}
== APP == Published data: {"orderId":8}
== APP == Published data: {"orderId":9}
== APP == Published data: {"orderId":10}

Subscriber output:

== APP == Subscriber received: {"orderId":1}
== APP == Subscriber received: {"orderId":2}
== APP == Subscriber received: {"orderId":3}
== APP == Subscriber received: {"orderId":4}
== APP == Subscriber received: {"orderId":5}
== APP == Subscriber received: {"orderId":6}
== APP == Subscriber received: {"orderId":7}
== APP == Subscriber received: {"orderId":8}
== APP == Subscriber received: {"orderId":9}
== APP == Subscriber received: {"orderId":10}
pubsub.yaml component file

When you run dapr init, Dapr creates a default Redis pubsub.yaml and runs a Redis container on your local machine, located:

  • On Windows, under %UserProfile%\.dapr\components\pubsub.yaml
  • On Linux/MacOS, under ~/.dapr/components/pubsub.yaml

With the pubsub.yaml component, you can easily swap out underlying components without application code changes.

The Redis pubsub.yaml file included for this Quickstart contains the following:

apiVersion: dapr.io/v1alpha1
kind: Component
metadata:
  name: orderpubsub
spec:
  type: pubsub.redis
  version: v1
  metadata:
  - name: redisHost
    value: localhost:6379
  - name: redisPassword
    value: ""

In the YAML file:

  • metadata/name is how your application talks to the component.
  • spec/metadata defines the connection to the instance of the component.
  • scopes specify which application can use the component.

Step 1: Pre-requisites

For this example, you will need:

Step 2: Set up the environment

Clone the sample provided in the Quickstarts repo.

git clone https://github.com/dapr/quickstarts.git

Step 3: Subscribe to topics

In a terminal window, from the root of the Quickstarts clone directory navigate to the order-processor directory.

cd pub_sub/csharp/sdk/order-processor

Recall NuGet packages:

dotnet restore
dotnet build

Run the order-processor subscriber service alongside a Dapr sidecar.

dapr run --app-id order-processor --resources-path ../../../components --app-port 7006 -- dotnet run

In the order-processor subscriber, we’re subscribing to the Redis instance called orderpubsub (as defined in the pubsub.yaml component) and topic orders. This enables your app code to talk to the Redis component instance through the Dapr sidecar.

// Dapr subscription in [Topic] routes orders topic to this route
app.MapPost("/orders", [Topic("orderpubsub", "orders")] (Order order) => {
    Console.WriteLine("Subscriber received : " + order);
    return Results.Ok(order);
});

public record Order([property: JsonPropertyName("orderId")] int OrderId);

Step 4: Publish a topic

In a new terminal window, from the root of the Quickstarts clone directory, navigate to the checkout directory.

cd pub_sub/csharp/sdk/checkout

Recall NuGet packages:

dotnet restore
dotnet build

Run the checkout publisher service alongside a Dapr sidecar.

dapr run --app-id checkout --resources-path ../../../components -- dotnet run

In the checkout publisher, we’re publishing the orderId message to the Redis instance called orderpubsub (as defined in the pubsub.yaml component) and topic orders. As soon as the service starts, it publishes in a loop:

using var client = new DaprClientBuilder().Build();
await client.PublishEventAsync("orderpubsub", "orders", order);
Console.WriteLine("Published data: " + order);

Step 5: View the Pub/sub outputs

Notice, as specified in the code above, the publisher pushes a random number to the Dapr sidecar while the subscriber receives it.

Publisher output:

== APP == Published data: Order { OrderId = 1 }
== APP == Published data: Order { OrderId = 2 }
== APP == Published data: Order { OrderId = 3 }
== APP == Published data: Order { OrderId = 4 }
== APP == Published data: Order { OrderId = 5 }
== APP == Published data: Order { OrderId = 6 }
== APP == Published data: Order { OrderId = 7 }
== APP == Published data: Order { OrderId = 8 }
== APP == Published data: Order { OrderId = 9 }
== APP == Published data: Order { OrderId = 10 }

Subscriber output:

== APP == Subscriber received: Order { OrderId = 1 }
== APP == Subscriber received: Order { OrderId = 2 }
== APP == Subscriber received: Order { OrderId = 3 }
== APP == Subscriber received: Order { OrderId = 4 }
== APP == Subscriber received: Order { OrderId = 5 }
== APP == Subscriber received: Order { OrderId = 6 }
== APP == Subscriber received: Order { OrderId = 7 }
== APP == Subscriber received: Order { OrderId = 8 }
== APP == Subscriber received: Order { OrderId = 9 }
== APP == Subscriber received: Order { OrderId = 10 }
pubsub.yaml component file

When you run dapr init, Dapr creates a default Redis pubsub.yaml and runs a Redis container on your local machine, located:

  • On Windows, under %UserProfile%\.dapr\components\pubsub.yaml
  • On Linux/MacOS, under ~/.dapr/components/pubsub.yaml

With the pubsub.yaml component, you can easily swap out underlying components without application code changes.

The Redis pubsub.yaml file included for this Quickstart contains the following:

apiVersion: dapr.io/v1alpha1
kind: Component
metadata:
  name: orderpubsub
spec:
  type: pubsub.redis
  version: v1
  metadata:
  - name: redisHost
    value: localhost:6379
  - name: redisPassword
    value: ""

In the YAML file:

  • metadata/name is how your application talks to the component.
  • spec/metadata defines the connection to the instance of the component.
  • scopes specify which application can use the component.

Step 1: Pre-requisites

For this example, you will need:

Step 2: Set up the environment

Clone the sample provided in the Quickstarts repo.

git clone https://github.com/dapr/quickstarts.git

Step 3: Subscribe to topics

In a terminal window, from the root of the Quickstarts clone directory navigate to the order-processor directory.

cd pub_sub/java/sdk/order-processor

Install the dependencies:

mvn clean install

Run the order-processor subscriber service alongside a Dapr sidecar.

dapr run --app-port 8080 --app-id order-processor --resources-path ../../../components -- java -jar target/OrderProcessingService-0.0.1-SNAPSHOT.jar

In the order-processor subscriber, we’re subscribing to the Redis instance called orderpubsub (as defined in the pubsub.yaml component) and topic orders. This enables your app code to talk to the Redis component instance through the Dapr sidecar.

@Topic(name = "orders", pubsubName = "orderpubsub")
@PostMapping(path = "/orders", consumes = MediaType.ALL_VALUE)
public Mono<ResponseEntity> getCheckout(@RequestBody(required = false) CloudEvent<Order> cloudEvent) {
    return Mono.fromSupplier(() -> {
        try {
            logger.info("Subscriber received: " + cloudEvent.getData().getOrderId());
            return ResponseEntity.ok("SUCCESS");
        } catch (Exception e) {
            throw new RuntimeException(e);
        }
    });
}

Step 4: Publish a topic

In a new terminal window, from the root of the Quickstarts clone directory, navigate to the checkout directory.

cd pub_sub/java/sdk/checkout

Install the dependencies:

mvn clean install

Run the checkout publisher service alongside a Dapr sidecar.

dapr run --app-id checkout --resources-path ../../../components -- java -jar target/CheckoutService-0.0.1-SNAPSHOT.jar

In the checkout publisher, we’re publishing the orderId message to the Redis instance called orderpubsub (as defined in the pubsub.yaml component) and topic orders. As soon as the service starts, it publishes in a loop:

DaprClient client = new DaprClientBuilder().build();
client.publishEvent(
		PUBSUB_NAME,
		TOPIC_NAME,
		order).block();
logger.info("Published data: " + order.getOrderId());

Step 5: View the Pub/sub outputs

Notice, as specified in the code above, the publisher pushes a random number to the Dapr sidecar while the subscriber receives it.

Publisher output:

== APP == 7194 [main] INFO com.service.CheckoutServiceApplication - Published data: 1
== APP == 12213 [main] INFO com.service.CheckoutServiceApplication - Published data: 2
== APP == 17233 [main] INFO com.service.CheckoutServiceApplication - Published data: 3
== APP == 22252 [main] INFO com.service.CheckoutServiceApplication - Published data: 4
== APP == 27276 [main] INFO com.service.CheckoutServiceApplication - Published data: 5
== APP == 32320 [main] INFO com.service.CheckoutServiceApplication - Published data: 6
== APP == 37340 [main] INFO com.service.CheckoutServiceApplication - Published data: 7
== APP == 42356 [main] INFO com.service.CheckoutServiceApplication - Published data: 8
== APP == 47386 [main] INFO com.service.CheckoutServiceApplication - Published data: 9
== APP == 52410 [main] INFO com.service.CheckoutServiceApplication - Published data: 10

Subscriber output:

== APP == 2022-03-07 13:31:19.551  INFO 43512 --- [nio-8080-exec-5] c.s.c.OrderProcessingServiceController   : Subscriber received: 1
== APP == 2022-03-07 13:31:19.552  INFO 43512 --- [nio-8080-exec-9] c.s.c.OrderProcessingServiceController   : Subscriber received: 2
== APP == 2022-03-07 13:31:19.551  INFO 43512 --- [nio-8080-exec-6] c.s.c.OrderProcessingServiceController   : Subscriber received: 3
== APP == 2022-03-07 13:31:19.552  INFO 43512 --- [nio-8080-exec-2] c.s.c.OrderProcessingServiceController   : Subscriber received: 4
== APP == 2022-03-07 13:31:19.553  INFO 43512 --- [nio-8080-exec-2] c.s.c.OrderProcessingServiceController   : Subscriber received: 5
== APP == 2022-03-07 13:31:19.553  INFO 43512 --- [nio-8080-exec-9] c.s.c.OrderProcessingServiceController   : Subscriber received: 6
== APP == 2022-03-07 13:31:22.849  INFO 43512 --- [nio-8080-exec-3] c.s.c.OrderProcessingServiceController   : Subscriber received: 7
== APP == 2022-03-07 13:31:27.866  INFO 43512 --- [nio-8080-exec-6] c.s.c.OrderProcessingServiceController   : Subscriber received: 8
== APP == 2022-03-07 13:31:32.895  INFO 43512 --- [nio-8080-exec-6] c.s.c.OrderProcessingServiceController   : Subscriber received: 9
== APP == 2022-03-07 13:31:37.919  INFO 43512 --- [nio-8080-exec-2] c.s.c.OrderProcessingServiceController   : Subscriber received: 10
pubsub.yaml component file

When you run dapr init, Dapr creates a default Redis pubsub.yaml and runs a Redis container on your local machine, located:

  • On Windows, under %UserProfile%\.dapr\components\pubsub.yaml
  • On Linux/MacOS, under ~/.dapr/components/pubsub.yaml

With the pubsub.yaml component, you can easily swap out underlying components without application code changes.

The Redis pubsub.yaml file included for this Quickstart contains the following:

apiVersion: dapr.io/v1alpha1
kind: Component
metadata:
  name: orderpubsub
spec:
  type: pubsub.redis
  version: v1
  metadata:
  - name: redisHost
    value: localhost:6379
  - name: redisPassword
    value: ""
scopes:
  - orderprocessing
  - checkout

In the YAML file:

  • metadata/name is how your application talks to the component.
  • spec/metadata defines the connection to the instance of the component.
  • scopes specify which application can use the component.

Step 1: Pre-requisites

For this example, you will need:

Step 2: Set up the environment

Clone the sample provided in the Quickstarts repo.

git clone https://github.com/dapr/quickstarts.git

Step 3: Subscribe to topics

In a terminal window, from the root of the Quickstarts clone directory navigate to the order-processor directory.

cd pub_sub/go/sdk/order-processor

Install the dependencies and build the application:

go build .

Run the order-processor subscriber service alongside a Dapr sidecar.

dapr run --app-port 6005 --app-id order-processor-sdk --app-protocol http --dapr-http-port 3501 --resources-path ../../../components -- go run .

In the order-processor subscriber, we’re subscribing to the Redis instance called orderpubsub (as defined in the pubsub.yaml component) and topic orders. This enables your app code to talk to the Redis component instance through the Dapr sidecar.

func eventHandler(ctx context.Context, e *common.TopicEvent) (retry bool, err error) {
	fmt.Println("Subscriber received: ", e.Data)
	return false, nil
}

Step 4: Publish a topic

In a new terminal window, from the root of the Quickstarts clone directory, navigate to the checkout directory.

cd pub_sub/go/sdk/checkout

Install the dependencies and build the application:

go build .

Run the checkout publisher service alongside a Dapr sidecar.

dapr run --app-id checkout --app-protocol http --dapr-http-port 3500 --resources-path ../../../components -- go run .

In the checkout publisher, we’re publishing the orderId message to the Redis instance called orderpubsub (as defined in the pubsub.yaml component) and topic orders. As soon as the service starts, it publishes in a loop:

client, err := dapr.NewClient()

if err := client.PublishEvent(ctx, PUBSUB_NAME, PUBSUB_TOPIC, []byte(order)); err != nil {
    panic(err)
}

fmt.Println("Published data: ", order)

Step 5: View the Pub/sub outputs

Notice, as specified in the code above, the publisher pushes a numbered message to the Dapr sidecar while the subscriber receives it.

Publisher output:

== APP == dapr client initializing for: 127.0.0.1:63293
== APP == Published data:  {"orderId":1}
== APP == Published data:  {"orderId":2}
== APP == Published data:  {"orderId":3}
== APP == Published data:  {"orderId":4}
== APP == Published data:  {"orderId":5}
== APP == Published data:  {"orderId":6}
== APP == Published data:  {"orderId":7}
== APP == Published data:  {"orderId":8}
== APP == Published data:  {"orderId":9}
== APP == Published data:  {"orderId":10}

Subscriber output:

== APP == Subscriber received:  {"orderId":1}
== APP == Subscriber received:  {"orderId":2}
== APP == Subscriber received:  {"orderId":3}
== APP == Subscriber received:  {"orderId":4}
== APP == Subscriber received:  {"orderId":5}
== APP == Subscriber received:  {"orderId":6}
== APP == Subscriber received:  {"orderId":7}
== APP == Subscriber received:  {"orderId":8}
== APP == Subscriber received:  {"orderId":9}
== APP == Subscriber received:  {"orderId":10}

Note: the order in which they are received may vary.

pubsub.yaml component file

When you run dapr init, Dapr creates a default Redis pubsub.yaml and runs a Redis container on your local machine, located:

  • On Windows, under %UserProfile%\.dapr\components\pubsub.yaml
  • On Linux/MacOS, under ~/.dapr/components/pubsub.yaml

With the pubsub.yaml component, you can easily swap out underlying components without application code changes.

The Redis pubsub.yaml file included for this Quickstart contains the following:

apiVersion: dapr.io/v1alpha1
kind: Component
metadata:
  name: orderpubsub
spec:
  type: pubsub.redis
  version: v1
  metadata:
  - name: redisHost
    value: localhost:6379
  - name: redisPassword
    value: ""
scopes:
  - orderprocessing
  - checkout

In the YAML file:

  • metadata/name is how your application talks to the component.
  • spec/metadata defines the connection to the instance of the component.
  • scopes specify which application can use the component.

Tell us what you think!

We’re continuously working to improve our Quickstart examples and value your feedback. Did you find this Quickstart helpful? Do you have suggestions for improvement?

Join the discussion in our discord channel.

Next steps

Explore Dapr tutorials >>

3 - Quickstart: Workflow

Get started with the Dapr Workflow building block

Let’s take a look at the Dapr Workflow building block. In this Quickstart, you’ll create a simple console application to demonstrate Dapr’s workflow programming model and the workflow management APIs.

In this guide, you’ll:

  • Run the order-processor application.
  • Start the workflow and watch the workflow activites/tasks execute.
  • Review the workflow logic and the workflow activities and how they’re represented in the code.

The workflow contains the following activities:

  • NotifyActivity: Utilizes a logger to print out messages throughout the workflow.
  • VerifyInventoryActivity: Checks the state store to ensure that there is enough inventory for the purchase.
  • RequestApprovalActivity: Requests approval for orders over a certain cost threshold.
  • ProcessPaymentActivity: Processes and authorizes the payment.
  • UpdateInventoryActivity: Removes the requested items from the state store and updates the store with the new remaining inventory value.

The workflow also contains business logic:

  • The workflow will not proceed with the payment if there is insufficient inventory.
  • The workflow will call the RequestApprovalActivity and wait for an external approval event when the total cost of the order is greater than 5000.
  • If the order is not approved or the approval is timed out, the workflow not proceed with the payment.

Select your preferred language-specific Dapr SDK before proceeding with the Quickstart.

The order-processor console app starts and manages the order_processing_workflow, which simulates purchasing items from a store. The workflow consists of five unique workflow activities, or tasks:

  • notify_activity: Utilizes a logger to print out messages throughout the workflow. These messages notify you when:
    • You have insufficient inventory
    • Your payment couldn’t be processed, etc.
  • verify_inventory_activity: Checks the state store to ensure there is enough inventory present for purchase.
  • request_approval_activity: Requests approval for orders over a certain cost threshold.
  • process_payment_activity: Processes and authorizes the payment.
  • update_inventory_activity: Removes the requested items from the state store and updates the store with the new remaining inventory value.

Step 1: Pre-requisites

For this example, you will need:

Step 2: Set up the environment

Clone the sample provided in the Quickstarts repo.

git clone https://github.com/dapr/quickstarts.git

In a new terminal window, navigate to the order-processor directory:

cd workflows/python/sdk/order-processor

Install the Dapr Python SDK package:

pip3 install -r requirements.txt

Return to the python/sdk directory:

cd ..

Step 3: Run the order processor app

In the terminal, start the order processor app alongside a Dapr sidecar using Multi-App Run. From the python/sdk directory, run the following command:

dapr run -f .

This starts the order-processor app with unique workflow ID and runs the workflow activities.

Expected output:

== APP - order-processor == *** Welcome to the Dapr Workflow console app sample!
== APP - order-processor == *** Using this app, you can place orders that start workflows.
== APP - order-processor == 2025-02-13 11:44:11.357 durabletask-worker INFO: Starting gRPC worker that connects to dns:127.0.0.1:38891
== APP - order-processor == 2025-02-13 11:44:11.361 durabletask-worker INFO: Successfully connected to dns:127.0.0.1:38891. Waiting for work items...
== APP - order-processor == INFO:NotifyActivity:Received order 6830cb00174544a0b062ba818e14fddc for 1 cars at $5000 !
== APP - order-processor == 2025-02-13 11:44:14.157 durabletask-worker INFO: 6830cb00174544a0b062ba818e14fddc: Orchestrator yielded with 1 task(s) and 0 event(s) outstanding.
== APP - order-processor == INFO:VerifyInventoryActivity:Verifying inventory for order 6830cb00174544a0b062ba818e14fddc of 1 cars
== APP - order-processor == INFO:VerifyInventoryActivity:There are 10 Cars available for purchase
== APP - order-processor == 2025-02-13 11:44:14.171 durabletask-worker INFO: 6830cb00174544a0b062ba818e14fddc: Orchestrator yielded with 1 task(s) and 0 event(s) outstanding.
== APP - order-processor == INFO:ProcessPaymentActivity:Processing payment: 6830cb00174544a0b062ba818e14fddc for 1 cars at 5000 USD
== APP - order-processor == INFO:ProcessPaymentActivity:Payment for request ID 6830cb00174544a0b062ba818e14fddc processed successfully
== APP - order-processor == 2025-02-13 11:44:14.177 durabletask-worker INFO: 6830cb00174544a0b062ba818e14fddc: Orchestrator yielded with 1 task(s) and 0 event(s) outstanding.
== APP - order-processor == INFO:UpdateInventoryActivity:Checking inventory for order 6830cb00174544a0b062ba818e14fddc for 1 cars
== APP - order-processor == INFO:UpdateInventoryActivity:There are now 9 cars left in stock
== APP - order-processor == 2025-02-13 11:44:14.189 durabletask-worker INFO: 6830cb00174544a0b062ba818e14fddc: Orchestrator yielded with 1 task(s) and 0 event(s) outstanding.
== APP - order-processor == INFO:NotifyActivity:Order 6830cb00174544a0b062ba818e14fddc has completed!
== APP - order-processor == 2025-02-13 11:44:14.195 durabletask-worker INFO: 6830cb00174544a0b062ba818e14fddc: Orchestration completed with status: COMPLETED
== APP - order-processor == item: InventoryItem(item_name=Paperclip, per_item_cost=5, quantity=100)
== APP - order-processor == item: InventoryItem(item_name=Cars, per_item_cost=5000, quantity=10)
== APP - order-processor == item: InventoryItem(item_name=Computers, per_item_cost=500, quantity=100)
== APP - order-processor == ==========Begin the purchase of item:==========
== APP - order-processor == Starting order workflow, purchasing 1 of cars
== APP - order-processor == 2025-02-13 11:44:16.363 durabletask-client INFO: Starting new 'order_processing_workflow' instance with ID = 'fc8a507e4a2246d2917d3ad4e3111240'.
== APP - order-processor == 2025-02-13 11:44:16.366 durabletask-client INFO: Waiting 30s for instance 'fc8a507e4a2246d2917d3ad4e3111240' to complete.
== APP - order-processor == 2025-02-13 11:44:16.366 durabletask-worker INFO: fc8a507e4a2246d2917d3ad4e3111240: Orchestrator yielded with 1 task(s) and 0 event(s) outstanding.
== APP - order-processor == INFO:NotifyActivity:Received order fc8a507e4a2246d2917d3ad4e3111240 for 1 cars at $5000 !
== APP - order-processor == 2025-02-13 11:44:16.373 durabletask-worker INFO: fc8a507e4a2246d2917d3ad4e3111240: Orchestrator yielded with 1 task(s) and 0 event(s) outstanding.
== APP - order-processor == INFO:VerifyInventoryActivity:Verifying inventory for order fc8a507e4a2246d2917d3ad4e3111240 of 1 cars
== APP - order-processor == INFO:VerifyInventoryActivity:There are 10 Cars available for purchase
== APP - order-processor == 2025-02-13 11:44:16.383 durabletask-worker INFO: fc8a507e4a2246d2917d3ad4e3111240: Orchestrator yielded with 1 task(s) and 0 event(s) outstanding.
== APP - order-processor == INFO:ProcessPaymentActivity:Processing payment: fc8a507e4a2246d2917d3ad4e3111240 for 1 cars at 5000 USD
== APP - order-processor == INFO:ProcessPaymentActivity:Payment for request ID fc8a507e4a2246d2917d3ad4e3111240 processed successfully
== APP - order-processor == 2025-02-13 11:44:16.390 durabletask-worker INFO: fc8a507e4a2246d2917d3ad4e3111240: Orchestrator yielded with 1 task(s) and 0 event(s) outstanding.
== APP - order-processor == INFO:UpdateInventoryActivity:Checking inventory for order fc8a507e4a2246d2917d3ad4e3111240 for 1 cars
== APP - order-processor == INFO:UpdateInventoryActivity:There are now 9 cars left in stock
== APP - order-processor == 2025-02-13 11:44:16.403 durabletask-worker INFO: fc8a507e4a2246d2917d3ad4e3111240: Orchestrator yielded with 1 task(s) and 0 event(s) outstanding.
== APP - order-processor == INFO:NotifyActivity:Order fc8a507e4a2246d2917d3ad4e3111240 has completed!
== APP - order-processor == 2025-02-13 11:44:16.411 durabletask-worker INFO: fc8a507e4a2246d2917d3ad4e3111240: Orchestration completed with status: COMPLETED
== APP - order-processor == 2025-02-13 11:44:16.425 durabletask-client INFO: Instance 'fc8a507e4a2246d2917d3ad4e3111240' completed.
== APP - order-processor == 2025-02-13 11:44:16.425 durabletask-worker INFO: Stopping gRPC worker...
== APP - order-processor == 2025-02-13 11:44:16.426 durabletask-worker INFO: Disconnected from dns:127.0.0.1:38891
== APP - order-processor == 2025-02-13 11:44:16.426 durabletask-worker INFO: No longer listening for work items
== APP - order-processor == 2025-02-13 11:44:16.426 durabletask-worker INFO: Worker shutdown completed
== APP - order-processor == Workflow completed! Result: {"processed": true, "__durabletask_autoobject__": true}

(Optional) Step 4: View in Zipkin

Running dapr init launches the openzipkin/zipkin Docker container. If the container has stopped running, launch the Zipkin Docker container with the following command:

docker run -d -p 9411:9411 openzipkin/zipkin

View the workflow trace spans in the Zipkin web UI (typically at http://localhost:9411/zipkin/).

What happened?

When you ran dapr run -f .:

  1. An OrderPayload is made containing one car.
  2. A unique order ID for the workflow is generated (in the above example, fc8a507e4a2246d2917d3ad4e3111240) and the workflow is scheduled.
  3. The notify_activity workflow activity sends a notification saying an order for one car has been received.
  4. The verify_inventory_activity workflow activity checks the inventory data, determines if you can supply the ordered item, and responds with the number of cars in stock. The inventory is sufficient so the workflow continues.
  5. The total cost of the order is 5000, so the workflow will not call the request_approval_activity activity.
  6. The process_payment_activity workflow activity begins processing payment for order fc8a507e4a2246d2917d3ad4e3111240 and confirms if successful.
  7. The update_inventory_activity workflow activity updates the inventory with the current available cars after the order has been processed.
  8. The notify_activity workflow activity sends a notification saying that order fc8a507e4a2246d2917d3ad4e3111240 has completed.
  9. The workflow terminates as completed and the OrderResult is set to processed.

order-processor/app.py

In the application’s program file:

  • The unique workflow order ID is generated
  • The workflow is scheduled
  • The workflow status is retrieved
  • The workflow and the workflow activities it invokes are registered
from datetime import datetime
from time import sleep

from dapr.clients import DaprClient
from dapr.conf import settings
from dapr.ext.workflow import DaprWorkflowClient, WorkflowStatus

from workflow import wfr, order_processing_workflow
from model import InventoryItem, OrderPayload

store_name = "statestore"
workflow_name = "order_processing_workflow"
default_item_name = "cars"

class WorkflowConsoleApp:    
    def main(self):
        print("*** Welcome to the Dapr Workflow console app sample!", flush=True)
        print("*** Using this app, you can place orders that start workflows.", flush=True)
        
        wfr.start()
        # Wait for the sidecar to become available
        sleep(5)

        wfClient = DaprWorkflowClient()

        baseInventory = {
            "paperclip": InventoryItem("Paperclip", 5, 100),
            "cars": InventoryItem("Cars", 5000, 10),
            "computers": InventoryItem("Computers", 500, 100),
        }


        daprClient = DaprClient(address=f'{settings.DAPR_RUNTIME_HOST}:{settings.DAPR_GRPC_PORT}')
        self.restock_inventory(daprClient, baseInventory)

        print("==========Begin the purchase of item:==========", flush=True)
        item_name = default_item_name
        order_quantity = 1
        total_cost = int(order_quantity) * baseInventory[item_name].per_item_cost
        order = OrderPayload(item_name=item_name, quantity=int(order_quantity), total_cost=total_cost)

        print(f'Starting order workflow, purchasing {order_quantity} of {item_name}', flush=True)
        instance_id = wfClient.schedule_new_workflow(
            workflow=order_processing_workflow, input=order.to_json())

        try:
            state = wfClient.wait_for_workflow_completion(instance_id=instance_id, timeout_in_seconds=30)
            if not state:
                print("Workflow not found!")
            elif state.runtime_status.name == 'COMPLETED':
                print(f'Workflow completed! Result: {state.serialized_output}')
            else:
                print(f'Workflow failed! Status: {state.runtime_status.name}')  # not expected
        except TimeoutError:
            print('*** Workflow timed out!')

        wfr.shutdown()

    def restock_inventory(self, daprClient: DaprClient, baseInventory):
        for key, item in baseInventory.items():
            print(f'item: {item}')
            item_str = f'{{"name": "{item.item_name}", "quantity": {item.quantity},\
                          "per_item_cost": {item.per_item_cost}}}'
            daprClient.save_state(store_name, key, item_str)

if __name__ == '__main__':
    app = WorkflowConsoleApp()
    app.main()

order-processor/workflow.py

In workflow.py, the workflow is defined as a class with all of its associated tasks (determined by workflow activities).

from datetime import timedelta
import logging
import json

from dapr.ext.workflow import DaprWorkflowContext, WorkflowActivityContext, WorkflowRuntime, when_any
from dapr.clients import DaprClient
from dapr.conf import settings

from model import InventoryItem, Notification, InventoryRequest, OrderPayload, OrderResult,\
    PaymentRequest, InventoryResult

store_name = "statestore"

wfr = WorkflowRuntime()

logging.basicConfig(level=logging.INFO)

@wfr.workflow(name="order_processing_workflow")
def order_processing_workflow(ctx: DaprWorkflowContext, order_payload_str: str):
    """Defines the order processing workflow.
    When the order is received, the inventory is checked to see if there is enough inventory to
    fulfill the order. If there is enough inventory, the payment is processed and the inventory is
    updated. If there is not enough inventory, the order is rejected.
    If the total order is greater than $5,000, the order is sent to a manager for approval.
    """
    order_id = ctx.instance_id
    order_payload=json.loads(order_payload_str)
    yield ctx.call_activity(notify_activity, 
                            input=Notification(message=('Received order ' +order_id+ ' for '
                                               +f'{order_payload["quantity"]}' +' ' +f'{order_payload["item_name"]}'
                                               +' at $'+f'{order_payload["total_cost"]}' +' !')))
    result = yield ctx.call_activity(verify_inventory_activity,
                                     input=InventoryRequest(request_id=order_id,
                                                            item_name=order_payload["item_name"],
                                                            quantity=order_payload["quantity"]))
    if not result.success:
        yield ctx.call_activity(notify_activity,
                                input=Notification(message='Insufficient inventory for '
                                                   +f'{order_payload["item_name"]}'+'!'))
        return OrderResult(processed=False)
    
    if order_payload["total_cost"] > 5000:
        yield ctx.call_activity(request_approval_activity, input=order_payload)
        approval_task = ctx.wait_for_external_event("approval_event")
        timeout_event = ctx.create_timer(timedelta(seconds=30))
        winner = yield when_any([approval_task, timeout_event])
        if winner == timeout_event:
            yield ctx.call_activity(notify_activity, 
                                    input=Notification(message='Order '+order_id
                                                       +' has been cancelled due to approval timeout.'))
            return OrderResult(processed=False)
        approval_result = yield approval_task
        if approval_result == False:
            yield ctx.call_activity(notify_activity, input=Notification(
                message=f'Order {order_id} was not approved'))
            return OrderResult(processed=False)    
    
    yield ctx.call_activity(process_payment_activity, input=PaymentRequest(
        request_id=order_id, item_being_purchased=order_payload["item_name"],
        amount=order_payload["total_cost"], quantity=order_payload["quantity"]))

    try:
        yield ctx.call_activity(update_inventory_activity, 
                                input=PaymentRequest(request_id=order_id,
                                                     item_being_purchased=order_payload["item_name"],
                                                     amount=order_payload["total_cost"],
                                                     quantity=order_payload["quantity"]))
    except Exception:
        yield ctx.call_activity(notify_activity, 
                                input=Notification(message=f'Order {order_id} Failed!'))
        return OrderResult(processed=False)

    yield ctx.call_activity(notify_activity, input=Notification(
        message=f'Order {order_id} has completed!'))
    return OrderResult(processed=True)

@wfr.activity(name="notify_activity")
def notify_activity(ctx: WorkflowActivityContext, input: Notification):
    """Defines Notify Activity. This is used by the workflow to send out a notification"""
    # Create a logger
    logger = logging.getLogger('NotifyActivity')
    logger.info(input.message)

@wfr.activity(name="process_payment_activity")
def process_payment_activity(ctx: WorkflowActivityContext, input: PaymentRequest):
    """Defines Process Payment Activity.This is used by the workflow to process a payment"""
    logger = logging.getLogger('ProcessPaymentActivity')
    logger.info('Processing payment: '+f'{input.request_id}'+' for '
                +f'{input.quantity}' +' ' +f'{input.item_being_purchased}'+' at '+f'{input.amount}'
                +' USD')
    logger.info(f'Payment for request ID {input.request_id} processed successfully')

@wfr.activity(name="verify_inventory_activity")
def verify_inventory_activity(ctx: WorkflowActivityContext,
                              input: InventoryRequest) -> InventoryResult:
    """Defines Verify Inventory Activity. This is used by the workflow to verify if inventory
    is available for the order"""
    logger = logging.getLogger('VerifyInventoryActivity')

    logger.info('Verifying inventory for order '+f'{input.request_id}'+' of '
                +f'{input.quantity}' +' ' +f'{input.item_name}')
    with DaprClient(f'{settings.DAPR_RUNTIME_HOST}:{settings.DAPR_GRPC_PORT}') as client:
        result = client.get_state(store_name, input.item_name)
    if result.data is None:
        return InventoryResult(False, None)
    res_json=json.loads(str(result.data.decode('utf-8')))
    logger.info(f'There are {res_json["quantity"]} {res_json["name"]} available for purchase')
    inventory_item = InventoryItem(item_name=input.item_name,
                                  per_item_cost=res_json['per_item_cost'],
                                  quantity=res_json['quantity'])

    if res_json['quantity'] >= input.quantity:
        return InventoryResult(True, inventory_item)
    return InventoryResult(False, None)

@wfr.activity(name="update_inventory_activity")
def update_inventory_activity(ctx: WorkflowActivityContext,
                              input: PaymentRequest) -> InventoryResult:
    """Defines Update Inventory Activity. This is used by the workflow to check if inventory
    is sufficient to fulfill the order and updates inventory by reducing order quantity from
    inventory."""
    logger = logging.getLogger('UpdateInventoryActivity')

    logger.info('Checking inventory for order ' +f'{input.request_id}'+' for '
                +f'{input.quantity}' +' ' +f'{input.item_being_purchased}')
    with DaprClient(f'{settings.DAPR_RUNTIME_HOST}:{settings.DAPR_GRPC_PORT}') as client:
        result = client.get_state(store_name, input.item_being_purchased)
        res_json=json.loads(str(result.data.decode('utf-8')))
        new_quantity = res_json['quantity'] - input.quantity
        per_item_cost = res_json['per_item_cost']
        if new_quantity < 0:
            raise ValueError('Inventory update for request ID '+f'{input.item_being_purchased}'
                             +' could not be processed. Insufficient inventory.')
        new_val = f'{{"name": "{input.item_being_purchased}", "quantity": {str(new_quantity)}, "per_item_cost": {str(per_item_cost)}}}'
        client.save_state(store_name, input.item_being_purchased, new_val)
        logger.info(f'There are now {new_quantity} {input.item_being_purchased} left in stock')

@wfr.activity(name="request_approval_activity")
def request_approval_activity(ctx: WorkflowActivityContext,
                             input: OrderPayload):
    """Defines Request Approval Activity. This is used by the workflow to request approval
    for payment of an order. This activity is used only if the order total cost is greater than
    a particular threshold"""
    logger = logging.getLogger('RequestApprovalActivity')

    logger.info('Requesting approval for payment of '+f'{input["total_cost"]}'+' USD for '
                +f'{input["quantity"]}' +' ' +f'{input["item_name"]}')

The order-processor console app starts and manages the lifecycle of an order processing workflow that stores and retrieves data in a state store. The workflow consists of four workflow activities, or tasks:

  • notifyActivity: Utilizes a logger to print out messages throughout the workflow. These messages notify the user when there is insufficient inventory, their payment couldn’t be processed, and more.
  • verifyInventoryActivity: Checks the state store to ensure that there is enough inventory present for purchase.
  • requestApprovalActivity: Requests approval for orders over a certain threshold.
  • processPaymentActivity: Processes and authorizes the payment.
  • updateInventoryActivity: Updates the state store with the new remaining inventory value.

Step 1: Pre-requisites

For this example, you will need:

Step 2: Set up the environment

Clone the sample provided in the Quickstarts repo.

git clone https://github.com/dapr/quickstarts.git

In a new terminal window, navigate to the order-processor directory:

cd workflows/javascript/sdk/order-processor

Install the dependencies:

cd ./javascript/sdk
npm install
npm run build

Step 3: Run the order processor app

In the terminal, start the order processor app alongside a Dapr sidecar using Multi-App Run. From the javascript/sdk directory, run the following command:

dapr run -f .

This starts the order-processor app with unique workflow ID and runs the workflow activities.

Expected output:

== APP - order-processor == Starting new orderProcessingWorkflow instance with ID = f5087775-779c-4e73-ac77-08edfcb375f4
== APP - order-processor == Orchestration scheduled with ID: f5087775-779c-4e73-ac77-08edfcb375f4
== APP - order-processor == Waiting 30 seconds for instance f5087775-779c-4e73-ac77-08edfcb375f4 to complete...
== APP - order-processor == Received "Orchestrator Request" work item with instance id 'f5087775-779c-4e73-ac77-08edfcb375f4'
== APP - order-processor == f5087775-779c-4e73-ac77-08edfcb375f4: Rebuilding local state with 0 history event...
== APP - order-processor == f5087775-779c-4e73-ac77-08edfcb375f4: Processing 2 new history event(s): [ORCHESTRATORSTARTED=1, EXECUTIONSTARTED=1]
== APP - order-processor == Processing order f5087775-779c-4e73-ac77-08edfcb375f4...
== APP - order-processor == f5087775-779c-4e73-ac77-08edfcb375f4: Waiting for 1 task(s) and 0 event(s) to complete...
== APP - order-processor == f5087775-779c-4e73-ac77-08edfcb375f4: Returning 1 action(s)
== APP - order-processor == Received "Activity Request" work item
== APP - order-processor == Received order f5087775-779c-4e73-ac77-08edfcb375f4 for 1 car at a total cost of 5000
== APP - order-processor == Activity notifyActivity completed with output undefined (0 chars)
== APP - order-processor == Received "Orchestrator Request" work item with instance id 'f5087775-779c-4e73-ac77-08edfcb375f4'
== APP - order-processor == f5087775-779c-4e73-ac77-08edfcb375f4: Rebuilding local state with 3 history event...
== APP - order-processor == Processing order f5087775-779c-4e73-ac77-08edfcb375f4...
== APP - order-processor == f5087775-779c-4e73-ac77-08edfcb375f4: Processing 2 new history event(s): [ORCHESTRATORSTARTED=1, TASKCOMPLETED=1]
== APP - order-processor == f5087775-779c-4e73-ac77-08edfcb375f4: Waiting for 1 task(s) and 0 event(s) to complete...
== APP - order-processor == f5087775-779c-4e73-ac77-08edfcb375f4: Returning 1 action(s)
== APP - order-processor == Received "Activity Request" work item
== APP - order-processor == Verifying inventory for f5087775-779c-4e73-ac77-08edfcb375f4 of 1 car
== APP - order-processor == 2025-02-13T10:33:21.622Z INFO [HTTPClient, HTTPClient] Sidecar Started
== APP - order-processor == There are 10 car in stock
== APP - order-processor == Activity verifyInventoryActivity completed with output {"success":true,"inventoryItem":{"itemName":"car","perItemCost":5000,"quantity":10}} (84 chars)
== APP - order-processor == Received "Orchestrator Request" work item with instance id 'f5087775-779c-4e73-ac77-08edfcb375f4'
== APP - order-processor == f5087775-779c-4e73-ac77-08edfcb375f4: Rebuilding local state with 6 history event...
== APP - order-processor == Processing order f5087775-779c-4e73-ac77-08edfcb375f4...
== APP - order-processor == f5087775-779c-4e73-ac77-08edfcb375f4: Processing 2 new history event(s): [ORCHESTRATORSTARTED=1, TASKCOMPLETED=1]
== APP - order-processor == f5087775-779c-4e73-ac77-08edfcb375f4: Waiting for 1 task(s) and 0 event(s) to complete...
== APP - order-processor == f5087775-779c-4e73-ac77-08edfcb375f4: Returning 1 action(s)
== APP - order-processor == Received "Activity Request" work item
== APP - order-processor == Processing payment for order car
== APP - order-processor == Payment of 5000 for 1 car processed successfully
== APP - order-processor == Activity processPaymentActivity completed with output true (4 chars)
== APP - order-processor == Received "Orchestrator Request" work item with instance id 'f5087775-779c-4e73-ac77-08edfcb375f4'
== APP - order-processor == f5087775-779c-4e73-ac77-08edfcb375f4: Rebuilding local state with 9 history event...
== APP - order-processor == Processing order f5087775-779c-4e73-ac77-08edfcb375f4...
== APP - order-processor == f5087775-779c-4e73-ac77-08edfcb375f4: Processing 2 new history event(s): [ORCHESTRATORSTARTED=1, TASKCOMPLETED=1]
== APP - order-processor == f5087775-779c-4e73-ac77-08edfcb375f4: Waiting for 1 task(s) and 0 event(s) to complete...
== APP - order-processor == f5087775-779c-4e73-ac77-08edfcb375f4: Returning 1 action(s)
== APP - order-processor == Received "Activity Request" work item
== APP - order-processor == Updating inventory for f5087775-779c-4e73-ac77-08edfcb375f4 of 1 car
== APP - order-processor == Inventory updated for f5087775-779c-4e73-ac77-08edfcb375f4, there are now 9 car in stock
== APP - order-processor == Activity updateInventoryActivity completed with output {"success":true,"inventoryItem":{"itemName":"car","perItemCost":5000,"quantity":9}} (83 chars)
== APP - order-processor == Received "Orchestrator Request" work item with instance id 'f5087775-779c-4e73-ac77-08edfcb375f4'
== APP - order-processor == f5087775-779c-4e73-ac77-08edfcb375f4: Rebuilding local state with 12 history event...
== APP - order-processor == Processing order f5087775-779c-4e73-ac77-08edfcb375f4...
== APP - order-processor == f5087775-779c-4e73-ac77-08edfcb375f4: Processing 2 new history event(s): [ORCHESTRATORSTARTED=1, TASKCOMPLETED=1]
== APP - order-processor == f5087775-779c-4e73-ac77-08edfcb375f4: Waiting for 1 task(s) and 0 event(s) to complete...
== APP - order-processor == f5087775-779c-4e73-ac77-08edfcb375f4: Returning 1 action(s)
== APP - order-processor == Received "Activity Request" work item
== APP - order-processor == order f5087775-779c-4e73-ac77-08edfcb375f4 processed successfully!
== APP - order-processor == Activity notifyActivity completed with output undefined (0 chars)
== APP - order-processor == Received "Orchestrator Request" work item with instance id 'f5087775-779c-4e73-ac77-08edfcb375f4'
== APP - order-processor == f5087775-779c-4e73-ac77-08edfcb375f4: Rebuilding local state with 15 history event...
== APP - order-processor == Processing order f5087775-779c-4e73-ac77-08edfcb375f4...
== APP - order-processor == f5087775-779c-4e73-ac77-08edfcb375f4: Processing 2 new history event(s): [ORCHESTRATORSTARTED=1, TASKCOMPLETED=1]
== APP - order-processor == Order f5087775-779c-4e73-ac77-08edfcb375f4 processed successfully!
== APP - order-processor == f5087775-779c-4e73-ac77-08edfcb375f4: Orchestration completed with status COMPLETED
== APP - order-processor == f5087775-779c-4e73-ac77-08edfcb375f4: Returning 1 action(s)
== APP - order-processor == Instance f5087775-779c-4e73-ac77-08edfcb375f4 completed
== APP - order-processor == Orchestration completed! Result: {"processed":true}

(Optional) Step 4: View in Zipkin

Running dapr init launches the openzipkin/zipkin Docker container. If the container has stopped running, launch the Zipkin Docker container with the following command:

docker run -d -p 9411:9411 openzipkin/zipkin

View the workflow trace spans in the Zipkin web UI (typically at http://localhost:9411/zipkin/).

What happened?

When you ran dapr run -f .:

  1. A unique order ID for the workflow is generated (in the above example, f5087775-779c-4e73-ac77-08edfcb375f4) and the workflow is scheduled.
  2. The notifyActivity workflow activity sends a notification saying an order for 1 car has been received.
  3. The verifyInventoryActivity workflow activity checks the inventory data, determines if you can supply the ordered item, and responds with the number of cars in stock.
  4. Your workflow starts and notifies you of its status.
  5. The requestApprovalActivity workflow activity requests approval for order f5087775-779c-4e73-ac77-08edfcb375f4
  6. The processPaymentActivity workflow activity begins processing payment for order f5087775-779c-4e73-ac77-08edfcb375f4 and confirms if successful.
  7. The updateInventoryActivity workflow activity updates the inventory with the current available cars after the order has been processed.
  8. The notifyActivity workflow activity sends a notification saying that order f5087775-779c-4e73-ac77-08edfcb375f4 has completed and processed.
  9. The workflow terminates as completed and processed.

order-processor/app.ts

In the application file:

  • The unique workflow order ID is generated
  • The workflow is scheduled
  • The workflow status is retrieved
  • The workflow and the workflow activities it invokes are registered
import { DaprWorkflowClient, WorkflowRuntime, DaprClient, CommunicationProtocolEnum } from "@dapr/dapr";
import { InventoryItem, OrderPayload } from "./model";
import { notifyActivity, orderProcessingWorkflow, processPaymentActivity, requestApprovalActivity, verifyInventoryActivity as verifyInventoryActivity, updateInventoryActivity } from "./orderProcessingWorkflow";

const workflowWorker = new WorkflowRuntime();

async function start() {
  // Update the gRPC client and worker to use a local address and port
  const workflowClient = new DaprWorkflowClient();


  const daprHost = process.env.DAPR_HOST ?? "127.0.0.1";
  const daprPort = process.env.DAPR_GRPC_PORT ?? "50001";

  const daprClient = new DaprClient({
    daprHost,
    daprPort,
    communicationProtocol: CommunicationProtocolEnum.GRPC,
  });

  const storeName = "statestore";

  const inventory = new InventoryItem("car", 5000, 10);
  const key = inventory.itemName;

  await daprClient.state.save(storeName, [
    {
      key: key,
      value: inventory,
    }
  ]);

  const order = new OrderPayload("car", 5000, 1);

  workflowWorker
  .registerWorkflow(orderProcessingWorkflow)
  .registerActivity(notifyActivity)
  .registerActivity(verifyInventoryActivity)
  .registerActivity(requestApprovalActivity)
  .registerActivity(processPaymentActivity)
  .registerActivity(updateInventoryActivity);

  // Wrap the worker startup in a try-catch block to handle any errors during startup
  try {
    await workflowWorker.start();
    console.log("Workflow runtime started successfully");
  } catch (error) {
    console.error("Error starting workflow runtime:", error);
  }

  // Schedule a new orchestration
  try {
    const id = await workflowClient.scheduleNewWorkflow(orderProcessingWorkflow, order);
    console.log(`Orchestration scheduled with ID: ${id}`);

    // Wait for orchestration completion
    const state = await workflowClient.waitForWorkflowCompletion(id, undefined, 30);

    console.log(`Orchestration completed! Result: ${state?.serializedOutput}`);
  } catch (error) {
    console.error("Error scheduling or waiting for orchestration:", error);
    throw error;
  }

  await workflowClient.stop();
}

process.on('SIGTERM', () => {
  workflowWorker.stop();
})

start().catch((e) => {
  console.error(e);
  process.exit(1);
});

order-processor/orderProcessingWorkflow.ts

In orderProcessingWorkflow.ts, the workflow is defined as a class with all of its associated tasks (determined by workflow activities).

import { Task, WorkflowActivityContext, WorkflowContext, TWorkflow, DaprClient } from "@dapr/dapr";
import { InventoryItem, InventoryRequest, InventoryResult, OrderNotification, OrderPayload, OrderPaymentRequest, OrderResult } from "./model";

const daprClient = new DaprClient();
const storeName = "statestore";

// Defines Notify Activity. This is used by the workflow to send out a notification
export const notifyActivity = async (_: WorkflowActivityContext, orderNotification: OrderNotification) => {
  console.log(orderNotification.message);
  return;
};

//Defines Verify Inventory Activity. This is used by the workflow to verify if inventory is available for the order
export const verifyInventoryActivity = async (_: WorkflowActivityContext, inventoryRequest: InventoryRequest) => {
  console.log(`Verifying inventory for ${inventoryRequest.requestId} of ${inventoryRequest.quantity} ${inventoryRequest.itemName}`);
  const result = await daprClient.state.get(storeName, inventoryRequest.itemName);
  if (result == undefined || result == null) {
    return new InventoryResult(false, undefined);
  }
  const inventoryItem = result as InventoryItem;
  console.log(`There are ${inventoryItem.quantity} ${inventoryItem.itemName} in stock`);

  if (inventoryItem.quantity >= inventoryRequest.quantity) {
    return new InventoryResult(true, inventoryItem)
  }
  return new InventoryResult(false, undefined);
}

export const requestApprovalActivity = async (_: WorkflowActivityContext, orderPayLoad: OrderPayload) => {
  console.log(`Requesting approval for order ${orderPayLoad.itemName}`);
  return true;
}

export const processPaymentActivity = async (_: WorkflowActivityContext, orderPaymentRequest: OrderPaymentRequest) => {
  console.log(`Processing payment for order ${orderPaymentRequest.itemBeingPurchased}`);
  console.log(`Payment of ${orderPaymentRequest.amount} for ${orderPaymentRequest.quantity} ${orderPaymentRequest.itemBeingPurchased} processed successfully`);
  return true;
}

export const updateInventoryActivity = async (_: WorkflowActivityContext, inventoryRequest: InventoryRequest) => {
  console.log(`Updating inventory for ${inventoryRequest.requestId} of ${inventoryRequest.quantity} ${inventoryRequest.itemName}`);
  const result = await daprClient.state.get(storeName, inventoryRequest.itemName);
  if (result == undefined || result == null) {
    return new InventoryResult(false, undefined);
  }
  const inventoryItem = result as InventoryItem;
  inventoryItem.quantity = inventoryItem.quantity - inventoryRequest.quantity;
  if (inventoryItem.quantity < 0) {
    console.log(`Insufficient inventory for ${inventoryRequest.requestId} of ${inventoryRequest.quantity} ${inventoryRequest.itemName}`);
    return new InventoryResult(false, undefined);
  }
  await daprClient.state.save(storeName, [
    {
      key: inventoryRequest.itemName,
      value: inventoryItem,
    }
  ]);
  console.log(`Inventory updated for ${inventoryRequest.requestId}, there are now ${inventoryItem.quantity} ${inventoryItem.itemName} in stock`);
  return new InventoryResult(true, inventoryItem);
}

export const orderProcessingWorkflow: TWorkflow = async function* (ctx: WorkflowContext, orderPayLoad: OrderPayload): any {
  const orderId = ctx.getWorkflowInstanceId();
  console.log(`Processing order ${orderId}...`);

  const orderNotification: OrderNotification = {
    message: `Received order ${orderId} for ${orderPayLoad.quantity} ${orderPayLoad.itemName} at a total cost of ${orderPayLoad.totalCost}`,
  };
  yield ctx.callActivity(notifyActivity, orderNotification);

  const inventoryRequest = new InventoryRequest(orderId, orderPayLoad.itemName, orderPayLoad.quantity);
  const inventoryResult = yield ctx.callActivity(verifyInventoryActivity, inventoryRequest);

  if (!inventoryResult.success) {
    const orderNotification: OrderNotification = {
      message: `Insufficient inventory for order ${orderId}`,
    };
    yield ctx.callActivity(notifyActivity, orderNotification);
    return new OrderResult(false);
  }

  if (orderPayLoad.totalCost > 5000) {
    yield ctx.callActivity(requestApprovalActivity, orderPayLoad);
    
    const tasks: Task<any>[] = [];
    const approvalEvent = ctx.waitForExternalEvent("approval_event");
    tasks.push(approvalEvent);
    const timeOutEvent = ctx.createTimer(30);
    tasks.push(timeOutEvent);
    const winner = ctx.whenAny(tasks);

    if (winner == timeOutEvent) {
      const orderNotification: OrderNotification = {
        message: `Order ${orderId} has been cancelled due to approval timeout.`,
      };
      yield ctx.callActivity(notifyActivity, orderNotification);
      return new OrderResult(false);
    }
    const approvalResult = approvalEvent.getResult();
    if (!approvalResult) {
      const orderNotification: OrderNotification = {
        message: `Order ${orderId} was not approved.`,
      };
      yield ctx.callActivity(notifyActivity, orderNotification);
      return new OrderResult(false);
    }
  }

  const orderPaymentRequest = new OrderPaymentRequest(orderId, orderPayLoad.itemName, orderPayLoad.totalCost, orderPayLoad.quantity);
  const paymentResult = yield ctx.callActivity(processPaymentActivity, orderPaymentRequest);

  if (!paymentResult) {
    const orderNotification: OrderNotification = {
      message: `Payment for order ${orderId} failed`,
    };
    yield ctx.callActivity(notifyActivity, orderNotification);
    return new OrderResult(false);
  }

  const updatedResult = yield ctx.callActivity(updateInventoryActivity, inventoryRequest);
  if (!updatedResult.success) {
    const orderNotification: OrderNotification = {
      message: `Failed to update inventory for order ${orderId}`,
    };
    yield ctx.callActivity(notifyActivity, orderNotification);
    return new OrderResult(false);
  }

  const orderCompletedNotification: OrderNotification = {
    message: `order ${orderId} processed successfully!`,
  };
  yield ctx.callActivity(notifyActivity, orderCompletedNotification);

  console.log(`Order ${orderId} processed successfully!`);
  return new OrderResult(true);
}

The order-processor console app starts and manages the lifecycle of an order processing workflow that stores and retrieves data in a state store. The workflow consists of four workflow activities, or tasks:

  • NotifyActivity: Utilizes a logger to print out messages throughout the workflow
  • VerifyInventoryActivity: Checks the state store to ensure that there is enough inventory for the purchase.
  • RequestApprovalActivity: Requests approval for orders over a certain threshold.
  • ProcessPaymentActivity: Processes and authorizes the payment.
  • UpdateInventoryActivity: Removes the requested items from the state store and updates the store with the new remaining inventory value.

Step 1: Pre-requisites

For this example, you will need:

NOTE: .NET 7 is the minimally supported version of .NET by Dapr.Workflows in Dapr v1.15. Only .NET 8 and .NET 9 will be supported in Dapr v1.16 and later releases.

Step 2: Set up the environment

Clone the sample provided in the Quickstarts repo.

git clone https://github.com/dapr/quickstarts.git

In a new terminal window, navigate to the order-processor directory:

cd workflows/csharp/sdk/order-processor

Install the dependencies:

dotnet restore
dotnet build

Return to the csharp/sdk directory:

cd ..

Step 3: Run the order processor app

In the terminal, start the order processor app alongside a Dapr sidecar using Multi-App Run. From the csharp/sdk directory, run the following command:

dapr run -f .

This starts the order-processor app with unique workflow ID and runs the workflow activities.

Expected output:

== APP - order-processor == Starting workflow 571a6e25 purchasing 1 Cars
== APP - order-processor == info: Microsoft.DurableTask.Client.Grpc.GrpcDurableTaskClient[40]
== APP - order-processor ==       Scheduling new OrderProcessingWorkflow orchestration with instance ID '571a6e25' and 45 bytes of input data.
== APP - order-processor == info: System.Net.Http.HttpClient.Default.LogicalHandler[100]
== APP - order-processor ==       Start processing HTTP request POST http://localhost:37355/TaskHubSidecarService/StartInstance
== APP - order-processor == info: System.Net.Http.HttpClient.Default.ClientHandler[100]
== APP - order-processor ==       Sending HTTP request POST http://localhost:37355/TaskHubSidecarService/StartInstance
== APP - order-processor == info: System.Net.Http.HttpClient.Default.ClientHandler[101]
== APP - order-processor ==       Received HTTP response headers after 3045.9209ms - 200
== APP - order-processor == info: System.Net.Http.HttpClient.Default.LogicalHandler[101]
== APP - order-processor ==       End processing HTTP request after 3046.0945ms - 200
== APP - order-processor == info: System.Net.Http.HttpClient.Default.ClientHandler[101]
== APP - order-processor ==       Received HTTP response headers after 3016.1346ms - 200
== APP - order-processor == info: System.Net.Http.HttpClient.Default.LogicalHandler[101]
== APP - order-processor ==       End processing HTTP request after 3016.3572ms - 200
== APP - order-processor == info: Microsoft.DurableTask.Client.Grpc.GrpcDurableTaskClient[42]
== APP - order-processor ==       Waiting for instance '571a6e25' to start.
== APP - order-processor == info: System.Net.Http.HttpClient.Default.LogicalHandler[100]
== APP - order-processor ==       Start processing HTTP request POST http://localhost:37355/TaskHubSidecarService/WaitForInstanceStart
== APP - order-processor == info: System.Net.Http.HttpClient.Default.ClientHandler[100]
== APP - order-processor ==       Sending HTTP request POST http://localhost:37355/TaskHubSidecarService/WaitForInstanceStart
== APP - order-processor == info: System.Net.Http.HttpClient.Default.LogicalHandler[100]
== APP - order-processor ==       Start processing HTTP request POST http://localhost:37355/TaskHubSidecarService/CompleteOrchestratorTask
== APP - order-processor == info: System.Net.Http.HttpClient.Default.ClientHandler[100]
== APP - order-processor ==       Sending HTTP request POST http://localhost:37355/TaskHubSidecarService/CompleteOrchestratorTask
== APP - order-processor == info: System.Net.Http.HttpClient.Default.ClientHandler[101]
== APP - order-processor ==       Received HTTP response headers after 2.9095ms - 200
== APP - order-processor == info: System.Net.Http.HttpClient.Default.LogicalHandler[101]
== APP - order-processor ==       End processing HTTP request after 3.0445ms - 200
== APP - order-processor == info: System.Net.Http.HttpClient.Default.ClientHandler[101]
== APP - order-processor ==       Received HTTP response headers after 99.446ms - 200
== APP - order-processor == info: System.Net.Http.HttpClient.Default.LogicalHandler[101]
== APP - order-processor ==       End processing HTTP request after 99.5407ms - 200
== APP - order-processor == Your workflow has started. Here is the status of the workflow: Running
== APP - order-processor == info: Microsoft.DurableTask.Client.Grpc.GrpcDurableTaskClient[43]
== APP - order-processor ==       Waiting for instance '571a6e25' to complete, fail, or terminate.
== APP - order-processor == info: System.Net.Http.HttpClient.Default.LogicalHandler[100]
== APP - order-processor ==       Start processing HTTP request POST http://localhost:37355/TaskHubSidecarService/WaitForInstanceCompletion
== APP - order-processor == info: System.Net.Http.HttpClient.Default.ClientHandler[100]
== APP - order-processor ==       Sending HTTP request POST http://localhost:37355/TaskHubSidecarService/WaitForInstanceCompletion
== APP - order-processor == info: WorkflowConsoleApp.Activities.NotifyActivity[1985924262]
== APP - order-processor ==       Presenting notification Notification { Message = Received order 571a6e25 for 1 Cars at $5000 }
== APP - order-processor == info: System.Net.Http.HttpClient.Default.LogicalHandler[100]
== APP - order-processor ==       Start processing HTTP request POST http://localhost:37355/TaskHubSidecarService/CompleteActivityTask
== APP - order-processor == info: System.Net.Http.HttpClient.Default.ClientHandler[100]
== APP - order-processor ==       Sending HTTP request POST http://localhost:37355/TaskHubSidecarService/CompleteActivityTask
== APP - order-processor == info: System.Net.Http.HttpClient.Default.ClientHandler[101]
== APP - order-processor ==       Received HTTP response headers after 1.6785ms - 200
== APP - order-processor == info: System.Net.Http.HttpClient.Default.LogicalHandler[101]
== APP - order-processor ==       End processing HTTP request after 1.7869ms - 200
== APP - order-processor == info: WorkflowConsoleApp.Workflows.OrderProcessingWorkflow[2013970020]
== APP - order-processor ==       Received request ID '571a6e25' for 1 Cars at $5000
== APP - order-processor == info: System.Net.Http.HttpClient.Default.LogicalHandler[100]
== APP - order-processor ==       Start processing HTTP request POST http://localhost:37355/TaskHubSidecarService/CompleteOrchestratorTask
== APP - order-processor == info: System.Net.Http.HttpClient.Default.ClientHandler[100]
== APP - order-processor ==       Sending HTTP request POST http://localhost:37355/TaskHubSidecarService/CompleteOrchestratorTask
== APP - order-processor == info: System.Net.Http.HttpClient.Default.ClientHandler[101]
== APP - order-processor ==       Received HTTP response headers after 1.1947ms - 200
== APP - order-processor == info: System.Net.Http.HttpClient.Default.LogicalHandler[101]
== APP - order-processor ==       End processing HTTP request after 1.3293ms - 200
== APP - order-processor == info: WorkflowConsoleApp.Activities.VerifyInventoryActivity[1478802116]
== APP - order-processor ==       Reserving inventory for order request ID '571a6e25' of 1 Cars
== APP - order-processor == info: WorkflowConsoleApp.Activities.VerifyInventoryActivity[1130866279]
== APP - order-processor ==       There are: 10 Cars available for purchase
== APP - order-processor == info: System.Net.Http.HttpClient.Default.LogicalHandler[100]
== APP - order-processor ==       Start processing HTTP request POST http://localhost:37355/TaskHubSidecarService/CompleteActivityTask
== APP - order-processor == info: System.Net.Http.HttpClient.Default.ClientHandler[100]
== APP - order-processor ==       Sending HTTP request POST http://localhost:37355/TaskHubSidecarService/CompleteActivityTask
== APP - order-processor == info: System.Net.Http.HttpClient.Default.ClientHandler[101]
== APP - order-processor ==       Received HTTP response headers after 1.8534ms - 200
== APP - order-processor == info: System.Net.Http.HttpClient.Default.LogicalHandler[101]
== APP - order-processor ==       End processing HTTP request after 2.0077ms - 200
== APP - order-processor == info: WorkflowConsoleApp.Workflows.OrderProcessingWorkflow[1162731597]
== APP - order-processor ==       Checked inventory for request ID 'InventoryRequest { RequestId = 571a6e25, ItemName = Cars, Quantity = 1 }'
== APP - order-processor == info: System.Net.Http.HttpClient.Default.LogicalHandler[100]
== APP - order-processor ==       Start processing HTTP request POST http://localhost:37355/TaskHubSidecarService/CompleteOrchestratorTask
== APP - order-processor == info: System.Net.Http.HttpClient.Default.ClientHandler[100]
== APP - order-processor ==       Sending HTTP request POST http://localhost:37355/TaskHubSidecarService/CompleteOrchestratorTask
== APP - order-processor == info: System.Net.Http.HttpClient.Default.ClientHandler[101]
== APP - order-processor ==       Received HTTP response headers after 1.1851ms - 200
== APP - order-processor == info: System.Net.Http.HttpClient.Default.LogicalHandler[101]
== APP - order-processor ==       End processing HTTP request after 1.3742ms - 200
== APP - order-processor == info: WorkflowConsoleApp.Activities.ProcessPaymentActivity[340284070]
== APP - order-processor ==       Processing payment: request ID '571a6e25' for 1 Cars at $5000
== APP - order-processor == info: WorkflowConsoleApp.Activities.ProcessPaymentActivity[1851315765]
== APP - order-processor ==       Payment for request ID '571a6e25' processed successfully
== APP - order-processor == info: System.Net.Http.HttpClient.Default.LogicalHandler[100]
== APP - order-processor ==       Start processing HTTP request POST http://localhost:37355/TaskHubSidecarService/CompleteActivityTask
== APP - order-processor == info: System.Net.Http.HttpClient.Default.ClientHandler[100]
== APP - order-processor ==       Sending HTTP request POST http://localhost:37355/TaskHubSidecarService/CompleteActivityTask
== APP - order-processor == info: System.Net.Http.HttpClient.Default.ClientHandler[101]
== APP - order-processor ==       Received HTTP response headers after 0.8249ms - 200
== APP - order-processor == info: System.Net.Http.HttpClient.Default.LogicalHandler[101]
== APP - order-processor ==       End processing HTTP request after 0.9595ms - 200
== APP - order-processor == info: WorkflowConsoleApp.Workflows.OrderProcessingWorkflow[340284070]
== APP - order-processor ==       Processed payment request as there's sufficient inventory to proceed: PaymentRequest { RequestId = 571a6e25, ItemBeingPurchased = Cars, Amount = 1, Currency = 5000 }
== APP - order-processor == info: System.Net.Http.HttpClient.Default.LogicalHandler[100]
== APP - order-processor ==       Start processing HTTP request POST http://localhost:37355/TaskHubSidecarService/CompleteOrchestratorTask
== APP - order-processor == info: System.Net.Http.HttpClient.Default.ClientHandler[100]
== APP - order-processor ==       Sending HTTP request POST http://localhost:37355/TaskHubSidecarService/CompleteOrchestratorTask
== APP - order-processor == info: System.Net.Http.HttpClient.Default.ClientHandler[101]
== APP - order-processor ==       Received HTTP response headers after 0.4457ms - 200
== APP - order-processor == info: System.Net.Http.HttpClient.Default.LogicalHandler[101]
== APP - order-processor ==       End processing HTTP request after 0.5267ms - 200
== APP - order-processor == info: WorkflowConsoleApp.Activities.UpdateInventoryActivity[2144991393]
== APP - order-processor ==       Checking inventory for request ID '571a6e25' for 1 Cars
== APP - order-processor == info: WorkflowConsoleApp.Activities.UpdateInventoryActivity[1901852920]
== APP - order-processor ==       There are now 9 Cars left in stock
== APP - order-processor == info: System.Net.Http.HttpClient.Default.LogicalHandler[100]
== APP - order-processor ==       Start processing HTTP request POST http://localhost:37355/TaskHubSidecarService/CompleteActivityTask
== APP - order-processor == info: System.Net.Http.HttpClient.Default.ClientHandler[100]
== APP - order-processor ==       Sending HTTP request POST http://localhost:37355/TaskHubSidecarService/CompleteActivityTask
== APP - order-processor == info: System.Net.Http.HttpClient.Default.ClientHandler[101]
== APP - order-processor ==       Received HTTP response headers after 0.6012ms - 200
== APP - order-processor == info: System.Net.Http.HttpClient.Default.LogicalHandler[101]
== APP - order-processor ==       End processing HTTP request after 0.7097ms - 200
== APP - order-processor == info: WorkflowConsoleApp.Workflows.OrderProcessingWorkflow[96138418]
== APP - order-processor ==       Updating available inventory for PaymentRequest { RequestId = 571a6e25, ItemBeingPurchased = Cars, Amount = 1, Currency = 5000 }
== APP - order-processor == info: System.Net.Http.HttpClient.Default.LogicalHandler[100]
== APP - order-processor ==       Start processing HTTP request POST http://localhost:37355/TaskHubSidecarService/CompleteOrchestratorTask
== APP - order-processor == info: System.Net.Http.HttpClient.Default.ClientHandler[100]
== APP - order-processor ==       Sending HTTP request POST http://localhost:37355/TaskHubSidecarService/CompleteOrchestratorTask
== APP - order-processor == info: System.Net.Http.HttpClient.Default.ClientHandler[101]
== APP - order-processor ==       Received HTTP response headers after 0.469ms - 200
== APP - order-processor == info: System.Net.Http.HttpClient.Default.LogicalHandler[101]
== APP - order-processor ==       End processing HTTP request after 0.5431ms - 200
== APP - order-processor == info: WorkflowConsoleApp.Activities.NotifyActivity[1985924262]
== APP - order-processor ==       Presenting notification Notification { Message = Order 571a6e25 has completed! }
== APP - order-processor == info: System.Net.Http.HttpClient.Default.LogicalHandler[100]
== APP - order-processor ==       Start processing HTTP request POST http://localhost:37355/TaskHubSidecarService/CompleteActivityTask
== APP - order-processor == info: System.Net.Http.HttpClient.Default.ClientHandler[100]
== APP - order-processor ==       Sending HTTP request POST http://localhost:37355/TaskHubSidecarService/CompleteActivityTask
== APP - order-processor == info: System.Net.Http.HttpClient.Default.ClientHandler[101]
== APP - order-processor ==       Received HTTP response headers after 0.494ms - 200
== APP - order-processor == info: System.Net.Http.HttpClient.Default.LogicalHandler[101]
== APP - order-processor ==       End processing HTTP request after 0.5685ms - 200
== APP - order-processor == info: WorkflowConsoleApp.Workflows.OrderProcessingWorkflow[510392223]
== APP - order-processor ==       Order 571a6e25 has completed
== APP - order-processor == info: System.Net.Http.HttpClient.Default.LogicalHandler[100]
== APP - order-processor ==       Start processing HTTP request POST http://localhost:37355/TaskHubSidecarService/CompleteOrchestratorTask
== APP - order-processor == info: System.Net.Http.HttpClient.Default.ClientHandler[100]
== APP - order-processor ==       Sending HTTP request POST http://localhost:37355/TaskHubSidecarService/CompleteOrchestratorTask
== APP - order-processor == info: System.Net.Http.HttpClient.Default.ClientHandler[101]
== APP - order-processor ==       Received HTTP response headers after 1.6353ms - 200
== APP - order-processor == info: System.Net.Http.HttpClient.Default.LogicalHandler[101]
== APP - order-processor ==       End processing HTTP request after 1.7546ms - 200
== APP - order-processor == info: System.Net.Http.HttpClient.Default.ClientHandler[101]
== APP - order-processor ==       Received HTTP response headers after 15807.213ms - 200
== APP - order-processor == info: System.Net.Http.HttpClient.Default.LogicalHandler[101]
== APP - order-processor ==       End processing HTTP request after 15807.3675ms - 200
== APP - order-processor == Workflow Status: Completed

(Optional) Step 4: View in Zipkin

Running dapr init launches the openzipkin/zipkin Docker container. If the container has stopped running, launch the Zipkin Docker container with the following command:

docker run -d -p 9411:9411 openzipkin/zipkin

View the workflow trace spans in the Zipkin web UI (typically at http://localhost:9411/zipkin/).

What happened?

When you ran dapr run -f .:

  1. An OrderPayload is made containing one car.
  2. A unique order ID for the workflow is generated (in the above example, 571a6e25) and the workflow is scheduled.
  3. The NotifyActivity workflow activity sends a notification saying an order for one car has been received.
  4. The VerifyInventoryActivity workflow activity checks the inventory data, determines if you can supply the ordered item, and responds with the number of cars in stock. The inventory is sufficient so the workflow continues.
  5. The total cost of the order is 5000, so the workflow will not call the RequestApprovalActivity activity.
  6. The ProcessPaymentActivity workflow activity begins processing payment for order 571a6e25 and confirms if successful.
  7. The UpdateInventoryActivity workflow activity updates the inventory with the current available cars after the order has been processed.
  8. The NotifyActivity workflow activity sends a notification saying that order 571a6e25 has completed.
  9. The workflow terminates as completed and the OrderResult is set to processed.

order-processor/Program.cs

In the application’s program file:

  • The unique workflow order ID is generated
  • The workflow is scheduled
  • The workflow status is retrieved
  • The workflow and the workflow activities it invokes are registered
using Dapr.Client;
using Dapr.Workflow;
using Microsoft.Extensions.Hosting;
using Microsoft.Extensions.DependencyInjection;
using WorkflowConsoleApp.Activities;
using WorkflowConsoleApp.Models;
using WorkflowConsoleApp.Workflows;

const string storeName = "statestore";

// The workflow host is a background service that connects to the sidecar over gRPC
var builder = Host.CreateDefaultBuilder(args).ConfigureServices(services =>
{
    services.AddDaprClient();
    services.AddDaprWorkflow(options =>
    {
        // Note that it's also possible to register a lambda function as the workflow
        // or activity implementation instead of a class.
        options.RegisterWorkflow<OrderProcessingWorkflow>();

        // These are the activities that get invoked by the workflow(s).
        options.RegisterActivity<NotifyActivity>();
        options.RegisterActivity<VerifyInventoryActivity>();
        options.RegisterActivity<RequestApprovalActivity>();
        options.RegisterActivity<ProcessPaymentActivity>();
        options.RegisterActivity<UpdateInventoryActivity>();
    });
});

// Start the app - this is the point where we connect to the Dapr sidecar
using var host = builder.Build();
host.Start();

var daprClient = host.Services.GetRequiredService<DaprClient>();
var workflowClient = host.Services.GetRequiredService<DaprWorkflowClient>();

// Generate a unique ID for the workflow
var orderId = Guid.NewGuid().ToString()[..8];
const string itemToPurchase = "Cars";
const int amountToPurchase = 1;

// Populate the store with items
RestockInventory(itemToPurchase);

// Construct the order
var orderInfo = new OrderPayload(itemToPurchase, 5000, amountToPurchase);

// Start the workflow
Console.WriteLine($"Starting workflow {orderId} purchasing {amountToPurchase} {itemToPurchase}");

await workflowClient.ScheduleNewWorkflowAsync(
    name: nameof(OrderProcessingWorkflow),
    instanceId: orderId,
    input: orderInfo);

// Wait for the workflow to start and confirm the input
var state = await workflowClient.WaitForWorkflowStartAsync(
    instanceId: orderId);

Console.WriteLine($"Your workflow has started. Here is the status of the workflow: {Enum.GetName(typeof(WorkflowRuntimeStatus), state.RuntimeStatus)}");

// Wait for the workflow to complete
state = await workflowClient.WaitForWorkflowCompletionAsync(
    instanceId: orderId);

Console.WriteLine("Workflow Status: {0}", Enum.GetName(typeof(WorkflowRuntimeStatus), state.RuntimeStatus));
return;

void RestockInventory(string itemToPurchase)
{
    daprClient.SaveStateAsync(storeName, itemToPurchase, new OrderPayload(Name: itemToPurchase, TotalCost: 50000, Quantity: 10));
}

order-processor/Workflows/OrderProcessingWorkflow.cs

In OrderProcessingWorkflow.cs, the workflow is defined as a class with all of its associated tasks (determined by workflow activities in separate files).

namespace WorkflowConsoleApp.Workflows;

using Microsoft.Extensions.Logging;
using System.Threading.Tasks;
using Dapr.Workflow;
using DurableTask.Core.Exceptions;
using Activities;
using Models;

internal sealed partial class OrderProcessingWorkflow : Workflow<OrderPayload, OrderResult>
{
    public override async Task<OrderResult> RunAsync(WorkflowContext context, OrderPayload order)
    {
        var logger = context.CreateReplaySafeLogger<OrderProcessingWorkflow>();
        var orderId = context.InstanceId;

        // Notify the user that an order has come through
        await context.CallActivityAsync(nameof(NotifyActivity),
            new Notification($"Received order {orderId} for {order.Quantity} {order.Name} at ${order.TotalCost}"));
        LogOrderReceived(logger, orderId, order.Quantity, order.Name, order.TotalCost);

        // Determine if there is enough of the item available for purchase by checking the inventory
        var inventoryRequest = new InventoryRequest(RequestId: orderId, order.Name, order.Quantity);
        var result = await context.CallActivityAsync<InventoryResult>(
            nameof(VerifyInventoryActivity), inventoryRequest);
        LogCheckInventory(logger, inventoryRequest);
            
        // If there is insufficient inventory, fail and let the user know 
        if (!result.Success)
        {
            // End the workflow here since we don't have sufficient inventory
            await context.CallActivityAsync(nameof(NotifyActivity),
                new Notification($"Insufficient inventory for {order.Name}"));
            LogInsufficientInventory(logger, order.Name);
            return new OrderResult(Processed: false);
        }

        if (order.TotalCost > 5000)
        {
            await context.CallActivityAsync(nameof(RequestApprovalActivity),
                new ApprovalRequest(orderId, order.Name, order.Quantity, order.TotalCost));

            var approvalResponse = await context.WaitForExternalEventAsync<ApprovalResponse>(
                eventName: "ApprovalEvent",
                timeout: TimeSpan.FromSeconds(30));
            if (!approvalResponse.IsApproved)
            {
                await context.CallActivityAsync(nameof(NotifyActivity),
                    new Notification($"Order {orderId} was not approved"));
                LogOrderNotApproved(logger, orderId);
                return new OrderResult(Processed: false);
            }
        }

        // There is enough inventory available so the user can purchase the item(s). Process their payment
        var processPaymentRequest = new PaymentRequest(RequestId: orderId, order.Name, order.Quantity, order.TotalCost);
        await context.CallActivityAsync(nameof(ProcessPaymentActivity),processPaymentRequest);
        LogPaymentProcessing(logger, processPaymentRequest);

        try
        {
            // Update the available inventory
            var paymentRequest = new PaymentRequest(RequestId: orderId, order.Name, order.Quantity, order.TotalCost); 
            await context.CallActivityAsync(nameof(UpdateInventoryActivity), paymentRequest);
            LogInventoryUpdate(logger, paymentRequest);
        }
        catch (TaskFailedException)
        {
            // Let them know their payment was processed, but there's insufficient inventory, so they're getting a refund
            await context.CallActivityAsync(nameof(NotifyActivity),
                new Notification($"Order {orderId} Failed! You are now getting a refund"));
            LogRefund(logger, orderId);
            return new OrderResult(Processed: false);
        }

        // Let them know their payment was processed
        await context.CallActivityAsync(nameof(NotifyActivity), new Notification($"Order {orderId} has completed!"));
        LogSuccessfulOrder(logger, orderId);

        // End the workflow with a success result
        return new OrderResult(Processed: true);
    }

    [LoggerMessage(LogLevel.Information, "Received request ID '{request}' for {quantity} {name} at ${totalCost}")]
    static partial void LogOrderReceived(ILogger logger, string request, int quantity, string name, double totalCost);
    
    [LoggerMessage(LogLevel.Information, "Checked inventory for request ID '{request}'")]
    static partial void LogCheckInventory(ILogger logger, InventoryRequest request);
    
    [LoggerMessage(LogLevel.Information, "Insufficient inventory for order {orderName}")]
    static partial void LogInsufficientInventory(ILogger logger, string orderName);
    
    [LoggerMessage(LogLevel.Information, "Order {orderName} was not approved")]
    static partial void LogOrderNotApproved(ILogger logger, string orderName);

    [LoggerMessage(LogLevel.Information, "Processed payment request as there's sufficient inventory to proceed: {request}")]
    static partial void LogPaymentProcessing(ILogger logger, PaymentRequest request);

    [LoggerMessage(LogLevel.Information, "Updating available inventory for {request}")]
    static partial void LogInventoryUpdate(ILogger logger, PaymentRequest request);

    [LoggerMessage(LogLevel.Information, "Order {orderId} failed due to insufficient inventory - processing refund")]
    static partial void LogRefund(ILogger logger, string orderId);

    [LoggerMessage(LogLevel.Information, "Order {orderId} has completed")]
    static partial void LogSuccessfulOrder(ILogger logger, string orderId);
}

order-processor/Activities directory

The Activities directory holds the four workflow activities used by the workflow, defined in the following files:

  • NotifyActivity.cs
  • VerifyInventoryActivity.cs
  • RequestApprovalActivity.cs
  • ProcessPaymentActivity.cs
  • UpdateInventoryActivity.cs

Watch the demo

Watch this video to walk through the Dapr Workflow .NET demo:

The order-processor console app starts and manages the lifecycle of an order processing workflow that stores and retrieves data in a state store. The workflow consists of four workflow activities, or tasks:

  • NotifyActivity: Utilizes a logger to print out messages throughout the workflow.
  • RequestApprovalActivity: Requests approval for orders over a certain cost threshold.
  • VerifyInventoryActivity: Checks the state store to ensure that there is enough inventory for the purchase.
  • ProcessPaymentActivity: Processes and authorizes the payment.
  • UpdateInventoryActivity: Removes the requested items from the state store and updates the store with the new remaining inventory value.

Step 1: Pre-requisites

For this example, you will need:

Step 2: Set up the environment

Clone the sample provided in the Quickstarts repo.

git clone https://github.com/dapr/quickstarts.git

Navigate to the order-processor directory:

cd workflows/java/sdk/order-processor

Install the dependencies:

mvn clean install

Return to the java/sdk directory:

cd ..

Step 3: Run the order processor app

In the terminal, start the order processor app alongside a Dapr sidecar using Multi-App Run. From the java/sdk directory, run the following command:

cd workflows/java/sdk
dapr run -f .

This starts the order-processor app with unique workflow ID and runs the workflow activities.

Expected output:

== APP - order-processor == *** Welcome to the Dapr Workflow console app sample!
== APP - order-processor == *** Using this app, you can place orders that start workflows.
== APP - order-processor == [main] INFO io.dapr.workflows.runtime.WorkflowRuntimeBuilder - Registered Workflow: OrderProcessingWorkflow
== APP - order-processor == [main] INFO io.dapr.workflows.runtime.WorkflowRuntimeBuilder - Registered Activity: NotifyActivity
== APP - order-processor == [main] INFO io.dapr.workflows.runtime.WorkflowRuntimeBuilder - Registered Activity: ProcessPaymentActivity
== APP - order-processor == [main] INFO io.dapr.workflows.runtime.WorkflowRuntimeBuilder - Registered Activity: RequestApprovalActivity
== APP - order-processor == [main] INFO io.dapr.workflows.runtime.WorkflowRuntimeBuilder - Registered Activity: VerifyInventoryActivity
== APP - order-processor == [main] INFO io.dapr.workflows.runtime.WorkflowRuntimeBuilder - Registered Activity: UpdateInventoryActivity
== APP - order-processor == [main] INFO io.dapr.workflows.runtime.WorkflowRuntimeBuilder - List of registered workflows: [io.dapr.quickstarts.workflows.OrderProcessingWorkflow]
== APP - order-processor == [main] INFO io.dapr.workflows.runtime.WorkflowRuntimeBuilder - List of registered activites: [io.dapr.quickstarts.workflows.activities.NotifyActivity, io.dapr.quickstarts.workflows.activities.UpdateInventoryActivity, io.dapr.quickstarts.workflows.activities.ProcessPaymentActivity, io.dapr.quickstarts.workflows.activities.RequestApprovalActivity, io.dapr.quickstarts.workflows.activities.VerifyInventoryActivity]
== APP - order-processor == [main] INFO io.dapr.workflows.runtime.WorkflowRuntimeBuilder - Successfully built dapr workflow runtime
== APP - order-processor == Start workflow runtime
== APP - order-processor == Feb 12, 2025 2:44:13 PM com.microsoft.durabletask.DurableTaskGrpcWorker startAndBlock
== APP - order-processor == INFO: Durable Task worker is connecting to sidecar at 127.0.0.1:39261.
== APP - order-processor == ==========Begin the purchase of item:==========
== APP - order-processor == Starting order workflow, purchasing 1 of cars
== APP - order-processor == scheduled new workflow instance of OrderProcessingWorkflow with instance ID: d1bf548b-c854-44af-978e-90c61ed88e3c
== APP - order-processor == [Thread-0] INFO io.dapr.workflows.WorkflowContext - Starting Workflow: io.dapr.quickstarts.workflows.OrderProcessingWorkflow
== APP - order-processor == [Thread-0] INFO io.dapr.workflows.WorkflowContext - Instance ID(order ID): d1bf548b-c854-44af-978e-90c61ed88e3c
== APP - order-processor == [Thread-0] INFO io.dapr.workflows.WorkflowContext - Current Orchestration Time: 2025-02-12T14:44:18.154Z
== APP - order-processor == [Thread-0] INFO io.dapr.workflows.WorkflowContext - Received Order: OrderPayload [itemName=cars, totalCost=5000, quantity=1]
== APP - order-processor == [Thread-0] INFO io.dapr.quickstarts.workflows.activities.NotifyActivity - Received Order: OrderPayload [itemName=cars, totalCost=5000, quantity=1]
== APP - order-processor == workflow instance d1bf548b-c854-44af-978e-90c61ed88e3c started
== APP - order-processor == [Thread-0] INFO io.dapr.quickstarts.workflows.activities.VerifyInventoryActivity - Verifying inventory for order 'd1bf548b-c854-44af-978e-90c61ed88e3c' of 1 cars
== APP - order-processor == [Thread-0] INFO io.dapr.quickstarts.workflows.activities.VerifyInventoryActivity - There are 10 cars available for purchase
== APP - order-processor == [Thread-0] INFO io.dapr.quickstarts.workflows.activities.VerifyInventoryActivity - Verified inventory for order 'd1bf548b-c854-44af-978e-90c61ed88e3c' of 1 cars
== APP - order-processor == [Thread-0] INFO io.dapr.quickstarts.workflows.activities.ProcessPaymentActivity - Processing payment: d1bf548b-c854-44af-978e-90c61ed88e3c for 1 cars at $5000
== APP - order-processor == [Thread-0] INFO io.dapr.quickstarts.workflows.activities.ProcessPaymentActivity - Payment for request ID 'd1bf548b-c854-44af-978e-90c61ed88e3c' processed successfully
== APP - order-processor == [Thread-0] INFO io.dapr.quickstarts.workflows.activities.UpdateInventoryActivity - Updating inventory for order 'd1bf548b-c854-44af-978e-90c61ed88e3c' of 1 cars
== APP - order-processor == [Thread-0] INFO io.dapr.quickstarts.workflows.activities.UpdateInventoryActivity - Updated inventory for order 'd1bf548b-c854-44af-978e-90c61ed88e3c': there are now 9 cars left in stock
== APP - order-processor == there are now 9 cars left in stock
== APP - order-processor == [Thread-0] INFO io.dapr.quickstarts.workflows.activities.NotifyActivity - Order completed! : d1bf548b-c854-44af-978e-90c61ed88e3c
== APP - order-processor == workflow instance completed, out is: {"processed":true}

(Optional) Step 4: View in Zipkin

Running dapr init launches the openzipkin/zipkin Docker container. If the container has stopped running, launch the Zipkin Docker container with the following command:

docker run -d -p 9411:9411 openzipkin/zipkin

View the workflow trace spans in the Zipkin web UI (typically at http://localhost:9411/zipkin/).

What happened?

When you ran dapr run -f .:

  1. An OrderPayload is made containing one car.
  2. A unique order ID for the workflow is generated (in the above example, d1bf548b-c854-44af-978e-90c61ed88e3c) and the workflow is scheduled.
  3. The NotifyActivity workflow activity sends a notification saying an order for one car has been received.
  4. The VertifyInventoryActivity workflow activity checks the inventory data, determines if you can supply the ordered item, and responds with the number of cars in stock. The inventory is sufficient so the workflow continues.
  5. The total cost of the order is 5000, so the workflow will not call the RequestApprovalActivity activity.
  6. The ProcessPaymentActivity workflow activity begins processing payment for order d1bf548b-c854-44af-978e-90c61ed88e3c and confirms if successful.
  7. The UpdateInventoryActivity workflow activity updates the inventory with the current available cars after the order has been processed.
  8. The NotifyActivity workflow activity sends a notification saying that order d1bf548b-c854-44af-978e-90c61ed88e3c has completed.
  9. The workflow terminates as completed and the orderResult is set to processed.

order-processor/WorkflowConsoleApp.java

In the application’s program file:

  • The unique workflow order ID is generated
  • The workflow is scheduled
  • The workflow status is retrieved
  • The workflow and the workflow activities it invokes are registered
package io.dapr.quickstarts.workflows;

import java.time.Duration;
import java.util.concurrent.TimeoutException;

import io.dapr.client.DaprClient;
import io.dapr.client.DaprClientBuilder;
import io.dapr.quickstarts.workflows.activities.NotifyActivity;
import io.dapr.quickstarts.workflows.activities.ProcessPaymentActivity;
import io.dapr.quickstarts.workflows.activities.RequestApprovalActivity;
import io.dapr.quickstarts.workflows.activities.VerifyInventoryActivity;
import io.dapr.quickstarts.workflows.activities.UpdateInventoryActivity;
import io.dapr.quickstarts.workflows.models.InventoryItem;
import io.dapr.quickstarts.workflows.models.OrderPayload;
import io.dapr.workflows.client.DaprWorkflowClient;
import io.dapr.workflows.client.WorkflowInstanceStatus;
import io.dapr.workflows.runtime.WorkflowRuntime;
import io.dapr.workflows.runtime.WorkflowRuntimeBuilder;

public class WorkflowConsoleApp {

  private static final String STATE_STORE_NAME = "statestore";

  /**
   * The main method of this console app.
   *
   * @param args The port the app will listen on.
   * @throws Exception An Exception.
   */
  public static void main(String[] args) throws Exception {
    System.out.println("*** Welcome to the Dapr Workflow console app sample!");
    System.out.println("*** Using this app, you can place orders that start workflows.");
    // Wait for the sidecar to become available
    Thread.sleep(5 * 1000);

    // Register the OrderProcessingWorkflow and its activities with the builder.
    WorkflowRuntimeBuilder builder = new WorkflowRuntimeBuilder().registerWorkflow(OrderProcessingWorkflow.class);
    builder.registerActivity(NotifyActivity.class);
    builder.registerActivity(ProcessPaymentActivity.class);
    builder.registerActivity(RequestApprovalActivity.class);
    builder.registerActivity(VerifyInventoryActivity.class);
    builder.registerActivity(UpdateInventoryActivity.class);

    // Build and then start the workflow runtime pulling and executing tasks
    try (WorkflowRuntime runtime = builder.build()) {
      System.out.println("Start workflow runtime");
      runtime.start(false);
    }

    InventoryItem inventory = prepareInventoryAndOrder();

    DaprWorkflowClient workflowClient = new DaprWorkflowClient();
    try (workflowClient) {
      executeWorkflow(workflowClient, inventory);
    }

  }

  private static void executeWorkflow(DaprWorkflowClient workflowClient, InventoryItem inventory) {
    System.out.println("==========Begin the purchase of item:==========");
    String itemName = inventory.getName();
    int orderQuantity = inventory.getQuantity();
    int totalcost = orderQuantity * inventory.getPerItemCost();
    OrderPayload order = new OrderPayload();
    order.setItemName(itemName);
    order.setQuantity(orderQuantity);
    order.setTotalCost(totalcost);
    System.out.println("Starting order workflow, purchasing " + orderQuantity + " of " + itemName);

    String instanceId = workflowClient.scheduleNewWorkflow(OrderProcessingWorkflow.class, order);
    System.out.printf("scheduled new workflow instance of OrderProcessingWorkflow with instance ID: %s%n",
        instanceId);

    try {
      workflowClient.waitForInstanceStart(instanceId, Duration.ofSeconds(10), false);
      System.out.printf("workflow instance %s started%n", instanceId);
    } catch (TimeoutException e) {
      System.out.printf("workflow instance %s did not start within 10 seconds%n", instanceId);
      return;
    }

    try {
      WorkflowInstanceStatus workflowStatus = workflowClient.waitForInstanceCompletion(instanceId,
          Duration.ofSeconds(30),
          true);
      if (workflowStatus != null) {
        System.out.printf("workflow instance completed, out is: %s%n",
            workflowStatus.getSerializedOutput());
      } else {
        System.out.printf("workflow instance %s not found%n", instanceId);
      }
    } catch (TimeoutException e) {
      System.out.printf("workflow instance %s did not complete within 30 seconds%n", instanceId);
    }

  }

  private static InventoryItem prepareInventoryAndOrder() {
    // prepare 10 cars in inventory
    InventoryItem inventory = new InventoryItem();
    inventory.setName("cars");
    inventory.setPerItemCost(50000);
    inventory.setQuantity(10);
    DaprClient daprClient = new DaprClientBuilder().build();
    restockInventory(daprClient, inventory);

    // prepare order for 10 cars
    InventoryItem order = new InventoryItem();
    order.setName("cars");
    order.setPerItemCost(5000);
    order.setQuantity(1);
    return order;
  }

  private static void restockInventory(DaprClient daprClient, InventoryItem inventory) {
    String key = inventory.getName();
    daprClient.saveState(STATE_STORE_NAME, key, inventory).block();
  }
}

OrderProcessingWorkflow.java

In OrderProcessingWorkflow.java, the workflow is defined as a class with all of its associated tasks (determined by workflow activities).

package io.dapr.quickstarts.workflows;

import java.time.Duration;
import org.slf4j.Logger;

import io.dapr.quickstarts.workflows.activities.NotifyActivity;
import io.dapr.quickstarts.workflows.activities.ProcessPaymentActivity;
import io.dapr.quickstarts.workflows.activities.RequestApprovalActivity;
import io.dapr.quickstarts.workflows.activities.VerifyInventoryActivity;
import io.dapr.quickstarts.workflows.activities.UpdateInventoryActivity;
import io.dapr.quickstarts.workflows.models.ApprovalResponse;
import io.dapr.quickstarts.workflows.models.InventoryRequest;
import io.dapr.quickstarts.workflows.models.InventoryResult;
import io.dapr.quickstarts.workflows.models.Notification;
import io.dapr.quickstarts.workflows.models.OrderPayload;
import io.dapr.quickstarts.workflows.models.OrderResult;
import io.dapr.quickstarts.workflows.models.PaymentRequest;
import io.dapr.workflows.Workflow;
import io.dapr.workflows.WorkflowStub;

public class OrderProcessingWorkflow extends Workflow {

  @Override
  public WorkflowStub create() {
    return ctx -> {
      Logger logger = ctx.getLogger();
      String orderId = ctx.getInstanceId();
      logger.info("Starting Workflow: " + ctx.getName());
      logger.info("Instance ID(order ID): " + orderId);
      logger.info("Current Orchestration Time: " + ctx.getCurrentInstant());

      OrderPayload order = ctx.getInput(OrderPayload.class);
      logger.info("Received Order: " + order.toString());
      OrderResult orderResult = new OrderResult();
      orderResult.setProcessed(false);

      // Notify the user that an order has come through
      Notification notification = new Notification();
      notification.setMessage("Received Order: " + order.toString());
      ctx.callActivity(NotifyActivity.class.getName(), notification).await();

      // Determine if there is enough of the item available for purchase by checking
      // the inventory
      InventoryRequest inventoryRequest = new InventoryRequest();
      inventoryRequest.setRequestId(orderId);
      inventoryRequest.setItemName(order.getItemName());
      inventoryRequest.setQuantity(order.getQuantity());
      InventoryResult inventoryResult = ctx.callActivity(VerifyInventoryActivity.class.getName(),
          inventoryRequest, InventoryResult.class).await();

      // If there is insufficient inventory, fail and let the user know
      if (!inventoryResult.isSuccess()) {
        notification.setMessage("Insufficient inventory for order : " + order.getItemName());
        ctx.callActivity(NotifyActivity.class.getName(), notification).await();
        ctx.complete(orderResult);
        return;
      }

      // Require orders over a certain threshold to be approved
      if (order.getTotalCost() > 5000) {
        ctx.callActivity(RequestApprovalActivity.class.getName(), order).await();

        ApprovalResponse approvalResponse = ctx.waitForExternalEvent("approvalEvent",
          Duration.ofSeconds(30), ApprovalResponse.class).await();
        if (!approvalResponse.isApproved()) {
          notification.setMessage("Order " + order.getItemName() + " was not approved.");
          ctx.callActivity(NotifyActivity.class.getName(), notification).await();
          ctx.complete(orderResult);
          return;
        }
      }

      // There is enough inventory available so the user can purchase the item(s).
      // Process their payment
      PaymentRequest paymentRequest = new PaymentRequest();
      paymentRequest.setRequestId(orderId);
      paymentRequest.setItemBeingPurchased(order.getItemName());
      paymentRequest.setQuantity(order.getQuantity());
      paymentRequest.setAmount(order.getTotalCost());
      boolean isOK = ctx.callActivity(ProcessPaymentActivity.class.getName(),
          paymentRequest, boolean.class).await();
      if (!isOK) {
        notification.setMessage("Payment failed for order : " + orderId);
        ctx.callActivity(NotifyActivity.class.getName(), notification).await();
        ctx.complete(orderResult);
        return;
      }

      inventoryResult = ctx.callActivity(UpdateInventoryActivity.class.getName(),
          inventoryRequest, InventoryResult.class).await();
      if (!inventoryResult.isSuccess()) {
        // If there is an error updating the inventory, refund the user
        // paymentRequest.setAmount(-1 * paymentRequest.getAmount());
        // ctx.callActivity(ProcessPaymentActivity.class.getName(),
        // paymentRequest).await();

        // Let users know their payment processing failed
        notification.setMessage("Order failed to update inventory! : " + orderId);
        ctx.callActivity(NotifyActivity.class.getName(), notification).await();
        ctx.complete(orderResult);
        return;
      }

      // Let user know their order was processed
      notification.setMessage("Order completed! : " + orderId);
      ctx.callActivity(NotifyActivity.class.getName(), notification).await();

      // Complete the workflow with order result is processed
      orderResult.setProcessed(true);
      ctx.complete(orderResult);
    };
  }

}

activities directory

The Activities directory holds the four workflow activities used by the workflow, defined in the following files:

The order-processor console app starts and manages the OrderProcessingWorkflow workflow, which simulates purchasing items from a store. The workflow consists of five unique workflow activities, or tasks:

  • NotifyActivity: Utilizes a logger to print out messages throughout the workflow. These messages notify you when:
    • You have insufficient inventory
    • Your payment couldn’t be processed, etc.
  • VerifyInventoryActivity: Checks the state store to ensure there is enough inventory present for purchase.
  • RequestApprovalActivity: Requests approval for orders over a certain cost threshold.
  • ProcessPaymentActivity: Processes and authorizes the payment.
  • UpdateInventoryActivity: Removes the requested items from the state store and updates the store with the new remaining inventory value.

Step 1: Pre-requisites

For this example, you will need:

Step 2: Set up the environment

Clone the sample provided in the Quickstarts repo.

git clone https://github.com/dapr/quickstarts.git

In a new terminal window, navigate to the sdk directory:

cd workflows/go/sdk

Step 3: Run the order processor app

In the terminal, start the order processor app alongside a Dapr sidecar using Multi-App Run. From the go/sdk directory, run the following command:

dapr run -f .

This starts the order-processor app with unique workflow ID and runs the workflow activities.

Expected output:

== APP - order-processor == *** Welcome to the Dapr Workflow console app sample!
== APP - order-processor == *** Using this app, you can place orders that start workflows.
== APP - order-processor == dapr client initializing for: 127.0.0.1:46533
== APP - order-processor == INFO: 2025/02/13 13:18:33 connecting work item listener stream
== APP - order-processor == 2025/02/13 13:18:33 work item listener started
== APP - order-processor == INFO: 2025/02/13 13:18:33 starting background processor
== APP - order-processor == adding base stock item: paperclip
== APP - order-processor == adding base stock item: cars
== APP - order-processor == adding base stock item: computers
== APP - order-processor == ==========Begin the purchase of item:==========
== APP - order-processor == NotifyActivity: Received order b4cb2687-1af0-4f8d-9659-eb6389c07ade for 1 cars - $5000
== APP - order-processor == VerifyInventoryActivity: Verifying inventory for order b4cb2687-1af0-4f8d-9659-eb6389c07ade of 1 cars
== APP - order-processor == VerifyInventoryActivity: There are 10 cars available for purchase
== APP - order-processor == ProcessPaymentActivity: b4cb2687-1af0-4f8d-9659-eb6389c07ade for 1 - cars (5000USD)
== APP - order-processor == UpdateInventoryActivity: Checking Inventory for order b4cb2687-1af0-4f8d-9659-eb6389c07ade for 1 * cars
== APP - order-processor == UpdateInventoryActivity: There are now 9 cars left in stock
== APP - order-processor == NotifyActivity: Order b4cb2687-1af0-4f8d-9659-eb6389c07ade has completed!
== APP - order-processor == workflow status: COMPLETED
== APP - order-processor == Purchase of item is complete

Stop the Dapr workflow with CTRL+C or:

dapr stop -f .

(Optional) Step 4: View in Zipkin

Running dapr init launches the openzipkin/zipkin Docker container. If the container has stopped running, launch the Zipkin Docker container with the following command:

docker run -d -p 9411:9411 openzipkin/zipkin

View the workflow trace spans in the Zipkin web UI (typically at http://localhost:9411/zipkin/).

What happened?

When you ran dapr run:

  1. An OrderPayload is made containing one car.
  2. A unique order ID for the workflow is generated (in the above example, b4cb2687-1af0-4f8d-9659-eb6389c07ade) and the workflow is scheduled.
  3. The NotifyActivity workflow activity sends a notification saying an order for 10 cars has been received.
  4. The VerifyInventoryActivity workflow activity checks the inventory data, determines if you can supply the ordered item, and responds with the number of cars in stock.
  5. The total cost of the order is 5000, so the workflow will not call the RequestApprovalActivity activity.
  6. The ProcessPaymentActivity workflow activity begins processing payment for order b4cb2687-1af0-4f8d-9659-eb6389c07ade and confirms if successful.
  7. The UpdateInventoryActivity workflow activity updates the inventory with the current available cars after the order has been processed.
  8. The NotifyActivity workflow activity sends a notification saying that order b4cb2687-1af0-4f8d-9659-eb6389c07ade has completed.
  9. The workflow terminates as completed and the OrderResult is set to processed.

order-processor/main.go

In the application’s program file:

  • The unique workflow order ID is generated
  • The workflow is scheduled
  • The workflow status is retrieved
  • The workflow and the workflow activities it invokes are registered
package main

import (
	"context"
	"encoding/json"
	"fmt"
	"log"
	"time"

	"github.com/dapr/go-sdk/client"
	"github.com/dapr/go-sdk/workflow"
)

var (
	stateStoreName    = "statestore"
	workflowComponent = "dapr"
	workflowName      = "OrderProcessingWorkflow"
	defaultItemName   = "cars"
)

func main() {
	fmt.Println("*** Welcome to the Dapr Workflow console app sample!")
	fmt.Println("*** Using this app, you can place orders that start workflows.")

	w, err := workflow.NewWorker()
	if err != nil {
		log.Fatalf("failed to start worker: %v", err)
	}

	if err := w.RegisterWorkflow(OrderProcessingWorkflow); err != nil {
		log.Fatal(err)
	}
	if err := w.RegisterActivity(NotifyActivity); err != nil {
		log.Fatal(err)
	}
	if err := w.RegisterActivity(RequestApprovalActivity); err != nil {
		log.Fatal(err)
	}
	if err := w.RegisterActivity(VerifyInventoryActivity); err != nil {
		log.Fatal(err)
	}
	if err := w.RegisterActivity(ProcessPaymentActivity); err != nil {
		log.Fatal(err)
	}
	if err := w.RegisterActivity(UpdateInventoryActivity); err != nil {
		log.Fatal(err)
	}

	if err := w.Start(); err != nil {
		log.Fatal(err)
	}

	daprClient, err := client.NewClient()
	if err != nil {
		log.Fatalf("failed to initialise dapr client: %v", err)
	}
	wfClient, err := workflow.NewClient(workflow.WithDaprClient(daprClient))
	if err != nil {
		log.Fatalf("failed to initialise workflow client: %v", err)
	}

	inventory := []InventoryItem{
		{ItemName: "paperclip", PerItemCost: 5, Quantity: 100},
		{ItemName: "cars", PerItemCost: 5000, Quantity: 10},
		{ItemName: "computers", PerItemCost: 500, Quantity: 100},
	}
	if err := restockInventory(daprClient, inventory); err != nil {
		log.Fatalf("failed to restock: %v", err)
	}

	fmt.Println("==========Begin the purchase of item:==========")

	itemName := defaultItemName
	orderQuantity := 1

	totalCost := inventory[1].PerItemCost * orderQuantity

	orderPayload := OrderPayload{
		ItemName:  itemName,
		Quantity:  orderQuantity,
		TotalCost: totalCost,
	}

	id, err := wfClient.ScheduleNewWorkflow(context.Background(), workflowName, workflow.WithInput(orderPayload))
	if err != nil {
		log.Fatalf("failed to start workflow: %v", err)
	}

	waitCtx, cancel := context.WithTimeout(context.Background(), 30*time.Second)
	_, err = wfClient.WaitForWorkflowCompletion(waitCtx, id)
	cancel()
	if err != nil {
		log.Fatalf("failed to wait for workflow: %v", err)
	}

	respFetch, err := wfClient.FetchWorkflowMetadata(context.Background(), id, workflow.WithFetchPayloads(true))
	if err != nil {
		log.Fatalf("failed to get workflow: %v", err)
	}

	fmt.Printf("workflow status: %v\n", respFetch.RuntimeStatus)

	fmt.Println("Purchase of item is complete")
}

func restockInventory(daprClient client.Client, inventory []InventoryItem) error {
	for _, item := range inventory {
		itemSerialized, err := json.Marshal(item)
		if err != nil {
			return err
		}
		fmt.Printf("adding base stock item: %s\n", item.ItemName)
		if err := daprClient.SaveState(context.Background(), stateStoreName, item.ItemName, itemSerialized, nil); err != nil {
			return err
		}
	}
	return nil
}

order-processor/workflow.go

package main

import (
	"context"
	"encoding/json"
	"fmt"
	"log"
	"time"

	"github.com/dapr/go-sdk/client"
	"github.com/dapr/go-sdk/workflow"
)

// OrderProcessingWorkflow is the main workflow for orchestrating activities in the order process.
func OrderProcessingWorkflow(ctx *workflow.WorkflowContext) (any, error) {
	orderID := ctx.InstanceID()
	var orderPayload OrderPayload
	if err := ctx.GetInput(&orderPayload); err != nil {
		return nil, err
	}
	err := ctx.CallActivity(NotifyActivity, workflow.ActivityInput(Notification{
		Message: fmt.Sprintf("Received order %s for %d %s - $%d", orderID, orderPayload.Quantity, orderPayload.ItemName, orderPayload.TotalCost),
	})).Await(nil)
	if err != nil {
		return OrderResult{Processed: false}, err
	}

	var verifyInventoryResult InventoryResult
	if err := ctx.CallActivity(VerifyInventoryActivity, workflow.ActivityInput(InventoryRequest{
		RequestID: orderID,
		ItemName:  orderPayload.ItemName,
		Quantity:  orderPayload.Quantity,
	})).Await(&verifyInventoryResult); err != nil {
		return OrderResult{Processed: false}, err
	}

	if !verifyInventoryResult.Success {
		notification := Notification{Message: fmt.Sprintf("Insufficient inventory for %s", orderPayload.ItemName)}
		err := ctx.CallActivity(NotifyActivity, workflow.ActivityInput(notification)).Await(nil)
		return OrderResult{Processed: false}, err
	}

	if orderPayload.TotalCost > 5000 {
		var approvalRequired ApprovalRequired
		if err := ctx.CallActivity(RequestApprovalActivity, workflow.ActivityInput(orderPayload)).Await(&approvalRequired); err != nil {
			return OrderResult{Processed: false}, err
		}
		if err := ctx.WaitForExternalEvent("manager_approval", time.Second*200).Await(nil); err != nil {
			return OrderResult{Processed: false}, err
		}
		// TODO: Confirm timeout flow - this will be in the form of an error.
		if approvalRequired.Approval {
			if err := ctx.CallActivity(NotifyActivity, workflow.ActivityInput(Notification{Message: fmt.Sprintf("Payment for order %s has been approved!", orderID)})).Await(nil); err != nil {
				log.Printf("failed to notify of a successful order: %v\n", err)
			}
		} else {
			if err := ctx.CallActivity(NotifyActivity, workflow.ActivityInput(Notification{Message: fmt.Sprintf("Payment for order %s has been rejected!", orderID)})).Await(nil); err != nil {
				log.Printf("failed to notify of an unsuccessful order :%v\n", err)
			}
			return OrderResult{Processed: false}, err
		}
	}
	err = ctx.CallActivity(ProcessPaymentActivity, workflow.ActivityInput(PaymentRequest{
		RequestID:          orderID,
		ItemBeingPurchased: orderPayload.ItemName,
		Amount:             orderPayload.TotalCost,
		Quantity:           orderPayload.Quantity,
	})).Await(nil)
	if err != nil {
		if err := ctx.CallActivity(NotifyActivity, workflow.ActivityInput(Notification{Message: fmt.Sprintf("Order %s failed!", orderID)})).Await(nil); err != nil {
			log.Printf("failed to notify of a failed order: %v", err)
		}
		return OrderResult{Processed: false}, err
	}

	err = ctx.CallActivity(UpdateInventoryActivity, workflow.ActivityInput(PaymentRequest{
		RequestID:          orderID,
		ItemBeingPurchased: orderPayload.ItemName,
		Amount:             orderPayload.TotalCost,
		Quantity:           orderPayload.Quantity,
	})).Await(nil)
	if err != nil {
		if err := ctx.CallActivity(NotifyActivity, workflow.ActivityInput(Notification{Message: fmt.Sprintf("Order %s failed!", orderID)})).Await(nil); err != nil {
			log.Printf("failed to notify of a failed order: %v", err)
		}
		return OrderResult{Processed: false}, err
	}

	if err := ctx.CallActivity(NotifyActivity, workflow.ActivityInput(Notification{Message: fmt.Sprintf("Order %s has completed!", orderID)})).Await(nil); err != nil {
		log.Printf("failed to notify of a successful order: %v", err)
	}
	return OrderResult{Processed: true}, err
}

// NotifyActivity outputs a notification message
func NotifyActivity(ctx workflow.ActivityContext) (any, error) {
	var input Notification
	if err := ctx.GetInput(&input); err != nil {
		return "", err
	}
	fmt.Printf("NotifyActivity: %s\n", input.Message)
	return nil, nil
}

// ProcessPaymentActivity is used to process a payment
func ProcessPaymentActivity(ctx workflow.ActivityContext) (any, error) {
	var input PaymentRequest
	if err := ctx.GetInput(&input); err != nil {
		return "", err
	}
	fmt.Printf("ProcessPaymentActivity: %s for %d - %s (%dUSD)\n", input.RequestID, input.Quantity, input.ItemBeingPurchased, input.Amount)
	return nil, nil
}

// VerifyInventoryActivity is used to verify if an item is available in the inventory
func VerifyInventoryActivity(ctx workflow.ActivityContext) (any, error) {
	var input InventoryRequest
	if err := ctx.GetInput(&input); err != nil {
		return nil, err
	}
	fmt.Printf("VerifyInventoryActivity: Verifying inventory for order %s of %d %s\n", input.RequestID, input.Quantity, input.ItemName)
	dClient, err := client.NewClient()
	if err != nil {
		return nil, err
	}
	item, err := dClient.GetState(context.Background(), stateStoreName, input.ItemName, nil)
	if err != nil {
		return nil, err
	}
	if item == nil {
		return InventoryResult{
			Success:       false,
			InventoryItem: InventoryItem{},
		}, nil
	}
	var result InventoryItem
	if err := json.Unmarshal(item.Value, &result); err != nil {
		log.Fatalf("failed to parse inventory result %v", err)
	}
	fmt.Printf("VerifyInventoryActivity: There are %d %s available for purchase\n", result.Quantity, result.ItemName)
	if result.Quantity >= input.Quantity {
		return InventoryResult{Success: true, InventoryItem: result}, nil
	}
	return InventoryResult{Success: false, InventoryItem: InventoryItem{}}, nil
}

// UpdateInventoryActivity modifies the inventory.
func UpdateInventoryActivity(ctx workflow.ActivityContext) (any, error) {
	var input PaymentRequest
	if err := ctx.GetInput(&input); err != nil {
		return nil, err
	}
	fmt.Printf("UpdateInventoryActivity: Checking Inventory for order %s for %d * %s\n", input.RequestID, input.Quantity, input.ItemBeingPurchased)
	dClient, err := client.NewClient()
	if err != nil {
		return nil, err
	}
	item, err := dClient.GetState(context.Background(), stateStoreName, input.ItemBeingPurchased, nil)
	if err != nil {
		return nil, err
	}
	var result InventoryItem
	err = json.Unmarshal(item.Value, &result)
	if err != nil {
		return nil, err
	}
	newQuantity := result.Quantity - input.Quantity
	if newQuantity < 0 {
		return nil, fmt.Errorf("insufficient inventory for: %s", input.ItemBeingPurchased)
	}
	result.Quantity = newQuantity
	newState, err := json.Marshal(result)
	if err != nil {
		log.Fatalf("failed to marshal new state: %v", err)
	}
	dClient.SaveState(context.Background(), stateStoreName, input.ItemBeingPurchased, newState, nil)
	fmt.Printf("UpdateInventoryActivity: There are now %d %s left in stock\n", result.Quantity, result.ItemName)
	return InventoryResult{Success: true, InventoryItem: result}, nil
}

// RequestApprovalActivity requests approval for the order
func RequestApprovalActivity(ctx workflow.ActivityContext) (any, error) {
	var input OrderPayload
	if err := ctx.GetInput(&input); err != nil {
		return nil, err
	}
	fmt.Printf("RequestApprovalActivity: Requesting approval for payment of %dUSD for %d %s\n", input.TotalCost, input.Quantity, input.ItemName)
	return ApprovalRequired{Approval: true}, nil
}

Tell us what you think!

We’re continuously working to improve our Quickstart examples and value your feedback. Did you find this Quickstart helpful? Do you have suggestions for improvement?

Join the discussion in our discord channel.

Next steps

Explore Dapr tutorials >>

4 - Quickstart: State Management

Get started with Dapr’s State Management building block

Let’s take a look at Dapr’s State Management building block. In this Quickstart, you will save, get, and delete state using a Redis state store by either:

While this sample uses Redis, you can swap it out for any one of the supported state stores.

Run using Multi-App Run

Select your preferred language-specific Dapr SDK before proceeding with the Quickstart.

Pre-requisites

For this example, you will need:

Step 1: Set up the environment

Clone the sample provided in the Quickstarts repo.

git clone https://github.com/dapr/quickstarts.git

Step 2: Manipulate service state

In a terminal window, navigate to the order-processor directory.

cd state_management/python/sdk/order-processor

Install the dependencies:

pip3 install -r requirements.txt 

Run the order-processor service alongside a Dapr sidecar using Multi-App Run.

dapr run -f .

Note: Since Python3.exe is not defined in Windows, you may need to change python3 to python in the dapr.yaml file before running dapr run -f .

The order-processor service writes, reads, and deletes an orderId key/value pair to the statestore instance defined in the statestore.yaml component. As soon as the service starts, it performs a loop.

with DaprClient() as client:

    # Save state into the state store
    client.save_state(DAPR_STORE_NAME, orderId, str(order))
    logging.info('Saving Order: %s', order)

    # Get state from the state store
    result = client.get_state(DAPR_STORE_NAME, orderId)
    logging.info('Result after get: ' + str(result.data))

    # Delete state from the state store
    client.delete_state(store_name=DAPR_STORE_NAME, key=orderId)
    logging.info('Deleting Order: %s', order)

Step 3: View the order-processor outputs

Notice, as specified in the code above, the code saves application state in the Dapr state store, reads it, then deletes it.

Order-processor output:

== APP == INFO:root:Saving Order: {'orderId': '1'}
== APP == INFO:root:Result after get: b"{'orderId': '1'}"
== APP == INFO:root:Deleting Order: {'orderId': '1'}
== APP == INFO:root:Saving Order: {'orderId': '2'}
== APP == INFO:root:Result after get: b"{'orderId': '2'}"
== APP == INFO:root:Deleting Order: {'orderId': '2'}
== APP == INFO:root:Saving Order: {'orderId': '3'}
== APP == INFO:root:Result after get: b"{'orderId': '3'}"
== APP == INFO:root:Deleting Order: {'orderId': '3'}
== APP == INFO:root:Saving Order: {'orderId': '4'}
== APP == INFO:root:Result after get: b"{'orderId': '4'}"
== APP == INFO:root:Deleting Order: {'orderId': '4'}
dapr.yaml Multi-App Run template file

When you run dapr init, Dapr creates a default Multi-App Run template file named dapr.yaml. Running dapr run -f starts all applications in your project. In this sample, the dapr.yaml file contains the following:

version: 1
common:
  resourcesPath: ../../resources/
apps:
  - appID: order-processor
    appDirPath: ./order-processor/
    command: ["python3" , "app.py"]
statestore.yaml component file

When you run dapr init, Dapr also creates a default Redis statestore.yaml and runs a Redis container on your local machine, located:

  • On Windows, under %UserProfile%\.dapr\components\statestore.yaml
  • On Linux/MacOS, under ~/.dapr/components/statestore.yaml

With the statestore.yaml component, you can easily swap out the state store without making code changes.

The Redis statestore.yaml file included for this quickstart contains the following:

apiVersion: dapr.io/v1alpha1
kind: Component
metadata:
  name: statestore
spec:
  type: state.redis
  version: v1
  metadata:
  - name: redisHost
    value: localhost:6379
  - name: redisPassword
    value: ""
  - name: actorStateStore
    value: "true"

In the YAML file:

  • metadata/name is how your application talks to the component (called DAPR_STORE_NAME in the code sample).
  • spec/metadata defines the connection to the Redis instance used by the component.

Pre-requisites

For this example, you will need:

Step 1: Set up the environment

Clone the sample provided in the Quickstarts repo.

git clone https://github.com/dapr/quickstarts.git

Step 2: Manipulate service state

In a terminal window, navigate to the order-processor directory.

cd state_management/javascript/sdk/order-processor

Install the dependencies:

npm install

Run the order-processor service alongside a Dapr sidecar.

dapr run -f .

The order-processor service writes, reads, and deletes an orderId key/value pair to the statestore instance defined in the statestore.yaml component. As soon as the service starts, it performs a loop.

const client = new DaprClient()

// Save state into a state store
await client.state.save(DAPR_STATE_STORE_NAME, order)
console.log("Saving Order: ", order)

// Get state from a state store
const savedOrder = await client.state.get(DAPR_STATE_STORE_NAME, order.orderId)
console.log("Getting Order: ", savedOrder)

// Delete state from the state store
await client.state.delete(DAPR_STATE_STORE_NAME, order.orderId)
console.log("Deleting Order: ", order)

Step 3: View the order-processor outputs

Notice, as specified in the code above, the code saves application state in the Dapr state store, reads it, then deletes it.

Order-processor output:

== APP == > order-processor@1.0.0 start
== APP == > node index.js
== APP == Saving Order:  { orderId: 1 }
== APP == Saving Order:  { orderId: 2 }
== APP == Saving Order:  { orderId: 3 }
== APP == Saving Order:  { orderId: 4 }
== APP == Saving Order:  { orderId: 5 }
== APP == Getting Order:  { orderId: 1 }
== APP == Deleting Order:  { orderId: 1 }
== APP == Getting Order:  { orderId: 2 }
== APP == Deleting Order:  { orderId: 2 }
== APP == Getting Order:  { orderId: 3 }
== APP == Deleting Order:  { orderId: 3 }
== APP == Getting Order:  { orderId: 4 }
== APP == Deleting Order:  { orderId: 4 }
== APP == Getting Order:  { orderId: 5 }
== APP == Deleting Order:  { orderId: 5 }
dapr.yaml Multi-App Run template file

When you run dapr init, Dapr creates a default Multi-App Run template file named dapr.yaml. Running dapr run -f starts all applications in your project. In this sample, the dapr.yaml file contains the following:

version: 1
common:
  resourcesPath: ../../resources/
apps:
  - appID: order-processor
    appDirPath: ./order-processor/
    command: ["npm", "run", "start"]
statestore.yaml component file

When you run dapr init, Dapr creates a default Redis statestore.yaml and runs a Redis container on your local machine, located:

  • On Windows, under %UserProfile%\.dapr\components\statestore.yaml
  • On Linux/MacOS, under ~/.dapr/components/statestore.yaml

With the statestore.yaml component, you can easily swap out the state store without making code changes.

The Redis statestore.yaml file included for this quickstart contains the following:

apiVersion: dapr.io/v1alpha1
kind: Component
metadata:
  name: statestore
spec:
  type: state.redis
  version: v1
  metadata:
  - name: redisHost
    value: localhost:6379
  - name: redisPassword
    value: ""
  - name: actorStateStore
    value: "true"

In the YAML file:

  • metadata/name is how your application talks to the component (called DAPR_STORE_NAME in the code sample).
  • spec/metadata defines the connection to the Redis instance used by the component.

Pre-requisites

For this example, you will need:

NOTE: .NET 6 is the minimally supported version of .NET for the Dapr .NET SDK packages in this release. Only .NET 8 and .NET 9 will be supported in Dapr v1.16 and later releases.

Step 1: Set up the environment

Clone the sample provided in the Quickstarts repo.

git clone https://github.com/dapr/quickstarts.git

Step 2: Manipulate service state

In a terminal window, navigate to the order-processor directory.

cd state_management/csharp/sdk/order-processor

Install the dependencies:

dotnet restore
dotnet build

Run the order-processor service alongside a Dapr sidecar.

dapr run -f .

The order-processor service writes, reads, and deletes an orderId key/value pair to the statestore instance defined in the statestore.yaml component. As soon as the service starts, it performs a loop.

var client = new DaprClientBuilder().Build();

// Save state into the state store
await client.SaveStateAsync(DAPR_STORE_NAME, orderId.ToString(), order.ToString());
Console.WriteLine("Saving Order: " + order);

// Get state from the state store
var result = await client.GetStateAsync<string>(DAPR_STORE_NAME, orderId.ToString());
Console.WriteLine("Getting Order: " + result);

// Delete state from the state store
await client.DeleteStateAsync(DAPR_STORE_NAME, orderId.ToString());
Console.WriteLine("Deleting Order: " + order);

Step 3: View the order-processor outputs

Notice, as specified in the code above, the code saves application state in the Dapr state store, reads it, then deletes it.

Order-processor output:

== APP == Saving Order: Order { orderId = 1 }
== APP == Getting Order: Order { orderId = 1 }
== APP == Deleting Order: Order { orderId = 1 }
== APP == Saving Order: Order { orderId = 2 }
== APP == Getting Order: Order { orderId = 2 }
== APP == Deleting Order: Order { orderId = 2 }
== APP == Saving Order: Order { orderId = 3 }
== APP == Getting Order: Order { orderId = 3 }
== APP == Deleting Order: Order { orderId = 3 }
== APP == Saving Order: Order { orderId = 4 }
== APP == Getting Order: Order { orderId = 4 }
== APP == Deleting Order: Order { orderId = 4 }
== APP == Saving Order: Order { orderId = 5 }
== APP == Getting Order: Order { orderId = 5 }
== APP == Deleting Order: Order { orderId = 5 }
dapr.yaml Multi-App Run template file

When you run dapr init, Dapr creates a default Multi-App Run template file named dapr.yaml. Running dapr run -f starts all applications in your project. In this sample, the dapr.yaml file contains the following:

version: 1
common:
  resourcesPath: ../../../resources/
apps:
  - appID: order-processor
    appDirPath: ./order-processor/
    command: ["dotnet", "run"]
statestore.yaml component file

When you run dapr init, Dapr creates a default Redis statestore.yaml and runs a Redis container on your local machine, located:

  • On Windows, under %UserProfile%\.dapr\components\statestore.yaml
  • On Linux/MacOS, under ~/.dapr/components/statestore.yaml

With the statestore.yaml component, you can easily swap out the state store without making code changes.

The Redis statestore.yaml file included for this quickstart contains the following:

apiVersion: dapr.io/v1alpha1
kind: Component
metadata:
  name: statestore
spec:
  type: state.redis
  version: v1
  metadata:
  - name: redisHost
    value: localhost:6379
  - name: redisPassword
    value: ""
  - name: actorStateStore
    value: "true"

In the YAML file:

  • metadata/name is how your application talks to the component (called DAPR_STORE_NAME in the code sample).
  • spec/metadata defines the connection to the Redis instance used by the component.

Pre-requisites

For this example, you will need:

Step 1: Set up the environment

Clone the sample provided in the Quickstarts repo.

git clone https://github.com/dapr/quickstarts.git

Step 2: Manipulate service state

In a terminal window, navigate to the order-processor directory.

cd state_management/java/sdk/order-processor

Install the dependencies:

mvn clean install

Run the order-processor service alongside a Dapr sidecar.

dapr run -f .

The order-processor service writes, reads, and deletes an orderId key/value pair to the statestore instance defined in the statestore.yaml component. As soon as the service starts, it performs a loop.

try (DaprClient client = new DaprClientBuilder().build()) {
  for (int i = 1; i <= 10; i++) {
    int orderId = i;
    Order order = new Order();
    order.setOrderId(orderId);

    // Save state into the state store
    client.saveState(DAPR_STATE_STORE, String.valueOf(orderId), order).block();
    LOGGER.info("Saving Order: " + order.getOrderId());

    // Get state from the state store
    State<Order> response = client.getState(DAPR_STATE_STORE, String.valueOf(orderId), Order.class).block();
    LOGGER.info("Getting Order: " + response.getValue().getOrderId());

    // Delete state from the state store
    client.deleteState(DAPR_STATE_STORE, String.valueOf(orderId)).block();
    LOGGER.info("Deleting Order: " + orderId);
    TimeUnit.MILLISECONDS.sleep(1000);
  }

Step 3: View the order-processor outputs

Notice, as specified in the code above, the code saves application state in the Dapr state store, reads it, then deletes it.

Order-processor output:

== APP == INFO:root:Saving Order: {'orderId': '1'}
== APP == INFO:root:Result after get: b"{'orderId': '1'}"
== APP == INFO:root:Deleting Order: {'orderId': '1'}
== APP == INFO:root:Saving Order: {'orderId': '2'}
== APP == INFO:root:Result after get: b"{'orderId': '2'}"
== APP == INFO:root:Deleting Order: {'orderId': '2'}
== APP == INFO:root:Saving Order: {'orderId': '3'}
== APP == INFO:root:Result after get: b"{'orderId': '3'}"
== APP == INFO:root:Deleting Order: {'orderId': '3'}
== APP == INFO:root:Saving Order: {'orderId': '4'}
== APP == INFO:root:Result after get: b"{'orderId': '4'}"
== APP == INFO:root:Deleting Order: {'orderId': '4'}
dapr.yaml Multi-App Run template file

When you run dapr init, Dapr creates a default Multi-App Run template file named dapr.yaml. Running dapr run -f starts all applications in your project. In this sample, the dapr.yaml file contains the following:

version: 1
common:
  resourcesPath: ../../resources/
apps:
  - appID: order-processor
    appDirPath: ./order-processor/
    command: ["java", "-jar", "target/OrderProcessingService-0.0.1-SNAPSHOT.jar"]
statestore.yaml component file

When you run dapr init, Dapr creates a default Redis statestore.yaml and runs a Redis container on your local machine, located:

  • On Windows, under %UserProfile%\.dapr\components\statestore.yaml
  • On Linux/MacOS, under ~/.dapr/components/statestore.yaml

With the statestore.yaml component, you can easily swap out the state store without making code changes.

The Redis statestore.yaml file included for this Quickstart contains the following:

apiVersion: dapr.io/v1alpha1
kind: Component
metadata:
  name: statestore
spec:
  type: state.redis
  version: v1
  metadata:
  - name: redisHost
    value: localhost:6379
  - name: redisPassword
    value: ""
  - name: actorStateStore
    value: "true"

In the YAML file:

  • metadata/name is how your application talks to the component (called DAPR_STORE_NAME in the code sample).
  • spec/metadata defines the connection to the Redis instance used by the component.

Pre-requisites

For this example, you will need:

Step 1: Set up the environment

Clone the sample provided in the Quickstarts repo.

git clone https://github.com/dapr/quickstarts.git

Step 2: Manipulate service state

In a terminal window, navigate to the order-processor directory.

cd state_management/go/sdk/order-processor

Install the dependencies:

go build .

Run the order-processor service alongside a Dapr sidecar.

dapr run -f .

The order-processor service writes, reads, and deletes an orderId key/value pair to the statestore instance defined in the statestore.yaml component. As soon as the service starts, it performs a loop.

  client, err := dapr.NewClient()

  // Save state into the state store
  _ = client.SaveState(ctx, STATE_STORE_NAME, strconv.Itoa(orderId), []byte(order))
  log.Print("Saving Order: " + string(order))

  // Get state from the state store
  result, _ := client.GetState(ctx, STATE_STORE_NAME, strconv.Itoa(orderId))
  fmt.Println("Getting Order: " + string(result.Value))

  // Delete state from the state store
  _ = client.DeleteState(ctx, STATE_STORE_NAME, strconv.Itoa(orderId))
  log.Print("Deleting Order: " + string(order))

Step 3: View the order-processor outputs

Notice, as specified in the code above, the code saves application state in the Dapr state store, reads it, then deletes it.

Order-processor output:

== APP == dapr client initializing for: 127.0.0.1:53689
== APP == 2022/04/01 09:16:03 Saving Order: {"orderId":1}
== APP == Getting Order: {"orderId":1}
== APP == 2022/04/01 09:16:03 Deleting Order: {"orderId":1}
== APP == 2022/04/01 09:16:03 Saving Order: {"orderId":2}
== APP == Getting Order: {"orderId":2}
== APP == 2022/04/01 09:16:03 Deleting Order: {"orderId":2}
== APP == 2022/04/01 09:16:03 Saving Order: {"orderId":3}
== APP == Getting Order: {"orderId":3}
== APP == 2022/04/01 09:16:03 Deleting Order: {"orderId":3}
== APP == 2022/04/01 09:16:03 Saving Order: {"orderId":4}
== APP == Getting Order: {"orderId":4}
== APP == 2022/04/01 09:16:03 Deleting Order: {"orderId":4}
== APP == 2022/04/01 09:16:03 Saving Order: {"orderId":5}
== APP == Getting Order: {"orderId":5}
== APP == 2022/04/01 09:16:03 Deleting Order: {"orderId":5}
dapr.yaml Multi-App Run template file

When you run dapr init, Dapr creates a default Multi-App Run template file named dapr.yaml. Running dapr run -f starts all applications in your project. In this sample, the dapr.yaml file contains the following:

version: 1
common:
  resourcesPath: ../../resources/
apps:
  - appID: order-processor
    appDirPath: ./order-processor/
    command: ["go", "run", "."]
statestore.yaml component file

When you run dapr init, Dapr creates a default Redis statestore.yaml and runs a Redis container on your local machine, located:

  • On Windows, under %UserProfile%\.dapr\components\statestore.yaml
  • On Linux/MacOS, under ~/.dapr/components/statestore.yaml

With the statestore.yaml component, you can easily swap out the state store without making code changes.

The Redis statestore.yaml file included for this Quickstart contains the following:

apiVersion: dapr.io/v1alpha1
kind: Component
metadata:
  name: statestore
spec:
  type: state.redis
  version: v1
  metadata:
  - name: redisHost
    value: localhost:6379
  - name: redisPassword
    value: ""
  - name: actorStateStore
    value: "true"

In the YAML file:

  • metadata/name is how your application talks to the component (called DAPR_STORE_NAME in the code sample).
  • spec/metadata defines the connection to the Redis instance used by the component.

Run one application at a time

Select your preferred language-specific Dapr SDK before proceeding with the Quickstart.

Pre-requisites

For this example, you will need:

Step 1: Set up the environment

Clone the sample provided in the Quickstarts repo.

git clone https://github.com/dapr/quickstarts.git

Step 2: Manipulate service state

In a terminal window, navigate to the order-processor directory.

cd state_management/python/sdk/order-processor

Install the dependencies:

pip3 install -r requirements.txt

Run the order-processor service alongside a Dapr sidecar.

dapr run --app-id order-processor --resources-path ../../../resources/ -- python3 app.py

Note: Since Python3.exe is not defined in Windows, you may need to use python app.py instead of python3 app.py.

The order-processor service writes, reads, and deletes an orderId key/value pair to the statestore instance defined in the statestore.yaml component. As soon as the service starts, it performs a loop.

with DaprClient() as client:

    # Save state into the state store
    client.save_state(DAPR_STORE_NAME, orderId, str(order))
    logging.info('Saving Order: %s', order)

    # Get state from the state store
    result = client.get_state(DAPR_STORE_NAME, orderId)
    logging.info('Result after get: ' + str(result.data))

    # Delete state from the state store
    client.delete_state(store_name=DAPR_STORE_NAME, key=orderId)
    logging.info('Deleting Order: %s', order)

Step 3: View the order-processor outputs

Notice, as specified in the code above, the code saves application state in the Dapr state store, reads it, then deletes it.

Order-processor output:

== APP == INFO:root:Saving Order: {'orderId': '1'}
== APP == INFO:root:Result after get: b"{'orderId': '1'}"
== APP == INFO:root:Deleting Order: {'orderId': '1'}
== APP == INFO:root:Saving Order: {'orderId': '2'}
== APP == INFO:root:Result after get: b"{'orderId': '2'}"
== APP == INFO:root:Deleting Order: {'orderId': '2'}
== APP == INFO:root:Saving Order: {'orderId': '3'}
== APP == INFO:root:Result after get: b"{'orderId': '3'}"
== APP == INFO:root:Deleting Order: {'orderId': '3'}
== APP == INFO:root:Saving Order: {'orderId': '4'}
== APP == INFO:root:Result after get: b"{'orderId': '4'}"
== APP == INFO:root:Deleting Order: {'orderId': '4'}
statestore.yaml component file

When you run dapr init, Dapr creates a default Redis statestore.yaml and runs a Redis container on your local machine, located:

  • On Windows, under %UserProfile%\.dapr\components\statestore.yaml
  • On Linux/MacOS, under ~/.dapr/components/statestore.yaml

With the statestore.yaml component, you can easily swap out the state store without making code changes.

The Redis statestore.yaml file included for this quickstart contains the following:

apiVersion: dapr.io/v1alpha1
kind: Component
metadata:
  name: statestore
spec:
  type: state.redis
  version: v1
  metadata:
  - name: redisHost
    value: localhost:6379
  - name: redisPassword
    value: ""
  - name: actorStateStore
    value: "true"

In the YAML file:

  • metadata/name is how your application talks to the component (called DAPR_STORE_NAME in the code sample).
  • spec/metadata defines the connection to the Redis instance used by the component.

Pre-requisites

For this example, you will need:

Step 1: Set up the environment

Clone the sample provided in the Quickstarts repo.

git clone https://github.com/dapr/quickstarts.git

Step 2: Manipulate service state

In a terminal window, navigate to the order-processor directory.

cd state_management/javascript/sdk/order-processor

Install dependencies, which will include the @dapr/dapr package from the JavaScript SDK:

npm install

Verify you have the following files included in the service directory:

  • package.json
  • package-lock.json

Run the order-processor service alongside a Dapr sidecar.

dapr run --app-id order-processor --resources-path ../../../resources/ -- npm run start

The order-processor service writes, reads, and deletes an orderId key/value pair to the statestore instance defined in the statestore.yaml component. As soon as the service starts, it performs a loop.

const client = new DaprClient()

// Save state into a state store
await client.state.save(DAPR_STATE_STORE_NAME, order)
console.log("Saving Order: ", order)

// Get state from a state store
const savedOrder = await client.state.get(DAPR_STATE_STORE_NAME, order.orderId)
console.log("Getting Order: ", savedOrder)

// Delete state from the state store
await client.state.delete(DAPR_STATE_STORE_NAME, order.orderId)
console.log("Deleting Order: ", order)

Step 3: View the order-processor outputs

Notice, as specified in the code above, the code saves application state in the Dapr state store, reads it, then deletes it.

Order-processor output:

== APP == > order-processor@1.0.0 start
== APP == > node index.js
== APP == Saving Order:  { orderId: 1 }
== APP == Saving Order:  { orderId: 2 }
== APP == Saving Order:  { orderId: 3 }
== APP == Saving Order:  { orderId: 4 }
== APP == Saving Order:  { orderId: 5 }
== APP == Getting Order:  { orderId: 1 }
== APP == Deleting Order:  { orderId: 1 }
== APP == Getting Order:  { orderId: 2 }
== APP == Deleting Order:  { orderId: 2 }
== APP == Getting Order:  { orderId: 3 }
== APP == Deleting Order:  { orderId: 3 }
== APP == Getting Order:  { orderId: 4 }
== APP == Deleting Order:  { orderId: 4 }
== APP == Getting Order:  { orderId: 5 }
== APP == Deleting Order:  { orderId: 5 }
statestore.yaml component file

When you run dapr init, Dapr creates a default Redis statestore.yaml and runs a Redis container on your local machine, located:

  • On Windows, under %UserProfile%\.dapr\components\statestore.yaml
  • On Linux/MacOS, under ~/.dapr/components/statestore.yaml

With the statestore.yaml component, you can easily swap out the state store without making code changes.

The Redis statestore.yaml file included for this quickstart contains the following:

apiVersion: dapr.io/v1alpha1
kind: Component
metadata:
  name: statestore
spec:
  type: state.redis
  version: v1
  metadata:
  - name: redisHost
    value: localhost:6379
  - name: redisPassword
    value: ""
  - name: actorStateStore
    value: "true"

In the YAML file:

  • metadata/name is how your application talks to the component (called DAPR_STORE_NAME in the code sample).
  • spec/metadata defines the connection to the Redis instance used by the component.

Pre-requisites

For this example, you will need:

Step 1: Set up the environment

Clone the sample provided in the Quickstarts repo.

git clone https://github.com/dapr/quickstarts.git

Step 2: Manipulate service state

In a terminal window, navigate to the order-processor directory.

cd state_management/csharp/sdk/order-processor

Recall NuGet packages:

dotnet restore
dotnet build

Run the order-processor service alongside a Dapr sidecar.

dapr run --app-id order-processor --resources-path ../../../resources/ -- dotnet run

The order-processor service writes, reads, and deletes an orderId key/value pair to the statestore instance defined in the statestore.yaml component. As soon as the service starts, it performs a loop.

var client = new DaprClientBuilder().Build();

// Save state into the state store
await client.SaveStateAsync(DAPR_STORE_NAME, orderId.ToString(), order.ToString());
Console.WriteLine("Saving Order: " + order);

// Get state from the state store
var result = await client.GetStateAsync<string>(DAPR_STORE_NAME, orderId.ToString());
Console.WriteLine("Getting Order: " + result);

// Delete state from the state store
await client.DeleteStateAsync(DAPR_STORE_NAME, orderId.ToString());
Console.WriteLine("Deleting Order: " + order);

Step 3: View the order-processor outputs

Notice, as specified in the code above, the code saves application state in the Dapr state store, reads it, then deletes it.

Order-processor output:

== APP == Saving Order: Order { orderId = 1 }
== APP == Getting Order: Order { orderId = 1 }
== APP == Deleting Order: Order { orderId = 1 }
== APP == Saving Order: Order { orderId = 2 }
== APP == Getting Order: Order { orderId = 2 }
== APP == Deleting Order: Order { orderId = 2 }
== APP == Saving Order: Order { orderId = 3 }
== APP == Getting Order: Order { orderId = 3 }
== APP == Deleting Order: Order { orderId = 3 }
== APP == Saving Order: Order { orderId = 4 }
== APP == Getting Order: Order { orderId = 4 }
== APP == Deleting Order: Order { orderId = 4 }
== APP == Saving Order: Order { orderId = 5 }
== APP == Getting Order: Order { orderId = 5 }
== APP == Deleting Order: Order { orderId = 5 }
statestore.yaml component file

When you run dapr init, Dapr creates a default Redis statestore.yaml and runs a Redis container on your local machine, located:

  • On Windows, under %UserProfile%\.dapr\components\statestore.yaml
  • On Linux/MacOS, under ~/.dapr/components/statestore.yaml

With the statestore.yaml component, you can easily swap out the state store without making code changes.

The Redis statestore.yaml file included for this quickstart contains the following:

apiVersion: dapr.io/v1alpha1
kind: Component
metadata:
  name: statestore
spec:
  type: state.redis
  version: v1
  metadata:
  - name: redisHost
    value: localhost:6379
  - name: redisPassword
    value: ""
  - name: actorStateStore
    value: "true"

In the YAML file:

  • metadata/name is how your application talks to the component (called DAPR_STORE_NAME in the code sample).
  • spec/metadata defines the connection to the Redis instance used by the component.

Pre-requisites

For this example, you will need:

Step 1: Set up the environment

Clone the sample provided in the Quickstarts repo.

git clone https://github.com/dapr/quickstarts.git

Step 2: Manipulate service state

In a terminal window, navigate to the order-processor directory.

cd state_management/java/sdk/order-processor

Install the dependencies:

mvn clean install

Run the order-processor service alongside a Dapr sidecar.

dapr run --app-id order-processor --resources-path ../../../resources -- java -jar target/OrderProcessingService-0.0.1-SNAPSHOT.jar

The order-processor service writes, reads, and deletes an orderId key/value pair to the statestore instance defined in the statestore.yaml component. As soon as the service starts, it performs a loop.

try (DaprClient client = new DaprClientBuilder().build()) {
  for (int i = 1; i <= 10; i++) {
    int orderId = i;
    Order order = new Order();
    order.setOrderId(orderId);

    // Save state into the state store
    client.saveState(DAPR_STATE_STORE, String.valueOf(orderId), order).block();
    LOGGER.info("Saving Order: " + order.getOrderId());

    // Get state from the state store
    State<Order> response = client.getState(DAPR_STATE_STORE, String.valueOf(orderId), Order.class).block();
    LOGGER.info("Getting Order: " + response.getValue().getOrderId());

    // Delete state from the state store
    client.deleteState(DAPR_STATE_STORE, String.valueOf(orderId)).block();
    LOGGER.info("Deleting Order: " + orderId);
    TimeUnit.MILLISECONDS.sleep(1000);
  }

Step 3: View the order-processor outputs

Notice, as specified in the code above, the code saves application state in the Dapr state store, reads it, then deletes it.

Order-processor output:

== APP == INFO:root:Saving Order: {'orderId': '1'}
== APP == INFO:root:Result after get: b"{'orderId': '1'}"
== APP == INFO:root:Deleting Order: {'orderId': '1'}
== APP == INFO:root:Saving Order: {'orderId': '2'}
== APP == INFO:root:Result after get: b"{'orderId': '2'}"
== APP == INFO:root:Deleting Order: {'orderId': '2'}
== APP == INFO:root:Saving Order: {'orderId': '3'}
== APP == INFO:root:Result after get: b"{'orderId': '3'}"
== APP == INFO:root:Deleting Order: {'orderId': '3'}
== APP == INFO:root:Saving Order: {'orderId': '4'}
== APP == INFO:root:Result after get: b"{'orderId': '4'}"
== APP == INFO:root:Deleting Order: {'orderId': '4'}
statestore.yaml component file

When you run dapr init, Dapr creates a default Redis statestore.yaml and runs a Redis container on your local machine, located:

  • On Windows, under %UserProfile%\.dapr\components\statestore.yaml
  • On Linux/MacOS, under ~/.dapr/components/statestore.yaml

With the statestore.yaml component, you can easily swap out the state store without making code changes.

The Redis statestore.yaml file included for this Quickstart contains the following:

apiVersion: dapr.io/v1alpha1
kind: Component
metadata:
  name: statestore
spec:
  type: state.redis
  version: v1
  metadata:
  - name: redisHost
    value: localhost:6379
  - name: redisPassword
    value: ""
  - name: actorStateStore
    value: "true"

In the YAML file:

  • metadata/name is how your application talks to the component (called DAPR_STORE_NAME in the code sample).
  • spec/metadata defines the connection to the Redis instance used by the component.

Pre-requisites

For this example, you will need:

Step 1: Set up the environment

Clone the sample provided in the Quickstarts repo.

git clone https://github.com/dapr/quickstarts.git

Step 2: Manipulate service state

In a terminal window, navigate to the order-processor directory.

cd state_management/go/sdk/order-processor

Install the dependencies and build the application:

go build .

Run the order-processor service alongside a Dapr sidecar.

dapr run --app-id order-processor --resources-path ../../../resources -- go run .

The order-processor service writes, reads, and deletes an orderId key/value pair to the statestore instance defined in the statestore.yaml component. As soon as the service starts, it performs a loop.

  client, err := dapr.NewClient()

  // Save state into the state store
  _ = client.SaveState(ctx, STATE_STORE_NAME, strconv.Itoa(orderId), []byte(order))
  log.Print("Saving Order: " + string(order))

  // Get state from the state store
  result, _ := client.GetState(ctx, STATE_STORE_NAME, strconv.Itoa(orderId))
  fmt.Println("Getting Order: " + string(result.Value))

  // Delete state from the state store
  _ = client.DeleteState(ctx, STATE_STORE_NAME, strconv.Itoa(orderId))
  log.Print("Deleting Order: " + string(order))

Step 3: View the order-processor outputs

Notice, as specified in the code above, the code saves application state in the Dapr state store, reads it, then deletes it.

Order-processor output:

== APP == dapr client initializing for: 127.0.0.1:53689
== APP == 2022/04/01 09:16:03 Saving Order: {"orderId":1}
== APP == Getting Order: {"orderId":1}
== APP == 2022/04/01 09:16:03 Deleting Order: {"orderId":1}
== APP == 2022/04/01 09:16:03 Saving Order: {"orderId":2}
== APP == Getting Order: {"orderId":2}
== APP == 2022/04/01 09:16:03 Deleting Order: {"orderId":2}
== APP == 2022/04/01 09:16:03 Saving Order: {"orderId":3}
== APP == Getting Order: {"orderId":3}
== APP == 2022/04/01 09:16:03 Deleting Order: {"orderId":3}
== APP == 2022/04/01 09:16:03 Saving Order: {"orderId":4}
== APP == Getting Order: {"orderId":4}
== APP == 2022/04/01 09:16:03 Deleting Order: {"orderId":4}
== APP == 2022/04/01 09:16:03 Saving Order: {"orderId":5}
== APP == Getting Order: {"orderId":5}
== APP == 2022/04/01 09:16:03 Deleting Order: {"orderId":5}
statestore.yaml component file

When you run dapr init, Dapr creates a default Redis statestore.yaml and runs a Redis container on your local machine, located:

  • On Windows, under %UserProfile%\.dapr\components\statestore.yaml
  • On Linux/MacOS, under ~/.dapr/components/statestore.yaml

With the statestore.yaml component, you can easily swap out the state store without making code changes.

The Redis statestore.yaml file included for this Quickstart contains the following:

apiVersion: dapr.io/v1alpha1
kind: Component
metadata:
  name: statestore
spec:
  type: state.redis
  version: v1
  metadata:
  - name: redisHost
    value: localhost:6379
  - name: redisPassword
    value: ""
  - name: actorStateStore
    value: "true"

In the YAML file:

  • metadata/name is how your application talks to the component (called DAPR_STORE_NAME in the code sample).
  • spec/metadata defines the connection to the Redis instance used by the component.

Tell us what you think!

We’re continuously working to improve our Quickstart examples and value your feedback. Did you find this quickstart helpful? Do you have suggestions for improvement?

Join the discussion in our discord channel.

Next steps

Explore Dapr tutorials >>

5 - Quickstart: Input & Output Bindings

Get started with Dapr’s Binding building block

Let’s take a look at Dapr’s Bindings building block. Using bindings, you can:

  • Trigger your app with events coming in from external systems.
  • Interface with external systems.

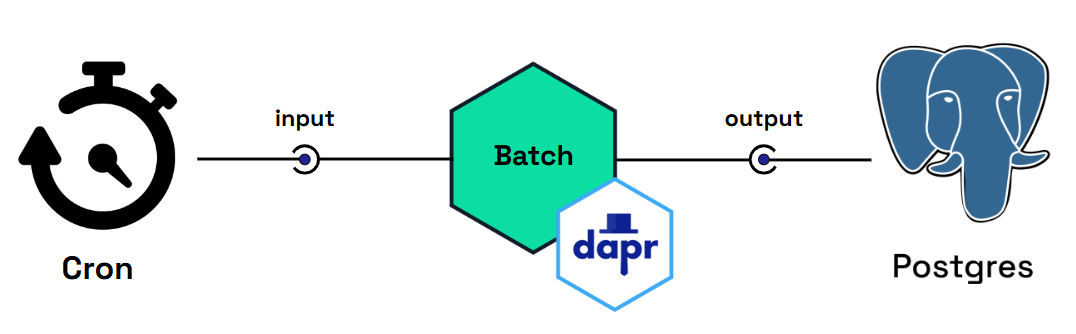
In this Quickstart, you schedule a batch script to run every 10 seconds using an input Cron binding. The script processes a JSON file and outputs data to a SQL database using the PostgreSQL Dapr binding.

Select your preferred language-specific Dapr SDK before proceeding with the Quickstart.

Pre-requisites

For this example, you will need:

Step 1: Set up the environment

Clone the sample provided in the Quickstarts repo.

git clone https://github.com/dapr/quickstarts.git

Step 2: Run PostgreSQL Docker container locally

Run the PostgreSQL instance locally in a Docker container on your machine. The Quickstart sample includes a Docker Compose file to locally customize, build, run, and initialize the postgres container with a default orders table.

In a terminal window, from the root of the Quickstarts clone directory, navigate to the bindings/db directory.

cd bindings/db

Run the following command to set up the container:

docker compose up

Verify that the container is running locally.

docker ps

The output should include:

CONTAINER ID   IMAGE      COMMAND                  CREATED         STATUS         PORTS                    NAMES
55305d1d378b   postgres   "docker-entrypoint.s…"   3 seconds ago   Up 2 seconds   0.0.0.0:5432->5432/tcp   sql_db

Step 3: Schedule a Cron job and write to the database

In a new terminal window, navigate to the SDK directory.

cd bindings/python/sdk/batch

Install the dependencies:

pip3 install -r requirements.txt

Run the batch-sdk service alongside a Dapr sidecar.

dapr run --app-id batch-sdk --app-port 50051 --resources-path ../../../components -- python3 app.py

Note: Since Python3.exe is not defined in Windows, you may need to use python app.py instead of python3 app.py.

The code inside the process_batch function is executed every 10 seconds (defined in binding-cron.yaml in the components directory). The binding trigger looks for a route called via HTTP POST in your application by the Dapr sidecar.

# Triggered by Dapr input binding
@app.route('/' + cron_binding_name, methods=['POST'])
def process_batch():

The batch-sdk service uses the PostgreSQL output binding defined in the binding-postgresql.yaml component to insert the OrderId, Customer, and Price records into the orders table.

with DaprClient() as d:
    sqlCmd = ('insert into orders (orderid, customer, price) values ' +
              '(%s, \'%s\', %s)' % (order_line['orderid'],
                                    order_line['customer'],
                                    order_line['price']))
    payload = {'sql': sqlCmd}

    print(sqlCmd, flush=True)

    try:
        # Insert order using Dapr output binding via HTTP Post
        resp = d.invoke_binding(binding_name=sql_binding, operation='exec',
                                binding_metadata=payload, data='')
        return resp
    except Exception as e:
        print(e, flush=True)
        raise SystemExit(e)

Step 4: View the output of the job

Notice, as specified above, the code invokes the output binding with the OrderId, Customer, and Price as a payload.

Your output binding’s print statement output:

== APP == Processing batch..
== APP == insert into orders (orderid, customer, price) values (1, 'John Smith', 100.32)
== APP == insert into orders (orderid, customer, price) values (2, 'Jane Bond', 15.4)
== APP == insert into orders (orderid, customer, price) values (3, 'Tony James', 35.56)
== APP == Finished processing batch

In a new terminal, verify the same data has been inserted into the database. Navigate to the bindings/db directory.

cd bindings/db

Run the following to start the interactive psql CLI:

docker exec -i -t postgres psql --username postgres  -p 5432 -h localhost --no-password

At the admin=# prompt, change to the orders table:

\c orders;

At the orders=# prompt, select all rows:

select * from orders;

The output should look like this:

 orderid |  customer  | price
---------+------------+--------
       1 | John Smith | 100.32
       2 | Jane Bond  |   15.4
       3 | Tony James |  35.56

components\binding-cron.yaml component file

When you execute the dapr run command and specify the component path, the Dapr sidecar:

The Cron binding-cron.yaml file included for this Quickstart contains the following:

apiVersion: dapr.io/v1alpha1
kind: Component
metadata:
  name: cron
  namespace: quickstarts
spec:
  type: bindings.cron
  version: v1
  metadata:
  - name: schedule
    value: "@every 10s" # valid cron schedule
  - name: direction
    value: "input" # direction of the cron binding

Note: The metadata section of binding-cron.yaml contains a Cron expression that specifies how often the binding is invoked.

component\binding-postgresql.yaml component file

When you execute the dapr run command and specify the component path, the Dapr sidecar:

  • Initiates the PostgreSQL binding building block
  • Connects to PostgreSQL using the settings specified in the binding-postgresql.yaml file

With the binding-postgresql.yaml component, you can easily swap out the backend database binding without making code changes.

The PostgreSQL binding-postgresql.yaml file included for this Quickstart contains the following:

apiVersion: dapr.io/v1alpha1
kind: Component
metadata:
  name: sqldb
  namespace: quickstarts
spec:
  type: bindings.postgresql
  version: v1
  metadata:
  - name: url # Required
    value: "user=postgres password=docker host=localhost port=5432 dbname=orders pool_min_conns=1 pool_max_conns=10"
  - name: direction
    value: "output" # direction of the postgresql binding

In the YAML file:

  • spec/type specifies that PostgreSQL is used for this binding.
  • spec/metadata defines the connection to the PostgreSQL instance used by the component.

Pre-requisites

For this example, you will need:

Step 1: Set up the environment

Clone the sample provided in the Quickstarts repo.

git clone https://github.com/dapr/quickstarts.git

Step 2: Run PostgreSQL Docker container locally

Run the PostgreSQL instance locally in a Docker container on your machine. The Quickstart sample includes a Docker Compose file to locally customize, build, run, and initialize the postgres container with a default orders table.

In a terminal window, from the root of the Quickstarts clone directory, navigate to the bindings/db directory.

cd bindings/db

Run the following command to set up the container:

docker compose up

Verify that the container is running locally.

docker ps

The output should include:

CONTAINER ID   IMAGE      COMMAND                  CREATED         STATUS         PORTS                    NAMES
55305d1d378b   postgres   "docker-entrypoint.s…"   3 seconds ago   Up 2 seconds   0.0.0.0:5432->5432/tcp   sql_db

Step 3: Schedule a Cron job and write to the database

In a new terminal window, navigate to the SDK directory.

cd bindings/javascript/sdk/batch

Install the dependencies:

npm install

Run the batch-sdk service alongside a Dapr sidecar.

dapr run --app-id batch-sdk --app-port 5002 --dapr-http-port 3500 --resources-path ../../../components -- node index.js 

The code inside the process_batch function is executed every 10 seconds (defined in binding-cron.yaml in the components directory). The binding trigger looks for a route called via HTTP POST in your application by the Dapr sidecar.

async function start() {
    await server.binding.receive(cronBindingName,processBatch);
    await server.start();
}

The batch-sdk service uses the PostgreSQL output binding defined in the binding-postgresql.yaml component to insert the OrderId, Customer, and Price records into the orders table.

async function processBatch(){
    const loc = '../../orders.json';
    fs.readFile(loc, 'utf8', (err, data) => {
        const orders = JSON.parse(data).orders;
        orders.forEach(order => {
            let sqlCmd = `insert into orders (orderid, customer, price) values (${order.orderid}, '${order.customer}', ${order.price});`;
            let payload = `{  "sql": "${sqlCmd}" } `;
            console.log(payload);
            client.binding.send(postgresBindingName, "exec", "", JSON.parse(payload));
        });
        console.log('Finished processing batch');
      });
    return 0;
}

Step 4: View the output of the job

Notice, as specified above, the code invokes the output binding with the OrderId, Customer, and Price as a payload.

Your output binding’s print statement output:

== APP == Processing batch..
== APP == insert into orders (orderid, customer, price) values(1, 'John Smith', 100.32)
== APP == insert into orders (orderid, customer, price) values(2, 'Jane Bond', 15.4)
== APP == insert into orders (orderid, customer, price) values(3, 'Tony James', 35.56)

In a new terminal, verify the same data has been inserted into the database. Navigate to the bindings/db directory.

cd bindings/db

Run the following to start the interactive Postgres CLI:

docker exec -i -t postgres psql --username postgres  -p 5432 -h localhost --no-password

At the admin=# prompt, change to the orders table:

\c orders;

At the orders=# prompt, select all rows:

select * from orders;

The output should look like this:

 orderid |  customer  | price
---------+------------+--------
       1 | John Smith | 100.32
       2 | Jane Bond  |   15.4
       3 | Tony James |  35.56

components\binding-cron.yaml component file

When you execute the dapr run command and specify the component path, the Dapr sidecar:

The Cron binding-cron.yaml file included for this Quickstart contains the following:

apiVersion: dapr.io/v1alpha1
kind: Component
metadata:
  name: cron
  namespace: quickstarts
spec:
  type: bindings.cron
  version: v1
  metadata:
  - name: schedule
    value: "@every 10s" # valid cron schedule
  - name: direction
    value: "input" # direction of the cron binding

Note: The metadata section of binding-cron.yaml contains a Cron expression that specifies how often the binding is invoked.

component\binding-postgresql.yaml component file

When you execute the dapr run command and specify the component path, the Dapr sidecar:

  • Initiates the PostgreSQL binding building block
  • Connects to PostgreSQL using the settings specified in the binding-postgresql.yaml file

With the binding-postgresql.yaml component, you can easily swap out the backend database binding without making code changes.

The PostgreSQL binding-postgresql.yaml file included for this Quickstart contains the following:

apiVersion: dapr.io/v1alpha1
kind: Component
metadata:
  name: sqldb
  namespace: quickstarts
spec:
  type: bindings.postgresql
  version: v1
  metadata:
  - name: url # Required
    value: "user=postgres password=docker host=localhost port=5432 dbname=orders pool_min_conns=1 pool_max_conns=10"
  - name: direction
    value: "output" # direction of the postgresql binding

In the YAML file:

  • spec/type specifies that PostgreSQL is used for this binding.
  • spec/metadata defines the connection to the PostgreSQL instance used by the component.

Pre-requisites

For this example, you will need:

NOTE: .NET 6 is the minimally supported version of .NET for the Dapr .NET SDK packages in this release. Only .NET 8 and .NET 9 will be supported in Dapr v1.16 and later releases.

Step 1: Set up the environment

Clone the sample provided in the Quickstarts repo.

git clone https://github.com/dapr/quickstarts.git

Step 2: Run PostgreSQL Docker container locally

Run the PostgreSQL instance locally in a Docker container on your machine. The Quickstart sample includes a Docker Compose file to locally customize, build, run, and initialize the postgres container with a default orders table.

In a terminal window, from the root of the Quickstarts clone directory, navigate to the bindings/db directory.

cd bindings/db

Run the following command to set up the container:

docker compose up

Verify that the container is running locally.

docker ps

The output should include:

CONTAINER ID   IMAGE      COMMAND                  CREATED         STATUS         PORTS                    NAMES
55305d1d378b   postgres   "docker-entrypoint.s…"   3 seconds ago   Up 2 seconds   0.0.0.0:5432->5432/tcp   sql_db

Step 3: Schedule a Cron job and write to the database

In a new terminal window, navigate to the SDK directory.

cd bindings/csharp/sdk/batch

Install the dependencies:

dotnet restore
dotnet build batch.csproj

Run the batch-sdk service alongside a Dapr sidecar.

dapr run --app-id batch-sdk --app-port 7002 --resources-path ../../../components -- dotnet run

The code inside the process_batch function is executed every 10 seconds (defined in binding-cron.yaml in the components directory). The binding trigger looks for a route called via HTTP POST in your application by the Dapr sidecar.

app.MapPost("/" + cronBindingName, async () => {
// ...
});

The batch-sdk service uses the PostgreSQL output binding defined in the binding-postgresql.yaml component to insert the OrderId, Customer, and Price records into the orders table.

// ...
string jsonFile = File.ReadAllText("../../../orders.json");
var ordersArray = JsonSerializer.Deserialize<Orders>(jsonFile);
using var client = new DaprClientBuilder().Build();
foreach(Order ord in ordersArray?.orders ?? new Order[] {}){
    var sqlText = $"insert into orders (orderid, customer, price) values ({ord.OrderId}, '{ord.Customer}', {ord.Price});";
    var command = new Dictionary<string,string>(){
        {"sql",
        sqlText}
    };
// ...
}

// Insert order using Dapr output binding via Dapr Client SDK
await client.InvokeBindingAsync(bindingName: sqlBindingName, operation: "exec", data: "", metadata: command);

Step 4: View the output of the job

Notice, as specified above, the code invokes the output binding with the OrderId, Customer, and Price as a payload.

Your output binding’s print statement output:

== APP == Processing batch..
== APP == insert into orders (orderid, customer, price) values (1, 'John Smith', 100.32);
== APP == insert into orders (orderid, customer, price) values (2, 'Jane Bond', 15.4);
== APP == insert into orders (orderid, customer, price) values (3, 'Tony James', 35.56);
== APP == Finished processing batch

In a new terminal, verify the same data has been inserted into the database. Navigate to the bindings/db directory.

cd bindings/db

Run the following to start the interactive Postgres CLI:

docker exec -i -t postgres psql --username postgres  -p 5432 -h localhost --no-password

At the admin=# prompt, change to the orders table:

\c orders;

At the orders=# prompt, select all rows:

select * from orders;

The output should look like this:

 orderid |  customer  | price
---------+------------+--------
       1 | John Smith | 100.32
       2 | Jane Bond  |   15.4
       3 | Tony James |  35.56

components\binding-cron.yaml component file

When you execute the dapr run command and specify the component path, the Dapr sidecar:

The Cron binding-cron.yaml file included for this Quickstart contains the following:

apiVersion: dapr.io/v1alpha1
kind: Component
metadata:
  name: cron
  namespace: quickstarts
spec:
  type: bindings.cron
  version: v1
  metadata:
  - name: schedule
    value: "@every 10s" # valid cron schedule
  - name: direction
    value: "input" # direction of the cron binding

Note: The metadata section of binding-cron.yaml contains a Cron expression that specifies how often the binding is invoked.

component\binding-postgresql.yaml component file

When you execute the dapr run command and specify the component path, the Dapr sidecar:

  • Initiates the PostgreSQL binding building block
  • Connects to PostgreSQL using the settings specified in the binding-postgresql.yaml file

With the binding-postgresql.yaml component, you can easily swap out the backend database binding without making code changes.

The PostgreSQL binding-postgresql.yaml file included for this Quickstart contains the following:

apiVersion: dapr.io/v1alpha1
kind: Component
metadata:
  name: sqldb
  namespace: quickstarts
spec:
  type: bindings.postgresql
  version: v1
  metadata:
  - name: url # Required
    value: "user=postgres password=docker host=localhost port=5432 dbname=orders pool_min_conns=1 pool_max_conns=10"
  - name: direction
    value: "output" # direction of the postgresql binding

In the YAML file:

  • spec/type specifies that PostgreSQL is used for this binding.
  • spec/metadata defines the connection to the PostgreSQL instance used by the component.

Pre-requisites

For this example, you will need:

Step 1: Set up the environment

Clone the sample provided in the Quickstarts repo.

git clone https://github.com/dapr/quickstarts.git

Step 2: Run PostgreSQL Docker container locally

Run the PostgreSQL instance locally in a Docker container on your machine. The Quickstart sample includes a Docker Compose file to locally customize, build, run, and initialize the postgres container with a default orders table.

In a terminal window, from the root of the Quickstarts clone directory, navigate to the bindings/db directory.

cd bindings/db

Run the following command to set up the container:

docker compose up

Verify that the container is running locally.

docker ps

The output should include:

CONTAINER ID   IMAGE      COMMAND                  CREATED         STATUS         PORTS                    NAMES
55305d1d378b   postgres   "docker-entrypoint.s…"   3 seconds ago   Up 2 seconds   0.0.0.0:5432->5432/tcp   sql_db

Step 3: Schedule a Cron job and write to the database

In a new terminal window, navigate to the SDK directory.

cd bindings/java/sdk/batch

Install the dependencies:

mvn clean install

Run the batch-sdk service alongside a Dapr sidecar.

dapr run --app-id batch-sdk --app-port 8080 --resources-path ../../../components -- java -jar target/BatchProcessingService-0.0.1-SNAPSHOT.jar

The code inside the process_batch function is executed every 10 seconds (defined in binding-cron.yaml in the components directory). The binding trigger looks for a route called via HTTP POST in your application by the Dapr sidecar.

@PostMapping(path = cronBindingPath, consumes = MediaType.ALL_VALUE)
public ResponseEntity<String> processBatch() throws IOException, Exception

The batch-sdk service uses the PostgreSQL output binding defined in the binding-postgresql.yaml component to insert the OrderId, Customer, and Price records into the orders table.

try (DaprClient client = new DaprClientBuilder().build()) {

    for (Order order : ordList.orders) {
        String sqlText = String.format(
            "insert into orders (orderid, customer, price) " +
            "values (%s, '%s', %s);", 
            order.orderid, order.customer, order.price);
        logger.info(sqlText);
    
        Map<String, String> metadata = new HashMap<String, String>();
        metadata.put("sql", sqlText);
 
        // Invoke sql output binding using Dapr SDK
        client.invokeBinding(sqlBindingName, "exec", null, metadata).block();
    } 

    logger.info("Finished processing batch");

    return ResponseEntity.ok("Finished processing batch");
}

Step 4: View the output of the job

Notice, as specified above, the code invokes the output binding with the OrderId, Customer, and Price as a payload.

Your output binding’s print statement output:

== APP == 2022-06-22 16:39:17.012  INFO 35772 --- [nio-8080-exec-4] c.s.c.BatchProcessingServiceController   : Processing batch..
== APP == 2022-06-22 16:39:17.268  INFO 35772 --- [nio-8080-exec-4] c.s.c.BatchProcessingServiceController   : insert into orders (orderid, customer, price) values (1, 'John Smith', 100.32);
== APP == 2022-06-22 16:39:17.838  INFO 35772 --- [nio-8080-exec-4] c.s.c.BatchProcessingServiceController   : insert into orders (orderid, customer, price) values (2, 'Jane Bond', 15.4);
== APP == 2022-06-22 16:39:17.844  INFO 35772 --- [nio-8080-exec-4] c.s.c.BatchProcessingServiceController   : insert into orders (orderid, customer, price) values (3, 'Tony James', 35.56);
== APP == 2022-06-22 16:39:17.848  INFO 35772 --- [nio-8080-exec-4] c.s.c.BatchProcessingServiceController   : Finished processing batch

In a new terminal, verify the same data has been inserted into the database. Navigate to the bindings/db directory.

cd bindings/db

Run the following to start the interactive Postgres CLI:

docker exec -i -t postgres psql --username postgres  -p 5432 -h localhost --no-password

At the admin=# prompt, change to the orders table:

\c orders;

At the orders=# prompt, select all rows:

select * from orders;

The output should look like this:

 orderid |  customer  | price
---------+------------+--------
       1 | John Smith | 100.32
       2 | Jane Bond  |   15.4
       3 | Tony James |  35.56

components\binding-cron.yaml component file

When you execute the dapr run command and specify the component path, the Dapr sidecar:

The Cron binding-cron.yaml file included for this Quickstart contains the following:

apiVersion: dapr.io/v1alpha1
kind: Component
metadata:
  name: cron
  namespace: quickstarts
spec:
  type: bindings.cron
  version: v1
  metadata:
  - name: schedule
    value: "@every 10s" # valid cron schedule
  - name: direction
    value: "input" # direction of the cron binding

Note: The metadata section of binding-cron.yaml contains a Cron expression that specifies how often the binding is invoked.

component\binding-postgresql.yaml component file

When you execute the dapr run command and specify the component path, the Dapr sidecar:

  • Initiates the PostgreSQL binding building block
  • Connects to PostgreSQL using the settings specified in the binding-postgresql.yaml file

With the binding-postgresql.yaml component, you can easily swap out the backend database binding without making code changes.

The PostgreSQL binding-postgresql.yaml file included for this Quickstart contains the following:

apiVersion: dapr.io/v1alpha1
kind: Component
metadata:
  name: sqldb
  namespace: quickstarts
spec:
  type: bindings.postgresql
  version: v1
  metadata:
  - name: url # Required
    value: "user=postgres password=docker host=localhost port=5432 dbname=orders pool_min_conns=1 pool_max_conns=10"
  - name: direction
    value: "output" # direction of the postgresql binding

In the YAML file:

  • spec/type specifies that PostgreSQL is used for this binding.
  • spec/metadata defines the connection to the PostgreSQL instance used by the component.

Pre-requisites

For this example, you will need:

Step 1: Set up the environment

Clone the sample provided in the Quickstarts repo.

git clone https://github.com/dapr/quickstarts.git

Step 2: Run PostgreSQL Docker container locally

Run the PostgreSQL instance locally in a Docker container on your machine. The Quickstart sample includes a Docker Compose file to locally customize, build, run, and initialize the postgres container with a default orders table.

In a terminal window, from the root of the Quickstarts clone directory, navigate to the bindings/db directory.

cd bindings/db

Run the following command to set up the container:

docker compose up

Verify that the container is running locally.

docker ps

The output should include:

CONTAINER ID   IMAGE      COMMAND                  CREATED         STATUS         PORTS                    NAMES
55305d1d378b   postgres   "docker-entrypoint.s…"   3 seconds ago   Up 2 seconds   0.0.0.0:5432->5432/tcp   sql_db

Step 3: Schedule a Cron job and write to the database

In a new terminal window, navigate to the SDK directory.

cd bindings/go/sdk/batch

Install the dependencies:

go build .

Run the batch-sdk service alongside a Dapr sidecar.

dapr run --app-id batch-sdk --app-port 6002 --dapr-http-port 3502 --dapr-grpc-port 60002 --resources-path ../../../components -- go run .

The code inside the process_batch function is executed every 10 seconds (defined in binding-cron.yaml in the components directory). The binding trigger looks for a route called via HTTP POST in your application by the Dapr sidecar.

// Triggered by Dapr input binding
r.HandleFunc("/"+cronBindingName, processBatch).Methods("POST")

The batch-sdk service uses the PostgreSQL output binding defined in the binding-postgresql.yaml component to insert the OrderId, Customer, and Price records into the orders table.

func sqlOutput(order Order) (err error) {

	client, err := dapr.NewClient()
	if err != nil {
		return err
	}

	ctx := context.Background()

	sqlCmd := fmt.Sprintf("insert into orders (orderid, customer, price) values (%d, '%s', %s);", order.OrderId, order.Customer, strconv.FormatFloat(order.Price, 'f', 2, 64))
	fmt.Println(sqlCmd)

	// Insert order using Dapr output binding via Dapr SDK
	in := &dapr.InvokeBindingRequest{
		Name:      sqlBindingName,
		Operation: "exec",
		Data:      []byte(""),
		Metadata:  map[string]string{"sql": sqlCmd},
	}
	err = client.InvokeOutputBinding(ctx, in)
	if err != nil {
		return err
	}

	return nil
}

Step 4: View the output of the job

Notice, as specified above, the code invokes the output binding with the OrderId, Customer, and Price as a payload.

Your output binding’s print statement output:

== APP == Processing batch..
== APP == insert into orders (orderid, customer, price) values(1, 'John Smith', 100.32)
== APP == insert into orders (orderid, customer, price) values(2, 'Jane Bond', 15.4)
== APP == insert into orders (orderid, customer, price) values(3, 'Tony James', 35.56)

In a new terminal, verify the same data has been inserted into the database. Navigate to the bindings/db directory.

cd bindings/db

Run the following to start the interactive Postgres CLI:

docker exec -i -t postgres psql --username postgres  -p 5432 -h localhost --no-password

At the admin=# prompt, change to the orders table:

\c orders;

At the orders=# prompt, select all rows:

select * from orders;

The output should look like this:

 orderid |  customer  | price
---------+------------+--------
       1 | John Smith | 100.32
       2 | Jane Bond  |   15.4
       3 | Tony James |  35.56

components\binding-cron.yaml component file

When you execute the dapr run command and specify the component path, the Dapr sidecar:

The Cron binding-cron.yaml file included for this Quickstart contains the following:

apiVersion: dapr.io/v1alpha1
kind: Component
metadata:
  name: cron
  namespace: quickstarts
spec:
  type: bindings.cron
  version: v1
  metadata:
  - name: schedule
    value: "@every 10s" # valid cron schedule
  - name: direction
    value: "input" # direction of the cron binding

Note: The metadata section of binding-cron.yaml contains a Cron expression that specifies how often the binding is invoked.

component\binding-postgresql.yaml component file

When you execute the dapr run command and specify the component path, the Dapr sidecar:

  • Initiates the PostgreSQL binding building block
  • Connects to PostgreSQL using the settings specified in the binding-postgresql.yaml file

With the binding-postgresql.yaml component, you can easily swap out the backend database binding without making code changes.

The PostgreSQL binding-postgresql.yaml file included for this Quickstart contains the following:

apiVersion: dapr.io/v1alpha1
kind: Component
metadata:
  name: sqldb
  namespace: quickstarts
spec:
  type: bindings.postgresql
  version: v1
  metadata:
  - name: url # Required
    value: "user=postgres password=docker host=localhost port=5432 dbname=orders pool_min_conns=1 pool_max_conns=10"
  - name: direction
    value: "output" # direction of the postgresql binding

In the YAML file:

  • spec/type specifies that PostgreSQL is used for this binding.
  • spec/metadata defines the connection to the PostgreSQL instance used by the component.

Tell us what you think!

We’re continuously working to improve our Quickstart examples and value your feedback. Did you find this quickstart helpful? Do you have suggestions for improvement?

Join the discussion in our discord channel.

Next steps

Explore Dapr tutorials >>

6 - Quickstart: Actors

Get started with Dapr’s Actors building block

Let’s take a look at Dapr’s Actors building block. In this Quickstart, you will run a smart device microservice and a simple console client to demonstrate the stateful object patterns in Dapr Actors.

Currently, you can experience this actors quickstart using the .NET SDK.

As a quick overview of the .NET actors quickstart:

  1. Using a SmartDevice.Service microservice, you host:
    • Two SmokeDetectorActor smoke alarm objects
    • A ControllerActor object that commands and controls the smart devices
  2. Using a SmartDevice.Client console app, the client app interacts with each actor, or the controller, to perform actions in aggregate.
  3. The SmartDevice.Interfaces contains the shared interfaces and data types used by both the service and client apps.

Pre-requisites

For this example, you will need:

NOTE: .NET 6 is the minimally supported version of .NET for the Dapr .NET SDK packages in this release. Only .NET 8 and .NET 9 will be supported in Dapr v1.16 and later releases.

Step 1: Set up the environment

Clone the sample provided in the Quickstarts repo.

git clone https://github.com/dapr/quickstarts.git

Step 2: Run the service app

In a new terminal window, navigate to the actors/csharp/sdk/service directory and restore dependencies:

cd actors/csharp/sdk/service
dotnet build

Run the SmartDevice.Service, which will start service itself and the Dapr sidecar:

dapr run --app-id actorservice --app-port 5001 --dapr-http-port 3500 --resources-path ../../../resources -- dotnet run --urls=http://localhost:5001/

Expected output:

== APP == info: Microsoft.AspNetCore.Hosting.Diagnostics[1]
== APP ==       Request starting HTTP/1.1 GET http://127.0.0.1:5001/healthz - -
== APP == info: Microsoft.AspNetCore.Routing.EndpointMiddleware[0]
== APP ==       Executing endpoint 'Dapr Actors Health Check'
== APP == info: Microsoft.AspNetCore.Routing.EndpointMiddleware[1]
== APP ==       Executed endpoint 'Dapr Actors Health Check'
== APP == info: Microsoft.AspNetCore.Hosting.Diagnostics[2]
== APP ==       Request finished HTTP/1.1 GET http://127.0.0.1:5001/healthz - - - 200 - text/plain 5.2599ms

Step 3: Run the client app

In a new terminal instance, navigate to the actors/csharp/sdk/client directory and install the dependencies:

cd ./actors/csharp/sdk/client
dotnet build

Run the SmartDevice.Client app:

dapr run --app-id actorclient -- dotnet run

Expected output:

== APP == Startup up...
== APP == Calling SetDataAsync on SmokeDetectorActor:1...
== APP == Got response: Success
== APP == Calling GetDataAsync on SmokeDetectorActor:1...
== APP == Device 1 state: Location: First Floor, Status: Ready
== APP == Calling SetDataAsync on SmokeDetectorActor:2...
== APP == Got response: Success
== APP == Calling GetDataAsync on SmokeDetectorActor:2...
== APP == Device 2 state: Location: Second Floor, Status: Ready
== APP == Registering the IDs of both Devices...
== APP == Registered devices: 1, 2
== APP == Detecting smoke on Device 1...
== APP == Device 1 state: Location: First Floor, Status: Alarm
== APP == Device 2 state: Location: Second Floor, Status: Alarm
== APP == Sleeping for 16 seconds before checking status again to see reminders fire and clear alarms
== APP == Device 1 state: Location: First Floor, Status: Ready
== APP == Device 2 state: Location: Second Floor, Status: Ready

(Optional) Step 4: View in Zipkin

If you have Zipkin configured for Dapr locally on your machine, you can view the actor’s interaction with the client in the Zipkin web UI (typically at http://localhost:9411/zipkin/).

What happened?

When you ran the client app, a few things happened:

  1. Two SmokeDetectorActor actors were created in the client application and initialized with object state with:

    • ActorProxy.Create<ISmartDevice>(actorId, actorType)
    • proxySmartDevice.SetDataAsync(data)

    These objects are re-entrant and hold the state, as shown by proxySmartDevice.GetDataAsync().

    // Actor Ids and types
    var deviceId1 = "1";
    var deviceId2 = "2";
    var smokeDetectorActorType = "SmokeDetectorActor";
    var controllerActorType = "ControllerActor";
    
    Console.WriteLine("Startup up...");
    
    // An ActorId uniquely identifies the first actor instance for the first device
    var deviceActorId1 = new ActorId(deviceId1);
    
    // Create a new instance of the data class that will be stored in the first actor
    var deviceData1 = new SmartDeviceData(){
        Location = "First Floor",
        Status = "Ready",
    };
    
    // Create the local proxy by using the same interface that the service implements.
    var proxySmartDevice1 = ActorProxy.Create<ISmartDevice>(deviceActorId1, smokeDetectorActorType);
    
    // Now you can use the actor interface to call the actor's methods.
    Console.WriteLine($"Calling SetDataAsync on {smokeDetectorActorType}:{deviceActorId1}...");
    var setDataResponse1 = await proxySmartDevice1.SetDataAsync(deviceData1);
    Console.WriteLine($"Got response: {setDataResponse1}");
    
    Console.WriteLine($"Calling GetDataAsync on {smokeDetectorActorType}:{deviceActorId1}...");
    var storedDeviceData1 = await proxySmartDevice1.GetDataAsync();
    Console.WriteLine($"Device 1 state: {storedDeviceData1}");
    
    // Create a second actor for second device
    var deviceActorId2 = new ActorId(deviceId2);
    
    // Create a new instance of the data class that will be stored in the first actor
    var deviceData2 = new SmartDeviceData(){
        Location = "Second Floor",
        Status = "Ready",
    };
    
    // Create the local proxy by using the same interface that the service implements.
    var proxySmartDevice2 = ActorProxy.Create<ISmartDevice>(deviceActorId2, smokeDetectorActorType);
    
    // Now you can use the actor interface to call the second actor's methods.
    Console.WriteLine($"Calling SetDataAsync on {smokeDetectorActorType}:{deviceActorId2}...");
    var setDataResponse2 = await proxySmartDevice2.SetDataAsync(deviceData2);
    Console.WriteLine($"Got response: {setDataResponse2}");
    
    Console.WriteLine($"Calling GetDataAsync on {smokeDetectorActorType}:{deviceActorId2}...");
    var storedDeviceData2 = await proxySmartDevice2.GetDataAsync();
    Console.WriteLine($"Device 2 state: {storedDeviceData2}");
    
  2. The DetectSmokeAsync method of SmokeDetectorActor 1 is called.

     public async Task DetectSmokeAsync()
     {
         var controllerActorId = new ActorId("controller");
         var controllerActorType = "ControllerActor";
         var controllerProxy = ProxyFactory.CreateActorProxy<IController>(controllerActorId, controllerActorType);
         await controllerProxy.TriggerAlarmForAllDetectors();
     }
    
  3. The TriggerAlarmForAllDetectors method of ControllerActor is called. The ControllerActor internally triggers all alarms when smoke is detected

    public async Task TriggerAlarmForAllDetectors()
    {
        var deviceIds =  await ListRegisteredDeviceIdsAsync();
        foreach (var deviceId in deviceIds)
        {
            var actorId = new ActorId(deviceId);
            var proxySmartDevice = ProxyFactory.CreateActorProxy<ISmartDevice>(actorId, "SmokeDetectorActor");
            await proxySmartDevice.SoundAlarm();
        }
    
        // Register a reminder to refresh and clear alarm state every 15 seconds
        await this.RegisterReminderAsync("AlarmRefreshReminder", null, TimeSpan.FromSeconds(15), TimeSpan.FromSeconds(15));
    }
    

    The console prints a message indicating that smoke has been detected.

    // Smoke is detected on device 1 that triggers an alarm on all devices.
    Console.WriteLine($"Detecting smoke on Device 1...");
    proxySmartDevice1 = ActorProxy.Create<ISmartDevice>(deviceActorId1, smokeDetectorActorType);
    await proxySmartDevice1.DetectSmokeAsync();   
    
  4. The SoundAlarm methods of SmokeDetectorActor 1 and 2 are called.

    storedDeviceData1 = await proxySmartDevice1.GetDataAsync();
    Console.WriteLine($"Device 1 state: {storedDeviceData1}");
    storedDeviceData2 = await proxySmartDevice2.GetDataAsync();
    Console.WriteLine($"Device 2 state: {storedDeviceData2}");
    
  5. The ControllerActor also creates a durable reminder to call ClearAlarm after 15 seconds using RegisterReminderAsync.

    // Register a reminder to refresh and clear alarm state every 15 seconds
    await this.RegisterReminderAsync("AlarmRefreshReminder", null, TimeSpan.FromSeconds(15), TimeSpan.FromSeconds(15));
    

For full context of the sample, take a look at the following code:

Tell us what you think!

We’re continuously working to improve our Quickstart examples and value your feedback. Did you find this Quickstart helpful? Do you have suggestions for improvement?

Join the discussion in our discord channel.

Next steps

Learn more about the Actor building block

Explore Dapr tutorials >>

7 - Quickstart: Secrets Management

Get started with Dapr’s Secrets Management building block

Dapr provides a dedicated secrets API that allows developers to retrieve secrets from a secrets store. In this quickstart, you:

  1. Run a microservice with a secret store component.
  2. Retrieve secrets using the Dapr secrets API in the application code.
Diagram showing secrets management of example service.

Select your preferred language-specific Dapr SDK before proceeding with the Quickstart.

Pre-requisites

For this example, you will need:

Step 1: Set up the environment

Clone the sample provided in the Quickstarts repo.

git clone https://github.com/dapr/quickstarts.git

Step 2: Retrieve the secret

In a terminal window, navigate to the order-processor directory.

cd secrets_management/python/sdk/order-processor

Install the dependencies:

pip3 install -r requirements.txt

Run the order-processor service alongside a Dapr sidecar.

dapr run --app-id order-processor --resources-path ../../../components/ -- python3 app.py

Note: Since Python3.exe is not defined in Windows, you may need to use python app.py instead of python3 app.py.

Behind the scenes

order-processor service

Notice how the order-processor service below points to:

  • The DAPR_SECRET_STORE defined in the local-secret-store.yaml component.
  • The secret defined in secrets.json.
# app.py
DAPR_SECRET_STORE = 'localsecretstore'
SECRET_NAME = 'secret'
with DaprClient() as client:
    secret = client.get_secret(store_name=DAPR_SECRET_STORE, key=SECRET_NAME)
    logging.info('Fetched Secret: %s', secret.secret)

local-secret-store.yaml component

DAPR_SECRET_STORE is defined in the local-secret-store.yaml component file, located in secrets_management/components:

apiVersion: dapr.io/v1alpha1
kind: Component
metadata:
  name: localsecretstore
  namespace: default
spec:
  type: secretstores.local.file
  version: v1
  metadata:
  - name: secretsFile
    value: secrets.json
  - name: nestedSeparator
    value: ":"

In the YAML file:

  • metadata/name is how your application references the component (called DAPR_SECRET_STORE in the code sample).
  • spec/metadata defines the connection to the secret used by the component.

secrets.json file

SECRET_NAME is defined in the secrets.json file, located in secrets_management/python/sdk/order-processor:

{
    "secret": "YourPasskeyHere"
}

Step 3: View the order-processor outputs

As specified in the application code above, the order-processor service retrieves the secret via the Dapr secret store and displays it in the console.

Order-processor output:

== APP == INFO:root:Fetched Secret: {'secret': 'YourPasskeyHere'}

Pre-requisites

For this example, you will need:

Step 1: Set up the environment

Clone the sample provided in the Quickstarts repo.

git clone https://github.com/dapr/quickstarts.git

Step 2: Retrieve the secret

In a terminal window, navigate to the order-processor directory.

cd secrets_management/javascript/sdk/order-processor

Install the dependencies:

npm install

Run the order-processor service alongside a Dapr sidecar.

dapr run --app-id order-processor --resources-path ../../../components/ -- npm start

Behind the scenes

order-processor service

Notice how the order-processor service below points to:

  • The DAPR_SECRET_STORE defined in the local-secret-store.yaml component.
  • The secret defined in secrets.json.
// index.js
const DAPR_SECRET_STORE = "localsecretstore";
const SECRET_NAME = "secret";

async function main() {
    // ...
    const secret = await client.secret.get(DAPR_SECRET_STORE, SECRET_NAME);
    console.log("Fetched Secret: " + JSON.stringify(secret));
}

local-secret-store.yaml component

DAPR_SECRET_STORE is defined in the local-secret-store.yaml component file, located in secrets_management/components:

apiVersion: dapr.io/v1alpha1
kind: Component
metadata:
  name: localsecretstore
  namespace: default
spec:
  type: secretstores.local.file
  version: v1
  metadata:
  - name: secretsFile
    value: secrets.json
  - name: nestedSeparator
    value: ":"

In the YAML file:

  • metadata/name is how your application references the component (called DAPR_SECRET_STORE in the code sample).
  • spec/metadata defines the connection to the secret used by the component.

secrets.json file

SECRET_NAME is defined in the secrets.json file, located in secrets_management/javascript/sdk/order-processor:

{
    "secret": "YourPasskeyHere"
}

Step 3: View the order-processor outputs

As specified in the application code above, the order-processor service retrieves the secret via the Dapr secret store and displays it in the console.

Order-processor output:

== APP ==
== APP == > order-processor@1.0.0 start
== APP == > node index.js
== APP ==
== APP == Fetched Secret: {"secret":"YourPasskeyHere"}

Pre-requisites

For this example, you will need:

NOTE: .NET 6 is the minimally supported version of .NET for the Dapr .NET SDK packages in this release. Only .NET 8 and .NET 9 will be supported in Dapr v1.16 and later releases.

Step 1: Set up the environment

Clone the sample provided in the Quickstarts repo.

git clone https://github.com/dapr/quickstarts.git

Step 2: Retrieve the secret

In a terminal window, navigate to the order-processor directory.

cd secrets_management/csharp/sdk/order-processor

Install the dependencies:

dotnet restore
dotnet build

Run the order-processor service alongside a Dapr sidecar.

dapr run --app-id order-processor --resources-path ../../../components/ -- dotnet run

Behind the scenes

order-processor service

Notice how the order-processor service below points to:

  • The DAPR_SECRET_STORE defined in the local-secret-store.yaml component.
  • The secret defined in secrets.json.
// Program.cs
const string DAPR_SECRET_STORE = "localsecretstore";
const string SECRET_NAME = "secret";
var client = new DaprClientBuilder().Build();

var secret = await client.GetSecretAsync(DAPR_SECRET_STORE, SECRET_NAME);
var secretValue = string.Join(", ", secret);
Console.WriteLine($"Fetched Secret: {secretValue}");

local-secret-store.yaml component

DAPR_SECRET_STORE is defined in the local-secret-store.yaml component file, located in secrets_management/components:

apiVersion: dapr.io/v1alpha1
kind: Component
metadata:
  name: localsecretstore
  namespace: default
spec:
  type: secretstores.local.file
  version: v1
  metadata:
  - name: secretsFile
    value: secrets.json
  - name: nestedSeparator
    value: ":"

In the YAML file:

  • metadata/name is how your application references the component (called DAPR_SECRET_NAME in the code sample).
  • spec/metadata defines the connection to the secret used by the component.

secrets.json file

SECRET_NAME is defined in the secrets.json file, located in secrets_management/csharp/sdk/order-processor:

{
    "secret": "YourPasskeyHere"
}

Step 3: View the order-processor outputs

As specified in the application code above, the order-processor service retrieves the secret via the Dapr secret store and displays it in the console.

Order-processor output:

== APP == Fetched Secret: [secret, YourPasskeyHere]

Pre-requisites

For this example, you will need:

Step 1: Set up the environment

Clone the sample provided in the Quickstarts repo.

git clone https://github.com/dapr/quickstarts.git

Step 2: Retrieve the secret

In a terminal window, navigate to the order-processor directory.

cd secrets_management/java/sdk/order-processor

Install the dependencies:

mvn clean install

Run the order-processor service alongside a Dapr sidecar.

dapr run --app-id order-processor --resources-path ../../../components/ -- java -jar target/OrderProcessingService-0.0.1-SNAPSHOT.jar

Behind the scenes

order-processor service

Notice how the order-processor service below points to:

  • The DAPR_SECRET_STORE defined in the local-secret-store.yaml component.
  • The secret defined in secrets.json.
// OrderProcessingServiceApplication.java
private static final String SECRET_STORE_NAME = "localsecretstore";
// ...
    Map<String, String> secret = client.getSecret(SECRET_STORE_NAME, "secret").block();
    System.out.println("Fetched Secret: " + secret);

local-secret-store.yaml component

DAPR_SECRET_STORE is defined in the local-secret-store.yaml component file, located in secrets_management/components:

apiVersion: dapr.io/v1alpha1
kind: Component
metadata:
  name: localsecretstore
  namespace: default
spec:
  type: secretstores.local.file
  version: v1
  metadata:
  - name: secretsFile
    value: secrets.json
  - name: nestedSeparator
    value: ":"

In the YAML file:

  • metadata/name is how your application references the component (called DAPR_SECRET_NAME in the code sample).
  • spec/metadata defines the connection to the secret used by the component.

secrets.json file

SECRET_NAME is defined in the secrets.json file, located in secrets_management/java/sdk/order-processor:

{
    "secret": "YourPasskeyHere"
}

Step 3: View the order-processor outputs

As specified in the application code above, the order-processor service retrieves the secret via the Dapr secret store and displays it in the console.

Order-processor output:

== APP == Fetched Secret: {secret=YourPasskeyHere}

Pre-requisites

For this example, you will need:

Step 1: Set up the environment

Clone the sample provided in the Quickstarts repo.

git clone https://github.com/dapr/quickstarts.git

Step 2: Retrieve the secret

In a terminal window, navigate to the order-processor directory.

cd secrets_management/go/sdk/order-processor

Install the dependencies:

go build .

Run the order-processor service alongside a Dapr sidecar.

dapr run --app-id order-processor --resources-path ../../../components/ -- go run .

Behind the scenes

order-processor service

Notice how the order-processor service below points to:

  • The DAPR_SECRET_STORE defined in the local-secret-store.yaml component.
  • The secret defined in secrets.json.
const DAPR_SECRET_STORE = "localsecretstore"
const SECRET_NAME = "secret"
// ...
secret, err := client.GetSecret(ctx, DAPR_SECRET_STORE, SECRET_NAME, nil)
if secret != nil {
    fmt.Println("Fetched Secret: ", secret[SECRET_NAME])
}

local-secret-store.yaml component

DAPR_SECRET_STORE is defined in the local-secret-store.yaml component file, located in secrets_management/components:

apiVersion: dapr.io/v1alpha1
kind: Component
metadata:
  name: localsecretstore
  namespace: default
spec:
  type: secretstores.local.file
  version: v1
  metadata:
  - name: secretsFile
    value: secrets.json
  - name: nestedSeparator
    value: ":"

In the YAML file:

  • metadata/name is how your application references the component (called DAPR_SECRET_NAME in the code sample).
  • spec/metadata defines the connection to the secret used by the component.

secrets.json file

SECRET_NAME is defined in the secrets.json file, located in secrets_management/go/sdk/order-processor:

{
    "secret": "YourPasskeyHere"
}

Step 3: View the order-processor outputs

As specified in the application code above, the order-processor service retrieves the secret via the Dapr secret store and displays it in the console.

Order-processor output:

== APP == Fetched Secret:  YourPasskeyHere

Tell us what you think!

We’re continuously working to improve our Quickstart examples and value your feedback. Did you find this Quickstart helpful? Do you have suggestions for improvement?

Join the discussion in our discord channel.

Next steps

Explore Dapr tutorials >>

8 - Quickstart: Configuration

Get started with Dapr’s Configuration building block

Let’s take a look at Dapr’s Configuration building block. A configuration item is often dynamic in nature and tightly coupled to the needs of the application that consumes it. Configuration items are key/value pairs containing configuration data, such as:

  • App ids
  • Partition keys
  • Database names, etc

In this quickstart, you’ll run an order-processor microservice that utilizes the Configuration API. The service:

  1. Gets configuration items from the configuration store.
  2. Subscribes for configuration updates.
Diagram that demonstrates the flow of the configuration API quickstart with key/value pairs used.

Select your preferred language-specific Dapr SDK before proceeding with the Quickstart.

Pre-requisites

For this example, you will need:

Step 1: Set up the environment

Clone the sample provided in the Quickstarts repo.

git clone https://github.com/dapr/quickstarts.git

Once cloned, open a new terminal and run the following command to set values for configuration items orderId1 and orderId2.

docker exec dapr_redis redis-cli MSET orderId1 "101" orderId2 "102"

Step 2: Run the order-processor service

From the root of the Quickstarts clone directory, navigate to the order-processor directory.

cd configuration/python/sdk/order-processor

Install the dependencies:

pip3 install -r requirements.txt

Run the order-processor service alongside a Dapr sidecar.

dapr run --app-id order-processor --resources-path ../../../components/ --app-port 6001 -- python3 app.py

Note: Since Python3.exe is not defined in Windows, you may need to use python app.py instead of python3 app.py.

The expected output:

== APP == Configuration for orderId1 : value: "101"
== APP ==
== APP == Configuration for orderId2 : value: "102"
== APP ==
== APP == App unsubscribed from config changes

(Optional) Step 3: Update configuration item values

Once the app has unsubscribed, try updating the configuration item values. Change the orderId1 and orderId2 values using the following command:

docker exec dapr_redis redis-cli MSET orderId1 "103" orderId2 "104"

Run the order-processor service again:

dapr run --app-id order-processor --resources-path ../../../components/ --app-port 6001 -- python3 app.py

Note: Since Python3.exe is not defined in Windows, you may need to use python app.py instead of python3 app.py.

The app will return the updated configuration values:

== APP == Configuration for orderId1 : value: "103"
== APP ==
== APP == Configuration for orderId2 : value: "104"
== APP ==

The order-processor service

The order-processor service includes code for:

  • Getting the configuration items from the config store
  • Subscribing to configuration updates (which you made in the CLI earlier)
  • Unsubscribing from configuration updates and exiting the app after 20 seconds of inactivity.

Get configuration items:

# Get config items from the config store
for config_item in CONFIGURATION_ITEMS:
    config = client.get_configuration(store_name=DAPR_CONFIGURATION_STORE, keys=[config_item], config_metadata={})
    print(f"Configuration for {config_item} : {config.items[config_item]}", flush=True)

Subscribe to configuration updates:

# Subscribe for configuration changes
configuration = await client.subscribe_configuration(DAPR_CONFIGURATION_STORE, CONFIGURATION_ITEMS)

Unsubscribe from configuration updates and exit the application:

# Unsubscribe from configuration updates
unsubscribed = True
for config_item in CONFIGURATION_ITEMS:
    unsub_item = client.unsubscribe_configuration(DAPR_CONFIGURATION_STORE, config_item)
    #...
if unsubscribed == True:
    print("App unsubscribed from config changes", flush=True)

Pre-requisites

For this example, you will need:

Step 1: Set up the environment

Clone the sample provided in the Quickstarts repo.

git clone https://github.com/dapr/quickstarts.git

Once cloned, open a new terminal and run the following command to set values for configuration items orderId1 and orderId2.

docker exec dapr_redis redis-cli MSET orderId1 "101" orderId2 "102"

Step 2: Run the order-processor service

From the root of the Quickstarts clone directory, navigate to the order-processor directory.

cd configuration/javascript/sdk/order-processor

Install the dependencies:

npm install

Run the order-processor service alongside a Dapr sidecar.

dapr run --app-id order-processor --resources-path ../../../components/ --app-protocol grpc --dapr-grpc-port 3500 -- node index.js

The expected output:

== APP == Configuration for orderId1: {"key":"orderId1","value":"101","version":"","metadata":{}}
== APP == Configuration for orderId2: {"key":"orderId2","value":"102","version":"","metadata":{}}
== APP == App unsubscribed to config changes

(Optional) Step 3: Update configuration item values

Once the app has unsubscribed, try updating the configuration item values. Change the orderId1 and orderId2 values using the following command:

docker exec dapr_redis redis-cli MSET orderId1 "103" orderId2 "104"

Run the order-processor service again:

dapr run --app-id order-processor --resources-path ../../../components/ --app-protocol grpc --dapr-grpc-port 3500 -- node index.js

The app will return the updated configuration values:

== APP == Configuration for orderId1: {"key":"orderId1","value":"103","version":"","metadata":{}}
== APP == Configuration for orderId2: {"key":"orderId2","value":"104","version":"","metadata":{}}

The order-processor service

The order-processor service includes code for:

  • Getting the configuration items from the config store
  • Subscribing to configuration updates (which you made in the CLI earlier)
  • Unsubscribing from configuration updates and exiting the app after 20 seconds of inactivity.

Get configuration items:

// Get config items from the config store
//...
  const config = await client.configuration.get(DAPR_CONFIGURATION_STORE, CONFIGURATION_ITEMS);
  Object.keys(config.items).forEach((key) => {
    console.log("Configuration for " + key + ":", JSON.stringify(config.items[key]));
  });

Subscribe to configuration updates:

// Subscribe to config updates
try {
  const stream = await client.configuration.subscribeWithKeys(
    DAPR_CONFIGURATION_STORE,
    CONFIGURATION_ITEMS,
    (config) => {
      console.log("Configuration update", JSON.stringify(config.items));
    }
  );

Unsubscribe from configuration updates and exit the application:

// Unsubscribe to config updates and exit app after 20 seconds
setTimeout(() => {
  stream.stop();
  console.log("App unsubscribed to config changes");
  process.exit(0);
},

Pre-requisites

For this example, you will need:

NOTE: .NET 6 is the minimally supported version of .NET for the Dapr .NET SDK packages in this release. Only .NET 8 and .NET 9 will be supported in Dapr v1.16 and later releases.

Step 1: Set up the environment

Clone the sample provided in the Quickstarts repo.

git clone https://github.com/dapr/quickstarts.git

Once cloned, open a new terminal and run the following command to set values for configuration items orderId1 and orderId2.

docker exec dapr_redis redis-cli MSET orderId1 "101" orderId2 "102"

Step 2: Run the order-processor service

From the root of the Quickstarts clone directory, navigate to the order-processor directory.

cd configuration/csharp/sdk/order-processor

Recall NuGet packages:

dotnet restore
dotnet build

Run the order-processor service alongside a Dapr sidecar.

dapr run --app-id order-processor-http --resources-path ../../../components/ --app-port 7001 -- dotnet run --project .

The expected output:

== APP == Configuration for orderId1: {"Value":"101","Version":"","Metadata":{}}
== APP == Configuration for orderId2: {"Value":"102","Version":"","Metadata":{}}
== APP == App unsubscribed from config changes

(Optional) Step 3: Update configuration item values

Once the app has unsubscribed, try updating the configuration item values. Change the orderId1 and orderId2 values using the following command:

docker exec dapr_redis redis-cli MSET orderId1 "103" orderId2 "104"

Run the order-processor service again:

dapr run --app-id order-processor-http --resources-path ../../../components/ --app-port 7001 -- dotnet run --project .

The app will return the updated configuration values:

== APP == Configuration for orderId1: {"Value":"103","Version":"","Metadata":{}}
== APP == Configuration for orderId2: {"Value":"104","Version":"","Metadata":{}}

The order-processor service

The order-processor service includes code for:

  • Getting the configuration items from the config store
  • Subscribing to configuration updates (which you made in the CLI earlier)
  • Unsubscribing from configuration updates and exiting the app after 20 seconds of inactivity.

Get configuration items:

// Get config from configuration store
GetConfigurationResponse config = await client.GetConfiguration(DAPR_CONFIGURATION_STORE, CONFIGURATION_ITEMS);
foreach (var item in config.Items)
{
  var cfg = System.Text.Json.JsonSerializer.Serialize(item.Value);
  Console.WriteLine("Configuration for " + item.Key + ": " + cfg);
}

Subscribe to configuration updates:

// Subscribe to config updates
SubscribeConfigurationResponse subscribe = await client.SubscribeConfiguration(DAPR_CONFIGURATION_STORE, CONFIGURATION_ITEMS);

Unsubscribe from configuration updates and exit the application:

// Unsubscribe to config updates and exit the app
try
{
  client.UnsubscribeConfiguration(DAPR_CONFIGURATION_STORE, subscriptionId);
  Console.WriteLine("App unsubscribed from config changes");
  Environment.Exit(0);
}

Pre-requisites

For this example, you will need:

Step 1: Set up the environment

Clone the sample provided in the Quickstarts repo.

git clone https://github.com/dapr/quickstarts.git

Once cloned, open a new terminal and run the following command to set values for configuration items orderId1 and orderId2.

docker exec dapr_redis redis-cli MSET orderId1 "101" orderId2 "102"

Step 2: Run the order-processor service

From the root of the Quickstarts clone directory, navigate to the order-processor directory.

cd configuration/java/sdk/order-processor

Install the dependencies:

mvn clean install

Run the order-processor service alongside a Dapr sidecar.

dapr run --app-id order-processor --resources-path ../../../components -- java -jar target/OrderProcessingService-0.0.1-SNAPSHOT.jar

The expected output:

== APP == Configuration for orderId1: {'value':'101'}
== APP == Configuration for orderId2: {'value':'102'}
== APP == App unsubscribed to config changes

(Optional) Step 3: Update configuration item values

Once the app has unsubscribed, try updating the configuration item values. Change the orderId1 and orderId2 values using the following command:

docker exec dapr_redis redis-cli MSET orderId1 "103" orderId2 "104"

Run the order-processor service again:

dapr run --app-id order-processor --resources-path ../../../components -- java -jar target/OrderProcessingService-0.0.1-SNAPSHOT.jar

The app will return the updated configuration values:

== APP == Configuration for orderId1: {'value':'103'}
== APP == Configuration for orderId2: {'value':'104'}

The order-processor service

The order-processor service includes code for:

  • Getting the configuration items from the config store
  • Subscribing to configuration updates (which you made in the CLI earlier)
  • Unsubscribing from configuration updates and exiting the app after 20 seconds of inactivity.

Get configuration items:

// Get config items from the config store
try (DaprPreviewClient client = (new DaprClientBuilder()).buildPreviewClient()) {
    for (String configurationItem : CONFIGURATION_ITEMS) {
        ConfigurationItem item = client.getConfiguration(DAPR_CONFIGURATON_STORE, configurationItem).block();
        System.out.println("Configuration for " + configurationItem + ": {'value':'" + item.getValue() + "'}");
    }

Subscribe to configuration updates:

// Subscribe for config changes
Flux<SubscribeConfigurationResponse> subscription = client.subscribeConfiguration(DAPR_CONFIGURATON_STORE,
        CONFIGURATION_ITEMS.toArray(String[]::new));

Unsubscribe from configuration updates and exit the application:

// Unsubscribe from config changes
UnsubscribeConfigurationResponse unsubscribe = client
        .unsubscribeConfiguration(subscriptionId, DAPR_CONFIGURATON_STORE).block();
if (unsubscribe.getIsUnsubscribed()) {
    System.out.println("App unsubscribed to config changes");
}

Pre-requisites

For this example, you will need:

Step 1: Set up the environment

Clone the sample provided in the Quickstarts repo.

git clone https://github.com/dapr/quickstarts.git

Once cloned, open a new terminal and run the following command to set values for configuration items orderId1 and orderId2.

docker exec dapr_redis redis-cli MSET orderId1 "101" orderId2 "102"

Step 2: Run the order-processor service

From the root of the Quickstarts clone directory, navigate to the order-processor directory.

cd configuration/go/sdk/order-processor

Run the order-processor service alongside a Dapr sidecar.

dapr run --app-id order-processor --app-port 6001 --resources-path ../../../components -- go run .

The expected output:

== APP == Configuration for orderId1: {"Value":"101","Version":"","Metadata":null}
== APP == Configuration for orderId2: {"Value":"102","Version":"","Metadata":null}
== APP == dapr configuration subscribe finished.
== APP == App unsubscribed to config changes

(Optional) Step 3: Update configuration item values

Once the app has unsubscribed, try updating the configuration item values. Change the orderId1 and orderId2 values using the following command:

docker exec dapr_redis redis-cli MSET orderId1 "103" orderId2 "104"

Run the order-processor service again:

dapr run --app-id order-processor --app-port 6001 --resources-path ../../../components -- go run .

The app will return the updated configuration values:

== APP == Configuration for orderId1: {"Value":"103","Version":"","Metadata":null}
== APP == Configuration for orderId2: {"Value":"104","Version":"","Metadata":null}

The order-processor service

The order-processor service includes code for:

  • Getting the configuration items from the config store
  • Subscribing to configuration updates (which you made in the CLI earlier)
  • Unsubscribing from configuration updates and exiting the app after 20 seconds of inactivity.

Get configuration items:

// Get config items from config store
for _, item := range CONFIGURATION_ITEMS {
	config, err := client.GetConfigurationItem(ctx, DAPR_CONFIGURATION_STORE, item)
	//...
	c, _ := json.Marshal(config)
	fmt.Println("Configuration for " + item + ": " + string(c))
}

Subscribe to configuration updates:

// Subscribe for config changes
err = client.SubscribeConfigurationItems(ctx, DAPR_CONFIGURATION_STORE, CONFIGURATION_ITEMS, func(id string, config map[string]*dapr.ConfigurationItem) {
	// First invocation when app subscribes to config changes only returns subscription id
	if len(config) == 0 {
		fmt.Println("App subscribed to config changes with subscription id: " + id)
		subscriptionId = id
		return
	}
})

Unsubscribe from configuration updates and exit the application:

// Unsubscribe to config updates and exit app after 20 seconds
select {
case <-ctx.Done():
	err = client.UnsubscribeConfigurationItems(context.Background(), DAPR_CONFIGURATION_STORE, subscriptionId)
    //...
	{
		fmt.Println("App unsubscribed to config changes")
	}

Demo

Watch this video demoing the Configuration API quickstart:

Tell us what you think!

We’re continuously working to improve our Quickstart examples and value your feedback. Did you find this quickstart helpful? Do you have suggestions for improvement?

Join the discussion in our discord channel.

Next steps

Explore Dapr tutorials >>

9 - Quickstart: Cryptography

Get started with the Dapr Cryptography building block

Let’s take a look at the Dapr cryptography building block. In this Quickstart, you’ll create an application that encrypts and decrypts data using the Dapr cryptography APIs. You’ll:

  • Encrypt and then decrypt a short string (using an RSA key), reading the result in-memory, in a Go byte slice.
  • Encrypt and then decrypt a large file (using an AES key), storing the encrypted and decrypted data to files using streams.

Currently, you can experience the cryptography API using the Go SDK.

This quickstart includes a JavaScript application called crypto-quickstart.

Pre-requisites

For this example, you will need:

Step 1: Set up the environment

Clone the sample provided in the Quickstarts repo

git clone https://github.com/dapr/quickstarts.git

In the terminal, from the root directory, navigate to the cryptography sample.

cd cryptography/javascript/sdk

Navigate into the folder with the source code:

cd ./crypto-quickstart

Install the dependencies:

npm install

Step 2: Run the application with Dapr

The application code defines two required keys:

  • Private RSA key
  • A 256-bit symmetric (AES) key

Generate two keys, an RSA key and and AES key using OpenSSL and write these to two files:

mkdir -p keys
# Generate a private RSA key, 4096-bit keys
openssl genpkey -algorithm RSA -pkeyopt rsa_keygen_bits:4096 -out keys/rsa-private-key.pem
# Generate a 256-bit key for AES
openssl rand -out keys/symmetric-key-256 32

Run the Go service app with Dapr:

dapr run --app-id crypto-quickstart --resources-path ../../../components/ -- npm start

Expected output

== APP == 2023-10-25T14:30:50.435Z INFO [GRPCClient, GRPCClient] Opening connection to 127.0.0.1:58173
== APP == == Encrypting message using buffers
== APP == Encrypted the message, got 856 bytes
== APP == == Decrypting message using buffers
== APP == Decrypted the message, got 24 bytes
== APP == The secret is "passw0rd"
== APP == == Encrypting message using streams
== APP == Encrypting federico-di-dio-photography-Q4g0Q-eVVEg-unsplash.jpg to encrypted.out
== APP == Encrypted the message to encrypted.out
== APP == == Decrypting message using streams
== APP == Decrypting encrypted.out to decrypted.out.jpg
== APP == Decrypted the message to decrypted.out.jpg

What happened?

local-storage.yaml

Earlier, you created a directory inside crypto-quickstarts called keys. In the local-storage component YAML, the path metadata maps to the newly created keys directory.

apiVersion: dapr.io/v1alpha1
kind: Component
metadata:
  name: localstorage
spec:
  type: crypto.dapr.localstorage
  version: v1
  metadata:
    - name: path
      # Path is relative to the folder where the example is located
      value: ./keys

index.mjs

The application file encrypts and decrypts messages and files using the RSA and AES keys that you generated. The application creates a new Dapr SDK client:

async function start() {
  const client = new DaprClient({
    daprHost,
    daprPort,
    communicationProtocol: CommunicationProtocolEnum.GRPC,
  });

  // Encrypt and decrypt a message from a buffer
  await encryptDecryptBuffer(client);

  // Encrypt and decrypt a message using streams
  await encryptDecryptStream(client);
}
Encrypting and decrypting a string using the RSA key

Once the client is created, the application encrypts a message:

async function encryptDecryptBuffer(client) {
  // Message to encrypt
  const plaintext = `The secret is "passw0rd"`

  // First, encrypt the message
  console.log("== Encrypting message using buffers");

  const encrypted = await client.crypto.encrypt(plaintext, {
    componentName: "localstorage",
    keyName: "rsa-private-key.pem",
    keyWrapAlgorithm: "RSA",
  });

  console.log("Encrypted the message, got", encrypted.length, "bytes");

The application then decrypts the message:

  // Decrypt the message
  console.log("== Decrypting message using buffers");
  const decrypted = await client.crypto.decrypt(encrypted, {
    componentName: "localstorage",
  });

  console.log("Decrypted the message, got", decrypted.length, "bytes");
  console.log(decrypted.toString("utf8"));

  // ...
}
Encrypt and decrpyt a large file using the AES key

Next, the application encrypts a large image file:

async function encryptDecryptStream(client) {
  // First, encrypt the message
  console.log("== Encrypting message using streams");
  console.log("Encrypting", testFileName, "to encrypted.out");

  await pipeline(
    createReadStream(testFileName),
    await client.crypto.encrypt({
      componentName: "localstorage",
      keyName: "symmetric-key-256",
      keyWrapAlgorithm: "A256KW",
    }),
    createWriteStream("encrypted.out"),
  );

  console.log("Encrypted the message to encrypted.out");

The application then decrypts the large image file:

  // Decrypt the message
  console.log("== Decrypting message using streams");
  console.log("Decrypting encrypted.out to decrypted.out.jpg");
  await pipeline(
    createReadStream("encrypted.out"),
    await client.crypto.decrypt({
      componentName: "localstorage",
    }),
    createWriteStream("decrypted.out.jpg"),
  );

  console.log("Decrypted the message to decrypted.out.jpg");
}

This quickstart includes a Go application called crypto-quickstart.

Pre-requisites

For this example, you will need:

Step 1: Set up the environment

Clone the sample provided in the Quickstarts repo

git clone https://github.com/dapr/quickstarts.git

In the terminal, from the root directory, navigate to the cryptography sample.

cd cryptography/go/sdk

Step 2: Run the application with Dapr

Navigate into the folder with the source code:

cd ./crypto-quickstart

The application code defines two required keys:

  • Private RSA key
  • A 256-bit symmetric (AES) key

Generate two keys, an RSA key and and AES key using OpenSSL and write these to two files:

mkdir -p keys
# Generate a private RSA key, 4096-bit keys
openssl genpkey -algorithm RSA -pkeyopt rsa_keygen_bits:4096 -out keys/rsa-private-key.pem
# Generate a 256-bit key for AES
openssl rand -out keys/symmetric-key-256 32

Run the Go service app with Dapr:

dapr run --app-id crypto-quickstart --resources-path ../../../components/ -- go run .

Expected output

== APP == dapr client initializing for: 127.0.0.1:52407
== APP == Encrypted the message, got 856 bytes
== APP == Decrypted the message, got 24 bytes
== APP == The secret is "passw0rd"
== APP == Wrote decrypted data to encrypted.out
== APP == Wrote decrypted data to decrypted.out.jpg

What happened?

local-storage.yaml

Earlier, you created a directory inside crypto-quickstarts called keys. In the local-storage component YAML, the path metadata maps to the newly created keys directory.

apiVersion: dapr.io/v1alpha1
kind: Component
metadata:
  name: localstorage
spec:
  type: crypto.dapr.localstorage
  version: v1
  metadata:
    - name: path
      # Path is relative to the folder where the example is located
      value: ./keys

app.go

The application file encrypts and decrypts messages and files using the RSA and AES keys that you generated. The application creates a new Dapr SDK client:

func main() {
	// Create a new Dapr SDK client
	client, err := dapr.NewClient()
    
    //...

	// Step 1: encrypt a string using the RSA key, then decrypt it and show the output in the terminal
	encryptDecryptString(client)

	// Step 2: encrypt a large file and then decrypt it, using the AES key
	encryptDecryptFile(client)
}
Encrypting and decrypting a string using the RSA key

Once the client is created, the application encrypts a message:

func encryptDecryptString(client dapr.Client) {
    // ...

	// Encrypt the message
	encStream, err := client.Encrypt(context.Background(),
		strings.NewReader(message),
		dapr.EncryptOptions{
			ComponentName: CryptoComponentName,
			// Name of the key to use
			// Since this is a RSA key, we specify that as key wrapping algorithm
			KeyName:          RSAKeyName,
			KeyWrapAlgorithm: "RSA",
		},
	)

    // ...

	// The method returns a readable stream, which we read in full in memory
	encBytes, err := io.ReadAll(encStream)
    // ...

	fmt.Printf("Encrypted the message, got %d bytes\n", len(encBytes))

The application then decrypts the message:

	// Now, decrypt the encrypted data
	decStream, err := client.Decrypt(context.Background(),
		bytes.NewReader(encBytes),
		dapr.DecryptOptions{
			// We just need to pass the name of the component
			ComponentName: CryptoComponentName,
			// Passing the name of the key is optional
			KeyName: RSAKeyName,
		},
	)

    // ...

	// The method returns a readable stream, which we read in full in memory
	decBytes, err := io.ReadAll(decStream)

    // ...

	// Print the message on the console
	fmt.Printf("Decrypted the message, got %d bytes\n", len(decBytes))
	fmt.Println(string(decBytes))
}
Encrypt and decrpyt a large file using the AES key

Next, the application encrypts a large image file:

func encryptDecryptFile(client dapr.Client) {
	const fileName = "liuguangxi-66ouBTTs_x0-unsplash.jpg"

	// Get a readable stream to the input file
	plaintextF, err := os.Open(fileName)

    // ...

	defer plaintextF.Close()

	// Encrypt the file
	encStream, err := client.Encrypt(context.Background(),
		plaintextF,
		dapr.EncryptOptions{
			ComponentName: CryptoComponentName,
			// Name of the key to use
			// Since this is a symmetric key, we specify AES as key wrapping algorithm
			KeyName:          SymmetricKeyName,
			KeyWrapAlgorithm: "AES",
		},
	)

    // ...

	// Write the encrypted data to a file "encrypted.out"
	encryptedF, err := os.Create("encrypted.out")

    // ...

	encryptedF.Close()

	fmt.Println("Wrote decrypted data to encrypted.out")

The application then decrypts the large image file:

	// Now, decrypt the encrypted data
	// First, open the file "encrypted.out" again, this time for reading
	encryptedF, err = os.Open("encrypted.out")

    // ...

	defer encryptedF.Close()

	// Now, decrypt the encrypted data
	decStream, err := client.Decrypt(context.Background(),
		encryptedF,
		dapr.DecryptOptions{
			// We just need to pass the name of the component
			ComponentName: CryptoComponentName,
			// Passing the name of the key is optional
			KeyName: SymmetricKeyName,
		},
	)

    // ...

	// Write the decrypted data to a file "decrypted.out.jpg"
	decryptedF, err := os.Create("decrypted.out.jpg")

    // ...

	decryptedF.Close()

	fmt.Println("Wrote decrypted data to decrypted.out.jpg")
}

Watch the demo

Watch this demo video of the cryptography API from the Dapr Community Call #83:

Tell us what you think!

We’re continuously working to improve our Quickstart examples and value your feedback. Did you find this Quickstart helpful? Do you have suggestions for improvement?

Join the discussion in our discord channel.

Next steps

Explore Dapr tutorials >>

10 - Quickstart: Jobs

Get started with the Dapr jobs building block

Let’s take a look at the Dapr jobs building block, which schedules and runs jobs at a specific time or interval. In this Quickstart, you’ll schedule, get, and delete a job using Dapr’s Job API.

You can try out this jobs quickstart by either:

Run using Multi-App Run

Select your preferred language-specific Dapr SDK before proceeding with the Quickstart. Currently, you can experiment with the jobs API with the Go SDK.

This quickstart includes two apps:

  • job-scheduler.go: schedules, retrieves, and deletes jobs.
  • job-service.go: handles the scheduled jobs.

Step 1: Pre-requisites

For this example, you will need:

Step 2: Set up the environment

Clone the sample provided in the Quickstarts repo.

git clone https://github.com/dapr/quickstarts.git

From the root of the Quickstarts directory, navigate into the jobs directory:

cd jobs/go/sdk

Step 3: Schedule jobs

Run the application and schedule jobs with one command:

dapr run -f .

Expected output

== APP - job-service == dapr client initializing for: 127.0.0.1:6281
== APP - job-service == Registered job handler for:  R2-D2
== APP - job-service == Registered job handler for:  C-3PO
== APP - job-service == Registered job handler for:  BB-8
== APP - job-service == Starting server on port: 6200
== APP - job-service == Job scheduled:  R2-D2
== APP - job-service == Job scheduled:  C-3PO
== APP - job-service == 2024/07/17 18:09:59 job:{name:"C-3PO"  due_time:"10s"  data:{value:"{\"droid\":\"C-3PO\",\"Task\":\"Memory Wipe\"}"}}
== APP - job-scheduler == Get job response:  {"droid":"C-3PO","Task":"Memory Wipe"}
== APP - job-service == Job scheduled:  BB-8
== APP - job-service == 2024/07/17 18:09:59 job:{name:"BB-8"  due_time:"15s"  data:{value:"{\"droid\":\"BB-8\",\"Task\":\"Internal Gyroscope Check\"}"}}
== APP - job-scheduler == Get job response:  {"droid":"BB-8","Task":"Internal Gyroscope Check"}
== APP - job-scheduler == Deleted job:  BB-8

After 5 seconds, the terminal output should present the R2-D2 job being processed:

== APP - job-service == Starting droid: R2-D2
== APP - job-service == Executing maintenance job: Oil Change

After 10 seconds, the terminal output should present the C3-PO job being processed:

== APP - job-service == Starting droid: C-3PO
== APP - job-service == Executing maintenance job: Memory Wipe

Once the process has completed, you can stop and clean up application processes with a single command.

dapr stop -f .

What happened?

When you ran dapr init during Dapr install:

Running dapr run -f . in this Quickstart started both the job-scheduler and the job-service. In the terminal output, you can see the following jobs being scheduled, retrieved, and deleted.

  • The R2-D2 job is being scheduled.
  • The C-3PO job is being scheduled.
  • The C-3PO job is being retrieved.
  • The BB-8 job is being scheduled.
  • The BB-8 job is being retrieved.
  • The BB-8 job is being deleted.
  • The R2-D2 job is being executed after 5 seconds.
  • The R2-D2 job is being executed after 10 seconds.

dapr.yaml Multi-App Run template file

Running the Multi-App Run template file with dapr run -f . starts all applications in your project. In this Quickstart, the dapr.yaml file contains the following:

version: 1
apps:
  - appDirPath: ./job-service/
    appID: job-service
    appPort: 6200
    daprGRPCPort: 6281
    appProtocol: grpc
    command: ["go", "run", "."]
  - appDirPath: ./job-scheduler/
    appID: job-scheduler
    appPort: 6300
    command: ["go", "run", "."]

job-service app

The job-service application creates service invocation handlers to manage the lifecycle of the job (scheduleJob, getJob, and deleteJob).

if err := server.AddServiceInvocationHandler("scheduleJob", scheduleJob); err != nil {
	log.Fatalf("error adding invocation handler: %v", err)
}

if err := server.AddServiceInvocationHandler("getJob", getJob); err != nil {
	log.Fatalf("error adding invocation handler: %v", err)
}

if err := server.AddServiceInvocationHandler("deleteJob", deleteJob); err != nil {
	log.Fatalf("error adding invocation handler: %v", err)
}

Next, job event handlers are registered for all droids:

for _, jobName := range jobNames {
	if err := server.AddJobEventHandler(jobName, handleJob); err != nil {
		log.Fatalf("failed to register job event handler: %v", err)
	}
	fmt.Println("Registered job handler for: ", jobName)
}

fmt.Println("Starting server on port: " + appPort)
if err = server.Start(); err != nil {
	log.Fatalf("failed to start server: %v", err)
}

The job-service then call functions that handle scheduling, getting, deleting, and handling job events.

// Handler that schedules a DroidJob
func scheduleJob(ctx context.Context, in *common.InvocationEvent) (out *common.Content, err error) {

	if in == nil {
		err = errors.New("no invocation parameter")
		return
	}

	droidJob := DroidJob{}
	err = json.Unmarshal(in.Data, &droidJob)
	if err != nil {
		fmt.Println("failed to unmarshal job: ", err)
		return nil, err
	}

	jobData := JobData{
		Droid: droidJob.Name,
		Task:  droidJob.Job,
	}

	content, err := json.Marshal(jobData)
	if err != nil {
		fmt.Printf("Error marshalling job content")
		return nil, err
	}

	// schedule job
	job := daprc.Job{
		Name:    droidJob.Name,
		DueTime: droidJob.DueTime,
		Data: &anypb.Any{
			Value: content,
		},
	}

	err = app.daprClient.ScheduleJobAlpha1(ctx, &job)
	if err != nil {
		fmt.Println("failed to schedule job. err: ", err)
		return nil, err
	}

	fmt.Println("Job scheduled: ", droidJob.Name)

	out = &common.Content{
		Data:        in.Data,
		ContentType: in.ContentType,
		DataTypeURL: in.DataTypeURL,
	}

	return out, err

}

// Handler that gets a job by name
func getJob(ctx context.Context, in *common.InvocationEvent) (out *common.Content, err error) {

	if in == nil {
		err = errors.New("no invocation parameter")
		return nil, err
	}

	job, err := app.daprClient.GetJobAlpha1(ctx, string(in.Data))
	if err != nil {
		fmt.Println("failed to get job. err: ", err)
	}

	out = &common.Content{
		Data:        job.Data.Value,
		ContentType: in.ContentType,
		DataTypeURL: in.DataTypeURL,
	}

	return out, err
}

// Handler that deletes a job by name
func deleteJob(ctx context.Context, in *common.InvocationEvent) (out *common.Content, err error) {
	if in == nil {
		err = errors.New("no invocation parameter")
		return nil, err
	}

	err = app.daprClient.DeleteJobAlpha1(ctx, string(in.Data))
	if err != nil {
		fmt.Println("failed to delete job. err: ", err)
	}

	out = &common.Content{
		Data:        in.Data,
		ContentType: in.ContentType,
		DataTypeURL: in.DataTypeURL,
	}

	return out, err
}

// Handler that handles job events
func handleJob(ctx context.Context, job *common.JobEvent) error {
    var jobData common.Job
    if err := json.Unmarshal(job.Data, &jobData); err != nil {
        return fmt.Errorf("failed to unmarshal job: %v", err)
    }

    var jobPayload JobData
    if err := json.Unmarshal(job.Data, &jobPayload); err != nil {
        return fmt.Errorf("failed to unmarshal payload: %v", err)
    }

    fmt.Println("Starting droid:", jobPayload.Droid)
    fmt.Println("Executing maintenance job:", jobPayload.Task)

    return nil
}

job-scheduler app

In the job-scheduler application, the R2D2, C3PO, and BB8 jobs are first defined as []DroidJob:

droidJobs := []DroidJob{
	{Name: "R2-D2", Job: "Oil Change", DueTime: "5s"},
	{Name: "C-3PO", Job: "Memory Wipe", DueTime: "15s"},
	{Name: "BB-8", Job: "Internal Gyroscope Check", DueTime: "30s"},
}

The jobs are then scheduled, retrieved, and deleted using the jobs API. As you can see from the terminal output, first the R2D2 job is scheduled:

// Schedule R2D2 job
err = schedule(droidJobs[0])
if err != nil {
	log.Fatalln("Error scheduling job: ", err)
}

Then, the C3PO job is scheduled, and returns job data:

// Schedule C-3PO job
err = schedule(droidJobs[1])
if err != nil {
	log.Fatalln("Error scheduling job: ", err)
}

// Get C-3PO job
resp, err := get(droidJobs[1])
if err != nil {
	log.Fatalln("Error retrieving job: ", err)
}
fmt.Println("Get job response: ", resp)

The BB8 job is then scheduled, retrieved, and deleted:

// Schedule BB-8 job
err = schedule(droidJobs[2])
if err != nil {
	log.Fatalln("Error scheduling job: ", err)
}

// Get BB-8 job
resp, err = get(droidJobs[2])
if err != nil {
	log.Fatalln("Error retrieving job: ", err)
}
fmt.Println("Get job response: ", resp)

// Delete BB-8 job
err = delete(droidJobs[2])
if err != nil {
	log.Fatalln("Error deleting job: ", err)
}
fmt.Println("Job deleted: ", droidJobs[2].Name)

The job-scheduler.go also defines the schedule, get, and delete functions, calling from job-service.go.

// Schedules a job by invoking grpc service from job-service passing a DroidJob as an argument
func schedule(droidJob DroidJob) error {
	jobData, err := json.Marshal(droidJob)
	if err != nil {
		fmt.Println("Error marshalling job content")
		return err
	}

	content := &daprc.DataContent{
		ContentType: "application/json",
		Data:        []byte(jobData),
	}

	// Schedule Job
	_, err = app.daprClient.InvokeMethodWithContent(context.Background(), "job-service", "scheduleJob", "POST", content)
	if err != nil {
		fmt.Println("Error invoking method: ", err)
		return err
	}

	return nil
}

// Gets a job by invoking grpc service from job-service passing a job name as an argument
func get(droidJob DroidJob) (string, error) {
	content := &daprc.DataContent{
		ContentType: "text/plain",
		Data:        []byte(droidJob.Name),
	}

	//get job
	resp, err := app.daprClient.InvokeMethodWithContent(context.Background(), "job-service", "getJob", "GET", content)
	if err != nil {
		fmt.Println("Error invoking method: ", err)
		return "", err
	}

	return string(resp), nil
}

// Deletes a job by invoking grpc service from job-service passing a job name as an argument
func delete(droidJob DroidJob) error {
	content := &daprc.DataContent{
		ContentType: "text/plain",
		Data:        []byte(droidJob.Name),
	}

	_, err := app.daprClient.InvokeMethodWithContent(context.Background(), "job-service", "deleteJob", "DELETE", content)
	if err != nil {
		fmt.Println("Error invoking method: ", err)
		return err
	}

	return nil
}

Run one job application at a time

This quickstart includes two apps:

  • job-scheduler.go: schedules, retrieves, and deletes jobs.
  • job-service.go: handles the scheduled jobs.

Step 1: Pre-requisites

For this example, you will need:

Step 2: Set up the environment

Clone the sample provided in the Quickstarts repo.

git clone https://github.com/dapr/quickstarts.git

From the root of the Quickstarts directory, navigate into the jobs directory:

cd jobs/go/sdk

Step 3: Schedule jobs

In the terminal, run the job-service app:

dapr run --app-id job-service --app-port 6200 --dapr-grpc-port 6281 --app-protocol grpc -- go run .

Expected output

== APP == dapr client initializing for: 127.0.0.1:6281
== APP == Registered job handler for:  R2-D2
== APP == Registered job handler for:  C-3PO
== APP == Registered job handler for:  BB-8
== APP == Starting server on port: 6200

In a new terminal window, run the job-scheduler app:

dapr run --app-id job-scheduler --app-port 6300 -- go run .

Expected output

== APP == dapr client initializing for: 
== APP == Get job response:  {"droid":"C-3PO","Task":"Memory Wipe"}
== APP == Get job response:  {"droid":"BB-8","Task":"Internal Gyroscope Check"}
== APP == Job deleted:  BB-8

Return to the job-service app terminal window. The output should be:

== APP == Job scheduled:  R2-D2
== APP == Job scheduled:  C-3PO
== APP == 2024/07/17 18:25:36 job:{name:"C-3PO"  due_time:"10s"  data:{value:"{\"droid\":\"C-3PO\",\"Task\":\"Memory Wipe\"}"}}
== APP == Job scheduled:  BB-8
== APP == 2024/07/17 18:25:36 job:{name:"BB-8"  due_time:"15s"  data:{value:"{\"droid\":\"BB-8\",\"Task\":\"Internal Gyroscope Check\"}"}}
== APP == Starting droid: R2-D2
== APP == Executing maintenance job: Oil Change
== APP == Starting droid: C-3PO
== APP == Executing maintenance job: Memory Wipe

Unpack what happened in the job-service and job-scheduler applications when you ran dapr run.

Watch the demo

See the jobs API in action using a Go HTTP example, recorded during the Dapr Community Call #107.

Tell us what you think!

We’re continuously working to improve our Quickstart examples and value your feedback. Did you find this Quickstart helpful? Do you have suggestions for improvement?

Join the discussion in our discord channel.

Next steps

Explore Dapr tutorials >>

11 - Quickstart: Conversation

Get started with the Dapr conversation building block

Let’s take a look at how the Dapr conversation building block makes interacting with Large Language Models (LLMs) easier. In this quickstart, you use the echo component to communicate with the mock LLM and ask it to define Dapr.

You can try out this conversation quickstart by either:

Run the app with the template file

Step 1: Pre-requisites

For this example, you will need:

Step 2: Set up the environment

Clone the sample provided in the Quickstarts repo.

git clone https://github.com/dapr/quickstarts.git

From the root of the Quickstarts directory, navigate into the conversation directory:

cd conversation/python/sdk/conversation

Install the dependencies:

pip3 install -r requirements.txt

Step 3: Launch the conversation service

Navigate back to the sdk directory and start the conversation service with the following command:

dapr run -f .

Expected output

== APP - conversation == Input sent: What is dapr?
== APP - conversation == Output response: What is dapr?

What happened?

When you ran dapr init during Dapr install, the dapr.yaml Multi-App Run template file was generated in the .dapr/components directory.

Running dapr run -f . in this Quickstart started conversation.go.

dapr.yaml Multi-App Run template file

Running the Multi-App Run template file with dapr run -f . starts all applications in your project. This Quickstart has only one application, so the dapr.yaml file contains the following:

version: 1
common:
  resourcesPath: ../../components/
apps:
  - appID: conversation
    appDirPath: ./conversation/
    command: ["python3", "app.py"]

Echo mock LLM component

In conversation/components directly of the quickstart, the conversation.yaml file configures the echo LLM component.

apiVersion: dapr.io/v1alpha1
kind: Component
metadata:
  name: echo
spec:
  type: conversation.echo
  version: v1

To interface with a real LLM, swap out the mock component with one of the supported conversation components. For example, to use an OpenAI component, see the example in the conversation how-to guide

app.py conversation app

In the application code:

  • The app sends an input “What is dapr?” to the echo mock LLM component.
  • The mock LLM echoes “What is dapr?”.
from dapr.clients import DaprClient
from dapr.clients.grpc._request import ConversationInput

with DaprClient() as d:
    inputs = [
        ConversationInput(content="What is dapr?", role='user', scrub_pii=True),
    ]

    metadata = {
        'model': 'modelname',
        'key': 'authKey',
        'cacheTTL': '10m',
    }

    print('Input sent: What is dapr?')

    response = d.converse_alpha1(
        name='echo', inputs=inputs, temperature=0.7, context_id='chat-123', metadata=metadata
    )

    for output in response.outputs:
        print(f'Output response: {output.result}')

Step 1: Pre-requisites

For this example, you will need:

Step 2: Set up the environment

Clone the sample provided in the Quickstarts repo.

git clone https://github.com/dapr/quickstarts.git

From the root of the Quickstarts directory, navigate into the conversation directory:

cd conversation/javascript/http/conversation

Install the dependencies:

npm install

Step 3: Launch the conversation service

Navigate back to the http directory and start the conversation service with the following command:

dapr run -f .

Expected output

== APP - conversation == Input sent: What is dapr?
== APP - conversation == Output response: What is dapr?

What happened?

When you ran dapr init during Dapr install, the dapr.yaml Multi-App Run template file was generated in the .dapr/components directory.

Running dapr run -f . in this Quickstart started conversation.go.

dapr.yaml Multi-App Run template file

Running the Multi-App Run template file with dapr run -f . starts all applications in your project. This Quickstart has only one application, so the dapr.yaml file contains the following:

version: 1
common:
  resourcesPath: ../../components/
apps:
  - appID: conversation
    appDirPath: ./conversation/
    daprHTTPPort: 3502
    command: ["npm", "run", "start"]

Echo mock LLM component

In conversation/components directly of the quickstart, the conversation.yaml file configures the echo LLM component.

apiVersion: dapr.io/v1alpha1
kind: Component
metadata:
  name: echo
spec:
  type: conversation.echo
  version: v1

To interface with a real LLM, swap out the mock component with one of the supported conversation components. For example, to use an OpenAI component, see the example in the conversation how-to guide

index.js conversation app

In the application code:

  • The app sends an input “What is dapr?” to the echo mock LLM component.
  • The mock LLM echoes “What is dapr?”.
const conversationComponentName = "echo";

async function main() {
  const daprHost = process.env.DAPR_HOST || "http://localhost";
  const daprHttpPort = process.env.DAPR_HTTP_PORT || "3500";

  const inputBody = {
    name: "echo",
    inputs: [{ message: "What is dapr?" }],
    parameters: {},
    metadata: {},
  };

  const reqURL = `${daprHost}:${daprHttpPort}/v1.0-alpha1/conversation/${conversationComponentName}/converse`;

  try {
    const response = await fetch(reqURL, {
      method: "POST",
      headers: {
        "Content-Type": "application/json",
      },
      body: JSON.stringify(inputBody),
    });

    console.log("Input sent: What is dapr?");

    const data = await response.json();
    const result = data.outputs[0].result;
    console.log("Output response:", result);
  } catch (error) {
    console.error("Error:", error.message);
    process.exit(1);
  }
}

main().catch((error) => {
  console.error("Unhandled error:", error);
  process.exit(1);
});

Step 1: Pre-requisites

For this example, you will need:

Step 2: Set up the environment

Clone the sample provided in the Quickstarts repo.

git clone https://github.com/dapr/quickstarts.git

From the root of the Quickstarts directory, navigate into the conversation directory:

cd conversation/csharp/sdk

Step 3: Launch the conversation service

Start the conversation service with the following command:

dapr run -f .

Expected output

== APP - conversation == Input sent: What is dapr?
== APP - conversation == Output response: What is dapr?

What happened?

When you ran dapr init during Dapr install, the dapr.yaml Multi-App Run template file was generated in the .dapr/components directory.

Running dapr run -f . in this Quickstart started the conversation Program.cs.

dapr.yaml Multi-App Run template file

Running the Multi-App Run template file with dapr run -f . starts all applications in your project. This Quickstart has only one application, so the dapr.yaml file contains the following:

version: 1
common:
  resourcesPath: ../../components/
apps:
  - appDirPath: ./conversation/
    appID: conversation
    daprHTTPPort: 3500
    command: ["dotnet", "run"]

Echo mock LLM component

In conversation/components, the conversation.yaml file configures the echo mock LLM component.

apiVersion: dapr.io/v1alpha1
kind: Component
metadata:
  name: echo
spec:
  type: conversation.echo
  version: v1

To interface with a real LLM, swap out the mock component with one of the supported conversation components. For example, to use an OpenAI component, see the example in the conversation how-to guide

Program.cs conversation app

In the application code:

  • The app sends an input “What is dapr?” to the echo mock LLM component.
  • The mock LLM echoes “What is dapr?”.
using Dapr.AI.Conversation;
using Dapr.AI.Conversation.Extensions;

class Program
{
  private const string ConversationComponentName = "echo";

  static async Task Main(string[] args)
  {
    const string prompt = "What is dapr?";

    var builder = WebApplication.CreateBuilder(args);
    builder.Services.AddDaprConversationClient();
    var app = builder.Build();

    //Instantiate Dapr Conversation Client
    var conversationClient = app.Services.GetRequiredService<DaprConversationClient>();

    try
    {
      // Send a request to the echo mock LLM component
      var response = await conversationClient.ConverseAsync(ConversationComponentName, [new(prompt, DaprConversationRole.Generic)]);
      Console.WriteLine("Input sent: " + prompt);

      if (response != null)
      {
        Console.Write("Output response:");
        foreach (var resp in response.Outputs)
        {
          Console.WriteLine($" {resp.Result}");
        }
      }
    }
    catch (Exception ex)
    {
      Console.WriteLine("Error: " + ex.Message);
    }
  }
}

Step 1: Pre-requisites

For this example, you will need:

Step 2: Set up the environment

Clone the sample provided in the Quickstarts repo.

git clone https://github.com/dapr/quickstarts.git

From the root of the Quickstarts directory, navigate into the conversation directory:

cd conversation/go/sdk

Step 3: Launch the conversation service

Start the conversation service with the following command:

dapr run -f .

Expected output

== APP - conversation == Input sent: What is dapr?
== APP - conversation == Output response: What is dapr?

What happened?

When you ran dapr init during Dapr install, the dapr.yaml Multi-App Run template file was generated in the .dapr/components directory.

Running dapr run -f . in this Quickstart started conversation.go.

dapr.yaml Multi-App Run template file

Running the Multi-App Run template file with dapr run -f . starts all applications in your project. This Quickstart has only one application, so the dapr.yaml file contains the following:

version: 1
common:
  resourcesPath: ../../components/
apps:
  - appDirPath: ./conversation/
    appID: conversation
    daprHTTPPort: 3501
    command: ["go", "run", "."]

Echo mock LLM component

In conversation/components directly of the quickstart, the conversation.yaml file configures the echo LLM component.

apiVersion: dapr.io/v1alpha1
kind: Component
metadata:
  name: echo
spec:
  type: conversation.echo
  version: v1

To interface with a real LLM, swap out the mock component with one of the supported conversation components. For example, to use an OpenAI component, see the example in the conversation how-to guide

conversation.go conversation app

In the application code:

  • The app sends an input “What is dapr?” to the echo mock LLM component.
  • The mock LLM echoes “What is dapr?”.
package main

import (
	"context"
	"fmt"
	"log"

	dapr "github.com/dapr/go-sdk/client"
)

func main() {
	client, err := dapr.NewClient()
	if err != nil {
		panic(err)
	}

	input := dapr.ConversationInput{
		Message: "What is dapr?",
		// Role:     nil, // Optional
		// ScrubPII: nil, // Optional
	}

	fmt.Println("Input sent:", input.Message)

	var conversationComponent = "echo"

	request := dapr.NewConversationRequest(conversationComponent, []dapr.ConversationInput{input})

	resp, err := client.ConverseAlpha1(context.Background(), request)
	if err != nil {
		log.Fatalf("err: %v", err)
	}

	fmt.Println("Output response:", resp.Outputs[0].Result)
}

Run the app without the template

Step 1: Pre-requisites

For this example, you will need:

Step 2: Set up the environment

Clone the sample provided in the Quickstarts repo.

git clone https://github.com/dapr/quickstarts.git

From the root of the Quickstarts directory, navigate into the conversation directory:

cd conversation/python/sdk/conversation

Install the dependencies:

pip3 install -r requirements.txt

Step 3: Launch the conversation service

Navigate back to the sdk directory and start the conversation service with the following command:

dapr run --app-id conversation --resources-path ../../../components -- python3 app.py

Note: Since Python3.exe is not defined in Windows, you may need to use python app.py instead of python3 app.py.

Expected output

== APP - conversation == Input sent: What is dapr?
== APP - conversation == Output response: What is dapr?

Step 1: Pre-requisites

For this example, you will need:

Step 2: Set up the environment

Clone the sample provided in the Quickstarts repo.

git clone https://github.com/dapr/quickstarts.git

From the root of the Quickstarts directory, navigate into the conversation directory:

cd conversation/javascript/http/conversation

Install the dependencies:

npm install

Step 3: Launch the conversation service

Navigate back to the http directory and start the conversation service with the following command:

dapr run --app-id conversation --resources-path ../../../components/ -- npm run start

Expected output

== APP - conversation == Input sent: What is dapr?
== APP - conversation == Output response: What is dapr?

Step 1: Pre-requisites

For this example, you will need:

Step 2: Set up the environment

Clone the sample provided in the Quickstarts repo.

git clone https://github.com/dapr/quickstarts.git

From the root of the Quickstarts directory, navigate into the conversation directory:

cd conversation/csharp/sdk/conversation

Install the dependencies:

dotnet build

Step 3: Launch the conversation service

Start the conversation service with the following command:

dapr run --app-id conversation --resources-path ../../../components/ -- dotnet run

Expected output

== APP - conversation == Input sent: What is dapr?
== APP - conversation == Output response: What is dapr?

Step 1: Pre-requisites

For this example, you will need:

Step 2: Set up the environment

Clone the sample provided in the Quickstarts repo.

git clone https://github.com/dapr/quickstarts.git

From the root of the Quickstarts directory, navigate into the conversation directory:

cd conversation/go/sdk/conversation

Install the dependencies:

go build .

Step 3: Launch the conversation service

Start the conversation service with the following command:

dapr run --app-id conversation --resources-path ../../../components/ -- go run .

Expected output

== APP - conversation == Input sent: What is dapr?
== APP - conversation == Output response: What is dapr?

Demo

Watch the demo presented during Diagrid’s Dapr v1.15 celebration to see how the conversation API works using the .NET SDK.

Tell us what you think!

We’re continuously working to improve our Quickstart examples and value your feedback. Did you find this Quickstart helpful? Do you have suggestions for improvement?

Join the discussion in our discord channel.

Next steps

Explore Dapr tutorials >>

12 - Resiliency Quickstarts

Get started with Dapr’s resiliency component

12.1 - Quickstart: Service-to-component resiliency

Get started with Dapr’s resiliency capabilities via the state management API

Observe Dapr resiliency capabilities by simulating a system failure. In this Quickstart, you will:

  • Execute a microservice application that continuously persists and retrieves state via Dapr’s state management API.
  • Trigger resiliency policies by simulating a system failure.
  • Resolve the failure and the microservice application will resume.
Diagram showing the resiliency applied to Dapr APIs

Select your preferred language-specific Dapr SDK before proceeding with the Quickstart.

Pre-requisites

For this example, you will need:

Step 1: Set up the environment

Clone the sample provided in the Quickstarts repo.

git clone https://github.com/dapr/quickstarts.git

In a terminal window, navigate to the order-processor directory.

cd ../state_management/python/sdk/order-processor

Install dependencies

pip3 install -r requirements.txt 

Step 2: Run the application

Run the order-processor service alongside a Dapr sidecar. The Dapr sidecar then loads the resiliency spec located in the resources directory:

apiVersion: dapr.io/v1alpha1
kind: Resiliency
metadata:
  name: myresiliency
scopes:
  - order-processor

spec:
  policies:
    retries:
      retryForever:
        policy: constant
        duration: 5s
        maxRetries: -1

    circuitBreakers:
      simpleCB:
        maxRequests: 1
        timeout: 5s
        trip: consecutiveFailures >= 5

  targets:
    components:
      statestore:
        outbound:
          retry: retryForever
          circuitBreaker: simpleCB
dapr run --app-id order-processor --resources-path ../../../resources/ -- python3

Once the application has started, the order-processorservice writes and reads orderId key/value pairs to the statestore Redis instance defined in the statestore.yaml component.

== APP == Saving Order:  { orderId: '1' }
== APP == Getting Order:  { orderId: '1' }
== APP == Saving Order:  { orderId: '2' }
== APP == Getting Order:  { orderId: '2' }
== APP == Saving Order:  { orderId: '3' }
== APP == Getting Order:  { orderId: '3' }
== APP == Saving Order:  { orderId: '4' }
== APP == Getting Order:  { orderId: '4' }

Step 3: Introduce a fault

Simulate a fault by stopping the Redis container instance that was initialized when executing dapr init on your development machine. Once the instance is stopped, write and read operations from the order-processor service begin to fail.

Since the resiliency.yaml spec defines statestore as a component target, all failed requests will apply retry and circuit breaker policies:

  targets:
    components:
      statestore:
        outbound:
          retry: retryForever
          circuitBreaker: simpleCB

In a new terminal window, run the following command to stop Redis:

docker stop dapr_redis

Once Redis is stopped, the requests begin to fail and the retry policy titled retryForever is applied. The output below shows the logs from the order-processor service:

INFO[0006] Error processing operation component[statestore] output. Retrying...

As per the retryForever policy, retries will continue for each failed request indefinitely, in 5 second intervals.

retryForever:
  policy: constant
  maxInterval: 5s
  maxRetries: -1 

Once 5 consecutive retries have failed, the circuit breaker policy, simpleCB, is tripped and the breaker opens, halting all requests:

INFO[0026] Circuit breaker "simpleCB-statestore" changed state from closed to open
circuitBreakers:
  simpleCB:
  maxRequests: 1
  timeout: 5s 
  trip: consecutiveFailures >= 5

After 5 seconds has surpassed, the circuit breaker will switch to a half-open state, allowing one request through to verify if the fault has been resolved. If the request continues to fail, the circuit will trip back to the open state.

INFO[0031] Circuit breaker "simpleCB-statestore" changed state from open to half-open  
INFO[0031] Circuit breaker "simpleCB-statestore" changed state from half-open to open 
INFO[0036] Circuit breaker "simpleCB-statestore" changed state from open to half-open  
INFO[0036] Circuit breaker "simpleCB-statestore" changed state from half-open to closed  

This half-open/open behavior will continue for as long as the Redis container is stopped.

Step 3: Remove the fault

Once you restart the Redis container on your machine, the application will recover seamlessly, picking up where it left off.

docker start dapr_redis
INFO[0036] Recovered processing operation component[statestore] output.  
== APP == Saving Order:  { orderId: '5' }
== APP == Getting Order:  { orderId: '5' }
== APP == Saving Order:  { orderId: '6' }
== APP == Getting Order:  { orderId: '6' }
== APP == Saving Order:  { orderId: '7' }
== APP == Getting Order:  { orderId: '7' }
== APP == Saving Order:  { orderId: '8' }
== APP == Getting Order:  { orderId: '8' }
== APP == Saving Order:  { orderId: '9' }
== APP == Getting Order:  { orderId: '9' }

Pre-requisites

For this example, you will need:

Step 1: Set up the environment

Clone the sample provided in the Quickstarts repo.

git clone https://github.com/dapr/quickstarts.git

In a terminal window, navigate to the order-processor directory.

cd ../state_management/javascript/sdk/order-processor

Install dependencies

npm install

Step 2: Run the application

Run the order-processor service alongside a Dapr sidecar. The Dapr sidecar then loads the resiliency spec located in the resources directory:

apiVersion: dapr.io/v1alpha1
kind: Resiliency
metadata:
  name: myresiliency
scopes:
  - checkout

spec:
  policies:
    retries:
      retryForever:
        policy: constant
        maxInterval: 5s
        maxRetries: -1 

    circuitBreakers:
      simpleCB:
        maxRequests: 1
        timeout: 5s 
        trip: consecutiveFailures >= 5

  targets:
    apps:
      order-processor:
        retry: retryForever
        circuitBreaker: simpleCB
dapr run --app-id order-processor --resources-path ../../../resources/ -- npm start

Once the application has started, the order-processorservice writes and reads orderId key/value pairs to the statestore Redis instance defined in the statestore.yaml component.

== APP == Saving Order:  { orderId: '1' }
== APP == Getting Order:  { orderId: '1' }
== APP == Saving Order:  { orderId: '2' }
== APP == Getting Order:  { orderId: '2' }
== APP == Saving Order:  { orderId: '3' }
== APP == Getting Order:  { orderId: '3' }
== APP == Saving Order:  { orderId: '4' }
== APP == Getting Order:  { orderId: '4' }

Step 3: Introduce a fault

Simulate a fault by stopping the Redis container instance that was initialized when executing dapr init on your development machine. Once the instance is stopped, write and read operations from the order-processor service begin to fail.

Since the resiliency.yaml spec defines statestore as a component target, all failed requests will apply retry and circuit breaker policies:

  targets:
    components:
      statestore:
        outbound:
          retry: retryForever
          circuitBreaker: simpleCB

In a new terminal window, run the following command to stop Redis:

docker stop dapr_redis

Once Redis is stopped, the requests begin to fail and the retry policy titled retryForever is applied. The output below shows the logs from the order-processor service:

INFO[0006] Error processing operation component[statestore] output. Retrying...

As per the retryForever policy, retries will continue for each failed request indefinitely, in 5 second intervals.

retryForever:
  policy: constant
  maxInterval: 5s
  maxRetries: -1 

Once 5 consecutive retries have failed, the circuit breaker policy, simpleCB, is tripped and the breaker opens, halting all requests:

INFO[0026] Circuit breaker "simpleCB-statestore" changed state from closed to open
circuitBreakers:
  simpleCB:
  maxRequests: 1
  timeout: 5s 
  trip: consecutiveFailures >= 5

After 5 seconds has surpassed, the circuit breaker will switch to a half-open state, allowing one request through to verify if the fault has been resolved. If the request continues to fail, the circuit will trip back to the open state.

INFO[0031] Circuit breaker "simpleCB-statestore" changed state from open to half-open  
INFO[0031] Circuit breaker "simpleCB-statestore" changed state from half-open to open 
INFO[0036] Circuit breaker "simpleCB-statestore" changed state from open to half-open  
INFO[0036] Circuit breaker "simpleCB-statestore" changed state from half-open to closed  

This half-open/open behavior will continue for as long as the Redis container is stopped.

Step 3: Remove the fault

Once you restart the Redis container on your machine, the application will recover seamlessly, picking up where it left off.

docker start dapr_redis
INFO[0036] Recovered processing operation component[statestore] output.  
== APP == Saving Order:  { orderId: '5' }
== APP == Getting Order:  { orderId: '5' }
== APP == Saving Order:  { orderId: '6' }
== APP == Getting Order:  { orderId: '6' }
== APP == Saving Order:  { orderId: '7' }
== APP == Getting Order:  { orderId: '7' }
== APP == Saving Order:  { orderId: '8' }
== APP == Getting Order:  { orderId: '8' }
== APP == Saving Order:  { orderId: '9' }
== APP == Getting Order:  { orderId: '9' }

Pre-requisites

For this example, you will need:

Step 1: Set up the environment

Clone the sample provided in the Quickstarts repo.

git clone https://github.com/dapr/quickstarts.git

In a terminal window, navigate to the order-processor directory.

cd ../state_management/csharp/sdk/order-processor

Install dependencies

dotnet restore
dotnet build

Step 2: Run the application

Run the order-processor service alongside a Dapr sidecar. The Dapr sidecar then loads the resiliency spec located in the resources directory:

apiVersion: dapr.io/v1alpha1
kind: Resiliency
metadata:
  name: myresiliency
scopes:
  - checkout

spec:
  policies:
    retries:
      retryForever:
        policy: constant
        maxInterval: 5s
        maxRetries: -1 

    circuitBreakers:
      simpleCB:
        maxRequests: 1
        timeout: 5s 
        trip: consecutiveFailures >= 5

  targets:
    apps:
      order-processor:
        retry: retryForever
        circuitBreaker: simpleCB
dapr run --app-id order-processor --resources-path ../../../resources/ -- dotnet run

Once the application has started, the order-processorservice writes and reads orderId key/value pairs to the statestore Redis instance defined in the statestore.yaml component.

== APP == Saving Order:  { orderId: '1' }
== APP == Getting Order:  { orderId: '1' }
== APP == Saving Order:  { orderId: '2' }
== APP == Getting Order:  { orderId: '2' }
== APP == Saving Order:  { orderId: '3' }
== APP == Getting Order:  { orderId: '3' }
== APP == Saving Order:  { orderId: '4' }
== APP == Getting Order:  { orderId: '4' }

Step 3: Introduce a fault

Simulate a fault by stopping the Redis container instance that was initialized when executing dapr init on your development machine. Once the instance is stopped, write and read operations from the order-processor service begin to fail.

Since the resiliency.yaml spec defines statestore as a component target, all failed requests will apply retry and circuit breaker policies:

  targets:
    components:
      statestore:
        outbound:
          retry: retryForever
          circuitBreaker: simpleCB

In a new terminal window, run the following command to stop Redis:

docker stop dapr_redis

Once Redis is stopped, the requests begin to fail and the retry policy titled retryForever is applied. The output below shows the logs from the order-processor service:

INFO[0006] Error processing operation component[statestore] output. Retrying...

As per the retryForever policy, retries will continue for each failed request indefinitely, in 5 second intervals.

retryForever:
  policy: constant
  maxInterval: 5s
  maxRetries: -1 

Once 5 consecutive retries have failed, the circuit breaker policy, simpleCB, is tripped and the breaker opens, halting all requests:

INFO[0026] Circuit breaker "simpleCB-statestore" changed state from closed to open
circuitBreakers:
  simpleCB:
  maxRequests: 1
  timeout: 5s 
  trip: consecutiveFailures >= 5

After 5 seconds has surpassed, the circuit breaker will switch to a half-open state, allowing one request through to verify if the fault has been resolved. If the request continues to fail, the circuit will trip back to the open state.

INFO[0031] Circuit breaker "simpleCB-statestore" changed state from open to half-open  
INFO[0031] Circuit breaker "simpleCB-statestore" changed state from half-open to open 
INFO[0036] Circuit breaker "simpleCB-statestore" changed state from open to half-open  
INFO[0036] Circuit breaker "simpleCB-statestore" changed state from half-open to closed  

This half-open/open behavior will continue for as long as the Redis container is stopped.

Step 3: Remove the fault

Once you restart the Redis container on your machine, the application will recover seamlessly, picking up where it left off.

docker start dapr_redis
INFO[0036] Recovered processing operation component[statestore] output.  
== APP == Saving Order:  { orderId: '5' }
== APP == Getting Order:  { orderId: '5' }
== APP == Saving Order:  { orderId: '6' }
== APP == Getting Order:  { orderId: '6' }
== APP == Saving Order:  { orderId: '7' }
== APP == Getting Order:  { orderId: '7' }
== APP == Saving Order:  { orderId: '8' }
== APP == Getting Order:  { orderId: '8' }
== APP == Saving Order:  { orderId: '9' }
== APP == Getting Order:  { orderId: '9' }

Pre-requisites

For this example, you will need:

Step 1: Set up the environment

Clone the sample provided in the Quickstarts repo.

git clone https://github.com/dapr/quickstarts.git

In a terminal window, navigate to the order-processor directory.

cd ../state_management/java/sdk/order-processor

Install dependencies

mvn clean install

Step 2: Run the application

Run the order-processor service alongside a Dapr sidecar. The Dapr sidecar then loads the resiliency spec located in the resources directory:

apiVersion: dapr.io/v1alpha1
kind: Resiliency
metadata:
  name: myresiliency
scopes:
  - checkout

spec:
  policies:
    retries:
      retryForever:
        policy: constant
        maxInterval: 5s
        maxRetries: -1 

    circuitBreakers:
      simpleCB:
        maxRequests: 1
        timeout: 5s 
        trip: consecutiveFailures >= 5

  targets:
    apps:
      order-processor:
        retry: retryForever
        circuitBreaker: simpleCB
dapr run --app-id order-processor --resources-path ../../../resources/ -- java -jar target/OrderProcessingService-0.0.1-SNAPSHOT.jar

Once the application has started, the order-processorservice writes and reads orderId key/value pairs to the statestore Redis instance defined in the statestore.yaml component.

== APP == Saving Order:  { orderId: '1' }
== APP == Getting Order:  { orderId: '1' }
== APP == Saving Order:  { orderId: '2' }
== APP == Getting Order:  { orderId: '2' }
== APP == Saving Order:  { orderId: '3' }
== APP == Getting Order:  { orderId: '3' }
== APP == Saving Order:  { orderId: '4' }
== APP == Getting Order:  { orderId: '4' }

Step 3: Introduce a fault

Simulate a fault by stopping the Redis container instance that was initialized when executing dapr init on your development machine. Once the instance is stopped, write and read operations from the order-processor service begin to fail.

Since the resiliency.yaml spec defines statestore as a component target, all failed requests will apply retry and circuit breaker policies:

  targets:
    components:
      statestore:
        outbound:
          retry: retryForever
          circuitBreaker: simpleCB

In a new terminal window, run the following command to stop Redis:

docker stop dapr_redis

Once Redis is stopped, the requests begin to fail and the retry policy titled retryForever is applied. The output below shows the logs from the order-processor service:

INFO[0006] Error processing operation component[statestore] output. Retrying...

As per the retryForever policy, retries will continue for each failed request indefinitely, in 5 second intervals.

retryForever:
  policy: constant
  maxInterval: 5s
  maxRetries: -1 

Once 5 consecutive retries have failed, the circuit breaker policy, simpleCB, is tripped and the breaker opens, halting all requests:

INFO[0026] Circuit breaker "simpleCB-statestore" changed state from closed to open
circuitBreakers:
  simpleCB:
  maxRequests: 1
  timeout: 5s 
  trip: consecutiveFailures >= 5

After 5 seconds has surpassed, the circuit breaker will switch to a half-open state, allowing one request through to verify if the fault has been resolved. If the request continues to fail, the circuit will trip back to the open state.

INFO[0031] Circuit breaker "simpleCB-statestore" changed state from open to half-open  
INFO[0031] Circuit breaker "simpleCB-statestore" changed state from half-open to open 
INFO[0036] Circuit breaker "simpleCB-statestore" changed state from open to half-open  
INFO[0036] Circuit breaker "simpleCB-statestore" changed state from half-open to closed  

This half-open/open behavior will continue for as long as the Redis container is stopped.

Step 3: Remove the fault

Once you restart the Redis container on your machine, the application will recover seamlessly, picking up where it left off.

docker start dapr_redis
INFO[0036] Recovered processing operation component[statestore] output.  
== APP == Saving Order:  { orderId: '5' }
== APP == Getting Order:  { orderId: '5' }
== APP == Saving Order:  { orderId: '6' }
== APP == Getting Order:  { orderId: '6' }
== APP == Saving Order:  { orderId: '7' }
== APP == Getting Order:  { orderId: '7' }
== APP == Saving Order:  { orderId: '8' }
== APP == Getting Order:  { orderId: '8' }
== APP == Saving Order:  { orderId: '9' }
== APP == Getting Order:  { orderId: '9' }

Pre-requisites

For this example, you will need:

Step 1: Set up the environment

Clone the sample provided in the Quickstarts repo.

git clone https://github.com/dapr/quickstarts.git

In a terminal window, navigate to the order-processor directory.

cd ../state_management/go/sdk/order-processor

Install dependencies

go build .

Step 2: Run the application

Run the order-processor service alongside a Dapr sidecar. The Dapr sidecar then loads the resiliency spec located in the resources directory:

apiVersion: dapr.io/v1alpha1
kind: Resiliency
metadata:
  name: myresiliency
scopes:
  - checkout

spec:
  policies:
    retries:
      retryForever:
        policy: constant
        maxInterval: 5s
        maxRetries: -1 

    circuitBreakers:
      simpleCB:
        maxRequests: 1
        timeout: 5s 
        trip: consecutiveFailures >= 5

  targets:
    apps:
      order-processor:
        retry: retryForever
        circuitBreaker: simpleCB
dapr run --app-id order-processor --resources-path ../../../resources -- go run .

Once the application has started, the order-processorservice writes and reads orderId key/value pairs to the statestore Redis instance defined in the statestore.yaml component.

== APP == Saving Order:  { orderId: '1' }
== APP == Getting Order:  { orderId: '1' }
== APP == Saving Order:  { orderId: '2' }
== APP == Getting Order:  { orderId: '2' }
== APP == Saving Order:  { orderId: '3' }
== APP == Getting Order:  { orderId: '3' }
== APP == Saving Order:  { orderId: '4' }
== APP == Getting Order:  { orderId: '4' }

Step 3: Introduce a fault

Simulate a fault by stopping the Redis container instance that was initialized when executing dapr init on your development machine. Once the instance is stopped, write and read operations from the order-processor service begin to fail.

Since the resiliency.yaml spec defines statestore as a component target, all failed requests will apply retry and circuit breaker policies:

  targets:
    components:
      statestore:
        outbound:
          retry: retryForever
          circuitBreaker: simpleCB

In a new terminal window, run the following command to stop Redis:

docker stop dapr_redis

Once Redis is stopped, the requests begin to fail and the retry policy titled retryForever is applied. The output belows shows the logs from the order-processor service:

INFO[0006] Error processing operation component[statestore] output. Retrying...

As per the retryForever policy, retries will continue for each failed request indefinitely, in 5 second intervals.

retryForever:
  policy: constant
  maxInterval: 5s
  maxRetries: -1 

Once 5 consecutive retries have failed, the circuit breaker policy, simpleCB, is tripped and the breaker opens, halting all requests:

INFO[0026] Circuit breaker "simpleCB-statestore" changed state from closed to open
circuitBreakers:
  simpleCB:
  maxRequests: 1
  timeout: 5s 
  trip: consecutiveFailures >= 5

After 5 seconds has surpassed, the circuit breaker will switch to a half-open state, allowing one request through to verify if the fault has been resolved. If the request continues to fail, the circuit will trip back to the open state.

INFO[0031] Circuit breaker "simpleCB-statestore" changed state from open to half-open  
INFO[0031] Circuit breaker "simpleCB-statestore" changed state from half-open to open 
INFO[0036] Circuit breaker "simpleCB-statestore" changed state from open to half-open  
INFO[0036] Circuit breaker "simpleCB-statestore" changed state from half-open to closed  

This half-open/open behavior will continue for as long as the Redis container is stopped.

Step 3: Remove the fault

Once you restart the Redis container on your machine, the application will recover seamlessly, picking up where it left off.

docker start dapr_redis
INFO[0036] Recovered processing operation component[statestore] output.  
== APP == Saving Order:  { orderId: '5' }
== APP == Getting Order:  { orderId: '5' }
== APP == Saving Order:  { orderId: '6' }
== APP == Getting Order:  { orderId: '6' }
== APP == Saving Order:  { orderId: '7' }
== APP == Getting Order:  { orderId: '7' }
== APP == Saving Order:  { orderId: '8' }
== APP == Getting Order:  { orderId: '8' }
== APP == Saving Order:  { orderId: '9' }
== APP == Getting Order:  { orderId: '9' }

Tell us what you think!

We’re continuously working to improve our Quickstart examples and value your feedback. Did you find this quickstart helpful? Do you have suggestions for improvement?

Join the discussion in our discord channel.

Next steps

Learn more about the resiliency feature and how it works with Dapr’s building block APIs.

Explore Dapr tutorials >>

12.2 - Quickstart: Service-to-service resiliency

Get started with Dapr’s resiliency capabilities via the service invocation API

Observe Dapr resiliency capabilities by simulating a system failure. In this Quickstart, you will:

  • Run two microservice applications: checkout and order-processor. checkout will continuously make Dapr service invocation requests to order-processor.
  • Trigger the resiliency spec by simulating a system failure.
  • Remove the failure to allow the microservice application to recover.
Diagram showing the resiliency applied to Dapr APIs

Select your preferred language-specific Dapr SDK before proceeding with the Quickstart.

Pre-requisites

For this example, you will need:

Step 1: Set up the environment

Clone the sample provided in the Quickstarts repo.

git clone https://github.com/dapr/quickstarts.git

Step 2: Run order-processor service

In a terminal window, from the root of the Quickstart directory, navigate to order-processor directory.

cd service_invocation/python/http/order-processor

Install dependencies:

pip3 install -r requirements.txt

Run the order-processor service alongside a Dapr sidecar.

dapr run --app-port 8001 --app-id order-processor --resources-path ../../../resources/ --app-protocol http --dapr-http-port 3501 -- python3 app.py

Step 3: Run the checkout service application

In a new terminal window, from the root of the Quickstart directory, navigate to the checkout directory.

cd service_invocation/python/http/checkout

Install dependencies:

pip3 install -r requirements.txt

Run the checkout service alongside a Dapr sidecar.

dapr run --app-id checkout --resources-path ../../../resources/ --app-protocol http --dapr-http-port 3500 -- python3 app.py

The Dapr sidecar then loads the resiliency spec located in the resources directory:

apiVersion: dapr.io/v1alpha1
kind: Resiliency
metadata:
  name: myresiliency
scopes:
  - checkout

spec:
  policies:
    retries:
      retryForever:
        policy: constant
        maxInterval: 5s
        maxRetries: -1 

    circuitBreakers:
      simpleCB:
        maxRequests: 1
        timeout: 5s 
        trip: consecutiveFailures >= 5

  targets:
    apps:
      order-processor:
        retry: retryForever
        circuitBreaker: simpleCB

Step 4: View the Service Invocation outputs

When both services and sidecars are running, notice how orders are passed from the checkout service to the order-processor service using Dapr service invoke.

checkout service output:

== APP == Order passed: {"orderId": 1}
== APP == Order passed: {"orderId": 2}
== APP == Order passed: {"orderId": 3}
== APP == Order passed: {"orderId": 4}

order-processor service output:

== APP == Order received: {"orderId": 1}
== APP == Order received: {"orderId": 2}
== APP == Order received: {"orderId": 3}
== APP == Order received: {"orderId": 4}

Step 5: Introduce a fault

Simulate a fault by stopping the order-processor service. Once the instance is stopped, service invoke operations from the checkout service begin to fail.

Since the resiliency.yaml spec defines the order-processor service as a resiliency target, all failed requests will apply retry and circuit breaker policies:

  targets:
    apps:
      order-processor:
        retry: retryForever
        circuitBreaker: simpleCB

In the order-processor window, stop the service:

CMD + C
CTRL + C

Once the first request fails, the retry policy titled retryForever is applied:

INFO[0005] Error processing operation endpoint[order-processor, order-processor:orders]. Retrying...  

Retries will continue for each failed request indefinitely, in 5 second intervals.

retryForever:
  policy: constant
  maxInterval: 5s
  maxRetries: -1 

Once 5 consecutive retries have failed, the circuit breaker policy, simpleCB, is tripped and the breaker opens, halting all requests:

INFO[0025] Circuit breaker "order-processor:orders" changed state from closed to open  
circuitBreakers:
  simpleCB:
  maxRequests: 1
  timeout: 5s 
  trip: consecutiveFailures >= 5

After 5 seconds has surpassed, the circuit breaker will switch to a half-open state, allowing one request through to verify if the fault has been resolved. If the request continues to fail, the circuit will trip back to the open state.

INFO[0030] Circuit breaker "order-processor:orders" changed state from open to half-open  
INFO[0030] Circuit breaker "order-processor:orders" changed state from half-open to open   
INFO[0030] Circuit breaker "order-processor:orders" changed state from open to half-open  
INFO[0030] Circuit breaker "order-processor:orders" changed state from half-open to open     

This half-open/open behavior will continue for as long as the order-processor service is stopped.

Step 6: Remove the fault

Once you restart the order-processor service, the application will recover seamlessly, picking up where it left off with accepting order requests.

In the order-processor service terminal, restart the application:

dapr run --app-port 8001 --app-id order-processor --app-protocol http --dapr-http-port 3501 -- python3 app.py

checkout service output:

== APP == Order passed: {"orderId": 5}
== APP == Order passed: {"orderId": 6}
== APP == Order passed: {"orderId": 7}
== APP == Order passed: {"orderId": 8}
== APP == Order passed: {"orderId": 9}
== APP == Order passed: {"orderId": 10}

order-processor service output:

== APP == Order received: {"orderId": 5}
== APP == Order received: {"orderId": 6}
== APP == Order received: {"orderId": 7}
== APP == Order received: {"orderId": 8}
== APP == Order received: {"orderId": 9}
== APP == Order received: {"orderId": 10}

Pre-requisites

For this example, you will need:

Step 1: Set up the environment

Clone the sample provided in the Quickstarts repo.

git clone https://github.com/dapr/quickstarts.git

Step 2: Run the order-processor service

In a terminal window, from the root of the Quickstart directory, navigate to order-processor directory.

cd service_invocation/javascript/http/order-processor

Install dependencies:

npm install

Run the order-processor service alongside a Dapr sidecar.

dapr run --app-port 5001 --app-id order-processor --resources-path ../../../resources/ --app-protocol http --dapr-http-port 3501 -- npm start

Step 3: Run the checkout service application

In a new terminal window, from the root of the Quickstart directory, navigate to the checkout directory.

cd service_invocation/javascript/http/checkout

Install dependencies:

npm install

Run the checkout service alongside a Dapr sidecar.

dapr run --app-id checkout --resources-path ../../../resources/ --app-protocol http --dapr-http-port 3500 -- npm start

The Dapr sidecar then loads the resiliency spec located in the resources directory:

apiVersion: dapr.io/v1alpha1
kind: Resiliency
metadata:
  name: myresiliency
scopes:
  - checkout

spec:
  policies:
    retries:
      retryForever:
        policy: constant
        maxInterval: 5s
        maxRetries: -1 

    circuitBreakers:
      simpleCB:
        maxRequests: 1
        timeout: 5s 
        trip: consecutiveFailures >= 5

  targets:
    apps:
      order-processor:
        retry: retryForever
        circuitBreaker: simpleCB

Step 4: View the Service Invocation outputs

When both services and sidecars are running, notice how orders are passed from the checkout service to the order-processor service using Dapr service invoke.

checkout service output:

== APP == Order passed: {"orderId": 1}
== APP == Order passed: {"orderId": 2}
== APP == Order passed: {"orderId": 3}
== APP == Order passed: {"orderId": 4}

order-processor service output:

== APP == Order received: {"orderId": 1}
== APP == Order received: {"orderId": 2}
== APP == Order received: {"orderId": 3}
== APP == Order received: {"orderId": 4}

Step 5: Introduce a fault

Simulate a fault by stopping the order-processor service. Once the instance is stopped, service invoke operations from the checkout service begin to fail.

Since the resiliency.yaml spec defines the order-processor service as a resiliency target, all failed requests will apply retry and circuit breaker policies:

  targets:
    apps:
      order-processor:
        retry: retryForever
        circuitBreaker: simpleCB

In the order-processor window, stop the service:

CMD + C
CTRL + C

Once the first request fails, the retry policy titled retryForever is applied:

INFO[0005] Error processing operation endpoint[order-processor, order-processor:orders]. Retrying...  

Retries will continue for each failed request indefinitely, in 5 second intervals.

retryForever:
  policy: constant
  maxInterval: 5s
  maxRetries: -1 

Once 5 consecutive retries have failed, the circuit breaker policy, simpleCB, is tripped and the breaker opens, halting all requests:

INFO[0025] Circuit breaker "order-processor:orders" changed state from closed to open  
circuitBreakers:
  simpleCB:
  maxRequests: 1
  timeout: 5s 
  trip: consecutiveFailures >= 5

After 5 seconds has surpassed, the circuit breaker will switch to a half-open state, allowing one request through to verify if the fault has been resolved. If the request continues to fail, the circuit will trip back to the open state.

INFO[0030] Circuit breaker "order-processor:orders" changed state from open to half-open  
INFO[0030] Circuit breaker "order-processor:orders" changed state from half-open to open   
INFO[0030] Circuit breaker "order-processor:orders" changed state from open to half-open  
INFO[0030] Circuit breaker "order-processor:orders" changed state from half-open to open     

This half-open/open behavior will continue for as long as the Redis container is stopped.

Step 6: Remove the fault

Once you restart the order-processor service, the application will recover seamlessly, picking up where it left off.

In the order-processor service terminal, restart the application:

dapr run --app-port 5001 --app-id order-processor --resources-path ../../../resources/ --app-protocol http --dapr-http-port 3501 -- npm start

checkout service output:

== APP == Order passed: {"orderId": 5}
== APP == Order passed: {"orderId": 6}
== APP == Order passed: {"orderId": 7}
== APP == Order passed: {"orderId": 8}
== APP == Order passed: {"orderId": 9}
== APP == Order passed: {"orderId": 10}

order-processor service output:

== APP == Order received: {"orderId": 5}
== APP == Order received: {"orderId": 6}
== APP == Order received: {"orderId": 7}
== APP == Order received: {"orderId": 8}
== APP == Order received: {"orderId": 9}
== APP == Order received: {"orderId": 10}

Pre-requisites

For this example, you will need:

Step 1: Set up the environment

Clone the sample provided in the Quickstarts repo.

git clone https://github.com/dapr/quickstarts.git

Step 2: Run the order-processor service

In a terminal window, from the root of the Quickstart directory, navigate to order-processor directory.

cd service_invocation/csharp/http/order-processor

Install dependencies:

dotnet restore
dotnet build

Run the order-processor service alongside a Dapr sidecar.

dapr run --app-port 7001 --app-id order-processor --resources-path ../../../resources/ --app-protocol http --dapr-http-port 3501 -- dotnet run

Step 3: Run the checkout service application

In a new terminal window, from the root of the Quickstart directory, navigate to the checkout directory.

cd service_invocation/csharp/http/checkout

Install dependencies:

dotnet restore
dotnet build

Run the checkout service alongside a Dapr sidecar.

dapr run --app-id checkout --resources-path ../../../resources/ --app-protocol http --dapr-http-port 3500 -- dotnet run

The Dapr sidecar then loads the resiliency spec located in the resources directory:

apiVersion: dapr.io/v1alpha1
kind: Resiliency
metadata:
  name: myresiliency
scopes:
  - checkout

spec:
  policies:
    retries:
      retryForever:
        policy: constant
        maxInterval: 5s
        maxRetries: -1 

    circuitBreakers:
      simpleCB:
        maxRequests: 1
        timeout: 5s 
        trip: consecutiveFailures >= 5

  targets:
    apps:
      order-processor:
        retry: retryForever
        circuitBreaker: simpleCB

Step 4: View the Service Invocation outputs

When both services and sidecars are running, notice how orders are passed from the checkout service to the order-processor service using Dapr service invoke.

checkout service output:

== APP == Order passed: {"orderId": 1}
== APP == Order passed: {"orderId": 2}
== APP == Order passed: {"orderId": 3}
== APP == Order passed: {"orderId": 4}

order-processor service output:

== APP == Order received: {"orderId": 1}
== APP == Order received: {"orderId": 2}
== APP == Order received: {"orderId": 3}
== APP == Order received: {"orderId": 4}

Step 5: Introduce a fault

Simulate a fault by stopping the order-processor service. Once the instance is stopped, service invoke operations from the checkout service begin to fail.

Since the resiliency.yaml spec defines the order-processor service as a resiliency target, all failed requests will apply retry and circuit breaker policies:

  targets:
    apps:
      order-processor:
        retry: retryForever
        circuitBreaker: simpleCB

In the order-processor window, stop the service:

CMD + C
CTRL + C

Once the first request fails, the retry policy titled retryForever is applied:

INFO[0005] Error processing operation endpoint[order-processor, order-processor:orders]. Retrying...  

Retries will continue for each failed request indefinitely, in 5 second intervals.

retryForever:
  policy: constant
  maxInterval: 5s
  maxRetries: -1 

Once 5 consecutive retries have failed, the circuit breaker policy, simpleCB, is tripped and the breaker opens, halting all requests:

INFO[0025] Circuit breaker "order-processor:orders" changed state from closed to open  
circuitBreakers:
  simpleCB:
  maxRequests: 1
  timeout: 5s 
  trip: consecutiveFailures >= 5

After 5 seconds has surpassed, the circuit breaker will switch to a half-open state, allowing one request through to verify if the fault has been resolved. If the request continues to fail, the circuit will trip back to the open state.

INFO[0030] Circuit breaker "order-processor:orders" changed state from open to half-open  
INFO[0030] Circuit breaker "order-processor:orders" changed state from half-open to open   
INFO[0030] Circuit breaker "order-processor:orders" changed state from open to half-open  
INFO[0030] Circuit breaker "order-processor:orders" changed state from half-open to open     

This half-open/open behavior will continue for as long as the Redis container is stopped.

Step 6: Remove the fault

Once you restart the order-processor service, the application will recover seamlessly, picking up where it left off.

In the order-processor service terminal, restart the application:

dapr run --app-port 7001 --app-id order-processor --app-protocol http --dapr-http-port 3501 -- dotnet run

checkout service output:

== APP == Order passed: {"orderId": 5}
== APP == Order passed: {"orderId": 6}
== APP == Order passed: {"orderId": 7}
== APP == Order passed: {"orderId": 8}
== APP == Order passed: {"orderId": 9}
== APP == Order passed: {"orderId": 10}

order-processor service output:

== APP == Order received: {"orderId": 5}
== APP == Order received: {"orderId": 6}
== APP == Order received: {"orderId": 7}
== APP == Order received: {"orderId": 8}
== APP == Order received: {"orderId": 9}
== APP == Order received: {"orderId": 10}

Pre-requisites

For this example, you will need:

Step 1: Set up the environment

Clone the sample provided in the Quickstarts repo.

git clone https://github.com/dapr/quickstarts.git

Step 2: Run the order-processor service

In a terminal window, from the root of the Quickstart directory, navigate to order-processor directory.

cd service_invocation/java/http/order-processor

Install dependencies:

mvn clean install

Run the order-processor service alongside a Dapr sidecar.

dapr run --app-id order-processor --resources-path ../../../resources/ --app-port 9001 --app-protocol http --dapr-http-port 3501 -- java -jar target/OrderProcessingService-0.0.1-SNAPSHOT.jar

Step 3: Run the checkout service application

In a new terminal window, from the root of the Quickstart directory, navigate to the checkout directory.

cd service_invocation/java/http/checkout

Install dependencies:

mvn clean install

Run the checkout service alongside a Dapr sidecar.

dapr run --app-id checkout --resources-path ../../../resources/ --app-protocol http --dapr-http-port 3500 -- java -jar target/CheckoutService-0.0.1-SNAPSHOT.jar

The Dapr sidecar then loads the resiliency spec located in the resources directory:

apiVersion: dapr.io/v1alpha1
kind: Resiliency
metadata:
  name: myresiliency
scopes:
  - checkout

spec:
  policies:
    retries:
      retryForever:
        policy: constant
        maxInterval: 5s
        maxRetries: -1 

    circuitBreakers:
      simpleCB:
        maxRequests: 1
        timeout: 5s 
        trip: consecutiveFailures >= 5

  targets:
    apps:
      order-processor:
        retry: retryForever
        circuitBreaker: simpleCB

Step 4: View the Service Invocation outputs

When both services and sidecars are running, notice how orders are passed from the checkout service to the order-processor service using Dapr service invoke.

checkout service output:

== APP == Order passed: {"orderId": 1}
== APP == Order passed: {"orderId": 2}
== APP == Order passed: {"orderId": 3}
== APP == Order passed: {"orderId": 4}

order-processor service output:

== APP == Order received: {"orderId": 1}
== APP == Order received: {"orderId": 2}
== APP == Order received: {"orderId": 3}
== APP == Order received: {"orderId": 4}

Step 5: Introduce a fault

Simulate a fault by stopping the order-processor service. Once the instance is stopped, service invoke operations from the checkout service begin to fail.

Since the resiliency.yaml spec defines the order-processor service as a resiliency target, all failed requests will apply retry and circuit breaker policies:

  targets:
    apps:
      order-processor:
        retry: retryForever
        circuitBreaker: simpleCB

In the order-processor window, stop the service:

CMD + C
CTRL + C

Once the first request fails, the retry policy titled retryForever is applied:

INFO[0005] Error processing operation endpoint[order-processor, order-processor:orders]. Retrying...  

Retries will continue for each failed request indefinitely, in 5 second intervals.

retryForever:
  policy: constant
  maxInterval: 5s
  maxRetries: -1 

Once 5 consecutive retries have failed, the circuit breaker policy, simpleCB, is tripped and the breaker opens, halting all requests:

INFO[0025] Circuit breaker "order-processor:orders" changed state from closed to open  
circuitBreakers:
  simpleCB:
  maxRequests: 1
  timeout: 5s 
  trip: consecutiveFailures >= 5

After 5 seconds has surpassed, the circuit breaker will switch to a half-open state, allowing one request through to verify if the fault has been resolved. If the request continues to fail, the circuit will trip back to the open state.

INFO[0030] Circuit breaker "order-processor:orders" changed state from open to half-open  
INFO[0030] Circuit breaker "order-processor:orders" changed state from half-open to open   
INFO[0030] Circuit breaker "order-processor:orders" changed state from open to half-open  
INFO[0030] Circuit breaker "order-processor:orders" changed state from half-open to open     

This half-open/open behavior will continue for as long as the Redis container is stopped.

Step 6: Remove the fault

Once you restart the order-processor service, the application will recover seamlessly, picking up where it left off.

In the order-processor service terminal, restart the application:

dapr run --app-id order-processor --resources-path ../../../resources/ --app-port 9001 --app-protocol http --dapr-http-port 3501 -- java -jar target/OrderProcessingService-0.0.1-SNAPSHOT.jar

checkout service output:

== APP == Order passed: {"orderId": 5}
== APP == Order passed: {"orderId": 6}
== APP == Order passed: {"orderId": 7}
== APP == Order passed: {"orderId": 8}
== APP == Order passed: {"orderId": 9}
== APP == Order passed: {"orderId": 10}

order-processor service output:

== APP == Order received: {"orderId": 5}
== APP == Order received: {"orderId": 6}
== APP == Order received: {"orderId": 7}
== APP == Order received: {"orderId": 8}
== APP == Order received: {"orderId": 9}
== APP == Order received: {"orderId": 10}

Pre-requisites

For this example, you will need:

Step 1: Set up the environment

Clone the sample provided in the Quickstarts repo.

git clone https://github.com/dapr/quickstarts.git

Step 2: Run the order-processor service

In a terminal window, from the root of the Quickstart directory, navigate to order-processor directory.

cd service_invocation/go/http/order-processor

Install dependencies:

go build .

Run the order-processor service alongside a Dapr sidecar.

dapr run --app-port 6001 --app-id order-processor --resources-path ../../../resources/ --app-protocol http --dapr-http-port 3501 -- go run .

Step 3: Run the checkout service application

In a new terminal window, from the root of the Quickstart directory, navigate to the checkout directory.

cd service_invocation/go/http/checkout

Install dependencies:

go build .

Run the checkout service alongside a Dapr sidecar.

dapr run --app-id checkout --resources-path ../../../resources/ --app-protocol http --dapr-http-port 3500 -- go run .

The Dapr sidecar then loads the resiliency spec located in the resources directory:

apiVersion: dapr.io/v1alpha1
kind: Resiliency
metadata:
  name: myresiliency
scopes:
  - checkout

spec:
  policies:
    retries:
      retryForever:
        policy: constant
        maxInterval: 5s
        maxRetries: -1 

    circuitBreakers:
      simpleCB:
        maxRequests: 1
        timeout: 5s 
        trip: consecutiveFailures >= 5

  targets:
    apps:
      order-processor:
        retry: retryForever
        circuitBreaker: simpleCB

Step 4: View the Service Invocation outputs

When both services and sidecars are running, notice how orders are passed from the checkout service to the order-processor service using Dapr service invoke.

checkout service output:

== APP == Order passed: {"orderId": 1}
== APP == Order passed: {"orderId": 2}
== APP == Order passed: {"orderId": 3}
== APP == Order passed: {"orderId": 4}

order-processor service output:

== APP == Order received: {"orderId": 1}
== APP == Order received: {"orderId": 2}
== APP == Order received: {"orderId": 3}
== APP == Order received: {"orderId": 4}

Step 5: Introduce a fault

Simulate a fault by stopping the order-processor service. Once the instance is stopped, service invoke operations from the checkout service begin to fail.

Since the resiliency.yaml spec defines the order-processor service as a resiliency target, all failed requests will apply retry and circuit breaker policies:

  targets:
    apps:
      order-processor:
        retry: retryForever
        circuitBreaker: simpleCB

In the order-processor window, stop the service:

CMD + C
CTRL + C

Once the first request fails, the retry policy titled retryForever is applied:

INFO[0005] Error processing operation endpoint[order-processor, order-processor:orders]. Retrying...  

Retries will continue for each failed request indefinitely, in 5 second intervals.

retryForever:
  policy: constant
  maxInterval: 5s
  maxRetries: -1 

Once 5 consecutive retries have failed, the circuit breaker policy, simpleCB, is tripped and the breaker opens, halting all requests:

INFO[0025] Circuit breaker "order-processor:orders" changed state from closed to open  
circuitBreakers:
  simpleCB:
  maxRequests: 1
  timeout: 5s 
  trip: consecutiveFailures >= 5

After 5 seconds has surpassed, the circuit breaker will switch to a half-open state, allowing one request through to verify if the fault has been resolved. If the request continues to fail, the circuit will trip back to the open state.

INFO[0030] Circuit breaker "order-processor:orders" changed state from open to half-open  
INFO[0030] Circuit breaker "order-processor:orders" changed state from half-open to open   
INFO[0030] Circuit breaker "order-processor:orders" changed state from open to half-open  
INFO[0030] Circuit breaker "order-processor:orders" changed state from half-open to open     

This half-open/open behavior will continue for as long as the Redis container is stopped.

Step 6: Remove the fault

Once you restart the order-processor service, the application will recover seamlessly, picking up where it left off.

In the order-processor service terminal, restart the application:

dapr run --app-port 6001 --app-id order-processor --resources-path ../../../resources/ --app-protocol http --dapr-http-port 3501 -- go run .

checkout service output:

== APP == Order passed: {"orderId": 5}
== APP == Order passed: {"orderId": 6}
== APP == Order passed: {"orderId": 7}
== APP == Order passed: {"orderId": 8}
== APP == Order passed: {"orderId": 9}
== APP == Order passed: {"orderId": 10}

order-processor service output:

== APP == Order received: {"orderId": 5}
== APP == Order received: {"orderId": 6}
== APP == Order received: {"orderId": 7}
== APP == Order received: {"orderId": 8}
== APP == Order received: {"orderId": 9}
== APP == Order received: {"orderId": 10}

Tell us what you think!

We’re continuously working to improve our Quickstart examples and value your feedback. Did you find this quickstart helpful? Do you have suggestions for improvement?

Join the discussion in our discord channel.

Next steps

Visit this link for more information about Dapr resiliency.

Explore Dapr tutorials >>