1 - JavaScript Client SDK
JavaScript Client SDK for developing Dapr applications
Introduction
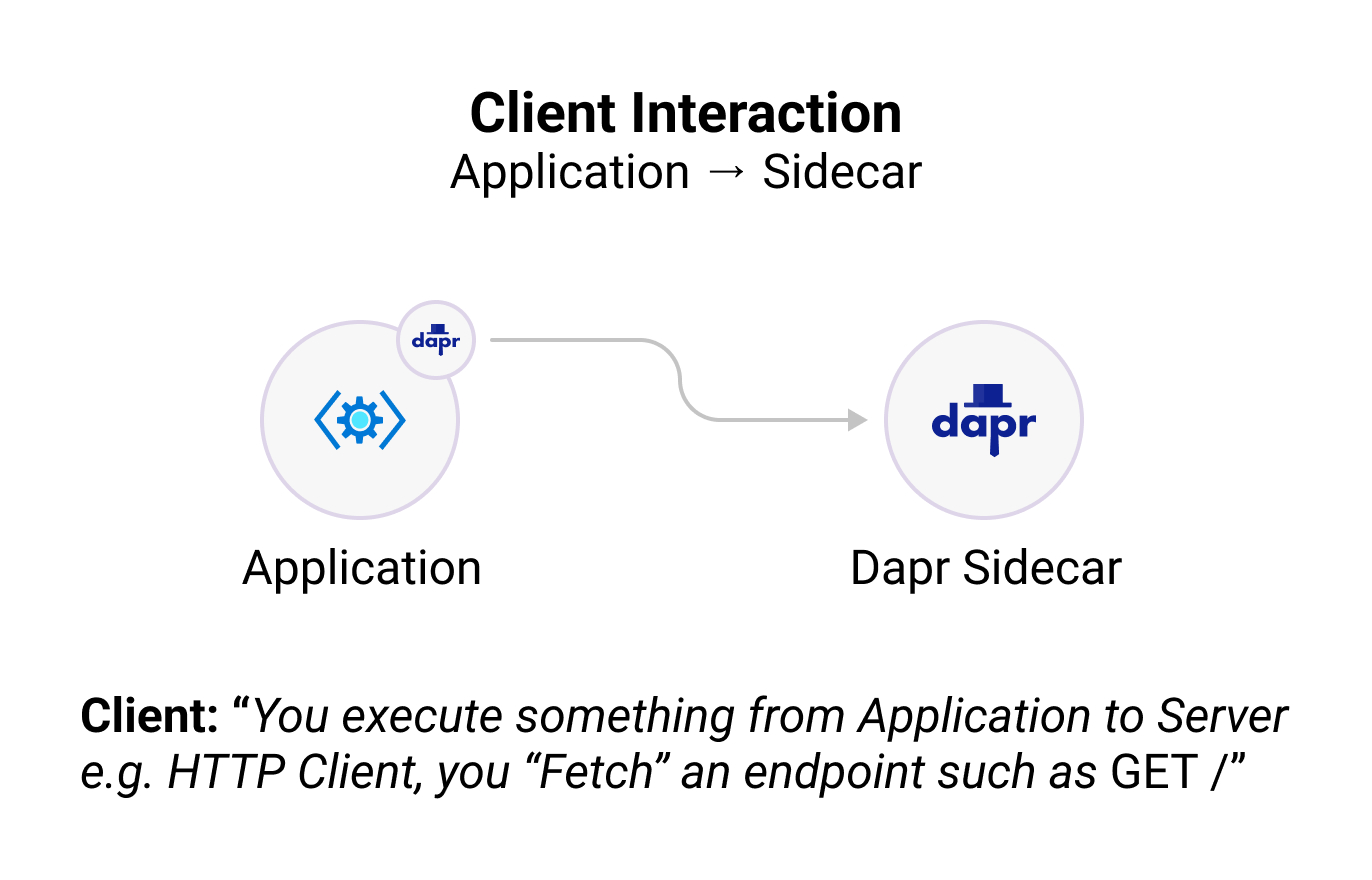
The Dapr Client allows you to communicate with the Dapr Sidecar and get access to its client facing features such as Publishing Events, Invoking Output Bindings, State Management, Secret Management, and much more.
Pre-requisites
Installing and importing Dapr’s JS SDK
- Install the SDK with
npm:
- Import the libraries:
import { DaprClient, DaprServer, HttpMethod, CommunicationProtocolEnum } from "@dapr/dapr";

const daprHost = "127.0.0.1"; // Dapr Sidecar Host
const daprPort = "3500"; // Dapr Sidecar Port of this Example Server
const serverHost = "127.0.0.1"; // App Host of this Example Server
const serverPort = "50051"; // App Port of this Example Server

// HTTP Example
const client = new DaprClient({ daprHost, daprPort });

// GRPC Example
const client = new DaprClient({ daprHost, daprPort, communicationProtocol: CommunicationProtocolEnum.GRPC });
Running
To run the examples, you can use two different protocols to interact with the Dapr sidecar: HTTP (default) or gRPC.
Using HTTP (default)
import { DaprClient } from "@dapr/dapr";
const client = new DaprClient({ daprHost, daprPort });
# Using dapr run
dapr run --app-id example-sdk --app-protocol http -- npm run start

# or, using npm script
npm run start:dapr-http
Using gRPC
Since HTTP is the default, you will have to adapt the communication protocol to use gRPC. You can do this by passing an extra argument to the client or server constructor.
import { DaprClient, CommunicationProtocol } from "@dapr/dapr";
const client = new DaprClient({ daprHost, daprPort, communicationProtocol: CommunicationProtocol.GRPC });
# Using dapr run
dapr run --app-id example-sdk --app-protocol grpc -- npm run start

# or, using npm script
npm run start:dapr-grpc
Environment Variables
Dapr Sidecar Endpoints
You can use the DAPR_HTTP_ENDPOINT and DAPR_GRPC_ENDPOINT environment variables to set the Dapr
Sidecar’s HTTP and gRPC endpoints respectively. When these variables are set, the daprHost
and daprPort don’t have to be set in the options argument of the constructor, the client will parse them automatically
out of the provided endpoints.
import { DaprClient, CommunicationProtocol } from "@dapr/dapr";

// Using HTTP, when DAPR_HTTP_ENDPOINT is set
const client = new DaprClient();

// Using gRPC, when DAPR_GRPC_ENDPOINT is set
const client = new DaprClient({ communicationProtocol: CommunicationProtocol.GRPC });
If the environment variables are set, but daprHost and daprPort values are passed to the
constructor, the latter will take precedence over the environment variables.
Dapr API Token
You can use the DAPR_API_TOKEN environment variable to set the Dapr API token. When this variable
is set, the daprApiToken doesn’t have to be set in the options argument of the constructor,
the client will get it automatically.
General
Increasing Body Size
You can increase the body size that is used by the application to communicate with the sidecar by using aDaprClient’s option.
import { DaprClient, CommunicationProtocol } from "@dapr/dapr";

// Allow a body size of 10Mb to be used
// The default is 4Mb
const client = new DaprClient({
  daprHost,
  daprPort,
  communicationProtocol: CommunicationProtocol.HTTP,
  maxBodySizeMb: 10,
});
Proxying Requests
By proxying requests, we can utilize the unique capabilities that Dapr brings with its sidecar architecture such as service discovery, logging, etc., enabling us to instantly “upgrade” our gRPC services. This feature of gRPC proxying was demonstrated in community call 41.
Creating a Proxy
To perform gRPC proxying, simply create a proxy by calling the client.proxy.create() method:
// As always, create a client to our dapr sidecar
// this client takes care of making sure the sidecar is started, that we can communicate, ...
const clientSidecar = new DaprClient({ daprHost, daprPort, communicationProtocol: CommunicationProtocol.GRPC });

// Create a Proxy that allows us to use our gRPC code
const clientProxy = await clientSidecar.proxy.create<GreeterClient>(GreeterClient);
We can now call the methods as defined in our GreeterClient interface (which in this case is from the Hello World example)
Behind the Scenes (Technical Working)

- The gRPC service gets started in Dapr. We tell Dapr which port this gRPC server is running on through
--app-port and give it a unique Dapr app ID with --app-id <APP_ID_HERE> - We can now call the Dapr Sidecar through a client that will connect to the Sidecar
- Whilst calling the Dapr Sidecar, we provide a metadata key named
dapr-app-id with the value of our gRPC server booted in Dapr (e.g. server in our example) - Dapr will now forward the call to the gRPC server configured
Building blocks
The JavaScript Client SDK allows you to interface with all of the Dapr building blocks focusing on Client to Sidecar features.
Invocation API
Invoke a Service
import { DaprClient, HttpMethod } from "@dapr/dapr";

const daprHost = "127.0.0.1";
const daprPort = "3500";

async function start() {
  const client = new DaprClient({ daprHost, daprPort });

  const serviceAppId = "my-app-id";
  const serviceMethod = "say-hello";

  // POST Request
  const response = await client.invoker.invoke(serviceAppId, serviceMethod, HttpMethod.POST, { hello: "world" });

  // POST Request with headers
  const response = await client.invoker.invoke(
    serviceAppId,
    serviceMethod,
    HttpMethod.POST,
    { hello: "world" },
    { headers: { "X-User-ID": "123" } },
  );

  // GET Request
  const response = await client.invoker.invoke(serviceAppId, serviceMethod, HttpMethod.GET);
}

start().catch((e) => {
  console.error(e);
  process.exit(1);
});
For a full guide on service invocation visit How-To: Invoke a service.
State Management API
Save, Get and Delete application state
import { DaprClient } from "@dapr/dapr";

const daprHost = "127.0.0.1";
const daprPort = "3500";

async function start() {
  const client = new DaprClient({ daprHost, daprPort });

  const serviceStoreName = "my-state-store-name";

  // Save State
  const response = await client.state.save(
    serviceStoreName,
    [
      {
        key: "first-key-name",
        value: "hello",
        metadata: {
          foo: "bar",
        },
      },
      {
        key: "second-key-name",
        value: "world",
      },
    ],
    {
      metadata: {
        ttlInSeconds: "3", // this should override the ttl in the state item
      },
    },
  );

  // Get State
  const response = await client.state.get(serviceStoreName, "first-key-name");

  // Get Bulk State
  const response = await client.state.getBulk(serviceStoreName, ["first-key-name", "second-key-name"]);

  // State Transactions
  await client.state.transaction(serviceStoreName, [
    {
      operation: "upsert",
      request: {
        key: "first-key-name",
        value: "new-data",
      },
    },
    {
      operation: "delete",
      request: {
        key: "second-key-name",
      },
    },
  ]);

  // Delete State
  const response = await client.state.delete(serviceStoreName, "first-key-name");
}

start().catch((e) => {
  console.error(e);
  process.exit(1);
});
For a full list of state operations visit How-To: Get & save state.
Query State API
import { DaprClient } from "@dapr/dapr";

async function start() {
  const client = new DaprClient({ daprHost, daprPort });

  const res = await client.state.query("state-mongodb", {
    filter: {
      OR: [
        {
          EQ: { "person.org": "Dev Ops" },
        },
        {
          AND: [
            {
              EQ: { "person.org": "Finance" },
            },
            {
              IN: { state: ["CA", "WA"] },
            },
          ],
        },
      ],
    },
    sort: [
      {
        key: "state",
        order: "DESC",
      },
    ],
    page: {
      limit: 10,
    },
  });

  console.log(res);
}

start().catch((e) => {
  console.error(e);
  process.exit(1);
});
PubSub API
Publish messages
import { DaprClient } from "@dapr/dapr";

const daprHost = "127.0.0.1";
const daprPort = "3500";

async function start() {
  const client = new DaprClient({ daprHost, daprPort });

  const pubSubName = "my-pubsub-name";
  const topic = "topic-a";

  // Publish message to topic as text/plain
  // Note, the content type is inferred from the message type unless specified explicitly
  const response = await client.pubsub.publish(pubSubName, topic, "hello, world!");
  // If publish fails, response contains the error
  console.log(response);

  // Publish message to topic as application/json
  await client.pubsub.publish(pubSubName, topic, { hello: "world" });

  // Publish a JSON message as plain text
  const options = { contentType: "text/plain" };
  await client.pubsub.publish(pubSubName, topic, { hello: "world" }, options);

  // Publish message to topic as application/cloudevents+json
  // You can also use the cloudevent SDK to create cloud events https://github.com/cloudevents/sdk-javascript
  const cloudEvent = {
    specversion: "1.0",
    source: "/some/source",
    type: "example",
    id: "1234",
  };
  await client.pubsub.publish(pubSubName, topic, cloudEvent);

  // Publish a cloudevent as raw payload
  const options = { metadata: { rawPayload: true } };
  await client.pubsub.publish(pubSubName, topic, "hello, world!", options);

  // Publish multiple messages to a topic as text/plain
  await client.pubsub.publishBulk(pubSubName, topic, ["message 1", "message 2", "message 3"]);

  // Publish multiple messages to a topic as application/json
  await client.pubsub.publishBulk(pubSubName, topic, [
    { hello: "message 1" },
    { hello: "message 2" },
    { hello: "message 3" },
  ]);

  // Publish multiple messages with explicit bulk publish messages
  const bulkPublishMessages = [
    {
      entryID: "entry-1",
      contentType: "application/json",
      event: { hello: "foo message 1" },
    },
    {
      entryID: "entry-2",
      contentType: "application/cloudevents+json",
      event: { ...cloudEvent, data: "foo message 2", datacontenttype: "text/plain" },
    },
    {
      entryID: "entry-3",
      contentType: "text/plain",
      event: "foo message 3",
    },
  ];
  await client.pubsub.publishBulk(pubSubName, topic, bulkPublishMessages);
}

start().catch((e) => {
  console.error(e);
  process.exit(1);
});
Bindings API
Invoke Output Binding
Output Bindings
import { DaprClient } from "@dapr/dapr";

const daprHost = "127.0.0.1";
const daprPort = "3500";

async function start() {
  const client = new DaprClient({ daprHost, daprPort });

  const bindingName = "my-binding-name";
  const bindingOperation = "create";
  const message = { hello: "world" };

  const response = await client.binding.send(bindingName, bindingOperation, message);
}

start().catch((e) => {
  console.error(e);
  process.exit(1);
});
For a full guide on output bindings visit How-To: Use bindings.
Secret API
Retrieve secrets
import { DaprClient } from "@dapr/dapr";

const daprHost = "127.0.0.1";
const daprPort = "3500";

async function start() {
  const client = new DaprClient({ daprHost, daprPort });

  const secretStoreName = "my-secret-store";
  const secretKey = "secret-key";

  // Retrieve a single secret from secret store
  const response = await client.secret.get(secretStoreName, secretKey);

  // Retrieve all secrets from secret store
  const response = await client.secret.getBulk(secretStoreName);
}

start().catch((e) => {
  console.error(e);
  process.exit(1);
});
For a full guide on secrets visit How-To: Retrieve secrets.
Configuration API
Get Configuration Keys
import { DaprClient } from "@dapr/dapr";

const daprHost = "127.0.0.1";

async function start() {
  const client = new DaprClient({
    daprHost,
    daprPort: process.env.DAPR_GRPC_PORT,
    communicationProtocol: CommunicationProtocolEnum.GRPC,
  });

  const config = await client.configuration.get("config-store", ["key1", "key2"]);
  console.log(config);
}

start().catch((e) => {
  console.error(e);
  process.exit(1);
});
Sample output:
{
   items: {
     key1: { key: 'key1', value: 'foo', version: '', metadata: {} },
     key2: { key: 'key2', value: 'bar2', version: '', metadata: {} }
   }
}
Subscribe to Configuration Updates
import { DaprClient } from "@dapr/dapr";

const daprHost = "127.0.0.1";

async function start() {
  const client = new DaprClient({
    daprHost,
    daprPort: process.env.DAPR_GRPC_PORT,
    communicationProtocol: CommunicationProtocolEnum.GRPC,
  });

  // Subscribes to config store changes for keys "key1" and "key2"
  const stream = await client.configuration.subscribeWithKeys("config-store", ["key1", "key2"], async (data) => {
    console.log("Subscribe received updates from config store: ", data);
  });

  // Wait for 60 seconds and unsubscribe.
  await new Promise((resolve) => setTimeout(resolve, 60000));
  stream.stop();
}

start().catch((e) => {
  console.error(e);
  process.exit(1);
});
Sample output:
Subscribe received updates from config store:  {
  items: { key2: { key: 'key2', value: 'bar', version: '', metadata: {} } }
}
Subscribe received updates from config store:  {
  items: { key1: { key: 'key1', value: 'foobar', version: '', metadata: {} } }
}
Cryptography API
Support for the cryptography API is only available on the gRPC client in the JavaScript SDK.
import { createReadStream, createWriteStream } from "node:fs";
import { readFile, writeFile } from "node:fs/promises";
import { pipeline } from "node:stream/promises";

import { DaprClient, CommunicationProtocolEnum } from "@dapr/dapr";

const daprHost = "127.0.0.1";
const daprPort = "50050"; // Dapr Sidecar Port of this example server

async function start() {
  const client = new DaprClient({
    daprHost,
    daprPort,
    communicationProtocol: CommunicationProtocolEnum.GRPC,
  });

  // Encrypt and decrypt a message using streams
  await encryptDecryptStream(client);

  // Encrypt and decrypt a message from a buffer
  await encryptDecryptBuffer(client);
}

async function encryptDecryptStream(client: DaprClient) {
  // First, encrypt the message
  console.log("== Encrypting message using streams");
  console.log("Encrypting plaintext.txt to ciphertext.out");

  await pipeline(
    createReadStream("plaintext.txt"),
    await client.crypto.encrypt({
      componentName: "crypto-local",
      keyName: "symmetric256",
      keyWrapAlgorithm: "A256KW",
    }),
    createWriteStream("ciphertext.out"),
  );

  // Decrypt the message
  console.log("== Decrypting message using streams");
  console.log("Encrypting ciphertext.out to plaintext.out");
  await pipeline(
    createReadStream("ciphertext.out"),
    await client.crypto.decrypt({
      componentName: "crypto-local",
    }),
    createWriteStream("plaintext.out"),
  );
}

async function encryptDecryptBuffer(client: DaprClient) {
  // Read "plaintext.txt" so we have some content
  const plaintext = await readFile("plaintext.txt");

  // First, encrypt the message
  console.log("== Encrypting message using buffers");

  const ciphertext = await client.crypto.encrypt(plaintext, {
    componentName: "crypto-local",
    keyName: "my-rsa-key",
    keyWrapAlgorithm: "RSA",
  });

  await writeFile("test.out", ciphertext);

  // Decrypt the message
  console.log("== Decrypting message using buffers");
  const decrypted = await client.crypto.decrypt(ciphertext, {
    componentName: "crypto-local",
  });

  // The contents should be equal
  if (plaintext.compare(decrypted) !== 0) {
    throw new Error("Decrypted message does not match original message");
  }
}

start().catch((e) => {
  console.error(e);
  process.exit(1);
});
For a full guide on cryptography visit How-To: Cryptography.
Distributed Lock API
Try Lock and Unlock APIs
import { CommunicationProtocolEnum, DaprClient } from "@dapr/dapr";
import { LockStatus } from "@dapr/dapr/types/lock/UnlockResponse";

const daprHost = "127.0.0.1";
const daprPortDefault = "3500";

async function start() {
  const client = new DaprClient({ daprHost, daprPort });

  const storeName = "redislock";
  const resourceId = "resourceId";
  const lockOwner = "owner1";
  let expiryInSeconds = 1000;

  console.log(`Acquiring lock on ${storeName}, ${resourceId} as owner: ${lockOwner}`);
  const lockResponse = await client.lock.lock(storeName, resourceId, lockOwner, expiryInSeconds);
  console.log(lockResponse);

  console.log(`Unlocking on ${storeName}, ${resourceId} as owner: ${lockOwner}`);
  const unlockResponse = await client.lock.unlock(storeName, resourceId, lockOwner);
  console.log("Unlock API response: " + getResponseStatus(unlockResponse.status));
}

function getResponseStatus(status: LockStatus) {
  switch (status) {
    case LockStatus.Success:
      return "Success";
    case LockStatus.LockDoesNotExist:
      return "LockDoesNotExist";
    case LockStatus.LockBelongsToOthers:
      return "LockBelongsToOthers";
    default:
      return "InternalError";
  }
}

start().catch((e) => {
  console.error(e);
  process.exit(1);
});
For a full guide on distributed locks visit How-To: Use Distributed Locks.
Workflow API
Workflow management
import { DaprClient } from "@dapr/dapr";

async function start() {
  const client = new DaprClient();

  // Start a new workflow instance
  const instanceId = await client.workflow.start("OrderProcessingWorkflow", {
    Name: "Paperclips",
    TotalCost: 99.95,
    Quantity: 4,
  });
  console.log(`Started workflow instance ${instanceId}`);

  // Get a workflow instance
  const workflow = await client.workflow.get(instanceId);
  console.log(
    `Workflow ${workflow.workflowName}, created at ${workflow.createdAt.toUTCString()}, has status ${
      workflow.runtimeStatus
    }`,
  );
  console.log(`Additional properties: ${JSON.stringify(workflow.properties)}`);

  // Pause a workflow instance
  await client.workflow.pause(instanceId);
  console.log(`Paused workflow instance ${instanceId}`);

  // Resume a workflow instance
  await client.workflow.resume(instanceId);
  console.log(`Resumed workflow instance ${instanceId}`);

  // Terminate a workflow instance
  await client.workflow.terminate(instanceId);
  console.log(`Terminated workflow instance ${instanceId}`);

  // Purge a workflow instance
  await client.workflow.purge(instanceId);
  console.log(`Purged workflow instance ${instanceId}`);
}

start().catch((e) => {
  console.error(e);
  process.exit(1);
});
2 - JavaScript Server SDK
JavaScript Server SDK for developing Dapr applications
Introduction
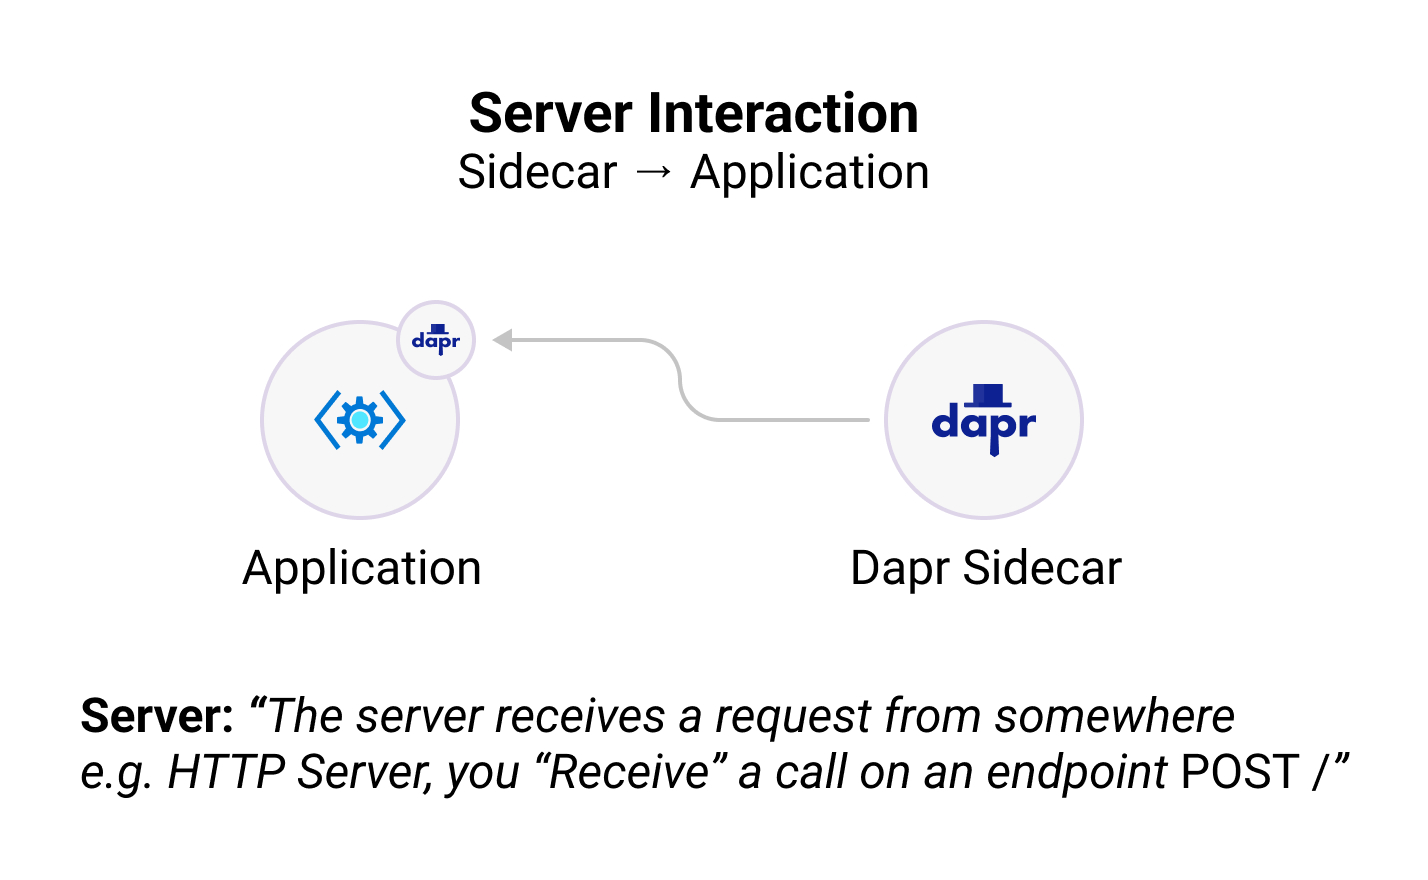
The Dapr Server will allow you to receive communication from the Dapr Sidecar and get access to its server facing features such as: Subscribing to Events, Receiving Input Bindings, and much more.
Pre-requisites
Installing and importing Dapr’s JS SDK
- Install the SDK with
npm:
- Import the libraries:
import { DaprServer, CommunicationProtocolEnum } from "@dapr/dapr";

const daprHost = "127.0.0.1"; // Dapr Sidecar Host
const daprPort = "3500"; // Dapr Sidecar Port of this Example Server
const serverHost = "127.0.0.1"; // App Host of this Example Server
const serverPort = "50051"; // App Port of this Example Server

// HTTP Example
const server = new DaprServer({
  serverHost,
  serverPort,
  communicationProtocol: CommunicationProtocolEnum.HTTP, // DaprClient to use same communication protocol as DaprServer, in case DaprClient protocol not mentioned explicitly
  clientOptions: {
    daprHost,
    daprPort,
  },
});

// GRPC Example
const server = new DaprServer({
  serverHost,
  serverPort,
  communicationProtocol: CommunicationProtocolEnum.GRPC,
  clientOptions: {
    daprHost,
    daprPort,
  },
});
Running
To run the examples, you can use two different protocols to interact with the Dapr sidecar: HTTP (default) or gRPC.
Using HTTP (built-in express webserver)
import { DaprServer } from "@dapr/dapr";

const server = new DaprServer({
  serverHost: appHost,
  serverPort: appPort,
  clientOptions: {
    daprHost,
    daprPort,
  },
});
// initialize subscribtions, ... before server start
// the dapr sidecar relies on these
await server.start();
# Using dapr run
dapr run --app-id example-sdk --app-port 50051 --app-protocol http -- npm run start

# or, using npm script
npm run start:dapr-http
ℹ️ Note: The app-port is required here, as this is where our server will need to bind to. Dapr will check for the application to bind to this port, before finishing start-up.
Using HTTP (bring your own express webserver)
Instead of using the built-in web server for Dapr sidecar to application communication, you can also bring your own instance. This is helpful in scenarios like when you are building a REST API back-end and want to integrate Dapr directly in it.
Note, this is currently available for express only.
💡 Note: when using a custom web-server, the SDK will configure server properties like max body size, and add new routes to it. The routes are unique on their own to avoid any collisions with your application, but it’s not guaranteed to not collide.
import { DaprServer, CommunicationProtocolEnum } from "@dapr/dapr";
import express from "express";

const myApp = express();

myApp.get("/my-custom-endpoint", (req, res) => {
  res.send({ msg: "My own express app!" });
});

const daprServer = new DaprServer({
      serverHost: "127.0.0.1", // App Host
      serverPort: "50002", // App Port
      serverHttp: myApp,
      clientOptions: {
        daprHost
        daprPort
      }
    });

// Initialize subscriptions before the server starts, the Dapr sidecar uses it.
// This will also initialize the app server itself (removing the need for `app.listen` to be called).
await daprServer.start();
After configuring the above, you can call your custom endpoint as you normally would:
const res = await fetch(`http://127.0.0.1:50002/my-custom-endpoint`);
const json = await res.json();
Using gRPC
Since HTTP is the default, you will have to adapt the communication protocol to use gRPC. You can do this by passing an extra argument to the client or server constructor.
import { DaprServer, CommunicationProtocol } from "@dapr/dapr";

const server = new DaprServer({
  serverHost: appHost,
  serverPort: appPort,
  communicationProtocol: CommunicationProtocolEnum.GRPC,
  clientOptions: {
    daprHost,
    daprPort,
  },
});
// initialize subscribtions, ... before server start
// the dapr sidecar relies on these
await server.start();
# Using dapr run
dapr run --app-id example-sdk --app-port 50051 --app-protocol grpc -- npm run start

# or, using npm script
npm run start:dapr-grpc
ℹ️ Note: The app-port is required here, as this is where our server will need to bind to. Dapr will check for the application to bind to this port, before finishing start-up.
Building blocks
The JavaScript Server SDK allows you to interface with all of the Dapr building blocks focusing on Sidecar to App features.
Invocation API
Listen to an Invocation
import { DaprServer, DaprInvokerCallbackContent } from "@dapr/dapr";

const daprHost = "127.0.0.1"; // Dapr Sidecar Host
const daprPort = "3500"; // Dapr Sidecar Port of this Example Server
const serverHost = "127.0.0.1"; // App Host of this Example Server
const serverPort = "50051"; // App Port of this Example Server "

async function start() {
  const server = new DaprServer({
    serverHost,
    serverPort,
    clientOptions: {
      daprHost,
      daprPort,
    },
  });

  const callbackFunction = (data: DaprInvokerCallbackContent) => {
    console.log("Received body: ", data.body);
    console.log("Received metadata: ", data.metadata);
    console.log("Received query: ", data.query);
    console.log("Received headers: ", data.headers); // only available in HTTP
  };

  await server.invoker.listen("hello-world", callbackFunction, { method: HttpMethod.GET });

  // You can now invoke the service with your app id and method "hello-world"

  await server.start();
}

start().catch((e) => {
  console.error(e);
  process.exit(1);
});
For a full guide on service invocation visit How-To: Invoke a service.
PubSub API
Subscribe to messages
Subscribing to messages can be done in several ways to offer flexibility of receiving messages on your topics:
- Direct subscription through the
subscribe method - Direct susbcription with options through the
subscribeWithOptions method - Subscription afterwards through the
susbcribeOnEvent method
Each time an event arrives, we pass its body as data and the headers as headers, which can contain properties of the event publisher (e.g., a device ID from IoT Hub)
Dapr requires subscriptions to be set up on startup, but in the JS SDK we allow event handlers to be added afterwards as well, providing you the flexibility of programming.
An example is provided below
import { DaprServer } from "@dapr/dapr";

const daprHost = "127.0.0.1"; // Dapr Sidecar Host
const daprPort = "3500"; // Dapr Sidecar Port of this Example Server
const serverHost = "127.0.0.1"; // App Host of this Example Server
const serverPort = "50051"; // App Port of this Example Server "

async function start() {
  const server = new DaprServer({
    serverHost,
    serverPort,
    clientOptions: {
      daprHost,
      daprPort,
    },
  });

  const pubSubName = "my-pubsub-name";
  const topic = "topic-a";

  // Configure Subscriber for a Topic
  // Method 1: Direct subscription through the `subscribe` method
  await server.pubsub.subscribe(pubSubName, topic, async (data: any, headers: object) =>
    console.log(`Received Data: ${JSON.stringify(data)} with headers: ${JSON.stringify(headers)}`),
  );

  // Method 2: Direct susbcription with options through the `subscribeWithOptions` method
  await server.pubsub.subscribeWithOptions(pubSubName, topic, {
    callback: async (data: any, headers: object) =>
      console.log(`Received Data: ${JSON.stringify(data)} with headers: ${JSON.stringify(headers)}`),
  });

  // Method 3: Subscription afterwards through the `susbcribeOnEvent` method
  // Note: we use default, since if no route was passed (empty options) we utilize "default" as the route name
  await server.pubsub.subscribeWithOptions("pubsub-redis", "topic-options-1", {});
  server.pubsub.subscribeToRoute("pubsub-redis", "topic-options-1", "default", async (data: any, headers: object) => {
    console.log(`Received Data: ${JSON.stringify(data)} with headers: ${JSON.stringify(headers)}`);
  });

  // Start the server
  await server.start();
}
For a full list of state operations visit How-To: Publish & subscribe.
Subscribe with SUCCESS/RETRY/DROP status
Dapr supports status codes for retry logic to specify what should happen after a message gets processed.
⚠️ The JS SDK allows multiple callbacks on the same topic, we handle priority of status on RETRY > DROP > SUCCESS and default to SUCCESS
⚠️ Make sure to configure resiliency in your application to handle RETRY messages
In the JS SDK we support these messages through the DaprPubSubStatusEnum enum. To ensure Dapr will retry we configure a Resiliency policy as well.
components/resiliency.yaml
apiVersion: dapr.io/v1alpha1
kind: Resiliency
metadata:
  name: myresiliency
spec:
  policies:
    retries:
      # Global Retry Policy for Inbound Component operations
      DefaultComponentInboundRetryPolicy:
        policy: constant
        duration: 500ms
        maxRetries: 10
  targets:
    components:
      messagebus:
        inbound:
          retry: DefaultComponentInboundRetryPolicy
src/index.ts
import { DaprServer, DaprPubSubStatusEnum } from "@dapr/dapr";

const daprHost = "127.0.0.1"; // Dapr Sidecar Host
const daprPort = "3500"; // Dapr Sidecar Port of this Example Server
const serverHost = "127.0.0.1"; // App Host of this Example Server
const serverPort = "50051"; // App Port of this Example Server "

async function start() {
  const server = new DaprServer({
    serverHost,
    serverPort,
    clientOptions: {
      daprHost,
      daprPort,
    },
  });

  const pubSubName = "my-pubsub-name";
  const topic = "topic-a";

  // Process a message successfully
  await server.pubsub.subscribe(pubSubName, topic, async (data: any, headers: object) => {
    return DaprPubSubStatusEnum.SUCCESS;
  });

  // Retry a message
  // Note: this example will keep on retrying to deliver the message
  // Note 2: each component can have their own retry configuration
  //   e.g., https://docs.dapr.io/reference/components-reference/supported-pubsub/setup-redis-pubsub/
  await server.pubsub.subscribe(pubSubName, topic, async (data: any, headers: object) => {
    return DaprPubSubStatusEnum.RETRY;
  });

  // Drop a message
  await server.pubsub.subscribe(pubSubName, topic, async (data: any, headers: object) => {
    return DaprPubSubStatusEnum.DROP;
  });

  // Start the server
  await server.start();
}
Subscribe to messages rule based
Dapr supports routing messages to different handlers (routes) based on rules.
E.g., you are writing an application that needs to handle messages depending on their “type” with Dapr, you can send them to different routes handlerType1 and handlerType2 with the default route being handlerDefault
import { DaprServer } from "@dapr/dapr";

const daprHost = "127.0.0.1"; // Dapr Sidecar Host
const daprPort = "3500"; // Dapr Sidecar Port of this Example Server
const serverHost = "127.0.0.1"; // App Host of this Example Server
const serverPort = "50051"; // App Port of this Example Server "

async function start() {
  const server = new DaprServer({
    serverHost,
    serverPort,
    clientOptions: {
      daprHost,
      daprPort,
    },
  });

  const pubSubName = "my-pubsub-name";
  const topic = "topic-a";

  // Configure Subscriber for a Topic with rule set
  // Note: the default route and match patterns are optional
  await server.pubsub.subscribe("pubsub-redis", "topic-1", {
    default: "/default",
    rules: [
      {
        match: `event.type == "my-type-1"`,
        path: "/type-1",
      },
      {
        match: `event.type == "my-type-2"`,
        path: "/type-2",
      },
    ],
  });

  // Add handlers for each route
  server.pubsub.subscribeToRoute("pubsub-redis", "topic-1", "default", async (data) => {
    console.log(`Handling Default`);
  });
  server.pubsub.subscribeToRoute("pubsub-redis", "topic-1", "type-1", async (data) => {
    console.log(`Handling Type 1`);
  });
  server.pubsub.subscribeToRoute("pubsub-redis", "topic-1", "type-2", async (data) => {
    console.log(`Handling Type 2`);
  });

  // Start the server
  await server.start();
}
Susbcribe with Wildcards
The popular wildcards * and + are supported (make sure to validate if the pubsub component supports it) and can be subscribed to as follows:
import { DaprServer } from "@dapr/dapr";

const daprHost = "127.0.0.1"; // Dapr Sidecar Host
const daprPort = "3500"; // Dapr Sidecar Port of this Example Server
const serverHost = "127.0.0.1"; // App Host of this Example Server
const serverPort = "50051"; // App Port of this Example Server "

async function start() {
  const server = new DaprServer({
    serverHost,
    serverPort,
    clientOptions: {
      daprHost,
      daprPort,
    },
  });

  const pubSubName = "my-pubsub-name";

  // * Wildcard
  await server.pubsub.subscribe(pubSubName, "/events/*", async (data: any, headers: object) =>
    console.log(`Received Data: ${JSON.stringify(data)}`),
  );

  // + Wildcard
  await server.pubsub.subscribe(pubSubName, "/events/+/temperature", async (data: any, headers: object) =>
    console.log(`Received Data: ${JSON.stringify(data)}`),
  );

  // Start the server
  await server.start();
}
Bulk Subscribe to messages
Bulk Subscription is supported and is available through following API:
- Bulk subscription through the
subscribeBulk method: maxMessagesCount and maxAwaitDurationMs are optional; and if not provided, default values for related components will be used.
While listening for messages, the application receives messages from Dapr in bulk. However, like regular subscribe, the callback function receives a single message at a time, and the user can choose to return a DaprPubSubStatusEnum value to acknowledge successfully, retry, or drop the message. The default behavior is to return a success response.
Please refer this document for more details.
import { DaprServer } from "@dapr/dapr";

const pubSubName = "orderPubSub";
const topic = "topicbulk";

const daprHost = process.env.DAPR_HOST || "127.0.0.1";
const daprHttpPort = process.env.DAPR_HTTP_PORT || "3502";
const serverHost = process.env.SERVER_HOST || "127.0.0.1";
const serverPort = process.env.APP_PORT || 5001;

async function start() {
  const server = new DaprServer({
    serverHost,
    serverPort,
    clientOptions: {
      daprHost,
      daprPort: daprHttpPort,
    },
  });

  // Publish multiple messages to a topic with default config.
  await client.pubsub.subscribeBulk(pubSubName, topic, (data) =>
    console.log("Subscriber received: " + JSON.stringify(data)),
  );

  // Publish multiple messages to a topic with specific maxMessagesCount and maxAwaitDurationMs.
  await client.pubsub.subscribeBulk(
    pubSubName,
    topic,
    (data) => {
      console.log("Subscriber received: " + JSON.stringify(data));
      return DaprPubSubStatusEnum.SUCCESS; // If App doesn't return anything, the default is SUCCESS. App can also return RETRY or DROP based on the incoming message.
    },
    {
      maxMessagesCount: 100,
      maxAwaitDurationMs: 40,
    },
  );
}
Dead Letter Topics
Dapr supports dead letter topic. This means that when a message fails to be processed, it gets sent to a dead letter queue. E.g., when a message fails to be handled on /my-queue it will be sent to /my-queue-failed.
E.g., when a message fails to be handled on /my-queue it will be sent to /my-queue-failed.
You can use the following options with subscribeWithOptions method:
deadletterTopic: Specify a deadletter topic name (note: if none is provided we create one named deadletter)deadletterCallback: The method to trigger as handler for our deadletter
Implementing Deadletter support in the JS SDK can be done by either
- Passing the
deadletterCallback as an option - By subscribing to route manually with
subscribeToRoute
An example is provided below
import { DaprServer } from "@dapr/dapr";

const daprHost = "127.0.0.1"; // Dapr Sidecar Host
const daprPort = "3500"; // Dapr Sidecar Port of this Example Server
const serverHost = "127.0.0.1"; // App Host of this Example Server
const serverPort = "50051"; // App Port of this Example Server "

async function start() {
  const server = new DaprServer({
    serverHost,
    serverPort,
    clientOptions: {
      daprHost,
      daprPort,
    },
  });

  const pubSubName = "my-pubsub-name";

  // Method 1 (direct subscribing through subscribeWithOptions)
  await server.pubsub.subscribeWithOptions("pubsub-redis", "topic-options-5", {
    callback: async (data: any) => {
      throw new Error("Triggering Deadletter");
    },
    deadLetterCallback: async (data: any) => {
      console.log("Handling Deadletter message");
    },
  });

  // Method 2 (subscribe afterwards)
  await server.pubsub.subscribeWithOptions("pubsub-redis", "topic-options-1", {
    deadletterTopic: "my-deadletter-topic",
  });
  server.pubsub.subscribeToRoute("pubsub-redis", "topic-options-1", "default", async () => {
    throw new Error("Triggering Deadletter");
  });
  server.pubsub.subscribeToRoute("pubsub-redis", "topic-options-1", "my-deadletter-topic", async () => {
    console.log("Handling Deadletter message");
  });

  // Start server
  await server.start();
}
Bindings API
import { DaprServer } from "@dapr/dapr";

const daprHost = "127.0.0.1";
const daprPort = "3500";
const serverHost = "127.0.0.1";
const serverPort = "5051";

async function start() {
  const server = new DaprServer({
    serverHost,
    serverPort,
    clientOptions: {
      daprHost,
      daprPort,
    },
  });

  const bindingName = "my-binding-name";

  const response = await server.binding.receive(bindingName, async (data: any) =>
    console.log(`Got Data: ${JSON.stringify(data)}`),
  );

  await server.start();
}

start().catch((e) => {
  console.error(e);
  process.exit(1);
});
For a full guide on output bindings visit How-To: Use bindings.
Configuration API
💡 The configuration API is currently only available through gRPC
Getting a configuration value
import { DaprServer } from "@dapr/dapr";

const daprHost = "127.0.0.1";
const daprPort = "3500";
const serverHost = "127.0.0.1";
const serverPort = "5051";

async function start() {
  const client = new DaprClient({
    daprHost,
    daprPort,
    communicationProtocol: CommunicationProtocolEnum.GRPC,
  });
  const config = await client.configuration.get("config-redis", ["myconfigkey1", "myconfigkey2"]);
}

start().catch((e) => {
  console.error(e);
  process.exit(1);
});
Subscribing to Key Changes
import { DaprServer } from "@dapr/dapr";

const daprHost = "127.0.0.1";
const daprPort = "3500";
const serverHost = "127.0.0.1";
const serverPort = "5051";

async function start() {
  const client = new DaprClient({
    daprHost,
    daprPort,
    communicationProtocol: CommunicationProtocolEnum.GRPC,
  });
  const stream = await client.configuration.subscribeWithKeys("config-redis", ["myconfigkey1", "myconfigkey2"], () => {
    // Received a key update
  });

  // When you are ready to stop listening, call the following
  await stream.close();
}

start().catch((e) => {
  console.error(e);
  process.exit(1);
});
3 - JavaScript SDK for Actors
How to get up and running with Actors using the Dapr JavaScript SDK
The Dapr actors package allows you to interact with Dapr virtual actors from a JavaScript application. The examples below demonstrate how to use the JavaScript SDK for interacting with virtual actors.
For a more in-depth overview of Dapr actors, visit the actors overview page.
Pre-requisites
Scenario
The below code examples loosely describe the scenario of a Parking Garage Spot Monitoring System, which can be seen in this video by Mark Russinovich.
A parking garage consists of hundreds of parking spaces, where each parking space includes a sensor that provides updates to a centralized monitoring system. The parking space sensors (our actors) detect if a parking space is occupied or available.
To jump in and run this example yourself, clone the source code, which can be found in the JavaScript SDK examples directory.
Actor Interface
The actor interface defines the contract that is shared between the actor implementation and the clients calling the actor. In the example below, we have created an interace for a parking garage sensor. Each sensor has 2 methods: carEnter and carLeave, which defines the state of the parking space:
export default interface ParkingSensorInterface {
  carEnter(): Promise<void>;
  carLeave(): Promise<void>;
}
Actor Implementation
An actor implementation defines a class by extending the base type AbstractActor and implementing the actor interface (ParkingSensorInterface in this case).
The following code describes an actor implementation along with a few helper methods.
import { AbstractActor } from "@dapr/dapr";
import ParkingSensorInterface from "./ParkingSensorInterface";

export default class ParkingSensorImpl extends AbstractActor implements ParkingSensorInterface {
  async carEnter(): Promise<void> {
    // Implementation that updates state that this parking spaces is occupied.
  }

  async carLeave(): Promise<void> {
    // Implementation that updates state that this parking spaces is available.
  }

  private async getInfo(): Promise<object> {
    // Implementation of requesting an update from the parking space sensor.
  }

  /**
   * @override
   */
  async onActivate(): Promise<void> {
    // Initialization logic called by AbstractActor.
  }
}
Configuring Actor Runtime
To configure actor runtime, use the DaprClientOptions. The various parameters and their default values are documented at How-to: Use virtual actors in Dapr.
Note, the timeouts and intervals should be formatted as time.ParseDuration strings.
import { CommunicationProtocolEnum, DaprClient, DaprServer } from "@dapr/dapr";

// Configure the actor runtime with the DaprClientOptions.
const clientOptions = {
  daprHost: daprHost,
  daprPort: daprPort,
  communicationProtocol: CommunicationProtocolEnum.HTTP,
  actor: {
    actorIdleTimeout: "1h",
    actorScanInterval: "30s",
    drainOngoingCallTimeout: "1m",
    drainRebalancedActors: true,
    reentrancy: {
      enabled: true,
      maxStackDepth: 32,
    },
    remindersStoragePartitions: 0,
  },
};

// Use the options when creating DaprServer and DaprClient.

// Note, DaprServer creates a DaprClient internally, which needs to be configured with clientOptions.
const server = new DaprServer({ serverHost, serverPort, clientOptions });

const client = new DaprClient(clientOptions);
Registering Actors
Initialize and register your actors by using the DaprServer package:
import { DaprServer } from "@dapr/dapr";
import ParkingSensorImpl from "./ParkingSensorImpl";

const daprHost = "127.0.0.1";
const daprPort = "50000";
const serverHost = "127.0.0.1";
const serverPort = "50001";

const server = new DaprServer({
  serverHost,
  serverPort,
  clientOptions: {
    daprHost,
    daprPort,
  },
});

await server.actor.init(); // Let the server know we need actors
server.actor.registerActor(ParkingSensorImpl); // Register the actor
await server.start(); // Start the server

// To get the registered actors, you can invoke `getRegisteredActors`:
const resRegisteredActors = await server.actor.getRegisteredActors();
console.log(`Registered Actors: ${JSON.stringify(resRegisteredActors)}`);
Invoking Actor Methods
After Actors are registered, create a Proxy object that implements ParkingSensorInterface using the ActorProxyBuilder. You can invoke the actor methods by directly calling methods on the Proxy object. Internally, it translates to making a network call to the Actor API and fetches the result back.
import { ActorId, DaprClient } from "@dapr/dapr";
import ParkingSensorImpl from "./ParkingSensorImpl";
import ParkingSensorInterface from "./ParkingSensorInterface";

const daprHost = "127.0.0.1";
const daprPort = "50000";

const client = new DaprClient({ daprHost, daprPort });

// Create a new actor builder. It can be used to create multiple actors of a type.
const builder = new ActorProxyBuilder<ParkingSensorInterface>(ParkingSensorImpl, client);

// Create a new actor instance.
const actor = builder.build(new ActorId("my-actor"));
// Or alternatively, use a random ID
// const actor = builder.build(ActorId.createRandomId());

// Invoke the method.
await actor.carEnter();
Using states with Actor
import { AbstractActor } from "@dapr/dapr";
import ActorStateInterface from "./ActorStateInterface";

export default class ActorStateExample extends AbstractActor implements ActorStateInterface {
  async setState(key: string, value: any): Promise<void> {
    await this.getStateManager().setState(key, value);
    await this.getStateManager().saveState();
  }

  async removeState(key: string): Promise<void> {
    await this.getStateManager().removeState(key);
    await this.getStateManager().saveState();
  }

  // getState with a specific type
  async getState<T>(key: string): Promise<T | null> {
    return await this.getStateManager<T>().getState(key);
  }

  // getState without type as `any`
  async getState(key: string): Promise<any> {
    return await this.getStateManager().getState(key);
  }
}
Actor Timers and Reminders
The JS SDK supports actors that can schedule periodic work on themselves by registering either timers or reminders. The main difference between timers and reminders is that the Dapr actor runtime does not retain any information about timers after deactivation, but persists reminders information using the Dapr actor state provider.
This distinction allows users to trade off between light-weight but stateless timers versus more resource-demanding but stateful reminders.
The scheduling interface of timers and reminders is identical. For an more in-depth look at the scheduling configurations see the actors timers and reminders docs.
Actor Timers
// ...

const actor = builder.build(new ActorId("my-actor"));

// Register a timer
await actor.registerActorTimer(
  "timer-id", // Unique name of the timer.
  "cb-method", // Callback method to execute when timer is fired.
  Temporal.Duration.from({ seconds: 2 }), // DueTime
  Temporal.Duration.from({ seconds: 1 }), // Period
  Temporal.Duration.from({ seconds: 1 }), // TTL
  50, // State to be sent to timer callback.
);

// Delete the timer
await actor.unregisterActorTimer("timer-id");
Actor Reminders
// ...

const actor = builder.build(new ActorId("my-actor"));

// Register a reminder, it has a default callback: `receiveReminder`
await actor.registerActorReminder(
  "reminder-id", // Unique name of the reminder.
  Temporal.Duration.from({ seconds: 2 }), // DueTime
  Temporal.Duration.from({ seconds: 1 }), // Period
  Temporal.Duration.from({ seconds: 1 }), // TTL
  100, // State to be sent to reminder callback.
);

// Delete the reminder
await actor.unregisterActorReminder("reminder-id");
To handle the callback, you need to override the default receiveReminder implementation in your actor. For example, from our original actor implementation:
export default class ParkingSensorImpl extends AbstractActor implements ParkingSensorInterface {
  // ...

  /**
   * @override
   */
  async receiveReminder(state: any): Promise<void> {
    // handle stuff here
  }

  // ...
}
For a full guide on actors, visit How-To: Use virtual actors in Dapr.
4 - Logging in JavaScript SDK
Configuring logging in JavaScript SDK
Introduction
The JavaScript SDK comes with a out-of-box Console based logger. The SDK emits various internal logs to help users understand the chain of events and troubleshoot problems. A consumer of this SDK can customize the verbosity of the log, as well as provide their own implementation for the logger.
There are five levels of logging in descending order of importance - error, warn, info, verbose, and debug. Setting the log to a level means that the logger will emit all the logs that are at least as important as the mentioned level. For example, setting to verbose log means that the SDK will not emit debug level logs. The default log level is info.
Dapr Client
import { CommunicationProtocolEnum, DaprClient, LogLevel } from "@dapr/dapr";

// create a client instance with log level set to verbose.
const client = new DaprClient({
  daprHost,
  daprPort,
  communicationProtocol: CommunicationProtocolEnum.HTTP,
  logger: { level: LogLevel.Verbose },
});
For more details on how to use the Client, see JavaScript Client.
DaprServer
import { CommunicationProtocolEnum, DaprServer, LogLevel } from "@dapr/dapr";

// create a server instance with log level set to error.
const server = new DaprServer({
  serverHost,
  serverPort,
  clientOptions: {
    daprHost,
    daprPort,
    logger: { level: LogLevel.Error },
  },
});
For more details on how to use the Server, see JavaScript Server.
Custom LoggerService
The JavaScript SDK uses the in-built Console for logging. To use a custom logger like Winston or Pino, you can implement the LoggerService interface.
Winston based logging:
Create a new implementation of LoggerService.
import { LoggerService } from "@dapr/dapr";
import * as winston from "winston";

export class WinstonLoggerService implements LoggerService {
  private logger;

  constructor() {
    this.logger = winston.createLogger({
      transports: [new winston.transports.Console(), new winston.transports.File({ filename: "combined.log" })],
    });
  }

  error(message: any, ...optionalParams: any[]): void {
    this.logger.error(message, ...optionalParams);
  }
  warn(message: any, ...optionalParams: any[]): void {
    this.logger.warn(message, ...optionalParams);
  }
  info(message: any, ...optionalParams: any[]): void {
    this.logger.info(message, ...optionalParams);
  }
  verbose(message: any, ...optionalParams: any[]): void {
    this.logger.verbose(message, ...optionalParams);
  }
  debug(message: any, ...optionalParams: any[]): void {
    this.logger.debug(message, ...optionalParams);
  }
}
Pass the new implementation to the SDK.
import { CommunicationProtocolEnum, DaprClient, LogLevel } from "@dapr/dapr";
import { WinstonLoggerService } from "./WinstonLoggerService";

const winstonLoggerService = new WinstonLoggerService();

// create a client instance with log level set to verbose and logger service as winston.
const client = new DaprClient({
  daprHost,
  daprPort,
  communicationProtocol: CommunicationProtocolEnum.HTTP,
  logger: { level: LogLevel.Verbose, service: winstonLoggerService },
});
6 - How to: Author and manage Dapr Workflow in the JavaScript SDK
How to get up and running with workflows using the Dapr JavaScript SDK
Let’s create a Dapr workflow and invoke it using the console. With the provided workflow example, you will:
This example uses the default configuration from dapr init in self-hosted mode.
Prerequisites
- Verify you’re using the latest proto bindings
Set up the environment
Clone the JavaScript SDK repo and navigate into it.
git clone https://github.com/dapr/js-sdk
cd js-sdk
From the JavaScript SDK root directory, navigate to the Dapr Workflow example.
cd examples/workflow/authoring
Run the following command to install the requirements for running this workflow sample with the Dapr JavaScript SDK.
Run the activity-sequence.ts
The activity-sequence file registers a workflow and an activity with the Dapr Workflow runtime. The workflow is a sequence of activities that are executed in order. We use DaprWorkflowClient to schedule a new workflow instance and wait for it to complete.
const daprHost = "localhost";
const daprPort = "50001";
const workflowClient = new DaprWorkflowClient({
  daprHost,
  daprPort,
});
const workflowRuntime = new WorkflowRuntime({
  daprHost,
  daprPort,
});

const hello = async (_: WorkflowActivityContext, name: string) => {
  return `Hello ${name}!`;
};

const sequence: TWorkflow = async function* (ctx: WorkflowContext): any {
  const cities: string[] = [];

  const result1 = yield ctx.callActivity(hello, "Tokyo");
  cities.push(result1);
  const result2 = yield ctx.callActivity(hello, "Seattle");
  cities.push(result2);
  const result3 = yield ctx.callActivity(hello, "London");
  cities.push(result3);

  return cities;
};

workflowRuntime.registerWorkflow(sequence).registerActivity(hello);

// Wrap the worker startup in a try-catch block to handle any errors during startup
try {
  await workflowRuntime.start();
  console.log("Workflow runtime started successfully");
} catch (error) {
  console.error("Error starting workflow runtime:", error);
}

// Schedule a new orchestration
try {
  const id = await workflowClient.scheduleNewWorkflow(sequence);
  console.log(`Orchestration scheduled with ID: ${id}`);

  // Wait for orchestration completion
  const state = await workflowClient.waitForWorkflowCompletion(id, undefined, 30);

  console.log(`Orchestration completed! Result: ${state?.serializedOutput}`);
} catch (error) {
  console.error("Error scheduling or waiting for orchestration:", error);
}
In the code above:
workflowRuntime.registerWorkflow(sequence) registers sequence as a workflow in the Dapr Workflow runtime.await workflowRuntime.start(); builds and starts the engine within the Dapr Workflow runtime.await workflowClient.scheduleNewWorkflow(sequence) schedules a new workflow instance with the Dapr Workflow runtime.await workflowClient.waitForWorkflowCompletion(id, undefined, 30) waits for the workflow instance to complete.
In the terminal, execute the following command to kick off the activity-sequence.ts:
npm run start:dapr:activity-sequence
Expected output
You're up and running! Both Dapr and your app logs will appear here.

...

== APP == Orchestration scheduled with ID: dc040bea-6436-4051-9166-c9294f9d2201
== APP == Waiting 30 seconds for instance dc040bea-6436-4051-9166-c9294f9d2201 to complete...
== APP == Received "Orchestrator Request" work item with instance id 'dc040bea-6436-4051-9166-c9294f9d2201'
== APP == dc040bea-6436-4051-9166-c9294f9d2201: Rebuilding local state with 0 history event...
== APP == dc040bea-6436-4051-9166-c9294f9d2201: Processing 2 new history event(s): [ORCHESTRATORSTARTED=1, EXECUTIONSTARTED=1]
== APP == dc040bea-6436-4051-9166-c9294f9d2201: Waiting for 1 task(s) and 0 event(s) to complete...
== APP == dc040bea-6436-4051-9166-c9294f9d2201: Returning 1 action(s)
== APP == Received "Activity Request" work item
== APP == Activity hello completed with output "Hello Tokyo!" (14 chars)
== APP == Received "Orchestrator Request" work item with instance id 'dc040bea-6436-4051-9166-c9294f9d2201'
== APP == dc040bea-6436-4051-9166-c9294f9d2201: Rebuilding local state with 3 history event...
== APP == dc040bea-6436-4051-9166-c9294f9d2201: Processing 2 new history event(s): [ORCHESTRATORSTARTED=1, TASKCOMPLETED=1]
== APP == dc040bea-6436-4051-9166-c9294f9d2201: Waiting for 1 task(s) and 0 event(s) to complete...
== APP == dc040bea-6436-4051-9166-c9294f9d2201: Returning 1 action(s)
== APP == Received "Activity Request" work item
== APP == Activity hello completed with output "Hello Seattle!" (16 chars)
== APP == Received "Orchestrator Request" work item with instance id 'dc040bea-6436-4051-9166-c9294f9d2201'
== APP == dc040bea-6436-4051-9166-c9294f9d2201: Rebuilding local state with 6 history event...
== APP == dc040bea-6436-4051-9166-c9294f9d2201: Processing 2 new history event(s): [ORCHESTRATORSTARTED=1, TASKCOMPLETED=1]
== APP == dc040bea-6436-4051-9166-c9294f9d2201: Waiting for 1 task(s) and 0 event(s) to complete...
== APP == dc040bea-6436-4051-9166-c9294f9d2201: Returning 1 action(s)
== APP == Received "Activity Request" work item
== APP == Activity hello completed with output "Hello London!" (15 chars)
== APP == Received "Orchestrator Request" work item with instance id 'dc040bea-6436-4051-9166-c9294f9d2201'
== APP == dc040bea-6436-4051-9166-c9294f9d2201: Rebuilding local state with 9 history event...
== APP == dc040bea-6436-4051-9166-c9294f9d2201: Processing 2 new history event(s): [ORCHESTRATORSTARTED=1, TASKCOMPLETED=1]
== APP == dc040bea-6436-4051-9166-c9294f9d2201: Orchestration completed with status COMPLETED
== APP == dc040bea-6436-4051-9166-c9294f9d2201: Returning 1 action(s)
INFO[0006] dc040bea-6436-4051-9166-c9294f9d2201: 'sequence' completed with a COMPLETED status.  app_id=activity-sequence-workflow instance=kaibocai-devbox scope=wfengine.backend type=log ver=1.12.3
== APP == Instance dc040bea-6436-4051-9166-c9294f9d2201 completed
== APP == Orchestration completed! Result: ["Hello Tokyo!","Hello Seattle!","Hello London!"]
Next steps