This is the multi-page printable view of this section. Click here to print.
Integrations
- 1: Integrations with AWS
- 2: Integrations with Azure
- 2.1: Authenticate to Azure
- 2.1.1: Authenticating to Azure
- 2.1.2: How to: Generate a new Microsoft Entra ID application and Service Principal
- 2.1.3: How to: Use managed identities
- 2.2: Dapr integration policies for Azure API Management
- 2.3: Dapr extension for Azure Functions runtime
- 2.4: Dapr extension for Azure Kubernetes Service (AKS)
- 3: Integrations with Diagrid
- 4: How to: Autoscale a Dapr app with KEDA
- 5: How to: Use the Dapr CLI in a GitHub Actions workflow
- 6: How to: Use the Dapr Kubernetes Operator
- 7: How to: Integrate with Kratix
- 8: How to: Integrate with Argo CD
1 - Integrations with AWS
1.1 - Authenticating to AWS
Dapr components leveraging AWS services (for example, DynamoDB, SQS, S3) utilize standardized configuration attributes via the AWS SDK. Learn more about how the AWS SDK handles credentials.
You can configure authentication using the AWS SDK’s default provider chain or one of the predefined AWS authentication profiles outlined below. Verify your component configuration by testing and inspecting Dapr runtime logs to confirm proper initialization.
Terminology
- ARN (Amazon Resource Name): A unique identifier used to specify AWS resources. Format:
arn:partition:service:region:account-id:resource. Example:arn:aws:iam::123456789012:role/example-role. - IAM (Identity and Access Management): AWS’s service for managing access to AWS resources securely.
Authentication Profiles
Access Key ID and Secret Access Key
Use static Access Key and Secret Key credentials, either through component metadata fields or via default AWS configuration.
Important
Prefer loading credentials via the default AWS configuration in scenarios such as:
- Running the Dapr sidecar (
daprd) with your application on EKS (AWS Kubernetes). - Using nodes or pods attached to IAM policies that define AWS resource access.
| Attribute | Required | Description | Example |
|---|---|---|---|
region |
Y | AWS region to connect to. | “us-east-1” |
accessKey |
N | AWS Access key id. Will be required in Dapr v1.17. | “AKIAIOSFODNN7EXAMPLE” |
secretKey |
N | AWS Secret access key, used alongside accessKey. Will be required in Dapr v1.17. |
“wJalrXUtnFEMI/K7MDENG/bPxRfiCYEXAMPLEKEY” |
sessionToken |
N | AWS Session token, used with accessKey and secretKey. Often unnecessary for IAM user keys. |
Assume IAM Role
This profile allows Dapr to assume a specific IAM Role. Typically used when the Dapr sidecar runs on EKS or nodes/pods linked to IAM policies. Currently supported by Kafka and PostgreSQL components.
| Attribute | Required | Description | Example |
|---|---|---|---|
region |
Y | AWS region to connect to. | “us-east-1” |
assumeRoleArn |
N | ARN of the IAM role with AWS resource access. Will be required in Dapr v1.17. | “arn:aws:iam::123456789:role/mskRole” |
sessionName |
N | Session name for role assumption. Default is "DaprDefaultSession". |
“MyAppSession” |
Credentials from Environment Variables
Authenticate using environment variables. This is especially useful for Dapr in self-hosted mode where sidecar injectors don’t configure environment variables.
There are no metadata fields required for this authentication profile.
IAM Roles Anywhere
IAM Roles Anywhere extends IAM role-based authentication to external workloads. It eliminates the need for long-term credentials by using cryptographically signed certificates, anchored in a trust relationship using Dapr PKI. Dapr SPIFFE identity X.509 certificates are used to authenticate to AWS services, and Dapr handles credential rotation at half the session lifespan.
To configure this authentication profile:
- Create a Trust Anchor in the trusting AWS account using the Dapr certificate bundle as an
External certificate bundle. - Create an IAM role with the resource permissions policy necessary, as well as a trust entity for the Roles Anywhere AWS service. Here, you specify SPIFFE identities allowed.
- Create an IAM Profile under the Roles Anywhere service, linking the IAM Role.
| Attribute | Required | Description | Example |
|---|---|---|---|
trustAnchorArn |
Y | ARN of the Trust Anchor in the AWS account granting trust to the Dapr Certificate Authority. | arn:aws:rolesanywhere:us-west-1:012345678910:trust-anchor/01234568-0123-0123-0123-012345678901 |
trustProfileArn |
Y | ARN of the AWS IAM Profile in the trusting AWS account. | arn:aws:rolesanywhere:us-west-1:012345678910:profile/01234568-0123-0123-0123-012345678901 |
assumeRoleArn |
Y | ARN of the AWS IAM role to assume in the trusting AWS account. | arn:aws:iam:012345678910:role/exampleIAMRoleName |
Additional Fields
Some AWS components include additional optional fields:
| Attribute | Required | Description | Example |
|---|---|---|---|
endpoint |
N | The endpoint is normally handled internally by the AWS SDK. However, in some situations it might make sense to set it locally - for example if developing against DynamoDB Local. |
Furthermore, non-native AWS components such as Kafka and PostgreSQL that support AWS authentication profiles have metadata fields to trigger the AWS authentication logic. Be sure to check specific component documentation.
Alternatives to explicitly specifying credentials in component manifest files
In production scenarios, it is recommended to use a solution such as:
If running on AWS EKS, you can link an IAM role to a Kubernetes service account, which your pod can use.
All of these solutions solve the same problem: They allow the Dapr runtime process (or sidecar) to retrieve credentials dynamically, so that explicit credentials aren’t needed. This provides several benefits, such as automated key rotation, and avoiding having to manage secrets.
Both Kiam and Kube2IAM work by intercepting calls to the instance metadata service.
Setting Up Dapr with AWS EKS Pod Identity
EKS Pod Identities provide the ability to manage credentials for your applications, similar to the way that Amazon EC2 instance profiles provide credentials to Amazon EC2 instances. Instead of creating and distributing your AWS credentials to the containers or using the Amazon EC2 instance’s role, you associate an IAM role with a Kubernetes service account and configure your Pods to use the service account.
To see a comprehensive example on how to authorize pod access to AWS Secrets Manager from EKS using AWS EKS Pod Identity, follow the sample in this repository.
Use an instance profile when running in stand-alone mode on AWS EC2
If running Dapr directly on an AWS EC2 instance in stand-alone mode, you can use instance profiles.
- Configure an IAM role.
- Attach it to the instance profile for the ec2 instance.
Dapr then authenticates to AWS without specifying credentials in the Dapr component manifest.
Authenticate to AWS when running dapr locally in stand-alone mode
When running Dapr (or the Dapr runtime directly) in stand-alone mode, you can inject environment variables into the process, like the following example:
FOO=bar daprd --app-id myapp
If you have configured named AWS profiles locally, you can tell Dapr (or the Dapr runtime) which profile to use by specifying the “AWS_PROFILE” environment variable:
AWS_PROFILE=myprofile dapr run...
or
AWS_PROFILE=myprofile daprd...
You can use any of the supported environment variables to configure Dapr in this manner.
On Windows, the environment variable needs to be set before starting the dapr or daprd command, doing it inline (like in Linux/MacOS) is not supported.
Authenticate to AWS if using AWS SSO based profiles
If you authenticate to AWS using AWS SSO, some AWS SDKs (including the Go SDK) don’t yet support this natively. There are several utilities you can use to “bridge the gap” between AWS SSO-based credentials and “legacy” credentials, such as:
If using AwsHelper, start Dapr like this:
AWS_PROFILE=myprofile awshelper dapr run...
or
AWS_PROFILE=myprofile awshelper daprd...
On Windows, the environment variable needs to be set before starting the awshelper command; doing it inline (like in Linux/MacOS) is not supported.
Next steps
Refer to AWS component specs >>Related links
2 - Integrations with Azure
2.1 - Authenticate to Azure
2.1.1 - Authenticating to Azure
Most Azure components for Dapr support authenticating with Microsoft Entra ID. Thanks to this:
- Administrators can leverage all the benefits of fine-tuned permissions with Azure Role-Based Access Control (RBAC).
- Applications running on Azure services such as Azure Container Apps, Azure Kubernetes Service, Azure VMs, or any other Azure platform services can leverage Managed Identities (MI) and Workload Identity. These offer the ability to authenticate your applications without having to manage sensitive credentials.
About authentication with Microsoft Entra ID
Microsoft Entra ID is Azure’s identity and access management (IAM) solution, which is used to authenticate and authorize users and services.
Microsoft Entra ID is built on top of open standards such OAuth 2.0, which allows services (applications) to obtain access tokens to make requests to Azure services, including Azure Storage, Azure Service Bus, Azure Key Vault, Azure Cosmos DB, Azure Database for Postgres, Azure SQL, etc.
In Azure terminology, an application is also called a “Service Principal”.
Some Azure components offer alternative authentication methods, such as systems based on “shared keys” or “access tokens”. Although these are valid and supported by Dapr, you should authenticate your Dapr components using Microsoft Entra ID whenever possible to take advantage of many benefits, including:
- Managed Identities and Workload Identity
- Role-Based Access Control
- Auditing
- (Optional) Authentication using certificates
Managed Identities and Workload Identity
With Managed Identities (MI), your application can authenticate with Microsoft Entra ID and obtain an access token to make requests to Azure services. When your application is running on a supported Azure service (such as Azure VMs, Azure Container Apps, Azure Web Apps, etc), an identity for your application can be assigned at the infrastructure level.
Once using MI, your code doesn’t have to deal with credentials, which:
- Removes the challenge of managing credentials safely
- Allows greater separation of concerns between development and operations teams
- Reduces the number of people with access to credentials
- Simplifies operational aspects–especially when multiple environments are used
Applications running on Azure Kubernetes Service can similarly leverage Workload Identity to automatically provide an identity to individual pods.
Role-Based Access Control
When using Azure Role-Based Access Control (RBAC) with supported services, permissions given to an application can be fine-tuned. For example, you can restrict access to a subset of data or make the access read-only.
Auditing
Using Microsoft Entra ID provides an improved auditing experience for access. Tenant administrators can consult audit logs to track authentication requests.
(Optional) Authentication using certificates
While Microsoft Entra ID allows you to use MI, you still have the option to authenticate using certificates.
Support for other Azure environments
By default, Dapr components are configured to interact with Azure resources in the “public cloud”. If your application is deployed to another cloud, such as Azure China or Azure Government (“sovereign clouds”), you can enable that for supported components by setting the azureEnvironment metadata property to one of the supported values:
- Azure public cloud (default):
"AzurePublicCloud" - Azure China:
"AzureChinaCloud" - Azure Government:
"AzureUSGovernmentCloud"
Support for sovereign clouds is experimental.
Credentials metadata fields
To authenticate with Microsoft Entra ID, you will need to add the following credentials as values in the metadata for your Dapr component.
Metadata options
Depending on how you’ve passed credentials to your Dapr services, you have multiple metadata options.
- Using client credentials
- Using a certificate
- Using Managed Identities (MI)
- Using Workload Identity on AKS
- Using Azure CLI credentials (development-only)
Authenticating using client credentials
| Field | Required | Details | Example |
|---|---|---|---|
azureTenantId |
Y | ID of the Microsoft Entra ID tenant | "cd4b2887-304c-47e1-b4d5-65447fdd542b" |
azureClientId |
Y | Client ID (application ID) | "c7dd251f-811f-4ba2-a905-acd4d3f8f08b" |
azureClientSecret |
Y | Client secret (application password) | "Ecy3XG7zVZK3/vl/a2NSB+a1zXLa8RnMum/IgD0E" |
When running on Kubernetes, you can also use references to Kubernetes secrets for any or all of the values above.
Authenticating using a certificate
| Field | Required | Details | Example |
|---|---|---|---|
azureTenantId |
Y | ID of the Microsoft Entra ID tenant | "cd4b2887-304c-47e1-b4d5-65447fdd542b" |
azureClientId |
Y | Client ID (application ID) | "c7dd251f-811f-4ba2-a905-acd4d3f8f08b" |
azureCertificate |
One of azureCertificate and azureCertificateFile |
Certificate and private key (in PFX/PKCS#12 format) | "-----BEGIN PRIVATE KEY-----\n MIIEvgI... \n -----END PRIVATE KEY----- \n -----BEGIN CERTIFICATE----- \n MIICoTC... \n -----END CERTIFICATE----- |
azureCertificateFile |
One of azureCertificate and azureCertificateFile |
Path to the PFX/PKCS#12 file containing the certificate and private key | "/path/to/file.pem" |
azureCertificatePassword |
N | Password for the certificate if encrypted | "password" |
When running on Kubernetes, you can also use references to Kubernetes secrets for any or all of the values above.
Authenticating with Managed Identities (MI)
| Field | Required | Details | Example |
|---|---|---|---|
azureClientId |
N | Client ID (application ID) | "c7dd251f-811f-4ba2-a905-acd4d3f8f08b" |
Using Managed Identities, the azureClientId field is generally recommended. The field is optional when using a system-assigned identity, but may be required when using user-assigned identities.
Authenticating with Workload Identity on AKS
When running on Azure Kubernetes Service (AKS), you can authenticate components using Workload Identity. Refer to the Azure AKS documentation on enabling Workload Identity for your Kubernetes resources.
Authenticating using Azure CLI credentials (development-only)
Important: This authentication method is recommended for development only.
This authentication method can be useful while developing on a local machine. You will need:
- The Azure CLI installed
- Have successfully authenticated using the
az logincommand
When Dapr is running on a host where there are credentials available for the Azure CLI, components can use those to authenticate automatically if no other authentication method is configuration.
Using this authentication method does not require setting any metadata option.
Example usage in a Dapr component
In this example, you will set up an Azure Key Vault secret store component that uses Microsoft Entra ID to authenticate.
To use a client secret, create a file called azurekeyvault.yaml in the components directory, filling in with the details from the above setup process:
apiVersion: dapr.io/v1alpha1
kind: Component
metadata:
  name: azurekeyvault
  namespace: default
spec:
  type: secretstores.azure.keyvault
  version: v1
  metadata:
  - name: vaultName
    value: "[your_keyvault_name]"
  - name: azureTenantId
    value: "[your_tenant_id]"
  - name: azureClientId
    value: "[your_client_id]"
  - name: azureClientSecret
    value : "[your_client_secret]"
If you want to use a certificate saved on the local disk, instead, use:
apiVersion: dapr.io/v1alpha1
kind: Component
metadata:
  name: azurekeyvault
  namespace: default
spec:
  type: secretstores.azure.keyvault
  version: v1
  metadata:
  - name: vaultName
    value: "[your_keyvault_name]"
  - name: azureTenantId
    value: "[your_tenant_id]"
  - name: azureClientId
    value: "[your_client_id]"
  - name: azureCertificateFile
    value : "[pfx_certificate_file_fully_qualified_local_path]"
In Kubernetes, you store the client secret or the certificate into the Kubernetes Secret Store and then refer to those in the YAML file.
To use a client secret:
-
Create a Kubernetes secret using the following command:
kubectl create secret generic [your_k8s_secret_name] --from-literal=[your_k8s_secret_key]=[your_client_secret][your_client_secret]is the application’s client secret as generated above[your_k8s_secret_name]is secret name in the Kubernetes secret store[your_k8s_secret_key]is secret key in the Kubernetes secret store
-
Create an
azurekeyvault.yamlcomponent file.The component yaml refers to the Kubernetes secretstore using
authproperty andsecretKeyRefrefers to the client secret stored in the Kubernetes secret store.apiVersion: dapr.io/v1alpha1 kind: Component metadata: name: azurekeyvault namespace: default spec: type: secretstores.azure.keyvault version: v1 metadata: - name: vaultName value: "[your_keyvault_name]" - name: azureTenantId value: "[your_tenant_id]" - name: azureClientId value: "[your_client_id]" - name: azureClientSecret secretKeyRef: name: "[your_k8s_secret_name]" key: "[your_k8s_secret_key]" auth: secretStore: kubernetes -
Apply the
azurekeyvault.yamlcomponent:kubectl apply -f azurekeyvault.yaml
To use a certificate:
-
Create a Kubernetes secret using the following command:
kubectl create secret generic [your_k8s_secret_name] --from-file=[your_k8s_secret_key]=[pfx_certificate_file_fully_qualified_local_path][pfx_certificate_file_fully_qualified_local_path]is the path to the PFX file you obtained earlier[your_k8s_secret_name]is secret name in the Kubernetes secret store[your_k8s_secret_key]is secret key in the Kubernetes secret store
-
Create an
azurekeyvault.yamlcomponent file.The component yaml refers to the Kubernetes secretstore using
authproperty andsecretKeyRefrefers to the certificate stored in the Kubernetes secret store.apiVersion: dapr.io/v1alpha1 kind: Component metadata: name: azurekeyvault namespace: default spec: type: secretstores.azure.keyvault version: v1 metadata: - name: vaultName value: "[your_keyvault_name]" - name: azureTenantId value: "[your_tenant_id]" - name: azureClientId value: "[your_client_id]" - name: azureCertificate secretKeyRef: name: "[your_k8s_secret_name]" key: "[your_k8s_secret_key]" auth: secretStore: kubernetes -
Apply the
azurekeyvault.yamlcomponent:kubectl apply -f azurekeyvault.yaml
Next steps
Generate a new Microsoft Entra ID application and Service Principal >>References
2.1.2 - How to: Generate a new Microsoft Entra ID application and Service Principal
Prerequisites
- An Azure subscription
- Azure CLI
- jq
- OpenSSL (included by default on all Linux and macOS systems, as well as on WSL)
- Make sure you’re using a bash or zsh shell
Log into Azure using the Azure CLI
In a new terminal, run the following command:
az login
az account set -s [your subscription id]
Create an Microsoft Entra ID application
Create the Microsoft Entra ID application with:
# Friendly name for the application / Service Principal
APP_NAME="dapr-application"

# Create the app
APP_ID=$(az ad app create --display-name "${APP_NAME}"  | jq -r .appId)
Select how you’d prefer to pass credentials.
To create a client secret, run the following command.
az ad app credential reset \
  --id "${APP_ID}" \
  --years 2
This generates a random, 40-characters long password based on the base64 charset. This password will be valid for 2 years, before you need to rotate it.
Save the output values returned; you’ll need them for Dapr to authenticate with Azure. The expected output:
{
  "appId": "<your-app-id>",
  "password": "<your-password>",
  "tenant": "<your-azure-tenant>"
}
When adding the returned values to your Dapr component’s metadata:
appIdis the value forazureClientIdpasswordis the value forazureClientSecret(this was randomly-generated)tenantis the value forazureTenantId
For a PFX (PKCS#12) certificate, run the following command to create a self-signed certificate:
az ad app credential reset \
  --id "${APP_ID}" \
  --create-cert
Note: Self-signed certificates are recommended for development only. For production, you should use certificates signed by a CA and imported with the
--certflag.
The output of the command above should look like:
Save the output values returned; you’ll need them for Dapr to authenticate with Azure. The expected output:
{
  "appId": "<your-app-id>",
  "fileWithCertAndPrivateKey": "<file-path>",
  "password": null,
  "tenant": "<your-azure-tenant>"
}
When adding the returned values to your Dapr component’s metadata:
appIdis the value forazureClientIdtenantis the value forazureTenantIdfileWithCertAndPrivateKeyindicates the location of the self-signed PFX certificate and private key. Use the contents of that file asazureCertificate(or write it to a file on the server and useazureCertificateFile)
Note: While the generated file has the
.pemextension, it contains a certificate and private key encoded as PFX (PKCS#12).
Create a Service Principal
Once you have created an Microsoft Entra ID application, create a Service Principal for that application. With this Service Principal, you can grant it access to Azure resources.
To create the Service Principal, run the following command:
SERVICE_PRINCIPAL_ID=$(az ad sp create \
  --id "${APP_ID}" \
  | jq -r .id)
echo "Service Principal ID: ${SERVICE_PRINCIPAL_ID}"
Expected output:
Service Principal ID: 1d0ccf05-5427-4b5e-8eb4-005ac5f9f163
The returned value above is the Service Principal ID, which is different from the Microsoft Entra ID application ID (client ID). The Service Principal ID is defined within an Azure tenant and used to grant access to Azure resources to an application
You’ll use the Service Principal ID to grant permissions to an application to access Azure resources.
Meanwhile, the client ID is used by your application to authenticate. You’ll use the client ID in Dapr manifests to configure authentication with Azure services.
Keep in mind that the Service Principal that was just created does not have access to any Azure resource by default. Access will need to be granted to each resource as needed, as documented in the docs for the components.
Next steps
Use Managed Identities >>2.1.3 - How to: Use managed identities
Using managed identities, authentication happens automatically by virtue of your application running on top of an Azure service that has either a system-managed or a user-assigned identity.
To get started, you need to enable a managed identity as a service option/functionality in various Azure services, independent of Dapr. Enabling this creates an identity (or application) under the hood for Microsoft Entra ID (previously Azure Active Directory ID) purposes.
Your Dapr services can then leverage that identity to authenticate with Microsoft Entra ID, transparently and without you having to specify any credentials.
In this guide, you learn how to:
- Grant your identity to the Azure service you’re using via official Azure documentation
- Set up either a system-managed or user-assigned identity in your component
That’s about all there is to it.
Note
In your component YAML, you only need theazureClientId property if using user-assigned identity. Otherwise, you can omit this property for system-managed identity to be used by default.
Grant access to the service
Set the requisite Microsoft Entra ID role assignments or custom permissions to your system-managed or user-assigned identity for a particular Azure resource (as identified by the resource scope).
You can set up a managed identity to a new or existing Azure resource. The instructions depend on the service use. Check the following official documentation for the most appropriate instructions:
- Azure Kubernetes Service (AKS)
- Azure Container Apps (ACA)
- Azure App Service (including Azure Web Apps and Azure Functions)
- Azure Virtual Machines (VM)
- Azure Virtual Machines Scale Sets (VMSS)
- Azure Container Instance (ACI)
After assigning a system-managed identity to your Azure resource, you’ll have credentials like the following:
{
    "principalId": "<object-id>",
    "tenantId": "<tenant-id>",
    "type": "SystemAssigned",
    "userAssignedIdentities": null
}
From the returned values, take note of the principalId value, which is the Service Principal ID created for your identity. Use that to grant access permissions for your Azure resources component to access the identity.
Managed identities in Azure Container Apps
Every container app has a completely different system-managed identity, making it very unmanageable to handle the required role assignments across multiple apps.
Instead, it’s strongly recommended to use a user-assigned identity and attach this to all the apps that should load the component. Then, you should scope the component to those same apps.
Set up identities in your component
By default, Dapr Azure components look up the system-managed identity of the environment they run in and authenticate as that. Generally, for a given component, there are no required properties to use system-managed identity other than the service name, storage account name, and any other properites required by the Azure service (listed in the documentation).
For user-assigned idenitities, in addition to the basic properties required by the service you’re using, you need to specify the azureClientId (user-assigned identity ID) in the component. Make sure the user-assigned identity is attached to the Azure service Dapr is running on, or else you won’t be able to use that identity.
Note
If the sidecar loads a component which does not specifyazureClientId, it only tries the system-assigned identity. If the component specifies the azureClientId property, it only tries the particular user-assigned identity with that ID.
The following examples demonstrate setting up either a system-managed or user-assigned identity in an Azure KeyVault secrets component.
If you set up system-managed identity using an Azure KeyVault component, the YAML would look like the following:
apiVersion: dapr.io/v1alpha1
kind: Component
metadata:
  name: azurekeyvault
spec:
  type: secretstores.azure.keyvault
  version: v1
  metadata:
  - name: vaultName
    value: mykeyvault
In this example, the system-managed identity looks up the service identity and communicates with the mykeyvault vault. Next, grant your system-managed identiy access to the desired service.
If you set up user-assigned identity using an Azure KeyVault component, the YAML would look like the following:
apiVersion: dapr.io/v1alpha1
kind: Component
metadata:
  name: azurekeyvault
spec:
  type: secretstores.azure.keyvault
  version: v1
  metadata:
  - name: vaultName
    value: mykeyvault
  - name: azureClientId
    value: someAzureIdentityClientIDHere
Once you’ve set up the component YAML with the azureClientId property, you can grant your user-assigned identity access to your service.
For component configuration in Kubernetes or AKS, refer to the Workload Identity guidance.
Troubleshooting
If you receive an error or your managed identity doesn’t work as expected, check if the following items are true:
-
The system-managed identity or user-assigned identity don’t have the required permissions on the target resource.
-
The user-assigned identity isn’t attached to the Azure service (container app or pod) from which you’re loading the component. This can especially happen if:
- You have an unscoped component (a component loaded by all container apps in an environment, or all deployments in your AKS cluster).
- You attached the user-assigned identity to only one container app or one deployment in AKS (using Azure Workload Identity).
In this scenario, since the identity isn’t attached to every other container app or deployment in AKS, the component referencing the user-assigned identity via
azureClientIdfails.
Best practice: When using user-assigned identities, make sure to scope your components to specific apps!
Next steps
Refer to Azure component specs >>2.2 - Dapr integration policies for Azure API Management
Azure API Management is a way to create consistent and modern API gateways for back-end services, including those built with Dapr. You can enable Dapr support in self-hosted API Management gateways to allow them to:
- Forward requests to Dapr services
- Send messages to Dapr Pub/Sub topics
- Trigger Dapr output bindings
Try out the Dapr & Azure API Management Integration sample.
Learn more about Dapr integration policies2.3 - Dapr extension for Azure Functions runtime
Dapr integrates with the Azure Functions runtime via an extension that lets a function seamlessly interact with Dapr.
- Azure Functions provides an event-driven programming model.
- Dapr provides cloud-native building blocks.
The extension combines the two for serverless and event-driven apps.
Try out the Dapr extension for Azure Functions2.4 - Dapr extension for Azure Kubernetes Service (AKS)
The recommended approach for installing Dapr on AKS is to use the AKS Dapr extension. The extension offers:
- Support for all native Dapr configuration capabilities through command-line arguments via the Azure CLI
- The option of opting into automatic minor version upgrades of the Dapr runtime
Note
If you install Dapr through the AKS extension, best practice is to continue using the extension for future management of Dapr instead of the Dapr CLI. Combining the two tools can cause conflicts and result in undesired behavior.Prerequisites for using the Dapr extension for AKS:
- An Azure subscription
- The latest version of the Azure CLI
- An existing AKS cluster
- The Azure Kubernetes Service RBAC Admin role
3 - Integrations with Diagrid
3.1 - Conductor: Enterprise Dapr for Kubernetes
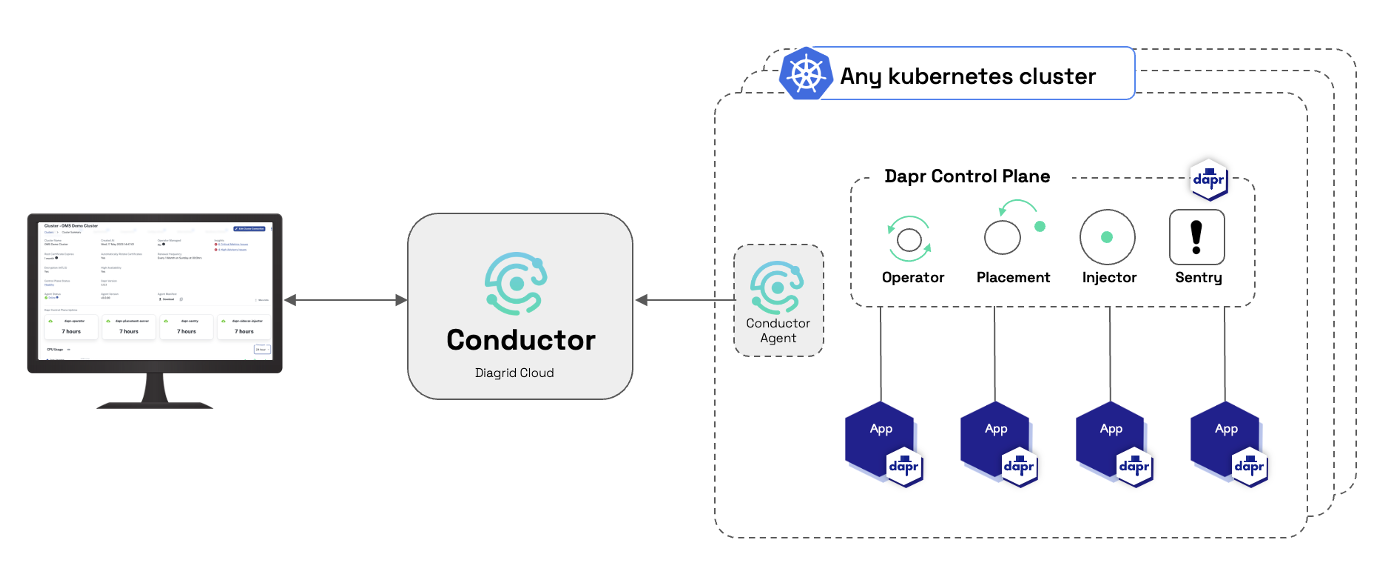
Diagrid Conductor quickly and securely connects to all your Kubernetes clusters running Dapr and Daprized applications, delivering operational excellence, security & reliability and insights & collaboration.
Automated Dapr management
One-click installation, upgrade and patching of Dapr with selective application update and automated rollback means you’re always up to date.
Advisor: Discover and automate best practices
Be informed and apply production best practices, with continuous checking to prevent misconfigurations, increasing security, reliability and performance.
Resource usage reporting and tracking
By studying past resource behavior, recommend application resource optimization usage leading to significant cost savings on CPU and memory.
Application visualizer
The application graph facilitates collaboration between dev and ops by providing a dynamic overview of your services and infrastructure components.
Learn more about Diagrid Conductor4 - How to: Autoscale a Dapr app with KEDA
Dapr, with its building-block API approach, along with the many pub/sub components, makes it easy to write message processing applications. Since Dapr can run in many environments (for example VMs, bare-metal, Cloud or Edge Kubernetes) the autoscaling of Dapr applications is managed by the hosting layer.
For Kubernetes, Dapr integrates with KEDA, an event driven autoscaler for Kubernetes. Many of Dapr’s pub/sub components overlap with the scalers provided by KEDA, so it’s easy to configure your Dapr deployment on Kubernetes to autoscale based on the back pressure using KEDA.
In this guide, you configure a scalable Dapr application, along with the back pressure on Kafka topic. However, you can apply this approach to any pub/sub components offered by Dapr.
Note
If you’re working with Azure Container Apps, refer to the official Azure documentation for scaling Dapr applications using KEDA scalers.Install KEDA
To install KEDA, follow the Deploying KEDA instructions on the KEDA website.
Install and deploy Kafka
If you don’t have access to a Kafka service, you can install it into your Kubernetes cluster for this example by using Helm:
helm repo add confluentinc https://confluentinc.github.io/cp-helm-charts/
helm repo update
kubectl create ns kafka
helm install kafka confluentinc/cp-helm-charts -n kafka \
		--set cp-schema-registry.enabled=false \
		--set cp-kafka-rest.enabled=false \
		--set cp-kafka-connect.enabled=false
To check on the status of the Kafka deployment:
kubectl rollout status deployment.apps/kafka-cp-control-center -n kafka
kubectl rollout status deployment.apps/kafka-cp-ksql-server -n kafka
kubectl rollout status statefulset.apps/kafka-cp-kafka -n kafka
kubectl rollout status statefulset.apps/kafka-cp-zookeeper -n kafka
Once installed, deploy the Kafka client and wait until it’s ready:
kubectl apply -n kafka -f deployment/kafka-client.yaml
kubectl wait -n kafka --for=condition=ready pod kafka-client --timeout=120s
Create the Kafka topic
Create the topic used in this example (demo-topic):
kubectl -n kafka exec -it kafka-client -- kafka-topics \
		--zookeeper kafka-cp-zookeeper-headless:2181 \
		--topic demo-topic \
		--create \
		--partitions 10 \
		--replication-factor 3 \
		--if-not-exists
The number of topic
partitionsis related to the maximum number of replicas KEDA creates for your deployments.
Deploy a Dapr pub/sub component
Deploy the Dapr Kafka pub/sub component for Kubernetes. Paste the following YAML into a file named kafka-pubsub.yaml:
apiVersion: dapr.io/v1alpha1
kind: Component
metadata:
  name: autoscaling-pubsub
spec:
  type: pubsub.kafka
  version: v1
  metadata:
    - name: brokers
      value: kafka-cp-kafka.kafka.svc.cluster.local:9092
    - name: authRequired
      value: "false"
    - name: consumerID
      value: autoscaling-subscriber
The above YAML defines the pub/sub component that your application subscribes to and that you created earlier (demo-topic).
If you used the Kafka Helm install instructions, you can leave the brokers value as-is. Otherwise, change this value to the connection string to your Kafka brokers.
Notice the autoscaling-subscriber value set for consumerID. This value is used later to ensure that KEDA and your deployment use the same Kafka partition offset.
Now, deploy the component to the cluster:
kubectl apply -f kafka-pubsub.yaml
Deploy KEDA autoscaler for Kafka
Deploy the KEDA scaling object that:
- Monitors the lag on the specified Kafka topic
- Configures the Kubernetes Horizontal Pod Autoscaler (HPA) to scale your Dapr deployment in and out
Paste the following into a file named kafka_scaler.yaml, and configure your Dapr deployment in the required place:
apiVersion: keda.sh/v1alpha1
kind: ScaledObject
metadata:
  name: subscriber-scaler
spec:
  scaleTargetRef:
    name: <REPLACE-WITH-DAPR-DEPLOYMENT-NAME>
  pollingInterval: 15
  minReplicaCount: 0
  maxReplicaCount: 10
  triggers:
  - type: kafka
    metadata:
      topic: demo-topic
      bootstrapServers: kafka-cp-kafka.kafka.svc.cluster.local:9092
      consumerGroup: autoscaling-subscriber
      lagThreshold: "5"
Let’s review a few metadata values in the file above:
| Values | Description |
|---|---|
scaleTargetRef/name |
The Dapr ID of your app defined in the Deployment (The value of the dapr.io/id annotation). |
pollingInterval |
The frequency in seconds with which KEDA checks Kafka for current topic partition offset. |
minReplicaCount |
The minimum number of replicas KEDA creates for your deployment. If your application takes a long time to start, it may be better to set this to 1 to ensure at least one replica of your deployment is always running. Otherwise, set to 0 and KEDA creates the first replica for you. |
maxReplicaCount |
The maximum number of replicas for your deployment. Given how Kafka partition offset works, you shouldn’t set that value higher than the total number of topic partitions. |
triggers/metadata/topic |
Should be set to the same topic to which your Dapr deployment subscribed (in this example, demo-topic). |
triggers/metadata/bootstrapServers |
Should be set to the same broker connection string used in the kafka-pubsub.yaml file. |
triggers/metadata/consumerGroup |
Should be set to the same value as the consumerID in the kafka-pubsub.yaml file. |
Important
Setting the connection string, topic, and consumer group to the same values for both the Dapr service subscription and the KEDA scaler configuration is critical to ensure the autoscaling works correctly.Deploy the KEDA scaler to Kubernetes:
kubectl apply -f kafka_scaler.yaml
All done!
See the KEDA scaler work
Now that the ScaledObject KEDA object is configured, your deployment will scale based on the lag of the Kafka topic. Learn more about configuring KEDA for Kafka topics.
As defined in the KEDA scaler manifest, you can now start publishing messages to your Kafka topic demo-topic and watch the pods autoscale when the lag threshold is higher than 5 topics. Publish messages to the Kafka Dapr component by using the Dapr Publish CLI command.
Next steps
Learn about scaling your Dapr pub/sub or binding application with KEDA in Azure Container Apps
5 - How to: Use the Dapr CLI in a GitHub Actions workflow
Dapr can be integrated with GitHub Actions via the Dapr tool installer available in the GitHub Marketplace. This installer adds the Dapr CLI to your workflow, allowing you to deploy, manage, and upgrade Dapr across your environments.
Install the Dapr CLI via the Dapr tool installer
Copy and paste the following installer snippet into your application’s YAML file:
- name: Dapr tool installer
  uses: dapr/setup-dapr@v1
The dapr/setup-dapr action will install the specified version of the Dapr CLI on macOS, Linux, and Windows runners. Once installed, you can run any Dapr CLI command to manage your Dapr environments.
Refer to the action.yml metadata file for details about all the inputs.
Example
For example, for an application using the Dapr extention for Azure Kubernetes Service (AKS), your application YAML will look like the following:
- name: Install Dapr
  uses: dapr/setup-dapr@v1
  with:
    version: '1.15.5'

- name: Initialize Dapr
  shell: bash
  run: |
    # Get the credentials to K8s to use with dapr init
    az aks get-credentials --resource-group ${{ env.RG_NAME }} --name "${{ steps.azure-deployment.outputs.aksName }}"

    # Initialize Dapr
    # Group the Dapr init logs so these lines can be collapsed.
    echo "::group::Initialize Dapr"
    dapr init --kubernetes --wait --runtime-version ${{ env.DAPR_VERSION }}
    echo "::endgroup::"

    dapr status --kubernetes
  working-directory: ./demos/demo3
Next steps
- Learn more about GitHub Actions.
6 - How to: Use the Dapr Kubernetes Operator
You can use the Dapr Kubernetes Operator to manage the Dapr control plane. Use the operator to automate the tasks required to manage the lifecycle of Dapr control plane in Kubernetes mode.
Install and use the Dapr Kubernetes Operator7 - How to: Integrate with Kratix
As part of the Kratix Marketplace, Dapr can be used to build custom platforms tailored to your needs.
Note
The Dapr Helm chart generates static public and private key pairs that are published in the repository. This promise should only be used locally for demo purposes. If you wish to use this promise for more than demo purposes, it’s recommended to manually update all the secrets in the promise with keys with your own credentials.Get started by simply installing the Dapr Promise, which installs Dapr on all matching clusters.
Install the Dapr Promise8 - How to: Integrate with Argo CD
Argo CD is a declarative, GitOps continuous delivery tool for Kubernetes. It enables you to manage your Kubernetes deployments by tracking the desired application state in Git repositories and automatically syncing it to your clusters.
Integration with Dapr
You can use Argo CD to manage the deployment of Dapr control plane components and Dapr-enabled applications. By adopting a GitOps approach, you ensure that Dapr’s configurations and applications are consistently deployed, versioned, and auditable across your environments. Argo CD can be easily configured to deploy Helm charts, manifests, and Dapr components stored in Git repositories.
Sample code
A sample project demonstrating Dapr deployment with Argo CD is available at https://github.com/dapr/samples/tree/master/dapr-argocd.