This is the multi-page printable view of this section. Click here to print.
Pluggable components
- 1: Pluggable components overview
- 2: How to: Implement pluggable components
- 3: Pluggable components SDKs
- 3.1: Getting started with the Dapr pluggable components .NET SDK
- 3.1.1: Implementing a .NET input/output binding component
- 3.1.2: Implementing a .NET pub/sub component
- 3.1.3: Implementing a .NET state store component
- 3.1.4: Advanced uses of the Dapr pluggable components .NET SDK
- 3.2: Getting started with the Dapr pluggable components Go SDK
1 - Pluggable components overview
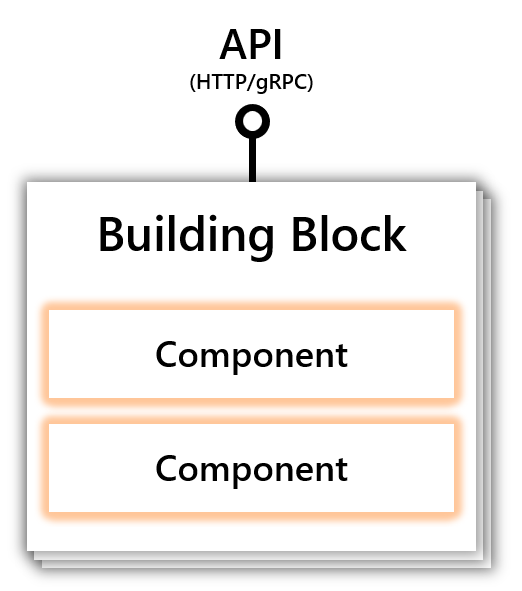
Pluggable components are components that are not included as part the runtime, as opposed to the built-in components included with dapr init. You can configure Dapr to use pluggable components that leverage the building block APIs, but are registered differently from the built-in Dapr components.
Pluggable components vs. built-in components
Dapr provides two approaches for registering and creating components:
- The built-in components included in the runtime and found in the components-contrib repository .
- Pluggable components which are deployed and registered independently.
While both registration options leverage Dapr’s building block APIs, each has a different implementation processes.
| Component details | Built-in Component | Pluggable Components |
|---|---|---|
| Language | Can only be written in Go | Can be written in any gRPC-supported language |
| Where it runs | As part of the Dapr runtime executable | As a distinct process or container in a pod. Runs separate from Dapr itself. |
| Registers with Dapr | Included into the Dapr codebase | Registers with Dapr via Unix Domain Sockets (using gRPC ) |
| Distribution | Distributed with Dapr release. New features added to component are aligned with Dapr releases | Distributed independently from Dapr itself. New features can be added when needed and follows its own release cycle. |
| How component is activated | Dapr starts runs the component (automatic) | User starts component (manual) |
Why create a pluggable component?
Pluggable components prove useful in scenarios where:
- You require a private component.
- You want to keep your component separate from the Dapr release process.
- You are not as familiar with Go, or implementing your component in Go is not ideal.
Features
Implement a pluggable component
In order to implement a pluggable component, you need to implement a gRPC service in the component. Implementing the gRPC service requires three steps:
- Find the proto definition file
- Create service scaffolding
- Define the service
Learn more about how to develop and implement a pluggable component
Leverage multiple building blocks for a component
In addition to implementing multiple gRPC services from the same component (for example StateStore, QueriableStateStore, TransactionalStateStore etc.), a pluggable component can also expose implementations for other component interfaces. This means that a single pluggable component can simultaneously function as a state store, pub/sub, and input or output binding. In other words, you can implement multiple component interfaces into a pluggable component and expose them as gRPC services.
While exposing multiple component interfaces on the same pluggable component lowers the operational burden of deploying multiple components, it makes implementing and debugging your component harder. If in doubt, stick to a “separation of concerns” by merging multiple components interfaces into the same pluggable component only when necessary.
Operationalize a pluggable component
Built-in components and pluggable components share one thing in common: both need a component specification. Built-in components do not require any extra steps to be used: Dapr is ready to use them automatically.
In contrast, pluggable components require additional steps before they can communicate with Dapr. You need to first run the component and facilitate Dapr-component communication to kick off the registration process.
Next steps
2 - How to: Implement pluggable components
In this guide, you’ll learn why and how to implement a pluggable component. To learn how to configure and register a pluggable component, refer to How to: Register a pluggable component
Implement a pluggable component
In order to implement a pluggable component, you need to implement a gRPC service in the component. Implementing the gRPC service requires three steps:
Find the proto definition file
Proto definitions are provided for each supported service interface (state store, pub/sub, bindings, secret stores).
Currently, the following component APIs are supported:
- State stores
- Pub/sub
- Bindings
- Secret stores
| Component | Type | gRPC definition | Built-in Reference Implementation | Docs |
|---|---|---|---|---|
| State Store | state | state.proto | Redis | concept, howto, api spec |
| Pub/sub | pubsub | pubsub.proto | Redis | concept, howto, api spec |
| Bindings | bindings | bindings.proto | Kafka | concept, input howto, output howto, api spec |
| Secret Store | secretstores | secretstore.proto | Hashicorp/Vault | concept, howto-secrets, api spec |
Below is a snippet of the gRPC service definition for pluggable component state stores ([state.proto]):
// StateStore service provides a gRPC interface for state store components.
service StateStore {
  // Initializes the state store component with the given metadata.
  rpc Init(InitRequest) returns (InitResponse) {}
  // Returns a list of implemented state store features.
  rpc Features(FeaturesRequest) returns (FeaturesResponse) {}
  // Ping the state store. Used for liveness purposes.
  rpc Ping(PingRequest) returns (PingResponse) {}

  // Deletes the specified key from the state store.
  rpc Delete(DeleteRequest) returns (DeleteResponse) {}
  // Get data from the given key.
  rpc Get(GetRequest) returns (GetResponse) {}
  // Sets the value of the specified key.
  rpc Set(SetRequest) returns (SetResponse) {}


  // Deletes many keys at once.
  rpc BulkDelete(BulkDeleteRequest) returns (BulkDeleteResponse) {}
  // Retrieves many keys at once.
  rpc BulkGet(BulkGetRequest) returns (BulkGetResponse) {}
  // Set the value of many keys at once.
  rpc BulkSet(BulkSetRequest) returns (BulkSetResponse) {}
}
The interface for the StateStore service exposes a total of 9 methods:
- 2 methods for initialization and components capability advertisement (Init and Features)
- 1 method for health-ness or liveness check (Ping)
- 3 methods for CRUD (Get, Set, Delete)
- 3 methods for bulk CRUD operations (BulkGet, BulkSet, BulkDelete)
Create service scaffolding
Use protocol buffers and gRPC tools to create the necessary scaffolding for the service. Learn more about these tools via the gRPC concepts documentation.
These tools generate code targeting any gRPC-supported language. This code serves as the base for your server and it provides:
- Functionality to handle client calls
- Infrastructure to:
- Decode incoming requests
- Execute service methods
- Encode service responses
The generated code is incomplete. It is missing:
- A concrete implementation for the methods your target service defines (the core of your pluggable component).
- Code on how to handle Unix Socket Domain integration, which is Dapr specific.
- Code handling integration with your downstream services.
Learn more about filling these gaps in the next step.
Define the service
Provide a concrete implementation of the desired service. Each component has a gRPC service definition for its core functionality which is the same as the core component interface. For example:
State stores
A pluggable state store must provide an implementation of the
StateStoreservice interface.In addition to this core functionality, some components might also expose functionality under other optional services. For example, you can add extra functionality by defining the implementation for a
QueriableStateStoreservice and aTransactionalStateStoreservice.Pub/sub
Pluggable pub/sub components only have a single core service interface defined pubsub.proto. They have no optional service interfaces.
Bindings
Pluggable input and output bindings have a single core service definition on bindings.proto. They have no optional service interfaces.
Secret Store
Pluggable Secret store have a single core service definition on secretstore.proto. They have no optional service interfaces.
After generating the above state store example’s service scaffolding code using gRPC and protocol buffers tools, you can define concrete implementations for the 9 methods defined under service StateStore, along with code to initialize and communicate with your dependencies.
This concrete implementation and auxiliary code are the core of your pluggable component. They define how your component behaves when handling gRPC requests from Dapr.
Returning semantic errors
Returning semantic errors are also part of the pluggable component protocol. The component must return specific gRPC codes that have semantic meaning for the user application, those errors are used to a variety of situations from concurrency requirements to informational only.
| Error | gRPC error code | Source component | Description |
|---|---|---|---|
| ETag Mismatch | codes.FailedPrecondition | State store | Error mapping to meet concurrency requirements |
| ETag Invalid | codes.InvalidArgument | State store | |
| Bulk Delete Row Mismatch | codes.Internal | State store |
Learn more about concurrency requirements in the State Management overview.
The following examples demonstrate how to return an error in your own pluggable component, changing the messages to suit your needs.
Important: In order to use .NET for error mapping, first install the
Google.Api.CommonProtosNuGet package.
Etag Mismatch
var badRequest = new BadRequest();
var des = "The ETag field provided does not match the one in the store";
badRequest.FieldViolations.Add(
   new Google.Rpc.BadRequest.Types.FieldViolation
       {
         Field = "etag",
         Description = des
       });

var baseStatusCode = Grpc.Core.StatusCode.FailedPrecondition;
var status = new Google.Rpc.Status{
   Code = (int)baseStatusCode
};

status.Details.Add(Google.Protobuf.WellKnownTypes.Any.Pack(badRequest));

var metadata = new Metadata();
metadata.Add("grpc-status-details-bin", status.ToByteArray());
throw new RpcException(new Grpc.Core.Status(baseStatusCode, "fake-err-msg"), metadata);
Etag Invalid
var badRequest = new BadRequest();
var des = "The ETag field must only contain alphanumeric characters";
badRequest.FieldViolations.Add(
   new Google.Rpc.BadRequest.Types.FieldViolation
   {
      Field = "etag",
      Description = des
   });

var baseStatusCode = Grpc.Core.StatusCode.InvalidArgument;
var status = new Google.Rpc.Status
{
   Code = (int)baseStatusCode
};

status.Details.Add(Google.Protobuf.WellKnownTypes.Any.Pack(badRequest));

var metadata = new Metadata();
metadata.Add("grpc-status-details-bin", status.ToByteArray());
throw new RpcException(new Grpc.Core.Status(baseStatusCode, "fake-err-msg"), metadata);
Bulk Delete Row Mismatch
var errorInfo = new Google.Rpc.ErrorInfo();

errorInfo.Metadata.Add("expected", "100");
errorInfo.Metadata.Add("affected", "99");

var baseStatusCode = Grpc.Core.StatusCode.Internal;
var status = new Google.Rpc.Status{
    Code = (int)baseStatusCode
};

status.Details.Add(Google.Protobuf.WellKnownTypes.Any.Pack(errorInfo));

var metadata = new Metadata();
metadata.Add("grpc-status-details-bin", status.ToByteArray());
throw new RpcException(new Grpc.Core.Status(baseStatusCode, "fake-err-msg"), metadata);
Just like the Dapr Java SDK, the Java Pluggable Components SDK uses Project Reactor, which provides an asynchronous API for Java.
Errors can be returned directly by:
- Calling the
.error()method in theMonoorFluxthat your method returns - Providing the appropriate exception as parameter.
You can also raise an exception, as long as it is captured and fed back to your resulting Mono or Flux.
ETag Mismatch
final Status status = Status.newBuilder()
    .setCode(io.grpc.Status.Code.FAILED_PRECONDITION.value())
    .setMessage("fake-err-msg-for-etag-mismatch")
    .addDetails(Any.pack(BadRequest.FieldViolation.newBuilder()
        .setField("etag")
        .setDescription("The ETag field provided does not match the one in the store")
        .build()))
    .build();
return Mono.error(StatusProto.toStatusException(status));
ETag Invalid
final Status status = Status.newBuilder()
    .setCode(io.grpc.Status.Code.INVALID_ARGUMENT.value())
    .setMessage("fake-err-msg-for-invalid-etag")
    .addDetails(Any.pack(BadRequest.FieldViolation.newBuilder()
        .setField("etag")
        .setDescription("The ETag field must only contain alphanumeric characters")
        .build()))
    .build();
return Mono.error(StatusProto.toStatusException(status));
Bulk Delete Row Mismatch
final Status status = Status.newBuilder()
    .setCode(io.grpc.Status.Code.INTERNAL.value())
    .setMessage("fake-err-msg-for-bulk-delete-row-mismatch")
    .addDetails(Any.pack(ErrorInfo.newBuilder()
        .putAllMetadata(Map.ofEntries(
            Map.entry("affected", "99"),
            Map.entry("expected", "100")
        ))
        .build()))
    .build();
return Mono.error(StatusProto.toStatusException(status));
ETag Mismatch
st := status.New(codes.FailedPrecondition, "fake-err-msg")
desc := "The ETag field provided does not match the one in the store"
v := &errdetails.BadRequest_FieldViolation{
	Field:       etagField,
	Description: desc,
}
br := &errdetails.BadRequest{}
br.FieldViolations = append(br.FieldViolations, v)
st, err := st.WithDetails(br)
ETag Invalid
st := status.New(codes.InvalidArgument, "fake-err-msg")
desc := "The ETag field must only contain alphanumeric characters"
v := &errdetails.BadRequest_FieldViolation{
	Field:       etagField,
	Description: desc,
}
br := &errdetails.BadRequest{}
br.FieldViolations = append(br.FieldViolations, v)
st, err := st.WithDetails(br)
Bulk Delete Row Mismatch
st := status.New(codes.Internal, "fake-err-msg")
br := &errdetails.ErrorInfo{}
br.Metadata = map[string]string{
	affected: "99",
	expected: "100",
}
st, err := st.WithDetails(br)
Next steps
- Get started with developing .NET pluggable component using this sample code
- Review the pluggable components overview
- Learn how to register your pluggable component
3 - Pluggable components SDKs
The Dapr SDKs are the easiest way for you to create pluggable components. Choose your favorite language and start creating components in minutes.
Pluggable components SDKs
| Language | Status |
|---|---|
| Go | In development |
| .NET | In development |
3.1 - Getting started with the Dapr pluggable components .NET SDK
Dapr offers NuGet packages to help with the development of .NET pluggable components.
Prerequisites
- .NET 6 SDK or later
- Dapr 1.9 CLI or later
- Initialized Dapr environment
- Linux, Mac, or Windows (with WSL)
Note
Development of Dapr pluggable components on Windows requires WSL as some development platforms do not fully support Unix Domain Sockets on “native” Windows.Project creation
Creating a pluggable component starts with an empty ASP.NET project.
dotnet new web --name <project name>
Add NuGet packages
Add the Dapr .NET pluggable components NuGet package.
dotnet add package Dapr.PluggableComponents.AspNetCore
Create application and service
Creating a Dapr pluggable component application is similar to creating an ASP.NET application. In Program.cs, replace the WebApplication related code with the Dapr DaprPluggableComponentsApplication equivalent.
using Dapr.PluggableComponents;

var app = DaprPluggableComponentsApplication.Create();

app.RegisterService(
    "<socket name>",
    serviceBuilder =>
    {
        // Register one or more components with this service.
    });

app.Run();
This creates an application with a single service. Each service:
- Corresponds to a single Unix Domain Socket
- Can host one or more component types
Note
Only a single component of each type can be registered with an individual service. However, multiple components of the same type can be spread across multiple services.Implement and register components
- Implementing an input/output binding component
- Implementing a pub-sub component
- Implementing a state store component
Test components locally
Pluggable components can be tested by starting the application on the command line and configuring a Dapr sidecar to use it.
To start the component, in the application directory:
dotnet run
To configure Dapr to use the component, in the resources path directory:
apiVersion: dapr.io/v1alpha1
kind: Component
metadata:
  name: <component name>
spec:
  type: state.<socket name>
  version: v1
  metadata:
  - name: key1
    value: value1
  - name: key2
    value: value2
Any metadata properties will be passed to the component via its IPluggableComponent.InitAsync() method when the component is instantiated.
To start Dapr (and, optionally, the service making use of the service):
dapr run --app-id <app id> --resources-path <resources path> ...
At this point, the Dapr sidecar will have started and connected via Unix Domain Socket to the component. You can then interact with the component either:
- Through the service using the component (if started), or
- By using the Dapr HTTP or gRPC API directly
Create Container
There are several ways to create a container for your component for eventual deployment.
Use .NET SDK
The .NET 7 and later SDKs enable you to create a .NET-based container for your application without a Dockerfile, even for those targeting earlier versions of the .NET SDK. This is probably the simplest way of generating a container for your component today.
Note
Currently, the .NET 7 SDK requires Docker Desktop on the local machine, a special NuGet package, and Docker Desktop on the local machine to build containers. Future versions of .NET SDK plan to eliminate those requirements.
Multiple versions of the .NET SDK can be installed on the local machine at the same time.
Add the Microsoft.NET.Build.Containers NuGet package to the component project.
dotnet add package Microsoft.NET.Build.Containers
Publish the application as a container:
dotnet publish --os linux --arch x64 /t:PublishContainer -c Release
Note
Ensure the architecture argument--arch x64 matches that of the component’s ultimate deployment target. By default, the architecture of the generated container matches that of the local machine. For example, if the local machine is ARM64-based (for example, a M1 or M2 Mac) and the argument is omitted, an ARM64 container will be generated which may not be compatible with deployment targets expecting an AMD64 container.For more configuration options, such as controlling the container name, tag, and base image, see the .NET publish as container guide.
Use a Dockerfile
While there are tools that can generate a Dockerfile for a .NET application, the .NET SDK itself does not. A typical Dockerfile might look like:
FROM mcr.microsoft.com/dotnet/aspnet:<runtime> AS base
WORKDIR /app

# Creates a non-root user with an explicit UID and adds permission to access the /app folder
# For more info, please refer to https://aka.ms/vscode-docker-dotnet-configure-containers
RUN adduser -u 5678 --disabled-password --gecos "" appuser && chown -R appuser /app
USER appuser

FROM mcr.microsoft.com/dotnet/sdk:<runtime> AS build
WORKDIR /src
COPY ["<application>.csproj", "<application folder>/"]
RUN dotnet restore "<application folder>/<application>.csproj"
COPY . .
WORKDIR "/src/<application folder>"
RUN dotnet build "<application>.csproj" -c Release -o /app/build

FROM build AS publish
RUN dotnet publish "<application>.csproj" -c Release -o /app/publish /p:UseAppHost=false

FROM base AS final
WORKDIR /app
COPY --from=publish /app/publish .
ENTRYPOINT ["dotnet", "<application>.dll"]
Build the image:
docker build -f Dockerfile -t <image name>:<tag> .
Note
Paths forCOPY operations in the Dockerfile are relative to the Docker context passed when building the image, while the Docker context itself will vary depending on the needs of the project being built (for example, if it has referenced projects). In the example above, the assumption is that the Docker context is the component project directory.Demo
Watch this video for a demo on building pluggable components with .NET:
Next steps
- Learn advanced steps for the Pluggable Component .NET SDK
- Learn more about using the Pluggable Component .NET SDK for:
3.1.1 - Implementing a .NET input/output binding component
Creating a binding component requires just a few basic steps.
Add bindings namespaces
Add using statements for the bindings related namespaces.
using Dapr.PluggableComponents.Components;
using Dapr.PluggableComponents.Components.Bindings;
Input bindings: Implement IInputBinding
Create a class that implements the IInputBinding interface.
internal sealed class MyBinding : IInputBinding
{
    public Task InitAsync(MetadataRequest request, CancellationToken cancellationToken = default)
    {
        // Called to initialize the component with its configured metadata...
    }

    public async Task ReadAsync(MessageDeliveryHandler<InputBindingReadRequest, InputBindingReadResponse> deliveryHandler, CancellationToken cancellationToken = default)
    {
        // Until canceled, check the underlying store for messages and deliver them to the Dapr runtime...
    }
}
Calls to the ReadAsync() method are “long-lived”, in that the method is not expected to return until canceled (for example, via the cancellationToken). As messages are read from the underlying store of the component, they are delivered to the Dapr runtime via the deliveryHandler callback. Delivery allows the component to receive notification if/when the application (served by the Dapr runtime) acknowledges processing of the message.
    public async Task ReadAsync(MessageDeliveryHandler<InputBindingReadRequest, InputBindingReadResponse> deliveryHandler, CancellationToken cancellationToken = default)
    {
        TimeSpan pollInterval = // Polling interval (e.g. from initalization metadata)...

        // Poll the underlying store until canceled...
        while (!cancellationToken.IsCancellationRequested)
        {
            var messages = // Poll underlying store for messages...

            foreach (var message in messages)
            {
                // Deliver the message to the Dapr runtime...
                await deliveryHandler(
                    new InputBindingReadResponse
                    {
                        // Set the message content...
                    },
                    // Callback invoked when application acknowledges the message...
                    async request =>
                    {
                        // Process response data or error message...
                    })
            }

            // Wait for the next poll (or cancellation)...
            await Task.Delay(pollInterval, cancellationToken);
        }
    }
Output bindings: Implement IOutputBinding
Create a class that implements the IOutputBinding interface.
internal sealed class MyBinding : IOutputBinding
{
    public Task InitAsync(MetadataRequest request, CancellationToken cancellationToken = default)
    {
        // Called to initialize the component with its configured metadata...
    }

    public Task<OutputBindingInvokeResponse> InvokeAsync(OutputBindingInvokeRequest request, CancellationToken cancellationToken = default)
    {
        // Called to invoke a specific operation...
    }

    public Task<string[]> ListOperationsAsync(CancellationToken cancellationToken = default)
    {
        // Called to list the operations that can be invoked.
    }
}
Input and output binding components
A component can be both an input and output binding, simply by implementing both interfaces.
internal sealed class MyBinding : IInputBinding, IOutputBinding
{
    // IInputBinding Implementation...

    // IOutputBinding Implementation...
}
Register binding component
In the main program file (for example, Program.cs), register the binding component in an application service.
using Dapr.PluggableComponents;

var app = DaprPluggableComponentsApplication.Create();

app.RegisterService(
    "<socket name>",
    serviceBuilder =>
    {
        serviceBuilder.RegisterBinding<MyBinding>();
    });

app.Run();
Note
A component that implements bothIInputBinding and IOutputBinding will be registered as both an input and output binding.Next steps
- Learn advanced steps for the Pluggable Component .NET SDK
- Learn more about using the Pluggable Component .NET SDK for:
3.1.2 - Implementing a .NET pub/sub component
Creating a pub/sub component requires just a few basic steps.
Add pub/sub namespaces
Add using statements for the pub/sub related namespaces.
using Dapr.PluggableComponents.Components;
using Dapr.PluggableComponents.Components.PubSub;
Implement IPubSub
Create a class that implements the IPubSub interface.
internal sealed class MyPubSub : IPubSub
{
    public Task InitAsync(MetadataRequest request, CancellationToken cancellationToken = default)
    {
        // Called to initialize the component with its configured metadata...
    }

    public Task PublishAsync(PubSubPublishRequest request, CancellationToken cancellationToken = default)
    {
        // Send the message to the "topic"...
    }

    public Task PullMessagesAsync(PubSubPullMessagesTopic topic, MessageDeliveryHandler<string?, PubSubPullMessagesResponse> deliveryHandler, CancellationToken cancellationToken = default)
    {
        // Until canceled, check the topic for messages and deliver them to the Dapr runtime...
    }
}
Calls to the PullMessagesAsync() method are “long-lived”, in that the method is not expected to return until canceled (for example, via the cancellationToken). The “topic” from which messages should be pulled is passed via the topic argument, while the delivery to the Dapr runtime is performed via the deliveryHandler callback. Delivery allows the component to receive notification if/when the application (served by the Dapr runtime) acknowledges processing of the message.
    public async Task PullMessagesAsync(PubSubPullMessagesTopic topic, MessageDeliveryHandler<string?, PubSubPullMessagesResponse> deliveryHandler, CancellationToken cancellationToken = default)
    {
        TimeSpan pollInterval = // Polling interval (e.g. from initalization metadata)...

        // Poll the topic until canceled...
        while (!cancellationToken.IsCancellationRequested)
        {
            var messages = // Poll topic for messages...

            foreach (var message in messages)
            {
                // Deliver the message to the Dapr runtime...
                await deliveryHandler(
                    new PubSubPullMessagesResponse(topicName)
                    {
                        // Set the message content...
                    },
                    // Callback invoked when application acknowledges the message...
                    async errorMessage =>
                    {
                        // An empty message indicates the application successfully processed the message...
                        if (String.IsNullOrEmpty(errorMessage))
                        {
                            // Delete the message from the topic...
                        }
                    })
            }

            // Wait for the next poll (or cancellation)...
            await Task.Delay(pollInterval, cancellationToken);
        }
    }
Register pub/sub component
In the main program file (for example, Program.cs), register the pub/sub component with an application service.
using Dapr.PluggableComponents;

var app = DaprPluggableComponentsApplication.Create();

app.RegisterService(
    "<socket name>",
    serviceBuilder =>
    {
        serviceBuilder.RegisterPubSub<MyPubSub>();
    });

app.Run();
Next steps
- Learn advanced steps for the Pluggable Component .NET SDK
- Learn more about using the Pluggable Component .NET SDK for:
3.1.3 - Implementing a .NET state store component
Creating a state store component requires just a few basic steps.
Add state store namespaces
Add using statements for the state store related namespaces.
using Dapr.PluggableComponents.Components;
using Dapr.PluggableComponents.Components.StateStore;
Implement IStateStore
Create a class that implements the IStateStore interface.
internal sealed class MyStateStore : IStateStore
{
    public Task DeleteAsync(StateStoreDeleteRequest request, CancellationToken cancellationToken = default)
    {
        // Delete the requested key from the state store...
    }

    public Task<StateStoreGetResponse?> GetAsync(StateStoreGetRequest request, CancellationToken cancellationToken = default)
    {
        // Get the requested key value from from the state store, else return null...
    }

    public Task InitAsync(MetadataRequest request, CancellationToken cancellationToken = default)
    {
        // Called to initialize the component with its configured metadata...
    }

    public Task SetAsync(StateStoreSetRequest request, CancellationToken cancellationToken = default)
    {
        // Set the requested key to the specified value in the state store...
    }
}
Register state store component
In the main program file (for example, Program.cs), register the state store with an application service.
using Dapr.PluggableComponents;

var app = DaprPluggableComponentsApplication.Create();

app.RegisterService(
    "<socket name>",
    serviceBuilder =>
    {
        serviceBuilder.RegisterStateStore<MyStateStore>();
    });

app.Run();
Bulk state stores
State stores that intend to support bulk operations should implement the optional IBulkStateStore interface. Its methods mirror those of the base IStateStore interface, but include multiple requested values.
Note
The Dapr runtime will emulate bulk state store operations for state stores that do not implementIBulkStateStore by calling its operations individually.internal sealed class MyStateStore : IStateStore, IBulkStateStore
{
// ...
public Task BulkDeleteAsync(StateStoreDeleteRequest[] requests, CancellationToken cancellationToken = default)
{
// Delete all of the requested values from the state store...
}
public Task<StateStoreBulkStateItem[]> BulkGetAsync(StateStoreGetRequest[] requests, CancellationToken cancellationToken = default)
{
// Return the values of all of the requested values from the state store...
}
public Task BulkSetAsync(StateStoreSetRequest[] requests, CancellationToken cancellationToken = default)
{
// Set all of the values of the requested keys in the state store...
}
}
Transactional state stores
State stores that intend to support transactions should implement the optional ITransactionalStateStore interface. Its TransactAsync() method is passed a request with a sequence of delete and/or set operations to be performed within a transaction. The state store should iterate over the sequence and call each operation’s Visit() method, passing callbacks that represent the action to take for each type of operation.
internal sealed class MyStateStore : IStateStore, ITransactionalStateStore
{
    // ...

    public async Task TransactAsync(StateStoreTransactRequest request, CancellationToken cancellationToken = default)
    {
        // Start transaction...

        try
        {
            foreach (var operation in request.Operations)
            {
                await operation.Visit(
                    async deleteRequest =>
                    {
                        // Process delete request...

                    },
                    async setRequest =>
                    {
                        // Process set request...
                    });
            }
        }
        catch
        {
            // Rollback transaction...

            throw;
        }

        // Commit transaction...
    }
}
Queryable state stores
State stores that intend to support queries should implement the optional IQueryableStateStore interface. Its QueryAsync() method is passed details about the query, such as the filter(s), result limits and pagination, and sort order(s) of the results. The state store should use those details to generate a set of values to return as part of its response.
internal sealed class MyStateStore : IStateStore, IQueryableStateStore
{
    // ...

    public Task<StateStoreQueryResponse> QueryAsync(StateStoreQueryRequest request, CancellationToken cancellationToken = default)
    {
        // Generate and return results...
    }
}
ETag and other semantic error handling
The Dapr runtime has additional handling of certain error conditions resulting from some state store operations. State stores can indicate such conditions by throwing specific exceptions from its operation logic:
| Exception | Applicable Operations | Description |
|---|---|---|
ETagInvalidException | Delete, Set, Bulk Delete, Bulk Set | When an ETag is invalid |
ETagMismatchException | Delete, Set, Bulk Delete, Bulk Set | When an ETag does not match an expected value |
BulkDeleteRowMismatchException | Bulk Delete | When the number of affected rows does not match the expected rows |
Next steps
- Learn advanced steps for the Pluggable Component .NET SDK
- Learn more about using the Pluggable Component .NET SDK for:
3.1.4 - Advanced uses of the Dapr pluggable components .NET SDK
While not typically needed by most, these guides show advanced ways to can configure your .NET pluggable components.
3.1.4.1 - Application Environment of a .NET Dapr pluggable component
A .NET Dapr pluggable component application can be configured for dependency injection, logging, and configuration values similarly to ASP.NET applications. The DaprPluggableComponentsApplication exposes a similar set of configuration properties to that exposed by WebApplicationBuilder.
Dependency injection
Components registered with services can participate in dependency injection. Arguments in the components constructor will be injected during creation, assuming those types have been registered with the application. You can register them through the IServiceCollection exposed by DaprPluggableComponentsApplication.
var app = DaprPluggableComponentsApplication.Create();

// Register MyService as the singleton implementation of IService.
app.Services.AddSingleton<IService, MyService>();

app.RegisterService(
    "<service name>",
    serviceBuilder =>
    {
        serviceBuilder.RegisterStateStore<MyStateStore>();
    });

app.Run();

interface IService
{
    // ...
}

class MyService : IService
{
    // ...
}

class MyStateStore : IStateStore
{
    // Inject IService on creation of the state store.
    public MyStateStore(IService service)
    {
        // ...
    }

    // ...
}
Warning
Use ofIServiceCollection.AddScoped() is not recommended. Such instances’ lifetimes are bound to a single gRPC method call, which does not match the lifetime of an individual component instance.Logging
.NET Dapr pluggable components can use the standard .NET logging mechanisms. The DaprPluggableComponentsApplication exposes an ILoggingBuilder, through which it can be configured.
Note
Like with ASP.NET, logger services (for example,ILogger<T>) are pre-registered.var app = DaprPluggableComponentsApplication.Create();
// Reset the default loggers and setup new ones.
app.Logging.ClearProviders();
app.Logging.AddConsole();
app.RegisterService(
"<service name>",
serviceBuilder =>
{
serviceBuilder.RegisterStateStore<MyStateStore>();
});
app.Run();
class MyStateStore : IStateStore
{
// Inject a logger on creation of the state store.
public MyStateStore(ILogger<MyStateStore> logger)
{
// ...
}
// ...
}
Configuration Values
Since .NET pluggable components are built on ASP.NET, they can use its standard configuration mechanisms and default to the same set of pre-registered providers. The DaprPluggableComponentsApplication exposes an IConfigurationManager through which it can be configured.
var app = DaprPluggableComponentsApplication.Create();

// Reset the default configuration providers and add new ones.
((IConfigurationBuilder)app.Configuration).Sources.Clear();
app.Configuration.AddEnvironmentVariables();

// Get configuration value on startup.
const value = app.Configuration["<name>"];

app.RegisterService(
    "<service name>",
    serviceBuilder =>
    {
        serviceBuilder.RegisterStateStore<MyStateStore>();
    });

app.Run();

class MyStateStore : IStateStore
{
    // Inject the configuration on creation of the state store.
    public MyStateStore(IConfiguration configuration)
    {
        // ...
    }

    // ...
}
Next steps
- Learn more about the component lifetime
- Learn more about multiple services
- Learn more about using the Pluggable Component .NET SDK for:
3.1.4.2 - Lifetimes of .NET Dapr pluggable components
There are two ways to register a component:
- The component operates as a singleton, with lifetime managed by the SDK
- A component’s lifetime is determined by the pluggable component and can be multi-instance or a singleton, as needed
Singleton components
Components registered by type are singletons: one instance will serve all configured components of that type associated with that socket. This approach is best when only a single component of that type exists and is shared amongst Dapr applications.
var app = DaprPluggableComponentsApplication.Create();

app.RegisterService(
    "service-a",
    serviceBuilder =>
    {
        serviceBuilder.RegisterStateStore<SingletonStateStore>();
    });

app.Run();

class SingletonStateStore : IStateStore
{
    // ...
}
Multi-instance components
Components can be registered by passing a “factory method”. This method will be called for each configured component of that type associated with that socket. The method returns the instance to associate with that component (whether shared or not). This approach is best when multiple components of the same type may be configured with different sets of metadata, when component operations need to be isolated from one another, etc.
The factory method will be passed context, such as the ID of the configured Dapr component, that can be used to differentiate component instances.
var app = DaprPluggableComponentsApplication.Create();

app.RegisterService(
    "service-a",
    serviceBuilder =>
    {
        serviceBuilder.RegisterStateStore(
            context =>
            {
                return new MultiStateStore(context.InstanceId);
            });
    });

app.Run();

class MultiStateStore : IStateStore
{
    private readonly string instanceId;

    public MultiStateStore(string instanceId)
    {
        this.instanceId = instanceId;
    }

    // ...
}
Next steps
- Learn more about the application environment
- Learn more about multiple services
- Learn more about using the Pluggable Component .NET SDK for:
3.1.4.3 - Multiple services in a .NET Dapr pluggable component
A pluggable component can host multiple components of varying types. You might do this:
- To minimize the number of sidecars running in a cluster
- To group related components that are likely to share libraries and implementation, such as:
- A database exposed both as a general state store, and
- Output bindings that allow more specific operations.
Each Unix Domain Socket can manage calls to one component of each type. To host multiple components of the same type, you can spread those types across multiple sockets. The SDK binds each socket to a “service”, with each service composed of one or more component types.
Registering multiple services
Each call to RegisterService() binds a socket to a set of registered components, where one of each type of component can be registered per service.
var app = DaprPluggableComponentsApplication.Create();

app.RegisterService(
    "service-a",
    serviceBuilder =>
    {
        serviceBuilder.RegisterStateStore<MyDatabaseStateStore>();
        serviceBuilder.RegisterBinding<MyDatabaseOutputBinding>();
    });

app.RegisterService(
    "service-b",
    serviceBuilder =>
    {
        serviceBuilder.RegisterStateStore<AnotherStateStore>();
    });

app.Run();

class MyDatabaseStateStore : IStateStore
{
    // ...
}

class MyDatabaseOutputBinding : IOutputBinding
{
    // ...
}

class AnotherStateStore : IStateStore
{
    // ...
}
Configuring Multiple Components
Configuring Dapr to use the hosted components is the same as for any single component - the component YAML refers to the associated socket.
#
# This component uses the state store associated with socket `state-store-a`
#
apiVersion: dapr.io/v1alpha1
kind: Component
metadata:
  name: state-store-a
spec:
  type: state.service-a
  version: v1
  metadata: []
#
# This component uses the state store associated with socket `state-store-b`
#
apiVersion: dapr.io/v1alpha1
kind: Component
metadata:
  name: state-store-b
spec:
  type: state.service-b
  version: v1
  metadata: []
Next steps
- Learn more about the component lifetime
- Learn more about the application environment
- Learn more about using the Pluggable Component .NET SDK for:
3.2 - Getting started with the Dapr pluggable components Go SDK
Dapr offers packages to help with the development of Go pluggable components.
Prerequisites
- Go 1.20 or later
- Dapr 1.9 CLI or later
- Initialized Dapr environment
- Linux, Mac, or Windows (with WSL)
Note
Development of Dapr pluggable components on Windows requires WSL. Not all languages and SDKs expose Unix Domain Sockets on “native” Windows.Application creation
Creating a pluggable component starts with an empty Go application.
mkdir example
cd example
go mod init example
Import Dapr packages
Import the Dapr pluggable components SDK package.
go get github.com/dapr-sandbox/components-go-sdk@v0.1.0
Create main package
In main.go, import the Dapr plugggable components package and run the application.
package main

import (
	dapr "github.com/dapr-sandbox/components-go-sdk"
)

func main() {
	dapr.MustRun()
}
This creates an application with no components. You will need to implement and register one or more components.
Implement and register components
- Implementing an input/output binding component
- Implementing a pub/sub component
- Implementing a state store component
Note
Only a single component of each type can be registered with an individual service. However, multiple components of the same type can be spread across multiple services.Test components locally
Create the Dapr components socket directory
Dapr communicates with pluggable components via Unix Domain Sockets files in a common directory. By default, both Dapr and pluggable components use the /tmp/dapr-components-sockets directory. You should create this directory if it does not already exist.
mkdir /tmp/dapr-components-sockets
Start the pluggable component
Pluggable components can be tested by starting the application on the command line.
To start the component, in the application directory:
go run main.go
Configure Dapr to use the pluggable component
To configure Dapr to use the component, create a component YAML file in the resources directory. For example, for a state store component:
apiVersion: dapr.io/v1alpha1
kind: Component
metadata:
  name: <component name>
spec:
  type: state.<socket name>
  version: v1
  metadata:
  - name: key1
    value: value1
  - name: key2
    value: value2
Any metadata properties will be passed to the component via its Store.Init(metadata state.Metadata) method when the component is instantiated.
Start Dapr
To start Dapr (and, optionally, the service making use of the service):
dapr run --app-id <app id> --resources-path <resources path> ...
At this point, the Dapr sidecar will have started and connected via Unix Domain Socket to the component. You can then interact with the component either:
- Through the service using the component (if started), or
- By using the Dapr HTTP or gRPC API directly
Create container
Pluggable components are deployed as containers that run as sidecars to the application (like Dapr itself). A typical Dockerfile for creating a Docker image for a Go application might look like:
FROM golang:1.20-alpine AS builder

WORKDIR /usr/src/app

# Download dependencies
COPY go.mod go.sum ./
RUN go mod download && go mod verify

# Build the application
COPY . .
RUN go build -v -o /usr/src/bin/app .

FROM alpine:latest

# Setup non-root user and permissions
RUN addgroup -S app && adduser -S app -G app
RUN mkdir /tmp/dapr-components-sockets && chown app /tmp/dapr-components-sockets

# Copy application to runtime image
COPY --from=builder --chown=app /usr/src/bin/app /app

USER app

CMD ["/app"]
Build the image:
docker build -f Dockerfile -t <image name>:<tag> .
Note
Paths forCOPY operations in the Dockerfile are relative to the Docker context passed when building the image, while the Docker context itself will vary depending on the needs of the application being built. In the example above, the assumption is that the Docker context is the component application directory.Next steps
- Advanced techniques with the pluggable components Go SDK
- Learn more about implementing:
3.2.1 - Implementing a Go input/output binding component
Creating a binding component requires just a few basic steps.
Import bindings packages
Create the file components/inputbinding.go and add import statements for the state store related packages.
package components

import (
	"context"
	"github.com/dapr/components-contrib/bindings"
)
Input bindings: Implement the InputBinding interface
Create a type that implements the InputBinding interface.
type MyInputBindingComponent struct {
}

func (component *MyInputBindingComponent) Init(meta bindings.Metadata) error {
	// Called to initialize the component with its configured metadata...
}

func (component *MyInputBindingComponent) Read(ctx context.Context, handler bindings.Handler) error {
	// Until canceled, check the underlying store for messages and deliver them to the Dapr runtime...
}
Calls to the Read() method are expected to set up a long-lived mechanism for retrieving messages but immediately return nil (or an error, if that mechanism could not be set up). The mechanism should end when canceled (for example, via the ctx.Done() or ctx.Err() != nil). As messages are read from the underlying store of the component, they are delivered to the Dapr runtime via the handler callback, which does not return until the application (served by the Dapr runtime) acknowledges processing of the message.
func (b *MyInputBindingComponent) Read(ctx context.Context, handler bindings.Handler) error {
	go func() {
		for {
			err := ctx.Err()

			if err != nil {
				return
			}

			messages := // Poll for messages...

            for _, message := range messages {
                handler(ctx, &bindings.ReadResponse{
                    // Set the message content...
                })
            }

			select {
				case <-ctx.Done():
				case <-time.After(5 * time.Second):
			}
		}
	}()

	return nil
}
Output bindings: Implement the OutputBinding interface
Create a type that implements the OutputBinding interface.
type MyOutputBindingComponent struct {
}

func (component *MyOutputBindingComponent) Init(meta bindings.Metadata) error {
	// Called to initialize the component with its configured metadata...
}

func (component *MyOutputBindingComponent) Invoke(ctx context.Context, req *bindings.InvokeRequest) (*bindings.InvokeResponse, error) {
	// Called to invoke a specific operation...
}

func (component *MyOutputBindingComponent) Operations() []bindings.OperationKind {
	// Called to list the operations that can be invoked.
}
Input and output binding components
A component can be both an input and output binding. Simply implement both interfaces and register the component as both binding types.
Register binding component
In the main application file (for example, main.go), register the binding component with the application.
package main

import (
	"example/components"
	dapr "github.com/dapr-sandbox/components-go-sdk"
	"github.com/dapr-sandbox/components-go-sdk/bindings/v1"
)

func main() {
	// Register an import binding...
	dapr.Register("my-inputbinding", dapr.WithInputBinding(func() bindings.InputBinding {
		return &components.MyInputBindingComponent{}
	}))

	// Register an output binding...
	dapr.Register("my-outputbinding", dapr.WithOutputBinding(func() bindings.OutputBinding {
		return &components.MyOutputBindingComponent{}
	}))

	dapr.MustRun()
}
Next steps
- Advanced techniques with the pluggable components Go SDK
- Learn more about implementing:
3.2.2 - Implementing a Go pub/sub component
Creating a pub/sub component requires just a few basic steps.
Import pub/sub packages
Create the file components/pubsub.go and add import statements for the pub/sub related packages.
package components

import (
	"context"
	"github.com/dapr/components-contrib/pubsub"
)
Implement the PubSub interface
Create a type that implements the PubSub interface.
type MyPubSubComponent struct {
}

func (component *MyPubSubComponent) Init(metadata pubsub.Metadata) error {
	// Called to initialize the component with its configured metadata...
}

func (component *MyPubSubComponent) Close() error {
    // Not used with pluggable components...
	return nil
}

func (component *MyPubSubComponent) Features() []pubsub.Feature {
	// Return a list of features supported by the component...
}

func (component *MyPubSubComponent) Publish(req *pubsub.PublishRequest) error {
	// Send the message to the "topic"...
}

func (component *MyPubSubComponent) Subscribe(ctx context.Context, req pubsub.SubscribeRequest, handler pubsub.Handler) error {
	// Until canceled, check the topic for messages and deliver them to the Dapr runtime...
}
Calls to the Subscribe() method are expected to set up a long-lived mechanism for retrieving messages but immediately return nil (or an error, if that mechanism could not be set up). The mechanism should end when canceled (for example, via the ctx.Done() or ctx.Err() != nil). The “topic” from which messages should be pulled is passed via the req argument, while the delivery to the Dapr runtime is performed via the handler callback. The callback doesn’t return until the application (served by the Dapr runtime) acknowledges processing of the message.
func (component *MyPubSubComponent) Subscribe(ctx context.Context, req pubsub.SubscribeRequest, handler pubsub.Handler) error {
	go func() {
		for {
			err := ctx.Err()

			if err != nil {
				return
			}

			messages := // Poll for messages...

            for _, message := range messages {
                handler(ctx, &pubsub.NewMessage{
                    // Set the message content...
                })
            }

			select {
				case <-ctx.Done():
				case <-time.After(5 * time.Second):
			}
		}
	}()

	return nil
}
Register pub/sub component
In the main application file (for example, main.go), register the pub/sub component with the application.
package main

import (
	"example/components"
	dapr "github.com/dapr-sandbox/components-go-sdk"
	"github.com/dapr-sandbox/components-go-sdk/pubsub/v1"
)

func main() {
	dapr.Register("<socket name>", dapr.WithPubSub(func() pubsub.PubSub {
		return &components.MyPubSubComponent{}
	}))

	dapr.MustRun()
}
Next steps
- Advanced techniques with the pluggable components Go SDK
- Learn more about implementing:
3.2.3 - Implementing a Go state store component
Creating a state store component requires just a few basic steps.
Import state store packages
Create the file components/statestore.go and add import statements for the state store related packages.
package components

import (
	"context"
	"github.com/dapr/components-contrib/state"
)
Implement the Store interface
Create a type that implements the Store interface.
type MyStateStore struct {
}

func (store *MyStateStore) Init(metadata state.Metadata) error {
	// Called to initialize the component with its configured metadata...
}

func (store *MyStateStore) GetComponentMetadata() map[string]string {
    // Not used with pluggable components...
	return map[string]string{}
}

func (store *MyStateStore) Features() []state.Feature {
	// Return a list of features supported by the state store...
}

func (store *MyStateStore) Delete(ctx context.Context, req *state.DeleteRequest) error {
	// Delete the requested key from the state store...
}

func (store *MyStateStore) Get(ctx context.Context, req *state.GetRequest) (*state.GetResponse, error) {
	// Get the requested key value from the state store, else return an empty response...
}

func (store *MyStateStore) Set(ctx context.Context, req *state.SetRequest) error {
	// Set the requested key to the specified value in the state store...
}

func (store *MyStateStore) BulkGet(ctx context.Context, req []state.GetRequest) (bool, []state.BulkGetResponse, error) {
	// Get the requested key values from the state store...
}

func (store *MyStateStore) BulkDelete(ctx context.Context, req []state.DeleteRequest) error {
	// Delete the requested keys from the state store...
}

func (store *MyStateStore) BulkSet(ctx context.Context, req []state.SetRequest) error {
	// Set the requested keys to their specified values in the state store...
}
Register state store component
In the main application file (for example, main.go), register the state store with an application service.
package main

import (
	"example/components"
	dapr "github.com/dapr-sandbox/components-go-sdk"
	"github.com/dapr-sandbox/components-go-sdk/state/v1"
)

func main() {
	dapr.Register("<socket name>", dapr.WithStateStore(func() state.Store {
		return &components.MyStateStoreComponent{}
	}))

	dapr.MustRun()
}
Bulk state stores
While state stores are required to support the bulk operations, their implementations sequentially delegate to the individual operation methods.
Transactional state stores
State stores that intend to support transactions should implement the optional TransactionalStore interface. Its Multi() method receives a request with a sequence of delete and/or set operations to be performed within a transaction. The state store should iterate over the sequence and apply each operation.
func (store *MyStateStoreComponent) Multi(ctx context.Context, request *state.TransactionalStateRequest) error {
    // Start transaction...

    for _, operation := range request.Operations {
		switch operation.Operation {
		case state.Delete:
			deleteRequest := operation.Request.(state.DeleteRequest)
			// Process delete request...
		case state.Upsert:
			setRequest := operation.Request.(state.SetRequest)
			// Process set request...
		}
	}

    // End (or rollback) transaction...

	return nil
}
Queryable state stores
State stores that intend to support queries should implement the optional Querier interface. Its Query() method is passed details about the query, such as the filter(s), result limits, pagination, and sort order(s) of the results. The state store uses those details to generate a set of values to return as part of its response.
func (store *MyStateStoreComponent) Query(ctx context.Context, req *state.QueryRequest) (*state.QueryResponse, error) {
	// Generate and return results...
}
ETag and other semantic error handling
The Dapr runtime has additional handling of certain error conditions resulting from some state store operations. State stores can indicate such conditions by returning specific errors from its operation logic:
| Error | Applicable Operations | Description |
|---|---|---|
NewETagError(state.ETagInvalid, ...) | Delete, Set, Bulk Delete, Bulk Set | When an ETag is invalid |
NewETagError(state.ETagMismatch, ...) | Delete, Set, Bulk Delete, Bulk Set | When an ETag does not match an expected value |
NewBulkDeleteRowMismatchError(...) | Bulk Delete | When the number of affected rows does not match the expected rows |
Next steps
- Advanced techniques with the pluggable components Go SDK
- Learn more about implementing:
3.2.4 - Advanced uses of the Dapr pluggable components .Go SDK
While not typically needed by most, these guides show advanced ways you can configure your Go pluggable components.
Component lifetime
Pluggable components are registered by passing a “factory method” that is called for each configured Dapr component of that type associated with that socket. The method returns the instance associated with that Dapr component (whether shared or not). This allows multiple Dapr components of the same type to be configured with different sets of metadata, when component operations need to be isolated from one another, etc.
Registering multiple services
Each call to Register() binds a socket to a registered pluggable component. One of each component type (input/output binding, pub/sub, and state store) can be registered per socket.
func main() {
	dapr.Register("service-a", dapr.WithStateStore(func() state.Store {
		return &components.MyDatabaseStoreComponent{}
	}))

	dapr.Register("service-a", dapr.WithOutputBinding(func() bindings.OutputBinding {
		return &components.MyDatabaseOutputBindingComponent{}
	}))

	dapr.Register("service-b", dapr.WithStateStore(func() state.Store {
		return &components.MyDatabaseStoreComponent{}
	}))

	dapr.MustRun()
}
In the example above, a state store and output binding is registered with the socket service-a while another state store is registered with the socket service-b.
Configuring Multiple Components
Configuring Dapr to use the hosted components is the same as for any single component - the component YAML refers to the associated socket. For example, to configure Dapr state stores for the two components registered above (to sockets service-a and service-b), you create two configuration files, each referencing their respective socket.
#
# This component uses the state store associated with socket `service-a`
#
apiVersion: dapr.io/v1alpha1
kind: Component
metadata:
  name: state-store-a
spec:
  type: state.service-a
  version: v1
  metadata: []
#
# This component uses the state store associated with socket `service-b`
#
apiVersion: dapr.io/v1alpha1
kind: Component
metadata:
  name: state-store-b
spec:
  type: state.service-b
  version: v1
  metadata: []