Overview of the state management API building block
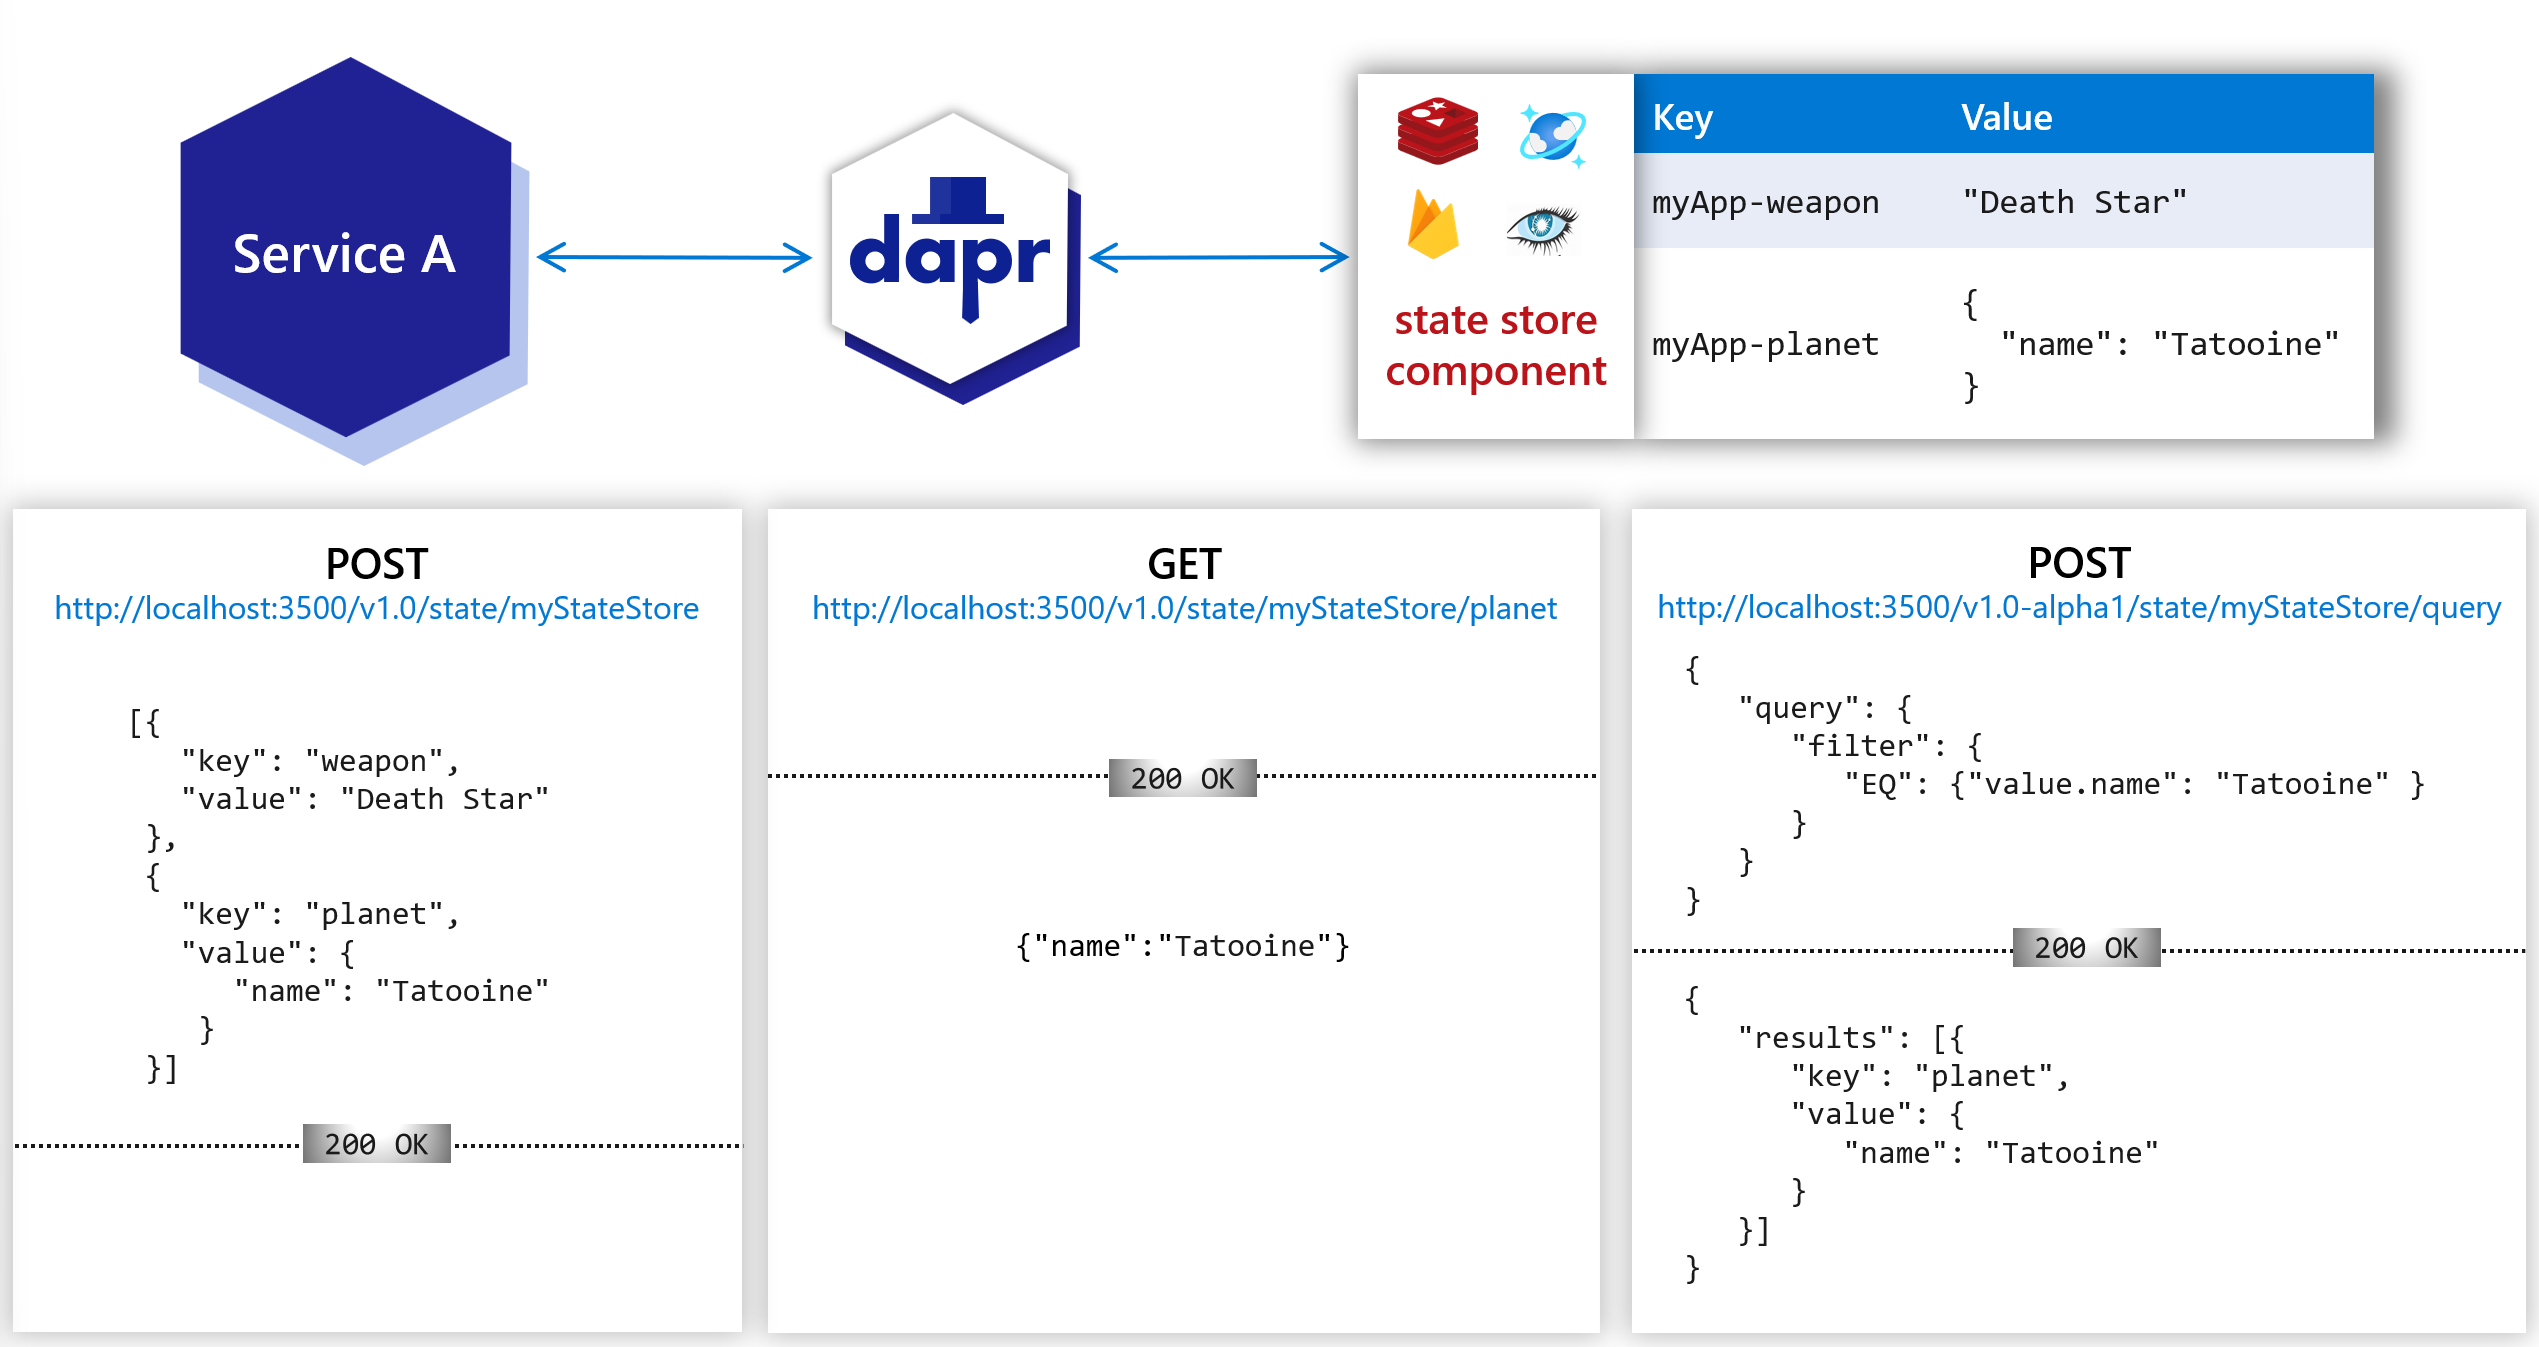
Your application can use Dapr’s state management API to save, read, and query key/value pairs in the supported state stores. Using a state store component, you can build stateful, long running applications that save and retrieve their state (like a shopping cart or a game’s session state). For example, in the diagram below:
Use HTTP POST to save or query key/value pairs.
Use HTTP GET to read a specific key and have its value returned.
With the state management API building block, your application can leverage features that are typically complicated and error-prone to build, including:
Setting the choices on concurrency control and data consistency.
Performing bulk update operations CRUD including multiple transactional operations.
Querying and filtering the key/value data.
These are the features available as part of the state management API:
Pluggable state stores
Dapr data stores are modeled as components, which can be swapped out without any changes to your service code. See supported state stores to see the list.
Configurable state store behaviors
With Dapr, you can include additional metadata in a state operation request that describes how you expect the request to be handled. You can attach:
Concurrency requirements
Consistency requirements
By default, your application should assume a data store is eventually consistent and uses a last-write-wins concurrency pattern.
Not all stores are created equal. To ensure your application’s portability, you can query the metadata capabilities of the store and make your code adaptive to different store capabilities.
Concurrency
Dapr supports Optimistic Concurrency Control (OCC) using ETags. When a state value is requested, Dapr always attaches an ETag property to the returned state. When the user code:
Updates a state, it’s expected to attach the ETag through the request body.
Deletes a state, it’s expected to attach the ETag through the If-Match header.
The write operation succeeds when the provided ETag matches the ETag in the state store.
Why Dapr chooses optimistic concurrency control (OCC)
Data update conflicts are rare in many applications, since clients are naturally partitioned by business contexts to operate on different data. However, if your application chooses to use ETags, mismatched ETags may cause a request rejection. It’s recommended you use a retry policy in your code to compensate for conflicts when using ETags.
If your application omits ETags in writing requests, Dapr skips ETag checks while handling the requests. This enables the last-write-wins pattern, compared to the first-write-wins pattern with ETags.
Note on ETags
For stores that don’t natively support ETags, the corresponding Dapr state store implementation is expected to simulate ETags and follow the Dapr state management API specification when handling states. Since Dapr state store implementations are technically clients to the underlying data store, simulation should be straightforward, using the concurrency control mechanisms provided by the store.
Read the API reference to learn how to set concurrency options.
Consistency
Dapr supports both strong consistency and eventual consistency, with eventual consistency as the default behavior.
Strong consistency: Dapr waits for all replicas (or designated quorums) to acknowledge before it acknowledges a write request.
Eventual consistency: Dapr returns as soon as the write request is accepted by the underlying data store, even if this is a single replica.
Read the API reference to learn how to set consistency options.
Setting content type
State store components may maintain and manipulate data differently, depending on the content type. Dapr supports passing content type in state management API as part of request metadata.
Setting the content type is optional, and the component decides whether to make use of it. Dapr only provides the means of passing this information to the component.
With the HTTP API: Set content type via URL query parameter metadata.contentType. For example, http://localhost:3500/v1.0/state/store?metadata.contentType=application/json.
With the gRPC API: Set content type by adding key/value pair "contentType" : <content type> to the request metadata.
Multiple operations
Dapr supports two types of multi-read or multi-write operations: bulk or transactional. Read the API reference to learn how use bulk and multi options.
Bulk read operations
You can group multiple read requests into a bulk (or batch) operation. In the bulk operation, Dapr submits the read requests as individual requests to the underlying data store, and returns them as a single result.
Transactional operations
You can group write, update, and delete operations into a request, which are then handled as an atomic transaction. The request will succeed or fail as a transactional set of operations.
Actor state
Transactional state stores can be used to store actor state. To specify which state store to use for actors, specify value of property actorStateStore as true in the state store component’s metadata section. Actors state is stored with a specific scheme in transactional state stores, allowing for consistent querying. Only a single state store component can be used as the state store for all actors. Read the state API reference and the actors API reference to learn more about state stores for actors.
Time to Live (TTL) on actor state
You should always set the TTL metadata field (ttlInSeconds), or the equivalent API call in your chosen SDK when saving actor state to ensure that state eventually removed. Read actors overview for more information.
State encryption
Dapr supports automatic client encryption of application state with support for key rotations. This is supported on all Dapr state stores. For more info, read the How-To: Encrypt application state topic.
Shared state between applications
Different applications’ needs vary when it comes to sharing state. In one scenario, you may want to encapsulate all state within a given application and have Dapr manage the access for you. In another scenario, you may want two applications working on the same state to get and save the same keys.
Dapr enables states to be:
Isolated to an application.
Shared in a state store between applications.
Shared between multiple applications across different state stores.
Dapr enables developers to use the outbox pattern for achieving a single transaction across a transactional state store and any message broker. For more information, read How to enable transactional outbox messaging
Querying state
There are two ways to query the state:
Using the state management query API provided in Dapr runtime.
Querying state store directly with the store’s native SDK.
Query API
Using the optional state management query API, you can query the key/value data saved in state stores, regardless of underlying database or storage technology. With the state management query API, you can filter, sort, and paginate the key/value data. For more details read How-To: Query state.
Querying state store directly
Dapr saves and retrieves state values without any transformation. You can query and aggregate state directly from the underlying state store.
For example, to get all state keys associated with an application ID “myApp” in Redis, use:
KEYS "myApp*"
Note on direct queries
Since you aren’t calling through the Dapr runtime, direct queries of the state store are not governed by Dapr concurrency control. What you see are snapshots of committed data acceptable for read-only queries across multiple actors. Writes should be done via the Dapr state management or actors APIs.
Querying actor state
If the data store supports SQL queries, you can query an actor’s state using SQL queries. For example:
You can also avoid the common turn-based concurrency limitations of actor frameworks by performing aggregate queries across actor instances. For example, to calculate the average temperature of all thermometer actors, use:
Dapr enables per state set request time-to-live (TTL). This means that applications can set time-to-live per state stored, and these states cannot be retrieved after expiration.
State management API
The state management API can be found in the state management API reference, which describes how to retrieve, save, delete, and query state values by providing keys.
Try out state management
Quickstarts and tutorials
Want to put the Dapr state management API to the test? Walk through the following quickstart and tutorials to see state management in action:
Recommended Demonstrates how to run Dapr in Kubernetes. Highlights service invocation and state management.
Start using state management directly in your app
Want to skip the quickstarts? Not a problem. You can try out the state management building block directly in your application. After Dapr is installed, you can begin using the state management API starting with the state management how-to guide.
Next steps
Start working through the state management how-to guides, starting with:
State management is one of the most common needs of any new, legacy, monolith, or microservice application. Dealing with and testing different database libraries and handling retries and faults can be both difficult and time consuming.
In this guide, you’ll learn the basics of using the key/value state API to allow an application to save, get, and delete state.
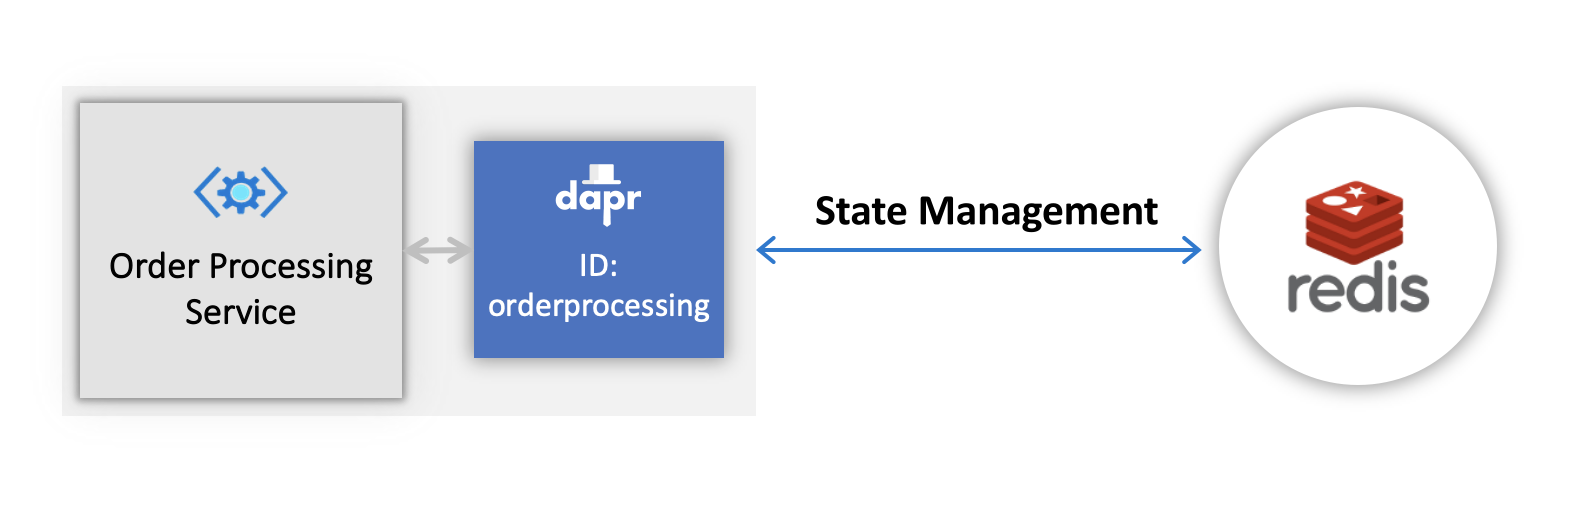
The code example below loosely describes an application that processes orders with an order processing service which has a Dapr sidecar. The order processing service uses Dapr to store state in a Redis state store.
Set up a state store
A state store component represents a resource that Dapr uses to communicate with a database.
For the purpose of this guide we’ll use a Redis state store, but any state store from the supported list will work.
When you run dapr init in self-hosted mode, Dapr creates a default Redis statestore.yaml and runs a Redis state store on your local machine, located:
On Windows, under %UserProfile%\.dapr\components\statestore.yaml
On Linux/MacOS, under ~/.dapr/components/statestore.yaml
With the statestore.yaml component, you can easily swap out underlying components without application code changes.
To deploy this into a Kubernetes cluster, fill in the metadata connection details of your state store component in the YAML below, save as statestore.yaml, and run kubectl apply -f statestore.yaml.
Set an app-id, as the state keys are prefixed with this value. If you don’t set an app-id, one is generated for you at runtime. The next time you run the command, a new app-id is generated and you will no longer have access to the previously saved state.
Save and retrieve a single state
The following example shows how to save and retrieve a single key/value pair using the Dapr state management API.
usingSystem.Text;usingSystem.Threading.Tasks;usingDapr.Client;varbuilder=WebApplication.CreateBuilder(args);builder.Services.AddDaprClient();varapp=builder.Build();varrandom=newRandom();//Resolve the DaprClient from its dependency injection registrationusingvarclient=app.Services.GetRequiredService<DaprClient>();while(true){awaitTask.Delay(TimeSpan.FromSeconds(5));varorderId=random.Next(1,1000);//Using Dapr SDK to save and get stateawaitclient.SaveStateAsync(DAPR_STORE_NAME,"order_1",orderId.ToString());awaitclient.SaveStateAsync(DAPR_STORE_NAME,"order_2",orderId.ToString());varresult=awaitclient.GetStateAsync<string>(DAPR_STORE_NAME,"order_1");Console.WriteLine($"Result after get: {result}");}
To launch a Dapr sidecar for the above example application, run a command similar to the following:
dapr run --app-id orderprocessing --app-port 6001 --dapr-http-port 3601 --dapr-grpc-port 60001 dotnet run
//dependenciesimportio.dapr.client.DaprClient;importio.dapr.client.DaprClientBuilder;importio.dapr.client.domain.State;importio.dapr.client.domain.TransactionalStateOperation;importorg.springframework.boot.autoconfigure.SpringBootApplication;importorg.slf4j.Logger;importorg.slf4j.LoggerFactory;importreactor.core.publisher.Mono;importjava.util.Random;importjava.util.concurrent.TimeUnit;//code@SpringBootApplicationpublicclassOrderProcessingServiceApplication{privatestaticfinalLoggerlog=LoggerFactory.getLogger(OrderProcessingServiceApplication.class);privatestaticfinalStringSTATE_STORE_NAME="statestore";publicstaticvoidmain(String[]args)throwsInterruptedException{while(true){TimeUnit.MILLISECONDS.sleep(5000);Randomrandom=newRandom();intorderId=random.nextInt(1000-1)+1;DaprClientclient=newDaprClientBuilder().build();//Using Dapr SDK to save and get stateclient.saveState(STATE_STORE_NAME,"order_1",Integer.toString(orderId)).block();client.saveState(STATE_STORE_NAME,"order_2",Integer.toString(orderId)).block();Mono<State<String>>result=client.getState(STATE_STORE_NAME,"order_1",String.class);log.info("Result after get"+result);}}}
To launch a Dapr sidecar for the above example application, run a command similar to the following:
#dependenciesimportrandomfromtimeimportsleepimportrequestsimportloggingfromdapr.clientsimportDaprClientfromdapr.clients.grpc._stateimportStateItemfromdapr.clients.grpc._requestimportTransactionalStateOperation,TransactionOperationType#codelogging.basicConfig(level=logging.INFO)DAPR_STORE_NAME="statestore"whileTrue:sleep(random.randrange(50,5000)/1000)orderId=random.randint(1,1000)withDaprClient()asclient:#Using Dapr SDK to save and get stateclient.save_state(DAPR_STORE_NAME,"order_1",str(orderId))result=client.get_state(DAPR_STORE_NAME,"order_1")logging.info('Result after get: '+result.data.decode('utf-8'))
To launch a Dapr sidecar for the above example application, run a command similar to the following:
// dependenciesimport("context""log""math/rand""strconv""time"dapr"github.com/dapr/go-sdk/client")// codefuncmain(){constSTATE_STORE_NAME="statestore"rand.Seed(time.Now().UnixMicro())fori:=0;i<10;i++{orderId:=rand.Intn(1000-1)+1client,err:=dapr.NewClient()iferr!=nil{panic(err)}deferclient.Close()ctx:=context.Background()err=client.SaveState(ctx,STATE_STORE_NAME,"order_1",[]byte(strconv.Itoa(orderId)),nil)iferr!=nil{panic(err)}result,err:=client.GetState(ctx,STATE_STORE_NAME,"order_1",nil)iferr!=nil{panic(err)}log.Println("Result after get:",string(result.Value))time.Sleep(2*time.Second)}}
To launch a Dapr sidecar for the above example application, run a command similar to the following:
dapr run --app-id orderprocessing --app-port 6001 --dapr-http-port 3601 --dapr-grpc-port 60001 go run OrderProcessingService.go
//dependencies
import{DaprClient,HttpMethod,CommunicationProtocolEnum}from'@dapr/dapr';//code
constdaprHost="127.0.0.1";varmain=function(){for(vari=0;i<10;i++){sleep(5000);varorderId=Math.floor(Math.random()*(1000-1)+1);start(orderId).catch((e)=>{console.error(e);process.exit(1);});}}asyncfunctionstart(orderId){constclient=newDaprClient({daprHost,daprPort:process.env.DAPR_HTTP_PORT,communicationProtocol:CommunicationProtocolEnum.HTTP,});constSTATE_STORE_NAME="statestore";//Using Dapr SDK to save and get state
awaitclient.state.save(STATE_STORE_NAME,[{key:"order_1",value:orderId.toString()},{key:"order_2",value:orderId.toString()}]);varresult=awaitclient.state.get(STATE_STORE_NAME,"order_1");console.log("Result after get: "+result);}functionsleep(ms){returnnewPromise(resolve=>setTimeout(resolve,ms));}main();
To launch a Dapr sidecar for the above example application, run a command similar to the following:
Restart your sidecar and try retrieving state again to observe that state persists separately from the app.
Delete state
Below are code examples that leverage Dapr SDKs for deleting the state.
usingDapr.Client;usingSystem.Threading.Tasks;conststringDAPR_STORE_NAME="statestore";varbuilder=WebApplication.CreateBuilder(args);builder.Services.AddDaprClient();varapp=builder.Build();//Resolve the DaprClient from the dependency injection registrationusingvarclient=app.Services.GetRequiredService<DaprClient>();//Use the DaprClient to delete the stateawaitclient.DeleteStateAsync(DAPR_STORE_NAME,"order_1",cancellationToken:cancellationToken);
To launch a Dapr sidecar for the above example application, run a command similar to the following:
dapr run --app-id orderprocessing --app-port 6001 --dapr-http-port 3601 --dapr-grpc-port 60001 dotnet run
//dependenciesimportio.dapr.client.DaprClient;importio.dapr.client.DaprClientBuilder;importorg.springframework.boot.autoconfigure.SpringBootApplication;//code@SpringBootApplicationpublicclassOrderProcessingServiceApplication{publicstaticvoidmain(String[]args)throwsInterruptedException{StringSTATE_STORE_NAME="statestore";//Using Dapr SDK to delete the stateDaprClientclient=newDaprClientBuilder().build();StringstoredEtag=client.getState(STATE_STORE_NAME,"order_1",String.class).block().getEtag();client.deleteState(STATE_STORE_NAME,"order_1",storedEtag,null).block();}}
To launch a Dapr sidecar for the above example application, run a command similar to the following:
#dependenciesfromdapr.clients.grpc._requestimportTransactionalStateOperation,TransactionOperationType#codelogging.basicConfig(level=logging.INFO)DAPR_STORE_NAME="statestore"#Using Dapr SDK to delete the statewithDaprClient()asclient:client.delete_state(store_name=DAPR_STORE_NAME,key="order_1")
To launch a Dapr sidecar for the above example application, run a command similar to the following:
//dependenciesimport("context"dapr"github.com/dapr/go-sdk/client")//codefuncmain(){STATE_STORE_NAME:="statestore"//Using Dapr SDK to delete the stateclient,err:=dapr.NewClient()iferr!=nil{panic(err)}deferclient.Close()ctx:=context.Background()iferr:=client.DeleteState(ctx,STATE_STORE_NAME,"order_1");err!=nil{panic(err)}}
To launch a Dapr sidecar for the above example application, run a command similar to the following:
dapr run --app-id orderprocessing --app-port 6001 --dapr-http-port 3601 --dapr-grpc-port 60001 go run OrderProcessingService.go
//dependencies
import{DaprClient,HttpMethod,CommunicationProtocolEnum}from'@dapr/dapr';//code
constdaprHost="127.0.0.1";varmain=function(){constSTATE_STORE_NAME="statestore";//Using Dapr SDK to save and get state
constclient=newDaprClient({daprHost,daprPort:process.env.DAPR_HTTP_PORT,communicationProtocol:CommunicationProtocolEnum.HTTP,});awaitclient.state.delete(STATE_STORE_NAME,"order_1");}main();
To launch a Dapr sidecar for the above example application, run a command similar to the following:
Try getting state again. Note that no value is returned.
Save and retrieve multiple states
Below are code examples that leverage Dapr SDKs for saving and retrieving multiple states.
usingDapr.Client;usingSystem.Threading.Tasks;conststringDAPR_STORE_NAME="statestore";varbuilder=WebApplication.CreateBuilder(args);builder.Services.AddDaprClient();varapp=builder.Build();//Resolve the DaprClient from the dependency injection registrationusingvarclient=app.Services.GetRequiredService<DaprClient>();IReadOnlyList<BulkStateItem>multipleStateResult=awaitclient.GetBulkStateAsync(DAPR_STORE_NAME,newList<string>{"order_1","order_2"},parallelism:1);
To launch a Dapr sidecar for the above example application, run a command similar to the following:
dapr run --app-id orderprocessing --app-port 6001 --dapr-http-port 3601 --dapr-grpc-port 60001 dotnet run
The above example returns a BulkStateItem with the serialized format of the value you saved to state. If you prefer that the value be deserialized by the SDK across each of your bulk response items, you can instead use the following:
usingDapr.Client;usingSystem.Threading.Tasks;conststringDAPR_STORE_NAME="statestore";varbuilder=WebApplication.CreateBuilder(args);builder.Serivces.AddDaprClient();varapp=builder.Build();//Resolve the DaprClient from the dependency injection registrationusingvarclient=app.Services.GetRequiredService<DaprClient>();IReadOnlyList<BulkStateItem<Widget>>mulitpleStateResult=awaitclient.GetBulkStateAsync<Widget>(DAPR_STORE_NAME,newList<string>{"widget_1","widget_2"},parallelism:1);recordWidget(stringSize,stringColor);
//dependenciesimportio.dapr.client.DaprClient;importio.dapr.client.DaprClientBuilder;importio.dapr.client.domain.State;importjava.util.Arrays;//code@SpringBootApplicationpublicclassOrderProcessingServiceApplication{privatestaticfinalLoggerlog=LoggerFactory.getLogger(OrderProcessingServiceApplication.class);publicstaticvoidmain(String[]args)throwsInterruptedException{StringSTATE_STORE_NAME="statestore";//Using Dapr SDK to retrieve multiple statesDaprClientclient=newDaprClientBuilder().build();Mono<List<State<String>>>resultBulk=client.getBulkState(STATE_STORE_NAME,Arrays.asList("order_1","order_2"),String.class);}}
To launch a Dapr sidecar for the above example application, run a command similar to the following:
#dependenciesfromdapr.clientsimportDaprClientfromdapr.clients.grpc._stateimportStateItem#codelogging.basicConfig(level=logging.INFO)DAPR_STORE_NAME="statestore"orderId=100#Using Dapr SDK to save and retrieve multiple stateswithDaprClient()asclient:client.save_bulk_state(store_name=DAPR_STORE_NAME,states=[StateItem(key="order_2",value=str(orderId))])result=client.get_bulk_state(store_name=DAPR_STORE_NAME,keys=["order_1","order_2"],states_metadata={"metakey":"metavalue"}).itemslogging.info('Result after get bulk: '+str(result))
To launch a Dapr sidecar for the above example application, run a command similar to the following:
// dependenciesimport("context""log""math/rand""strconv""time"dapr"github.com/dapr/go-sdk/client")// codefuncmain(){constSTATE_STORE_NAME="statestore"rand.Seed(time.Now().UnixMicro())fori:=0;i<10;i++{orderId:=rand.Intn(1000-1)+1client,err:=dapr.NewClient()iferr!=nil{panic(err)}deferclient.Close()ctx:=context.Background()err=client.SaveState(ctx,STATE_STORE_NAME,"order_1",[]byte(strconv.Itoa(orderId)),nil)iferr!=nil{panic(err)}keys:=[]string{"key1","key2","key3"}items,err:=client.GetBulkState(ctx,STATE_STORE_NAME,keys,nil,100)iferr!=nil{panic(err)}for_,item:=rangeitems{log.Println("Item from GetBulkState:",string(item.Value))}}}
To launch a Dapr sidecar for the above example application, run a command similar to the following:
dapr run --app-id orderprocessing --app-port 6001 --dapr-http-port 3601 --dapr-grpc-port 60001 go run OrderProcessingService.go
//dependencies
import{DaprClient,HttpMethod,CommunicationProtocolEnum}from'@dapr/dapr';//code
constdaprHost="127.0.0.1";varmain=function(){constSTATE_STORE_NAME="statestore";varorderId=100;//Using Dapr SDK to save and retrieve multiple states
constclient=newDaprClient({daprHost,daprPort:process.env.DAPR_HTTP_PORT,communicationProtocol:CommunicationProtocolEnum.HTTP,});awaitclient.state.save(STATE_STORE_NAME,[{key:"order_1",value:orderId.toString()},{key:"order_2",value:orderId.toString()}]);result=awaitclient.state.getBulk(STATE_STORE_NAME,["order_1","order_2"]);}main();
To launch a Dapr sidecar for the above example application, run a command similar to the following:
State transactions require a state store that supports multi-item transactions. See the supported state stores page for a full list.
Below are code examples that leverage Dapr SDKs for performing state transactions.
usingDapr.Client;usingSystem.Threading.Tasks;conststringDAPR_STORE_NAME="statestore";varbuilder=WebApplication.CreateBuilder(args);builder.Serivces.AddDaprClient();varapp=builder.Build();//Resolve the DaprClient from the dependency injection registrationusingvarclient=app.Services.GetRequiredService<DaprClient>();varrandom=newRandom();while(true){awaitTask.Delay(TimeSpan.FromSeconds(5));varorderId=random.Next(1,1000);varrequests=newList<StateTransactionRequest>{newStateTransactionRequest("order_3",JsonSerializer.SerializeToUtf8Bytes(orderId.ToString()),StateOperationType.Upsert),newStateTransactionRequest("order_2",null,StateOperationType.Delete)};varcancellationTokenSource=newCancellationTokenSource();varcancellationToken=cancellationTokenSource.Token;//Use the DaprClient to perform the state transactionsawaitclient.ExecuteStateTransactionAsync(DAPR_STORE_NAME,requests,cancellationToken:cancellationToken);Console.WriteLine($"Order requested: {orderId}");Console.WriteLine($"Result: {result}");}
To launch a Dapr sidecar for the above example application, run a command similar to the following:
dapr run --app-id orderprocessing --app-port 6001 --dapr-http-port 3601 --dapr-grpc-port 60001 dotnet run
//dependenciesimportio.dapr.client.DaprClient;importio.dapr.client.DaprClientBuilder;importio.dapr.client.domain.State;importio.dapr.client.domain.TransactionalStateOperation;importorg.springframework.boot.autoconfigure.SpringBootApplication;importorg.slf4j.Logger;importorg.slf4j.LoggerFactory;importreactor.core.publisher.Mono;importjava.util.ArrayList;importjava.util.List;importjava.util.Random;importjava.util.concurrent.TimeUnit;//code@SpringBootApplicationpublicclassOrderProcessingServiceApplication{privatestaticfinalLoggerlog=LoggerFactory.getLogger(OrderProcessingServiceApplication.class);privatestaticfinalStringSTATE_STORE_NAME="statestore";publicstaticvoidmain(String[]args)throwsInterruptedException{while(true){TimeUnit.MILLISECONDS.sleep(5000);Randomrandom=newRandom();intorderId=random.nextInt(1000-1)+1;DaprClientclient=newDaprClientBuilder().build();List<TransactionalStateOperation<?>>operationList=newArrayList<>();operationList.add(newTransactionalStateOperation<>(TransactionalStateOperation.OperationType.UPSERT,newState<>("order_3",Integer.toString(orderId),"")));operationList.add(newTransactionalStateOperation<>(TransactionalStateOperation.OperationType.DELETE,newState<>("order_2")));//Using Dapr SDK to perform the state transactionsclient.executeStateTransaction(STATE_STORE_NAME,operationList).block();log.info("Order requested: "+orderId);}}}
To launch a Dapr sidecar for the above example application, run a command similar to the following:
#dependenciesimportrandomfromtimeimportsleepimportrequestsimportloggingfromdapr.clientsimportDaprClientfromdapr.clients.grpc._stateimportStateItemfromdapr.clients.grpc._requestimportTransactionalStateOperation,TransactionOperationType#codelogging.basicConfig(level=logging.INFO)DAPR_STORE_NAME="statestore"whileTrue:sleep(random.randrange(50,5000)/1000)orderId=random.randint(1,1000)withDaprClient()asclient:#Using Dapr SDK to perform the state transactionsclient.execute_state_transaction(store_name=DAPR_STORE_NAME,operations=[TransactionalStateOperation(operation_type=TransactionOperationType.upsert,key="order_3",data=str(orderId)),TransactionalStateOperation(key="order_3",data=str(orderId)),TransactionalStateOperation(operation_type=TransactionOperationType.delete,key="order_2",data=str(orderId)),TransactionalStateOperation(key="order_2",data=str(orderId))])client.delete_state(store_name=DAPR_STORE_NAME,key="order_1")logging.basicConfig(level=logging.INFO)logging.info('Order requested: '+str(orderId))logging.info('Result: '+str(result))
To launch a Dapr sidecar for the above example application, run a command similar to the following:
// dependenciespackagemainimport("context""log""math/rand""strconv""time"dapr"github.com/dapr/go-sdk/client")// codefuncmain(){constSTATE_STORE_NAME="statestore"rand.Seed(time.Now().UnixMicro())fori:=0;i<10;i++{orderId:=rand.Intn(1000-1)+1client,err:=dapr.NewClient()iferr!=nil{panic(err)}deferclient.Close()ctx:=context.Background()err=client.SaveState(ctx,STATE_STORE_NAME,"order_1",[]byte(strconv.Itoa(orderId)),nil)iferr!=nil{panic(err)}result,err:=client.GetState(ctx,STATE_STORE_NAME,"order_1",nil)iferr!=nil{panic(err)}ops:=make([]*dapr.StateOperation,0)data1:="data1"data2:="data2"op1:=&dapr.StateOperation{Type:dapr.StateOperationTypeUpsert,Item:&dapr.SetStateItem{Key:"key1",Value:[]byte(data1),},}op2:=&dapr.StateOperation{Type:dapr.StateOperationTypeDelete,Item:&dapr.SetStateItem{Key:"key2",Value:[]byte(data2),},}ops=append(ops,op1,op2)meta:=map[string]string{}err=client.ExecuteStateTransaction(ctx,STATE_STORE_NAME,meta,ops)log.Println("Result after get:",string(result.Value))time.Sleep(2*time.Second)}}
To launch a Dapr sidecar for the above example application, run a command similar to the following:
dapr run --app-id orderprocessing --app-port 6001 --dapr-http-port 3601 --dapr-grpc-port 60001 go run OrderProcessingService.go
//dependencies
import{DaprClient,HttpMethod,CommunicationProtocolEnum}from'@dapr/dapr';//code
constdaprHost="127.0.0.1";varmain=function(){for(vari=0;i<10;i++){sleep(5000);varorderId=Math.floor(Math.random()*(1000-1)+1);start(orderId).catch((e)=>{console.error(e);process.exit(1);});}}asyncfunctionstart(orderId){constclient=newDaprClient({daprHost,daprPort:process.env.DAPR_HTTP_PORT,communicationProtocol:CommunicationProtocolEnum.HTTP,});constSTATE_STORE_NAME="statestore";//Using Dapr SDK to save and retrieve multiple states
awaitclient.state.transaction(STATE_STORE_NAME,[{operation:"upsert",request:{key:"order_3",value:orderId.toString()}},{operation:"delete",request:{key:"order_2"}}]);}functionsleep(ms){returnnewPromise(resolve=>setTimeout(resolve,ms));}main();
To launch a Dapr sidecar for the above example application, run a command similar to the following:
With the state query API, you can retrieve, filter, and sort the key/value data stored in state store components. The query API is not a replacement for a complete query language.
Even though the state store is a key/value store, the value might be a JSON document with its own hierarchy, keys, and values. The query API allows you to use those keys/values to retrieve corresponding documents.
Querying the state
Submit query requests via HTTP POST/PUT or gRPC. The body of the request is the JSON map with 3 entries:
filter
sort
page
filter
The filter specifies the query conditions in the form of a tree, where each node represents either unary or multi-operand operation.
The following operations are supported:
Operator
Operands
Description
EQ
key:value
key == value
NEQ
key:value
key != value
GT
key:value
key > value
GTE
key:value
key >= value
LT
key:value
key < value
LTE
key:value
key <= value
IN
key:[]value
key == value[0] OR key == value[1] OR … OR key == value[n]
AND
[]operation
operation[0] AND operation[1] AND … AND operation[n]
OR
[]operation
operation[0] OR operation[1] OR … OR operation[n]
The key in the operand is similar to the JSONPath notation. Each dot in the key indicates a nested JSON structure. For example, consider this structure:
To compare the value of the color code, the key will be shape.color.code.
If the filter section is omitted, the query returns all entries.
sort
The sort is an ordered array of key:order pairs, where:
key is a key in the state store
order is an optional string indicating sorting order:
"ASC" for ascending
"DESC" for descending If omitted, ascending order is the default.
page
The page contains limit and token parameters.
limit sets the page size.
token is an iteration token returned by the component, used in subsequent queries.
Behind the scenes, this query request is translated into the native query language and executed by the state store component.
Example data and query
Let’s look at some real examples, ranging from simple to complex.
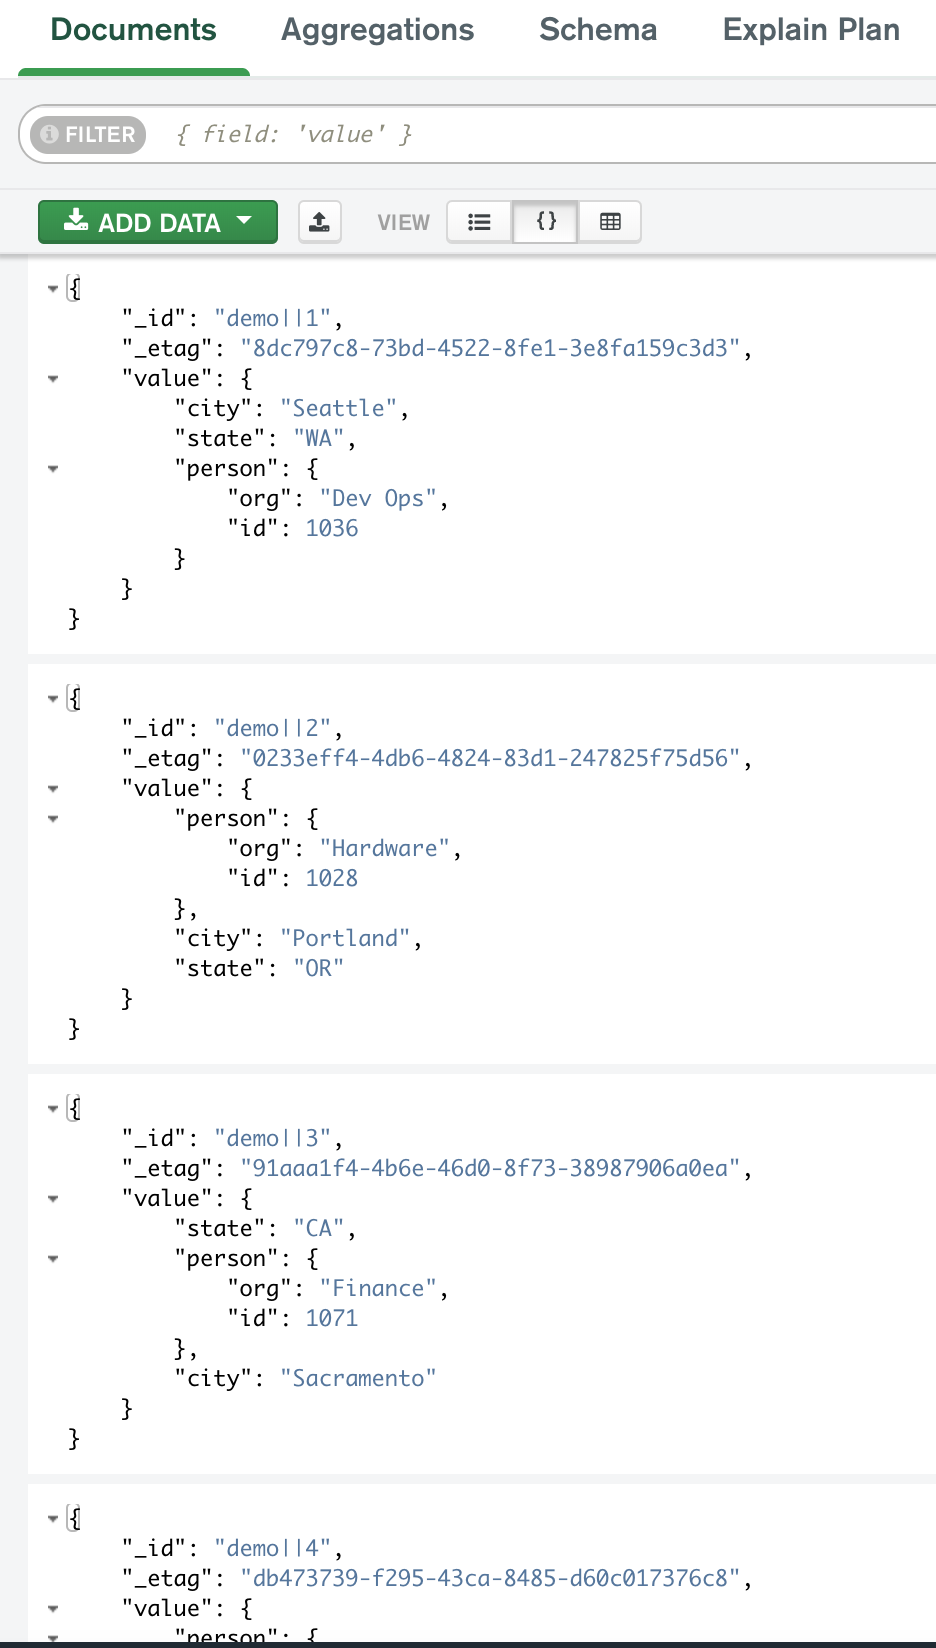
As a dataset, consider a collection of employee records containing employee ID, organization, state, and city. Notice that this dataset is an array of key/value pairs, where:
key is the unique ID
value is the JSON object with employee record.
To better illustrate functionality, organization name (org) and employee ID (id) are a nested JSON person object.
Get started by creating an instance of MongoDB, which is your state store.
docker run -d --rm -p 27017:27017 --name mongodb mongo:5
Next, start a Dapr application. Refer to the component configuration file, which instructs Dapr to use MongoDB as its state store.
dapr run --app-id demo --dapr-http-port 3500 --resources-path query-api-examples/components/mongodb
Populate the state store with the employee dataset, so you can query it later.
curl -X POST -H "Content-Type: application/json" -d @query-api-examples/dataset.json http://localhost:3500/v1.0/state/statestore
Once populated, you can examine the data in the state store. In the image below, a section of the MongoDB UI displays employee records.
Each entry has the _id member as a concatenated object key, and the value member containing the JSON record.
The query API allows you to select records from this JSON structure.
Now you can run the example queries.
Example 1
First, find all employees in the state of California and sort them by their employee ID in descending order.
Similar to the previous example, the result is an array of matching key/value pairs.
Example 3
In this example, find:
All employees from the “Dev Ops” department.
Employees from the “Finance” departing residing in the states of Washington and California.
In addition, sort the results first by state in descending alphabetical order, then by employee ID in ascending order. Let’s process up to 3 records at a time.
That way you can update the pagination token in the query and iterate through the results until no more records are returned.
Limitations
The state query API has the following limitations:
To query actor states stored in a state store, you need to use the query API for the specific database. See querying actor state.
The API does not work with Dapr encrypted state stores capability. Since the encryption is done by the Dapr runtime and stored as encrypted data, then this effectively prevents server side querying.
You can find additional information in the related links section.
Use state management with a scaled, replicated service
In this article, you’ll learn how to create a stateful service which can be horizontally scaled, using opt-in concurrency and consistency models. Consuming the state management API frees developers from difficult state coordination, conflict resolution, and failure handling.
Set up a state store
A state store component represents a resource that Dapr uses to communicate with a database.
For the purpose of this guide, we’ll use the default Redis state store.
Using the Dapr CLI
When you run dapr init in self-hosted mode, Dapr creates a default Redis statestore.yaml and runs a Redis state store on your local machine, located:
On Windows, under %UserProfile%\.dapr\components\statestore.yaml
On Linux/MacOS, under ~/.dapr/components/statestore.yaml
With the statestore.yaml component, you can easily swap out underlying components without application code changes.
Using strong consistency, Dapr makes sure that the underlying state store:
Returns the response once the data has been written to all replicas.
Receives an ACK from a quorum before writing or deleting state.
For get requests, Dapr ensures the store returns the most up-to-date data consistently among replicas. The default is eventual consistency, unless specified otherwise in the request to the state API.
The following examples illustrate how to save, get, and delete state using strong consistency. The example is written in Python, but is applicable to any programming language.
Saving state
importrequestsimportjsonstore_name="redis-store"# name of the state store as specified in state store component yaml filedapr_state_url="http://localhost:3500/v1.0/state/{}".format(store_name)stateReq='[{ "key": "k1", "value": "Some Data", "options": { "consistency": "strong" }}]'response=requests.post(dapr_state_url,json=stateReq)
Getting state
importrequestsimportjsonstore_name="redis-store"# name of the state store as specified in state store component yaml filedapr_state_url="http://localhost:3500/v1.0/state/{}".format(store_name)response=requests.get(dapr_state_url+"/key1",headers={"consistency":"strong"})print(response.headers['ETag'])
Deleting state
importrequestsimportjsonstore_name="redis-store"# name of the state store as specified in state store component yaml filedapr_state_url="http://localhost:3500/v1.0/state/{}".format(store_name)response=requests.delete(dapr_state_url+"/key1",headers={"consistency":"strong"})
If the concurrency option hasn’t been specified, the default is last-write concurrency mode.
First-write-wins and last-write-wins
Dapr allows developers to opt-in for two common concurrency patterns when working with data stores:
First-write-wins: useful in situations where you have multiple instances of an application, all writing to the same key concurrently.
Last-write-wins: Default mode for Dapr.
Dapr uses version numbers to determine whether a specific key has been updated. You can:
Retain the version number when reading the data for a key.
Use the version number during updates such as writes and deletes.
If the version information has changed since the version number was retrieved, an error is thrown, requiring you to perform another read to get the latest version information and state.
Dapr utilizes ETags to determine the state’s version number. ETags are returned from state requests in an ETag header. Using ETags, your application knows that a resource has been updated since the last time they checked by erroring during an ETag mismatch.
The following example shows how to:
Get an ETag.
Use the ETag to save state.
Delete the state.
The following example is written in Python, but is applicable to any programming language.
importrequestsimportjsonstore_name="redis-store"# name of the state store as specified in state store component yaml filedapr_state_url="http://localhost:3500/v1.0/state/{}".format(store_name)response=requests.get(dapr_state_url+"/key1",headers={"concurrency":"first-write"})etag=response.headers['ETag']newState='[{ "key": "k1", "value": "New Data", "etag": {}, "options": { "concurrency": "first-write" }}]'.format(etag)requests.post(dapr_state_url,json=newState)response=requests.delete(dapr_state_url+"/key1",headers={"If-Match":"{}".format(etag)})
Handling version mismatch failures
In the following example, you’ll see how to retry a save state operation when the version has changed:
importrequestsimportjson# This method saves the state and returns false if failed to save statedefsave_state(data):try:store_name="redis-store"# name of the state store as specified in state store component yaml filedapr_state_url="http://localhost:3500/v1.0/state/{}".format(store_name)response=requests.post(dapr_state_url,json=data)ifresponse.status_code==200:returnTrueexcept:returnFalsereturnFalse# This method gets the state and returns the response, with the ETag in the header -->defget_state(key):response=requests.get("http://localhost:3500/v1.0/state/<state_store_name>/{}".format(key),headers={"concurrency":"first-write"})returnresponse# Exit when save state is successful. success will be False if there's an ETag mismatch -->success=Falsewhilesuccess!=True:response=get_state("key1")etag=response.headers['ETag']newState='[{ "key": "key1", "value": "New Data", "etag": {}, "options": { "concurrency": "first-write" }}]'.format(etag)success=save_state(newState)
5 - How-To: Enable the transactional outbox pattern
Commit a single transaction across a state store and pub/sub message broker
The transactional outbox pattern is a well known design pattern for sending notifications regarding changes in an application’s state. The transactional outbox pattern uses a single transaction that spans across the database and the message broker delivering the notification.
Developers are faced with many difficult technical challenges when trying to implement this pattern on their own, which often involves writing error-prone central coordination managers that, at most, support a combination of one or two databases and message brokers.
For example, you can use the outbox pattern to:
Write a new user record to an account database.
Send a notification message that the account was successfully created.
With Dapr’s outbox support, you can notify subscribers when an application’s state is created or updated when calling Dapr’s transactions API.
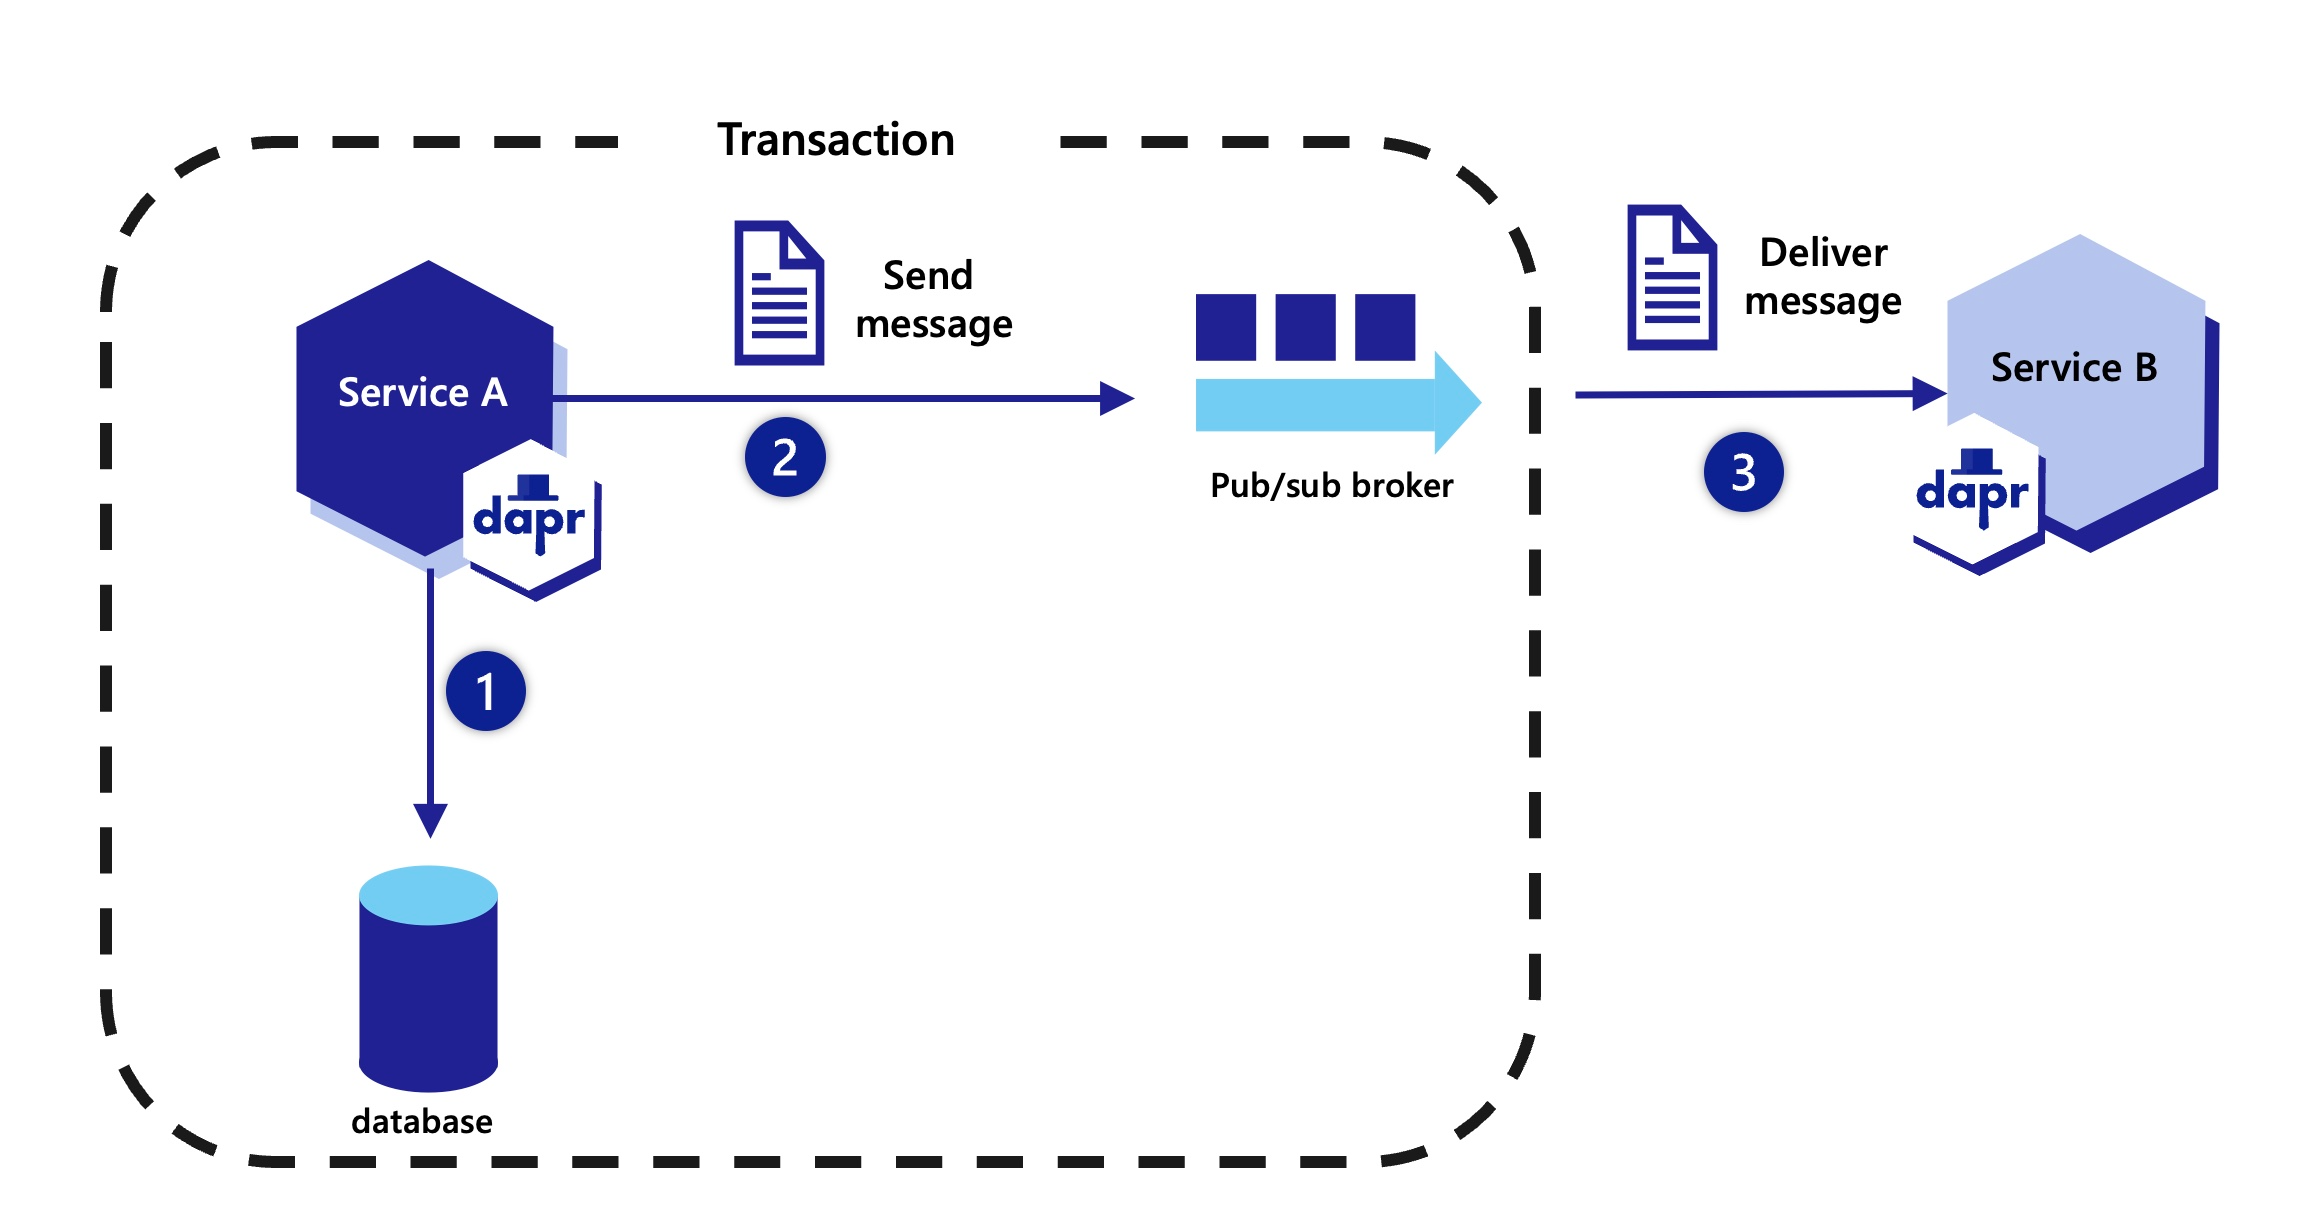
The diagram below is an overview of how the outbox feature works:
Service A saves/updates state to the state store using a transaction.
A message is written to the broker under the same transaction. When the message is successfully delivered to the message broker, the transaction completes, ensuring the state and message are transacted together.
The message broker delivers the message topic to any subscribers - in this case, Service B.
Sets the name of the pub/sub component to deliver the notifications when publishing state changes
outboxPublishTopic
Yes
N/A
Sets the topic that receives the state changes on the pub/sub configured with outboxPublishPubsub. The message body will be a state transaction item for an insert or update operation
outboxPubsub
No
outboxPublishPubsub
Sets the pub/sub component used by Dapr to coordinate the state and pub/sub transactions. If not set, the pub/sub component configured with outboxPublishPubsub is used. This is useful if you want to separate the pub/sub component used to send the notification state changes from the one used to coordinate the transaction
outboxDiscardWhenMissingState
No
false
By setting outboxDiscardWhenMissingState to true, Dapr discards the transaction if it cannot find the state in the database and does not retry. This setting can be useful if the state store data has been deleted for any reason before Dapr was able to deliver the message and you would like Dapr to drop the items from the pub/sub and stop retrying to fetch the state
Additional configurations
Combining outbox and non-outbox messages on the same state store
If you want to use the same state store for sending both outbox and non-outbox messages, simply define two state store components that connect to the same state store, where one has the outbox feature and the other does not.
You can override the outbox pattern message published to the pub/sub broker by setting another transaction that is not be saved to the database and is explicitly mentioned as a projection. This transaction is added a metadata key named outbox.projection with a value set to true. When added to the state array saved in a transaction, this payload is ignored when the state is written and the data is used as the payload sent to the upstream subscriber.
To use correctly, the key values must match between the operation on the state store and the message projection. If the keys do not match, the whole transaction fails.
If you have two or more outbox.projection enabled state items for the same key, the first one defined is used and the others are ignored.
In the following Python SDK example of a state transaction, the value of "2" is saved to the database, but the value of "3" is published to the end-user topic.
DAPR_STORE_NAME="statestore"asyncdefmain():client=DaprClient()# Define the first state operation to save the value "2"op1=StateItem(key="key1",value=b"2")# Define the second state operation to publish the value "3" with metadataop2=StateItem(key="key1",value=b"3",options=StateOptions(metadata={"outbox.projection":"true"}))# Create the list of state operationsops=[op1,op2]# Execute the state transactionawaitclient.state.transaction(DAPR_STORE_NAME,operations=ops)print("State transaction executed.")
By setting the metadata item "outbox.projection" to "true" and making sure the key values match (key1):
The first operation is written to the state store and no message is written to the message broker.
The second operation value is published to the configured pub/sub topic.
In the following JavaScript SDK example of a state transaction, the value of "2" is saved to the database, but the value of "3" is published to the end-user topic.
const{DaprClient,StateOperationType}=require('@dapr/dapr');constDAPR_STORE_NAME="statestore";asyncfunctionmain(){constclient=newDaprClient();// Define the first state operation to save the value "2"
constop1={operation:StateOperationType.UPSERT,request:{key:"key1",value:"2"}};// Define the second state operation to publish the value "3" with metadata
constop2={operation:StateOperationType.UPSERT,request:{key:"key1",value:"3",metadata:{"outbox.projection":"true"}}};// Create the list of state operations
constops=[op1,op2];// Execute the state transaction
awaitclient.state.transaction(DAPR_STORE_NAME,ops);console.log("State transaction executed.");}main().catch(err=>{console.error(err);});
By setting the metadata item "outbox.projection" to "true" and making sure the key values match (key1):
The first operation is written to the state store and no message is written to the message broker.
The second operation value is published to the configured pub/sub topic.
In the following .NET SDK example of a state transaction, the value of "2" is saved to the database, but the value of "3" is published to the end-user topic.
publicclassProgram{privateconststringDAPR_STORE_NAME="statestore";publicstaticasyncTaskMain(string[]args){varclient=newDaprClientBuilder().Build();// Define the first state operation to save the value "2"varop1=newStateTransactionRequest(key:"key1",value:Encoding.UTF8.GetBytes("2"),operationType:StateOperationType.Upsert);// Define the second state operation to publish the value "3" with metadatavarmetadata=newDictionary<string,string>{{"outbox.projection","true"}};varop2=newStateTransactionRequest(key:"key1",value:Encoding.UTF8.GetBytes("3"),operationType:StateOperationType.Upsert,metadata:metadata);// Create the list of state operationsvarops=newList<StateTransactionRequest>{op1,op2};// Execute the state transactionawaitclient.ExecuteStateTransactionAsync(DAPR_STORE_NAME,ops);Console.WriteLine("State transaction executed.");}}
By setting the metadata item "outbox.projection" to "true" and making sure the key values match (key1):
The first operation is written to the state store and no message is written to the message broker.
The second operation value is published to the configured pub/sub topic.
In the following Java SDK example of a state transaction, the value of "2" is saved to the database, but the value of "3" is published to the end-user topic.
publicclassMain{privatestaticfinalStringDAPR_STORE_NAME="statestore";publicstaticvoidmain(String[]args){try(DaprClientclient=newDaprClientBuilder().build()){// Define the first state operation to save the value "2"StateOperation<String>op1=newStateOperation<>(StateOperationType.UPSERT,"key1","2");// Define the second state operation to publish the value "3" with metadataMap<String,String>metadata=newHashMap<>();metadata.put("outbox.projection","true");StateOperation<String>op2=newStateOperation<>(StateOperationType.UPSERT,"key1","3",metadata);// Create the list of state operationsList<StateOperation<?>>ops=newArrayList<>();ops.add(op1);ops.add(op2);// Execute the state transactionclient.executeStateTransaction(DAPR_STORE_NAME,ops).block();System.out.println("State transaction executed.");}catch(Exceptione){e.printStackTrace();}}}
By setting the metadata item "outbox.projection" to "true" and making sure the key values match (key1):
The first operation is written to the state store and no message is written to the message broker.
The second operation value is published to the configured pub/sub topic.
In the following Go SDK example of a state transaction, the value of "2" is saved to the database, but the value of "3" is published to the end-user topic.
ops:=make([]*dapr.StateOperation,0)op1:=&dapr.StateOperation{Type:dapr.StateOperationTypeUpsert,Item:&dapr.SetStateItem{Key:"key1",Value:[]byte("2"),},}op2:=&dapr.StateOperation{Type:dapr.StateOperationTypeUpsert,Item:&dapr.SetStateItem{Key:"key1",Value:[]byte("3"),// Override the data payload saved to the database Metadata:map[string]string{"outbox.projection":"true",},},}ops=append(ops,op1,op2)meta:=map[string]string{}err:=testClient.ExecuteStateTransaction(ctx,store,meta,ops)
By setting the metadata item "outbox.projection" to "true" and making sure the key values match (key1):
The first operation is written to the state store and no message is written to the message broker.
The second operation value is published to the configured pub/sub topic.
You can pass the message override using the following HTTP request:
asyncdefexecute_state_transaction():asyncwithDaprClient()asclient:# Define state operationsops=[]op1={'operation':'upsert','request':{'key':'key1','value':b'2',# Convert string to byte array'metadata':{'cloudevent.id':'unique-business-process-id','cloudevent.source':'CustomersApp','cloudevent.type':'CustomerCreated','cloudevent.subject':'123','my-custom-ce-field':'abc'}}}ops.append(op1)# Execute state transactionstore_name='your-state-store-name'try:awaitclient.execute_state_transaction(store_name,ops)print('State transaction executed.')exceptExceptionase:print('Error executing state transaction:',e)# Run the async functionif__name__=="__main__":asyncio.run(execute_state_transaction())
const{DaprClient}=require('dapr-client');asyncfunctionexecuteStateTransaction(){// Initialize Dapr client
constdaprClient=newDaprClient();// Define state operations
constops=[];constop1={operationType:'upsert',request:{key:'key1',value:Buffer.from('2'),metadata:{'id':'unique-business-process-id','source':'CustomersApp','type':'CustomerCreated','subject':'123','my-custom-ce-field':'abc'}}};ops.push(op1);// Execute state transaction
conststoreName='your-state-store-name';constmetadata={};}executeStateTransaction();
publicclassStateOperationExample{publicasyncTaskExecuteStateTransactionAsync(){vardaprClient=newDaprClientBuilder().Build();// Define the value "2" as a string and serialize it to a byte arrayvarvalue="2";varvalueBytes=JsonSerializer.SerializeToUtf8Bytes(value);// Define the first state operation to save the value "2" with metadata// Override Cloudevent metadatavarmetadata=newDictionary<string,string>{{"cloudevent.id","unique-business-process-id"},{"cloudevent.source","CustomersApp"},{"cloudevent.type","CustomerCreated"},{"cloudevent.subject","123"},{"my-custom-ce-field","abc"}};varop1=newStateTransactionRequest(key:"key1",value:valueBytes,operationType:StateOperationType.Upsert,metadata:metadata);// Create the list of state operationsvarops=newList<StateTransactionRequest>{op1};// Execute the state transactionvarstoreName="your-state-store-name";awaitdaprClient.ExecuteStateTransactionAsync(storeName,ops);Console.WriteLine("State transaction executed.");}publicstaticasyncTaskMain(string[]args){varexample=newStateOperationExample();awaitexample.ExecuteStateTransactionAsync();}}
publicclassStateOperationExample{publicstaticvoidmain(String[]args){executeStateTransaction();}publicstaticvoidexecuteStateTransaction(){// Build Dapr clienttry(DaprClientdaprClient=newDaprClientBuilder().build()){// Define the value "2"Stringvalue="2";// Override CloudEvent metadataMap<String,String>metadata=newHashMap<>();metadata.put("cloudevent.id","unique-business-process-id");metadata.put("cloudevent.source","CustomersApp");metadata.put("cloudevent.type","CustomerCreated");metadata.put("cloudevent.subject","123");metadata.put("my-custom-ce-field","abc");// Define state operationsList<StateOperation<?>>ops=newArrayList<>();StateOperation<String>op1=newStateOperation<>(StateOperationType.UPSERT,"key1",value,metadata);ops.add(op1);// Execute state transactionStringstoreName="your-state-store-name";daprClient.executeStateTransaction(storeName,ops).block();System.out.println("State transaction executed.");}catch(Exceptione){e.printStackTrace();}}}
funcmain(){// Create a Dapr clientclient,err:=dapr.NewClient()iferr!=nil{log.Fatalf("failed to create Dapr client: %v",err)}deferclient.Close()ctx:=context.Background()store:="your-state-store-name"// Define state operationsops:=make([]*dapr.StateOperation,0)op1:=&dapr.StateOperation{Type:dapr.StateOperationTypeUpsert,Item:&dapr.SetStateItem{Key:"key1",Value:[]byte("2"),// Override Cloudevent metadataMetadata:map[string]string{"cloudevent.id":"unique-business-process-id","cloudevent.source":"CustomersApp","cloudevent.type":"CustomerCreated","cloudevent.subject":"123","my-custom-ce-field":"abc",},},}ops=append(ops,op1)// Metadata for the transaction (if any)meta:=map[string]string{}// Execute state transactionerr=client.ExecuteStateTransaction(ctx,store,meta,ops)iferr!=nil{log.Fatalf("failed to execute state transaction: %v",err)}log.Println("State transaction executed.")}
Learn the strategies for sharing state between different applications
Dapr provides different ways to share state between applications.
Different architectures might have different needs when it comes to sharing state. In one scenario, you may want to:
Encapsulate all state within a given application
Have Dapr manage the access for you
In a different scenario, you may need two applications working on the same state to get and save the same keys.
To enable state sharing, Dapr supports the following key prefixes strategies:
Key prefixes
Description
appid
The default strategy allowing you to manage state only by the app with the specified appid. All state keys will be prefixed with the appid, and are scoped for the application.
name
Uses the name of the state store component as the prefix. Multiple applications can share the same state for a given state store.
namespace
If set, this setting prefixes the appid key with the configured namespace, resulting in a key that is scoped to a given namespace. This allows apps in different namespace with the same appid to reuse the same state store. If a namespace is not configured, the setting fallbacks to the appid strategy. For more information on namespaces in Dapr see How-To: Scope components to one or more applications
none
Uses no prefixing. Multiple applications share state across different state stores.
Specifying a state prefix strategy
To specify a prefix strategy, add a metadata key named keyPrefix on a state component:
Automatically encrypt state and manage key rotations
Encrypt application state at rest to provide stronger security in enterprise workloads or regulated environments. Dapr offers automatic client-side encryption based on AES in Galois/Counter Mode (GCM), supporting keys of 128, 192, and 256-bits.
In addition to automatic encryption, Dapr supports primary and secondary encryption keys to make it easier for developers and ops teams to enable a key rotation strategy. This feature is supported by all Dapr state stores.
The encryption keys are always fetched from a secret, and cannot be supplied as plaintext values on the metadata section.
Enabling automatic encryption
Add the following metadata section to any Dapr supported state store:
metadata:- name:primaryEncryptionKeysecretKeyRef:name:mysecretkey:mykey# key is optional.
For example, this is the full YAML of a Redis encrypted state store:
You now have a Dapr state store configured to fetch the encryption key from a secret named mysecret, containing the actual encryption key in a key named mykey.
The actual encryption key must be a valid, hex-encoded encryption key. While 192-bit and 256-bit keys are supported, it’s recommended you use 128-bit encryption keys. Dapr errors and exists if the encryption key is invalid.
For example, you can generate a random, hex-encoded 128-bit (16-byte) key with:
openssl rand 16| hexdump -v -e '/1 "%02x"'# Result will be similar to "cb321007ad11a9d23f963bff600d58e0"
Note that the secret store does not have to support keys.
Key rotation
To support key rotation, Dapr provides a way to specify a secondary encryption key:
When Dapr starts, it fetches the secrets containing the encryption keys listed in the metadata section. Dapr automatically knows which state item has been encrypted with which key, as it appends the secretKeyRef.name field to the end of the actual state key.
To rotate a key,
Change the primaryEncryptionKey to point to a secret containing your new key.
Move the old primary encryption key to the secondaryEncryptionKey.
New data will be encrypted using the new key, and any retrieved old data will be decrypted using the secondary key.
Any updates to data items encrypted with the old key will be re-encrypted using the new key.
Note
when you rotate a key, data encrypted with the old key is not automatically re-encrypted unless your application writes it again. If you remove the rotated key (the now-secondary encryption key), you will not be able to access data that was encrypted with that.
Dapr doesn’t transform state values while saving and retrieving states. Dapr requires all state store implementations to abide by a certain key format scheme (see the state management spec. You can directly interact with the underlying store to manipulate the state data, such as:
Querying states.
Creating aggregated views.
Making backups.
Note
Azure Cosmos DB is a multi-modal database that supports multiple APIs. The default Dapr Cosmos DB state store implementation uses the Azure Cosmos DB SQL API.
Connect to Azure Cosmos DB
To connect to your Cosmos DB instance, you can either:
When you configure an Azure Cosmos DB for Dapr, specify the exact database and collection to use. The following Cosmos DB SQL API samples assume you’ve already connected to the right database and a collection named “states”.
List keys by App ID
To get all state keys associated with application “myapp”, use the query:
To get all the state keys associated with an actor with the instance ID “leroy” of actor type “cat” belonging to the application with ID “mypets”, use the command:
You should not manually update or delete states in the store. All writes and delete operations should be done via the Dapr runtime. The only exception: it is often required to delete actor records in a state store, once you know that these are no longer in use, to prevent a build up of unused actor instances that may never be loaded again.
8.2 - Redis
Use Redis as a state store
Dapr doesn’t transform state values while saving and retrieving states. Dapr requires all state store implementations to abide by a certain key format scheme (see the state management spec. You can directly interact with the underlying store to manipulate the state data, such as:
Querying states.
Creating aggregated views.
Making backups.
Note
The following examples uses Redis CLI against a Redis store using the default Dapr state store implementation.
Connect to Redis
You can use the official redis-cli or any other Redis compatible tools to connect to the Redis state store to query Dapr states directly. If you are running Redis in a container, the easiest way to use redis-cli is via a container:
docker run --rm -it --link <name of the Redis container> redis redis-cli -h <name of the Redis container>
List keys by App ID
To get all state keys associated with application “myapp”, use the command:
KEYS myapp*
The above command returns a list of existing keys, for example:
1)"myapp||balance"2)"myapp||amount"
Get specific state data
Dapr saves state values as hash values. Each hash value contains a “data” field, which contains:
The state data.
A “version” field, with an ever-incrementing version serving as the ETag.
For example, to get the state data by a key “balance” for the application “myapp”, use the command:
HGET myapp||balance data
To get the state version/ETag, use the command:
HGET myapp||balance version
Read actor state
To get all the state keys associated with an actor with the instance ID “leroy” of actor type “cat” belonging to the application with ID “mypets”, use the command:
KEYS mypets||cat||leroy*
To get a specific actor state such as “food”, use the command:
HGET mypets||cat||leroy||food value
Warning
You should not manually update or delete states in the store. All writes and delete operations should be done via the Dapr runtime. The only exception: it is often required to delete actor records in a state store, once you know that these are no longer in use, to prevent a build up of unused actor instances that may never be loaded again.
8.3 - SQL server
Use SQL server as a backend state store
Dapr doesn’t transform state values while saving and retrieving states. Dapr requires all state store implementations to abide by a certain key format scheme (see the state management spec. You can directly interact with the underlying store to manipulate the state data, such as:
Querying states.
Creating aggregated views.
Making backups.
Connect to SQL Server
The easiest way to connect to your SQL Server instance is to use the:
When you configure an Azure SQL database for Dapr, you need to specify the exact table name to use. The following Azure SQL samples assume you’ve already connected to the right database with a table named “states”.
List keys by App ID
To get all state keys associated with application “myapp”, use the query:
SELECT*FROMstatesWHERE[Key]LIKE'myapp||%'
The above query returns all rows with id containing “myapp||”, which is the prefix of the state keys.
Get specific state data
To get the state data by a key “balance” for the application “myapp”, use the query:
SELECT*FROMstatesWHERE[Key]='myapp||balance'
Read the Data field of the returned row. To get the state version/ETag, use the command:
To get all the state keys associated with an actor with the instance ID “leroy” of actor type “cat” belonging to the application with ID “mypets”, use the command:
You should not manually update or delete states in the store. All writes and delete operations should be done via the Dapr runtime. The only exception: it is often required to delete actor records in a state store, once you know that these are no longer in use, to prevent a build up of unused actor instances that may never be loaded again.
9 - State Time-to-Live (TTL)
Manage state with TTL.
Dapr enables per state set request time-to-live (TTL). This means that applications can set time-to-live per state stored, and these states cannot be retrieved after expiration.
For supported state stores, you simply set the ttlInSeconds metadata when publishing a message. Other state stores will ignore this value. For some state stores, you can specify a default expiration on a per-table/container basis.
Native state TTL support
When state TTL has native support in the state store component, Dapr forwards the TTL configuration without adding any extra logic, maintaining predictable behavior. This is helpful when the expired state is handled differently by the component.
When a TTL is not specified, the default behavior of the state store is retained.
Explicit persistence bypassing globally defined TTL
Persisting state applies to all state stores that let you specify a default TTL used for all data, either:
Setting a global TTL value via a Dapr component, or
When creating the state store outside of Dapr and setting a global TTL value.
When no specific TTL is specified, the data expires after that global TTL period of time. This is not facilitated by Dapr.
In addition, all state stores also support the option to explicitly persist data. This means you can ignore the default database policy (which may have been set outside of Dapr or via a Dapr Component) to indefinitely retain a given database record. You can do this by setting ttlInSeconds to the value of -1. This value indicates to ignore any TTL value set.