Get a high-level overview of Dapr building blocks in the Concepts section.

This is the multi-page printable view of this section. Click here to print.
Get a high-level overview of Dapr building blocks in the Concepts section.
Learn more about how to use Dapr Service Invocation:
Using service invocation, your application can reliably and securely communicate with other applications using the standard gRPC or HTTP protocols.
In many microservice-based applications, multiple services need the ability to communicate with one another. This inter-service communication requires that application developers handle problems like:
Dapr addresses these challenges by providing a service invocation API that acts similar to a reverse proxy with built-in service discovery, while leveraging built-in distributed tracing, metrics, error handling, encryption and more.
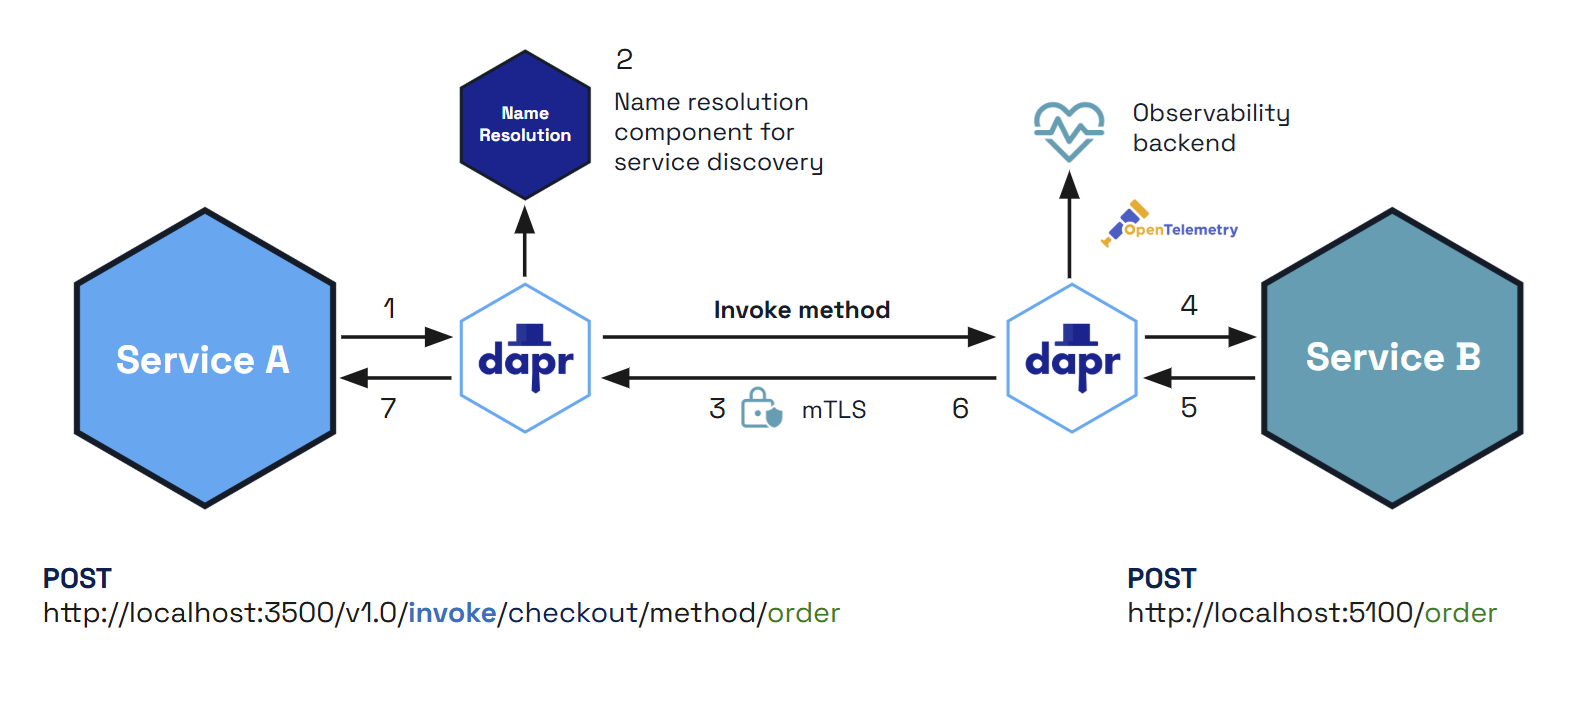
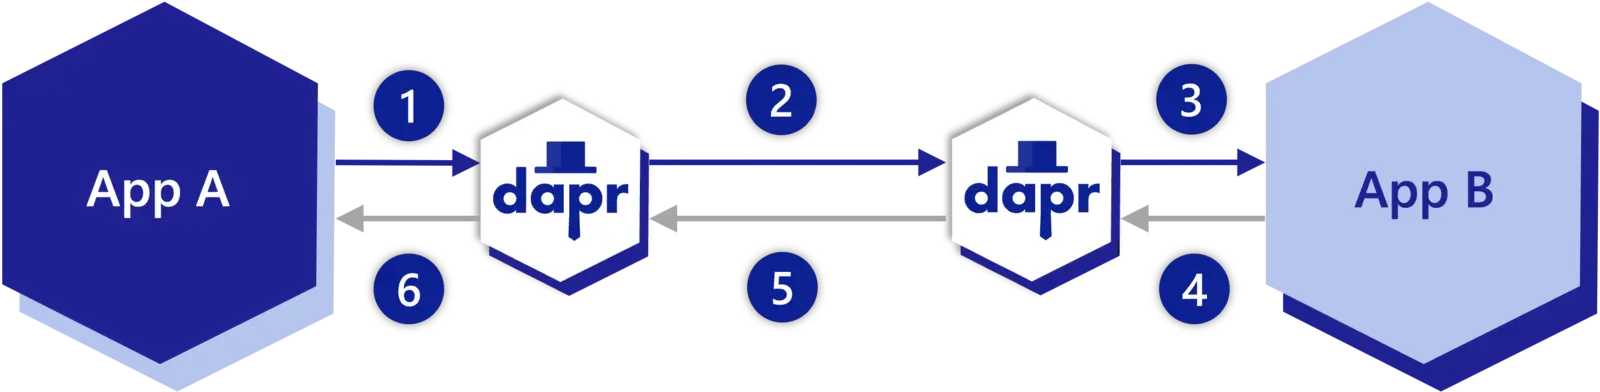
Dapr uses a sidecar architecture. To invoke an application using Dapr:
invoke API on the Dapr instance.The following overview video and demo demonstrates how Dapr service invocation works.
The diagram below is an overview of how Dapr’s service invocation works between two Dapr-ized applications.
You can also call non-Dapr HTTP endpoints using the service invocation API. For example, you may only use Dapr in part of an overall application, may not have access to the code to migrate an existing application to use Dapr, or simply need to call an external HTTP service. Read “How-To: Invoke Non-Dapr Endpoints using HTTP” for more information.
Service invocation provides several features to make it easy for you to call methods between applications or to call external HTTP endpoints.
dapr-app-id header and you’re ready to go. For more information, see Invoke Services using HTTP.With the Dapr Sentry service, all calls between Dapr applications can be made secure with mutual (mTLS) authentication on hosted platforms, including automatic certificate rollover.
For more information read the service-to-service security article.
In the event of call failures and transient errors, service invocation provides a resiliency feature that performs automatic retries with backoff time periods. To find out more, see the Resiliency article here.
By default, all calls between applications are traced and metrics are gathered to provide insights and diagnostics for applications. This is especially important in production scenarios, providing call graphs and metrics on the calls between your services. For more information read about observability.
With access policies, applications can control:
For example, you can restrict sensitive applications with personnel information from being accessed by unauthorized applications. Combined with service-to-service secure communication, you can provide for soft multi-tenancy deployments.
For more information read the access control allow lists for service invocation article.
You can scope applications to namespaces for deployment and security and call between services deployed to different namespaces. For more information, read the Service invocation across namespaces article.
Dapr provides round robin load balancing of service invocation requests with the mDNS protocol, for example with a single machine or with multiple, networked, physical machines.
The diagram below shows an example of how this works. If you have 1 instance of an application with app ID FrontEnd and 3 instances of application with app ID Cart and you call from FrontEnd app to Cart app, Dapr round robins’ between the 3 instances. These instance can be on the same machine or on different machines. .
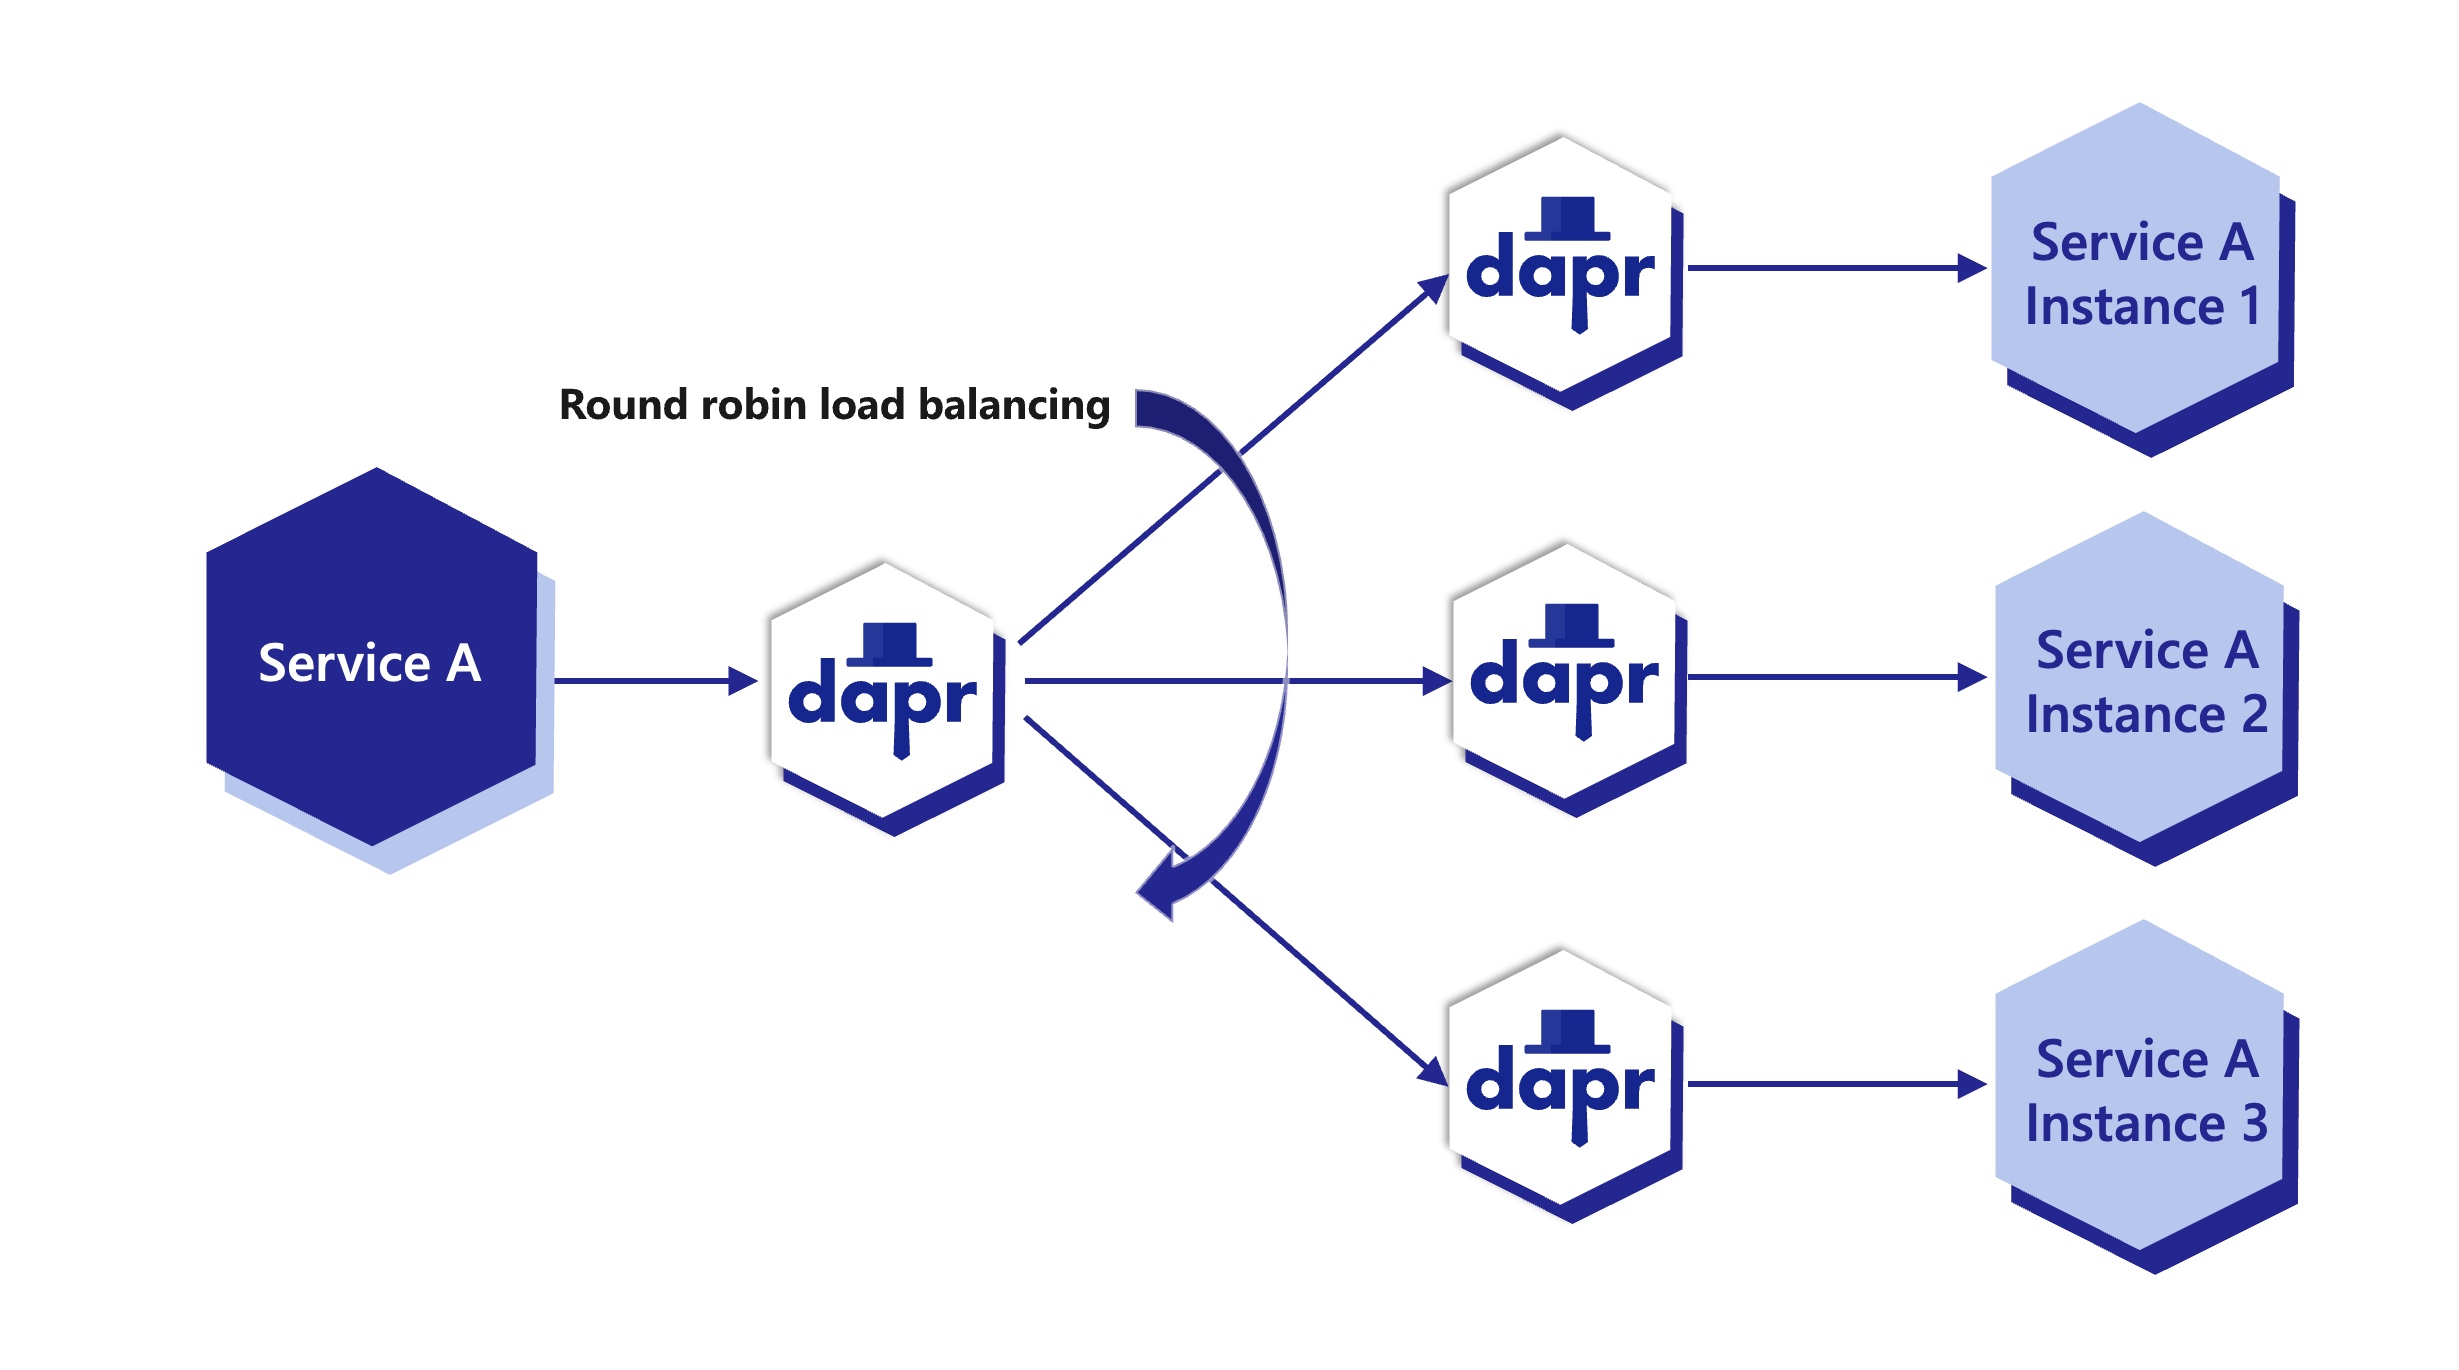
Note: App ID is unique per application, not application instance. Regardless how many instances of that application exist (due to scaling), all of them will share the same app ID.
Dapr can run on a variety of hosting platforms. To enable swappable service discovery with service invocation, Dapr uses name resolution components. For example, the Kubernetes name resolution component uses the Kubernetes DNS service to resolve the location of other applications running in the cluster.
Self-hosted machines can use the mDNS name resolution component. As an alternative, you can use the SQLite name resolution component to run Dapr on single-node environments and for local development scenarios. Dapr sidecars that are part of the cluster store their information in a SQLite database on the local machine.
The Consul name resolution component is particularly suited to multi-machine deployments and can be used in any hosting environment, including Kubernetes, multiple VMs, or self-hosted.
You can handle data as a stream in HTTP service invocation. This can offer improvements in performance and memory utilization when using Dapr to invoke another service using HTTP with large request or response bodies.
The diagram below demonstrates the six steps of data flow.
Following the above call sequence, suppose you have the applications as described in the Hello World tutorial, where a python app invokes a node.js app. In such a scenario, the python app would be “Service A” , and a Node.js app would be “Service B”.
The diagram below shows sequence 1-7 again on a local machine showing the API calls:
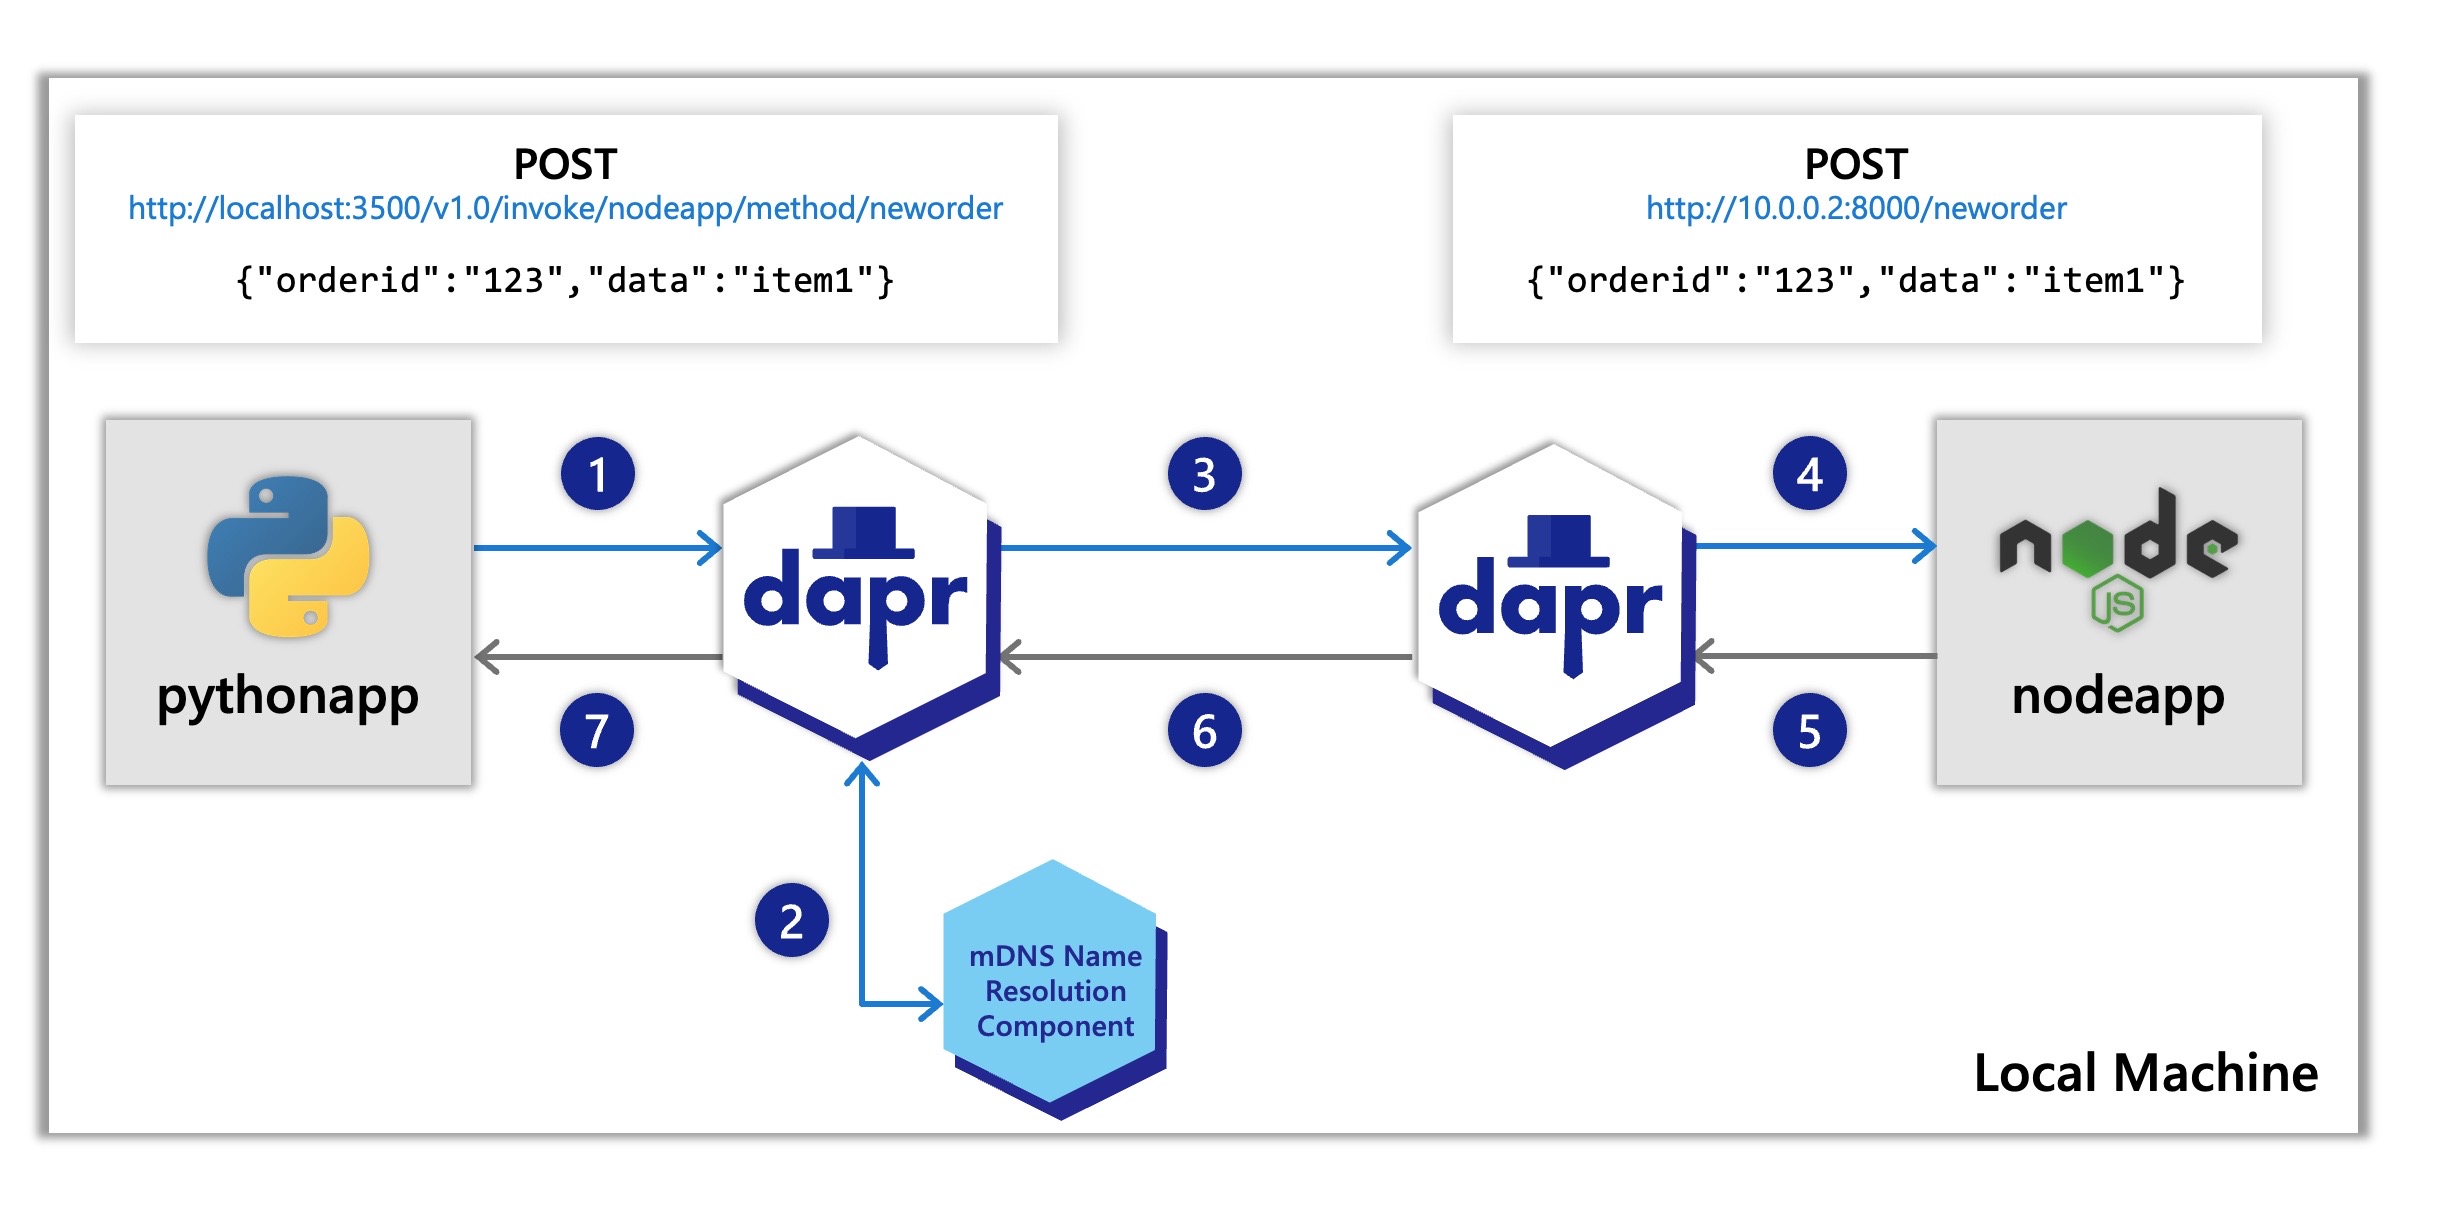
nodeapp. The python app invokes the Node.js app’s neworder method by POSTing http://localhost:3500/v1.0/invoke/nodeapp/method/neworder, which first goes to the python app’s local Dapr sidecar.The Dapr docs contain multiple quickstarts that leverage the service invocation building block in different example architectures. To get a straight-forward understanding of the service invocation api and it’s features we recommend starting with our quickstarts:
| Quickstart/tutorial | Description |
|---|---|
| Service invocation quickstart | This quickstart gets you interacting directly with the service invocation building block. |
| Hello world tutorial | This tutorial shows how to use both the service invocation and state management building blocks all running locally on your machine. |
| Hello world kubernetes tutorial | This tutorial walks through using Dapr in kubernetes and covers both the service invocation and state management building blocks as well. |
Want to skip the quickstarts? Not a problem. You can try out the service invocation building block directly in your application to securely communicate with other services. After Dapr is installed, you can begin using the service invocation API in the following ways.
Invoke services using:
dapr-app-id header and you’re ready to get started. Read more on this here, Invoke Services using HTTP.localhost:<dapr-http-port> and you’ll be able to directly call the API. You can also read more on this in the Invoke Services using HTTP docs linked above under HTTP proxying.For quick testing, try using the Dapr CLI for service invocation:
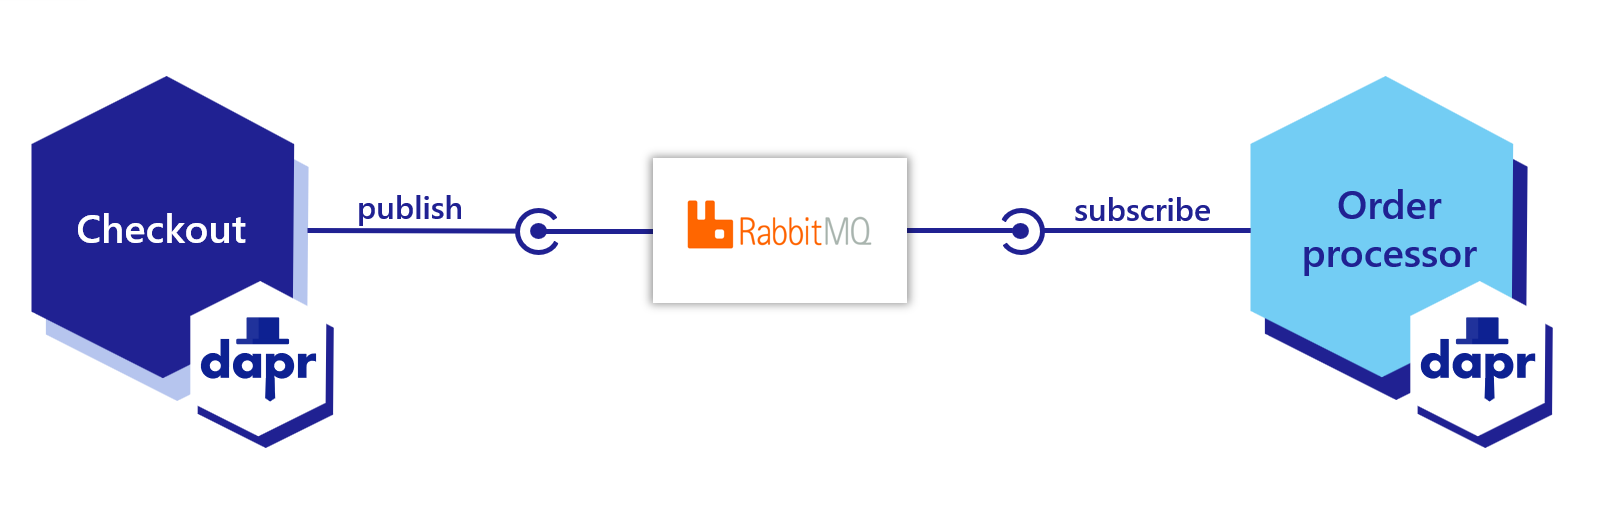
dapr invoke --method <method-name> command along with the method flag and the method of interest. Read more on this in Dapr CLI.This article demonstrates how to deploy services each with an unique application ID for other services to discover and call endpoints on them using service invocation over HTTP.
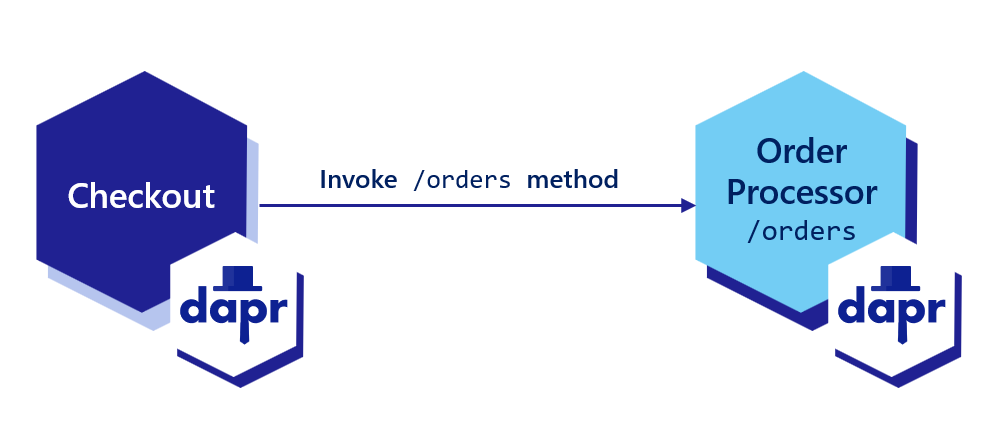
Dapr allows you to assign a global, unique ID for your app. This ID encapsulates the state for your application, regardless of the number of instances it may have.
dapr run --app-id checkout --app-protocol http --dapr-http-port 3500 -- python3 checkout/app.py

dapr run --app-id order-processor --app-port 8001  --app-protocol http --dapr-http-port 3501 -- python3 order-processor/app.py
If your app uses a TLS, you can tell Dapr to invoke your app over a TLS connection by setting --app-protocol https:
dapr run --app-id checkout --app-protocol https --dapr-http-port 3500 -- python3 checkout/app.py

dapr run --app-id order-processor --app-port 8001 --app-protocol https --dapr-http-port 3501 -- python3 order-processor/app.py
dapr run --app-id checkout --app-protocol http --dapr-http-port 3500 -- npm start

dapr run --app-id order-processor --app-port 5001  --app-protocol http --dapr-http-port 3501 -- npm start
If your app uses a TLS, you can tell Dapr to invoke your app over a TLS connection by setting --app-protocol https:
dapr run --app-id checkout --dapr-http-port 3500 --app-protocol https -- npm start

dapr run --app-id order-processor --app-port 5001 --dapr-http-port 3501 --app-protocol https -- npm start
dapr run --app-id checkout --app-protocol http --dapr-http-port 3500 -- dotnet run

dapr run --app-id order-processor --app-port 7001 --app-protocol http --dapr-http-port 3501 -- dotnet run
If your app uses a TLS, you can tell Dapr to invoke your app over a TLS connection by setting --app-protocol https:
dapr run --app-id checkout --dapr-http-port 3500 --app-protocol https -- dotnet run

dapr run --app-id order-processor --app-port 7001 --dapr-http-port 3501 --app-protocol https -- dotnet run
dapr run --app-id checkout --app-protocol http --dapr-http-port 3500 -- java -jar target/CheckoutService-0.0.1-SNAPSHOT.jar

dapr run --app-id order-processor --app-port 9001 --app-protocol http --dapr-http-port 3501 -- java -jar target/OrderProcessingService-0.0.1-SNAPSHOT.jar
If your app uses a TLS, you can tell Dapr to invoke your app over a TLS connection by setting --app-protocol https:
dapr run --app-id checkout --dapr-http-port 3500 --app-protocol https -- java -jar target/CheckoutService-0.0.1-SNAPSHOT.jar

dapr run --app-id order-processor --app-port 9001 --dapr-http-port 3501 --app-protocol https -- java -jar target/OrderProcessingService-0.0.1-SNAPSHOT.jar
dapr run --app-id checkout --dapr-http-port 3500 -- go run .

dapr run --app-id order-processor --app-port 6006 --app-protocol http --dapr-http-port 3501 -- go run .
If your app uses a TLS, you can tell Dapr to invoke your app over a TLS connection by setting --app-protocol https:
dapr run --app-id checkout --dapr-http-port 3500 --app-protocol https -- go run .

dapr run --app-id order-processor --app-port 6006 --dapr-http-port 3501 --app-protocol https -- go run .
In Kubernetes, set the dapr.io/app-id annotation on your pod:
apiVersion: apps/v1
kind: Deployment
metadata:
  name: <language>-app
  namespace: default
  labels:
    app: <language>-app
spec:
  replicas: 1
  selector:
    matchLabels:
      app: <language>-app
  template:
    metadata:
      labels:
        app: <language>-app
      annotations:
        dapr.io/enabled: "true"
        dapr.io/app-id: "order-processor"
        dapr.io/app-port: "6001"
...
If your app uses a TLS connection, you can tell Dapr to invoke your app over TLS with the app-protocol: "https" annotation (full list here). Note that Dapr does not validate TLS certificates presented by the app.
To invoke an application using Dapr, you can use the invoke API on any Dapr instance. The sidecar programming model encourages each application to interact with its own instance of Dapr. The Dapr sidecars discover and communicate with one another.
Below are code examples that leverage Dapr SDKs for service invocation.
#dependencies
import random
from time import sleep
import logging
import requests

#code
logging.basicConfig(level = logging.INFO)
while True:
    sleep(random.randrange(50, 5000) / 1000)
    orderId = random.randint(1, 1000)
        #Invoke a service
        result = requests.post(
           url='%s/orders' % (base_url),
           data=json.dumps(order),
           headers=headers
        )
    logging.basicConfig(level = logging.INFO)
    logging.info('Order requested: ' + str(orderId))
    logging.info('Result: ' + str(result))
//dependencies
import axios from "axios";

//code
const daprHost = "127.0.0.1";

var main = function() {
    for(var i=0;i<10;i++) {
        sleep(5000);
        var orderId = Math.floor(Math.random() * (1000 - 1) + 1);
        start(orderId).catch((e) => {
            console.error(e);
            process.exit(1);
        });
    }
}

    //Invoke a service
    const result = await axios.post('order-processor' , "orders/" + orderId , axiosConfig);
    console.log("Order requested: " + orderId);
    console.log("Result: " + result.config.data);


function sleep(ms) {
    return new Promise(resolve => setTimeout(resolve, ms));
}

main();
//dependencies
using System;
using System.Collections.Generic;
using System.Net.Http;
using System.Net.Http.Headers;
using System.Threading.Tasks;
using Microsoft.AspNetCore.Mvc;
using System.Threading;

//code
namespace EventService
{
  class Program
   {
       static async Task Main(string[] args)
       {
          while(true) {
               await Task.Delay(5000)
               var random = new Random();
               var orderId = random.Next(1,1000);

               //Using Dapr SDK to invoke a method
               var order = new Order(orderId.ToString());

               var httpClient = DaprClient.CreateInvokeHttpClient();
               var response = await httpClient.PostAsJsonAsync("http://order-processor/orders", order);
               var result = await response.Content.ReadAsStringAsync();

               Console.WriteLine("Order requested: " + orderId);
               Console.WriteLine("Result: " + result);
   	    }
       }
   }
}
//dependencies
import java.io.IOException;
import java.net.URI;
import java.net.http.HttpClient;
import java.net.http.HttpRequest;
import java.net.http.HttpResponse;
import java.time.Duration;
import java.util.HashMap;
import java.util.Map;
import java.util.Random;
import java.util.concurrent.TimeUnit;

//code
@SpringBootApplication
public class CheckoutServiceApplication {
    private static final HttpClient httpClient = HttpClient.newBuilder()
            .version(HttpClient.Version.HTTP_2)
            .connectTimeout(Duration.ofSeconds(10))
            .build();

    public static void main(String[] args) throws InterruptedException, IOException {
        while (true) {
            TimeUnit.MILLISECONDS.sleep(5000);
            Random random = new Random();
            int orderId = random.nextInt(1000 - 1) + 1;

            // Create a Map to represent the request body
            Map<String, Object> requestBody = new HashMap<>();
            requestBody.put("orderId", orderId);
            // Add other fields to the requestBody Map as needed

            HttpRequest request = HttpRequest.newBuilder()
                    .POST(HttpRequest.BodyPublishers.ofString(new JSONObject(requestBody).toString()))
                    .uri(URI.create(dapr_url))
                    .header("Content-Type", "application/json")
                    .header("dapr-app-id", "order-processor")
                    .build();

            HttpResponse<String> response = httpClient.send(request, HttpResponse.BodyHandlers.ofString());

            System.out.println("Order passed: " + orderId);
            TimeUnit.MILLISECONDS.sleep(1000);

            log.info("Order requested: " + orderId);
            log.info("Result: " + response.body());
        }
    }
}
package main

import (
	"fmt"
	"io"
	"log"
	"math/rand"
	"net/http"
	"os"
	"time"
)

func main() {
	daprHttpPort := os.Getenv("DAPR_HTTP_PORT")
	if daprHttpPort == "" {
		daprHttpPort = "3500"
	}

	client := &http.Client{
		Timeout: 15 * time.Second,
	}

	for i := 0; i < 10; i++ {
		time.Sleep(5000)
		orderId := rand.Intn(1000-1) + 1

		url := fmt.Sprintf("http://localhost:%s/checkout/%v", daprHttpPort, orderId)
		req, err := http.NewRequest(http.MethodGet, url, nil)
		if err != nil {
			panic(err)
		}

		// Adding target app id as part of the header
		req.Header.Add("dapr-app-id", "order-processor")

		// Invoking a service
		resp, err := client.Do(req)
		if err != nil {
			log.Fatal(err.Error())
		}

		b, err := io.ReadAll(resp.Body)
		if err != nil {
			panic(err)
		}

		fmt.Println(string(b))
	}
}
To invoke a ‘GET’ endpoint:
curl http://localhost:3602/v1.0/invoke/checkout/method/checkout/100
To avoid changing URL paths as much as possible, Dapr provides the following ways to call the service invocation API:
localhost:<dapr-http-port>.dapr-app-id header to specify the ID of the target service, or alternatively pass the ID via HTTP Basic Auth: http://dapr-app-id:<service-id>@localhost:3602/path.For example, the following command:
curl http://localhost:3602/v1.0/invoke/checkout/method/checkout/100
is equivalent to:
curl -H 'dapr-app-id: checkout' 'http://localhost:3602/checkout/100' -X POST
or:
curl 'http://dapr-app-id:checkout@localhost:3602/checkout/100' -X POST
Using CLI:
dapr invoke --app-id checkout --method checkout/100
You can also append a query string or a fragment to the end of the URL and Dapr will pass it through unchanged. This means that if you need to pass some additional arguments in your service invocation that aren’t part of a payload or the path, you can do so by appending a ? to the end of the URL, followed by the key/value pairs separated by = signs and delimited by &. For example:
curl 'http://dapr-app-id:checkout@localhost:3602/checkout/100?basket=1234&key=abc' -X POST
When running on namespace supported platforms, you include the namespace of the target app in the app ID. For example, following the <app>.<namespace> format, use checkout.production.
Using this example, invoking the service with a namespace would look like:
curl http://localhost:3602/v1.0/invoke/checkout.production/method/checkout/100 -X POST
See the Cross namespace API spec for more information on namespaces.
Our example above showed you how to directly invoke a different service running locally or in Kubernetes. Dapr:
For more information on tracing and logs, see the observability article.
This article describe how to use Dapr to connect services using gRPC.
By using Dapr’s gRPC proxying capability, you can use your existing proto-based gRPC services and have the traffic go through the Dapr sidecar. Doing so yields the following Dapr service invocation benefits to developers:
Dapr allows proxying all kinds of gRPC invocations, including unary and stream-based ones.
The following example is taken from the “hello world” grpc-go example. Although this example is in Go, the same concepts apply to all programming languages supported by gRPC.
package main

import (
	"context"
	"log"
	"net"

	"google.golang.org/grpc"
	pb "google.golang.org/grpc/examples/helloworld/helloworld"
)

const (
	port = ":50051"
)

// server is used to implement helloworld.GreeterServer.
type server struct {
	pb.UnimplementedGreeterServer
}

// SayHello implements helloworld.GreeterServer
func (s *server) SayHello(ctx context.Context, in *pb.HelloRequest) (*pb.HelloReply, error) {
	log.Printf("Received: %v", in.GetName())
	return &pb.HelloReply{Message: "Hello " + in.GetName()}, nil
}

func main() {
	lis, err := net.Listen("tcp", port)
	if err != nil {
		log.Fatalf("failed to listen: %v", err)
	}
	s := grpc.NewServer()
	pb.RegisterGreeterServer(s, &server{})
	log.Printf("server listening at %v", lis.Addr())
	if err := s.Serve(lis); err != nil {
		log.Fatalf("failed to serve: %v", err)
	}
}
This Go app implements the Greeter proto service and exposes a SayHello method.
dapr run --app-id server --app-port 50051 -- go run main.go
Using the Dapr CLI, we’re assigning a unique id to the app, server, using the --app-id flag.
The following example shows you how to discover the Greeter service using Dapr from a gRPC client.
Notice that instead of invoking the target service directly at port 50051, the client is invoking its local Dapr sidecar over port 50007 which then provides all the capabilities of service invocation including service discovery, tracing, mTLS and retries.
package main

import (
	"context"
	"log"
	"time"

	"google.golang.org/grpc"
	pb "google.golang.org/grpc/examples/helloworld/helloworld"
	"google.golang.org/grpc/metadata"
)

const (
	address = "localhost:50007"
)

func main() {
	// Set up a connection to the server.
	conn, err := grpc.Dial(address, grpc.WithInsecure(), grpc.WithBlock())
	if err != nil {
		log.Fatalf("did not connect: %v", err)
	}
	defer conn.Close()
	c := pb.NewGreeterClient(conn)

	ctx, cancel := context.WithTimeout(context.Background(), time.Second*2)
	defer cancel()

	ctx = metadata.AppendToOutgoingContext(ctx, "dapr-app-id", "server")
	r, err := c.SayHello(ctx, &pb.HelloRequest{Name: "Darth Tyrannus"})
	if err != nil {
		log.Fatalf("could not greet: %v", err)
	}

	log.Printf("Greeting: %s", r.GetMessage())
}
The following line tells Dapr to discover and invoke an app named server:
ctx = metadata.AppendToOutgoingContext(ctx, "dapr-app-id", "server")
All languages supported by gRPC allow for adding metadata. Here are a few examples:
Metadata headers = new Metadata();
Metadata.Key<String> jwtKey = Metadata.Key.of("dapr-app-id", "server");

GreeterService.ServiceBlockingStub stub = GreeterService.newBlockingStub(channel);
stub = MetadataUtils.attachHeaders(stub, header);
stub.SayHello(new HelloRequest() { Name = "Darth Malak" });
var metadata = new Metadata
{
	{ "dapr-app-id", "server" }
};

var call = client.SayHello(new HelloRequest { Name = "Darth Nihilus" }, metadata);
metadata = (('dapr-app-id', 'server'),)
response = stub.SayHello(request={ name: 'Darth Revan' }, metadata=metadata)
const metadata = new grpc.Metadata();
metadata.add('dapr-app-id', 'server');

client.sayHello({ name: "Darth Malgus" }, metadata)
metadata = { 'dapr-app-id' : 'server' }
response = service.sayHello({ 'name': 'Darth Bane' }, metadata)
grpc::ClientContext context;
context.AddMetadata("dapr-app-id", "server");
dapr run --app-id client --dapr-grpc-port 50007 -- go run main.go
If you’re running Dapr locally with Zipkin installed, open the browser at http://localhost:9411 and view the traces between the client and server.
Set the following Dapr annotations on your deployment:
apiVersion: apps/v1
kind: Deployment
metadata:
  name: grpc-app
  namespace: default
  labels:
    app: grpc-app
spec:
  replicas: 1
  selector:
    matchLabels:
      app: grpc-app
  template:
    metadata:
      labels:
        app: grpc-app
      annotations:
        dapr.io/enabled: "true"
        dapr.io/app-id: "server"
        dapr.io/app-protocol: "grpc"
        dapr.io/app-port: "50051"
...
The dapr.io/app-protocol: "grpc" annotation tells Dapr to invoke the app using gRPC.
If your app uses a TLS connection, you can tell Dapr to invoke your app over TLS with the app-protocol: "grpcs" annotation (full list here). Note that Dapr does not validate TLS certificates presented by the app.
When running on namespace supported platforms, you include the namespace of the target app in the app ID: myApp.production
For example, invoking the gRPC server on a different namespace:
ctx = metadata.AppendToOutgoingContext(ctx, "dapr-app-id", "server.production")
See the Cross namespace API spec for more information on namespaces.
The example above showed you how to directly invoke a different service running locally or in Kubernetes. Dapr outputs metrics, tracing and logging information allowing you to visualize a call graph between services, log errors and optionally log the payload body.
For more information on tracing and logs see the observability article.
When using Dapr to proxy streaming RPC calls using gRPC, you must set an additional metadata option dapr-stream with value true.
For example:
ctx = metadata.AppendToOutgoingContext(ctx, "dapr-app-id", "server")
ctx = metadata.AppendToOutgoingContext(ctx, "dapr-stream", "true")
Metadata headers = new Metadata();
Metadata.Key<String> jwtKey = Metadata.Key.of("dapr-app-id", "server");
Metadata.Key<String> jwtKey = Metadata.Key.of("dapr-stream", "true");
var metadata = new Metadata
{
	{ "dapr-app-id", "server" },
	{ "dapr-stream", "true" }
};
metadata = (('dapr-app-id', 'server'), ('dapr-stream', 'true'),)
const metadata = new grpc.Metadata();
metadata.add('dapr-app-id', 'server');
metadata.add('dapr-stream', 'true');
metadata = { 'dapr-app-id' : 'server' }
metadata = { 'dapr-stream' : 'true' }
grpc::ClientContext context;
context.AddMetadata("dapr-app-id", "server");
context.AddMetadata("dapr-stream", "true");
Currently, resiliency policies are not supported for service invocation via gRPC.
When proxying streaming gRPCs, due to their long-lived nature, resiliency policies are applied on the “initial handshake” only. As a consequence:
Watch this video on how to use Dapr’s gRPC proxying capability:
This article demonstrates how to call a non-Dapr endpoint using Dapr over HTTP.
Using Dapr’s service invocation API, you can communicate with endpoints that either use or do not use Dapr. Using Dapr to call endpoints that do not use Dapr not only provides a consistent API, but also the following Dapr service invocation benefits:
Sometimes you need to call a non-Dapr HTTP endpoint. For example:
By defining an HTTPEndpoint resource, you declaratively define a way to interact with a non-Dapr endpoint. You then use the service invocation URL to invoke non-Dapr endpoints. Alternatively, you can place a non-Dapr Fully Qualified Domain Name (FQDN) endpoint URL directly into the service invocation URL.
When using service invocation, the Dapr runtime follows a precedence order:
HTTPEndpoint resource?http:// or https:// prefix?appID?The diagram below is an overview of how Dapr’s service invocation works when invoking non-Dapr endpoints.

HTTPEndpoint or FQDN URL then forwards the message to Service B.There are two ways to invoke a non-Dapr endpoint when communicating either to Dapr applications or non-Dapr applications. A Dapr application can invoke a non-Dapr endpoint by providing one of the following:
A named HTTPEndpoint resource, including defining an HTTPEndpoint resource type. See the HTTPEndpoint reference guide for an example.
localhost:3500/v1.0/invoke/<HTTPEndpoint-name>/method/<my-method>
For example, with an HTTPEndpoint resource called “palpatine” and a method called “Order66”, this would be:
curl http://localhost:3500/v1.0/invoke/palpatine/method/order66
A FQDN URL to the non-Dapr endpoint.
localhost:3500/v1.0/invoke/<URL>/method/<my-method>
For example, with an FQDN resource called https://darthsidious.starwars, this would be:
curl http://localhost:3500/v1.0/invoke/https://darthsidious.starwars/method/order66
AppIDs are always used to call Dapr applications with the appID and my-method. Read the How-To: Invoke services using HTTP guide for more information. For example:
localhost:3500/v1.0/invoke/<appID>/method/<my-method>
curl http://localhost:3602/v1.0/invoke/orderprocessor/method/checkout
Using the HTTPEndpoint resource allows you to use any combination of a root certificate, client certificate and private key according to the authentication requirements of the remote endpoint.
apiVersion: dapr.io/v1alpha1
kind: HTTPEndpoint
metadata:
  name: "external-http-endpoint-tls"
spec:
  baseUrl: https://service-invocation-external:443
  headers:
  - name: "Accept-Language"
    value: "en-US"
  clientTLS:
    rootCA:
      secretKeyRef:
        name: dapr-tls-client
        key: ca.crt
apiVersion: dapr.io/v1alpha1
kind: HTTPEndpoint
metadata:
  name: "external-http-endpoint-tls"
spec:
  baseUrl: https://service-invocation-external:443
  headers:
  - name: "Accept-Language"
    value: "en-US"
  clientTLS:
    certificate:
      secretKeyRef:
        name: dapr-tls-client
        key: tls.crt
    privateKey:
      secretKeyRef:
        name: dapr-tls-key
        key: tls.key
Watch this video on how to use service invocation to call non-Dapr endpoints.
In this article, you’ll learn how you can call between services deployed to different namespaces. By default, service invocation supports invoking services within the same namespace by simply referencing the app ID (nodeapp):
localhost:3500/v1.0/invoke/nodeapp/method/neworder
Service invocation also supports calls across namespaces. On all supported hosting platforms, Dapr app IDs conform to a valid FQDN format that includes the target namespace. You can specify both:
nodeapp), andproduction).Example 1
Call the neworder method on the nodeapp in the production namespace:
localhost:3500/v1.0/invoke/nodeapp.production/method/neworder
When calling an application in a namespace using service invocation, you qualify it with the namespace. This proves useful in cross-namespace calls in a Kubernetes cluster.
Example 2
Call the ping method on myapp scoped to the production namespace:
https://localhost:3500/v1.0/invoke/myapp.production/method/ping
Example 3
Call the same ping method as example 2 using a curl command from an external DNS address (in this case, api.demo.dapr.team) and supply the Dapr API token for authentication:
MacOS/Linux:
curl -i -d '{ "message": "hello" }' \
     -H "Content-type: application/json" \
     -H "dapr-api-token: ${API_TOKEN}" \
     https://api.demo.dapr.team/v1.0/invoke/myapp.production/method/ping
Learn more about how to use Dapr Pub/sub:
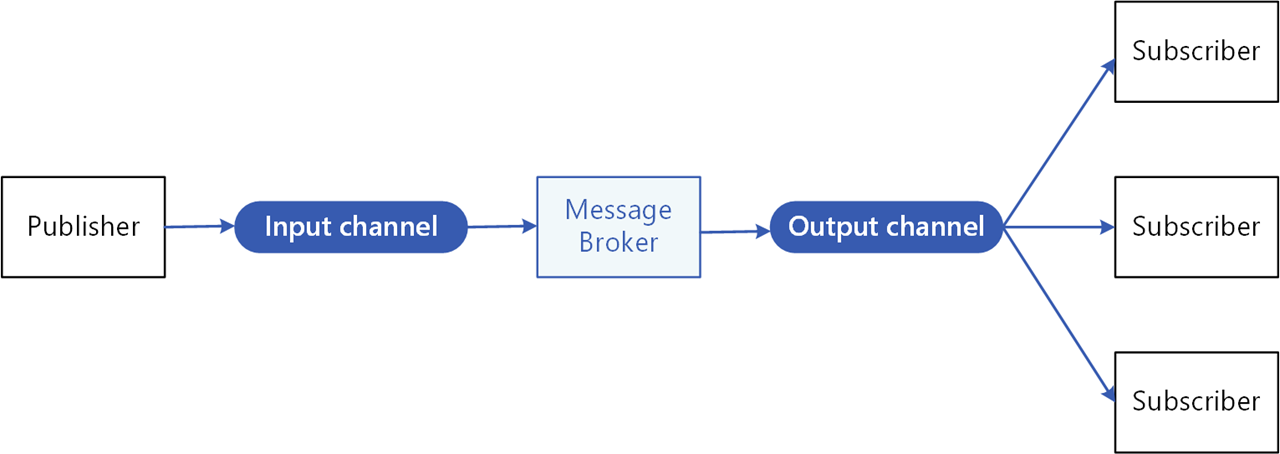
Publish and subscribe (pub/sub) enables microservices to communicate with each other using messages for event-driven architectures.
An intermediary message broker copies each message from a publisher’s input channel to an output channel for all subscribers interested in that message. This pattern is especially useful when you need to decouple microservices from one another.
The pub/sub API in Dapr:
The specific message broker used by your service is pluggable and configured as a Dapr pub/sub component at runtime. This removes the dependency from your service and makes your service more portable and flexible to changes.
When using pub/sub in Dapr:
The following overview video and demo demonstrates how Dapr pub/sub works.
In the diagram below, a “shipping” service and an “email” service have both subscribed to topics published by a “cart” service. Each service loads pub/sub component configuration files that point to the same pub/sub message broker component; for example: Redis Streams, NATS Streaming, Azure Service Bus, or GCP pub/sub.
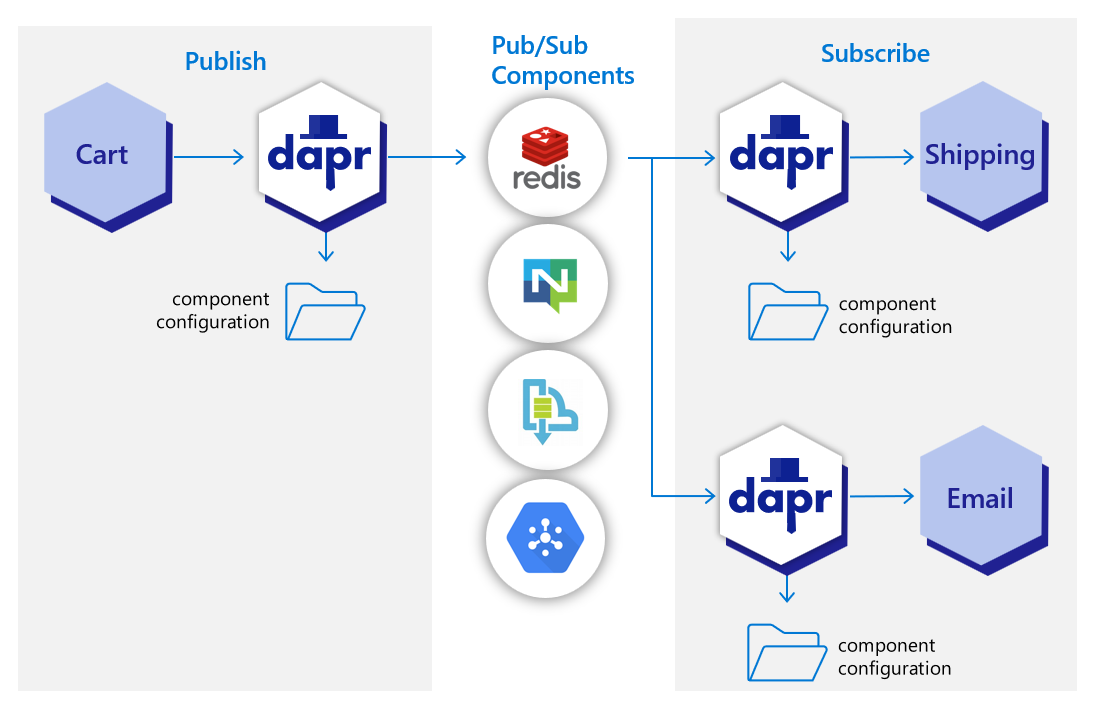
In the diagram below, the Dapr API posts an “order” topic from the publishing “cart” service to “order” endpoints on the “shipping” and “email” subscribing services.

View the complete list of pub/sub components that Dapr supports.
The pub/sub API building block brings several features to your application.
To enable message routing and provide additional context with each message between services, Dapr uses the CloudEvents 1.0 specification as its message format. Any message sent by an application to a topic using Dapr is automatically wrapped in a Cloud Events envelope, using Content-Type header value for datacontenttype attribute.
For more information, read about messaging with CloudEvents, or sending raw messages without CloudEvents.
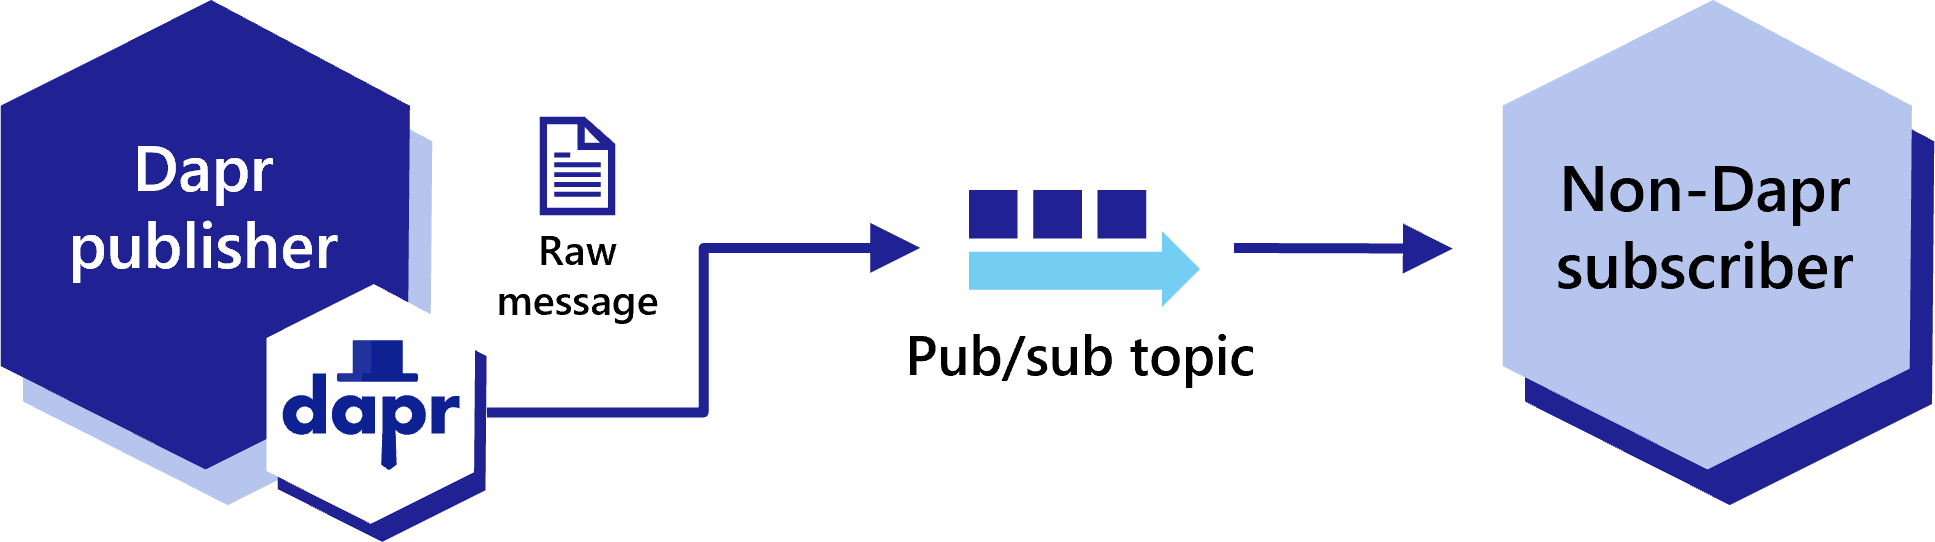
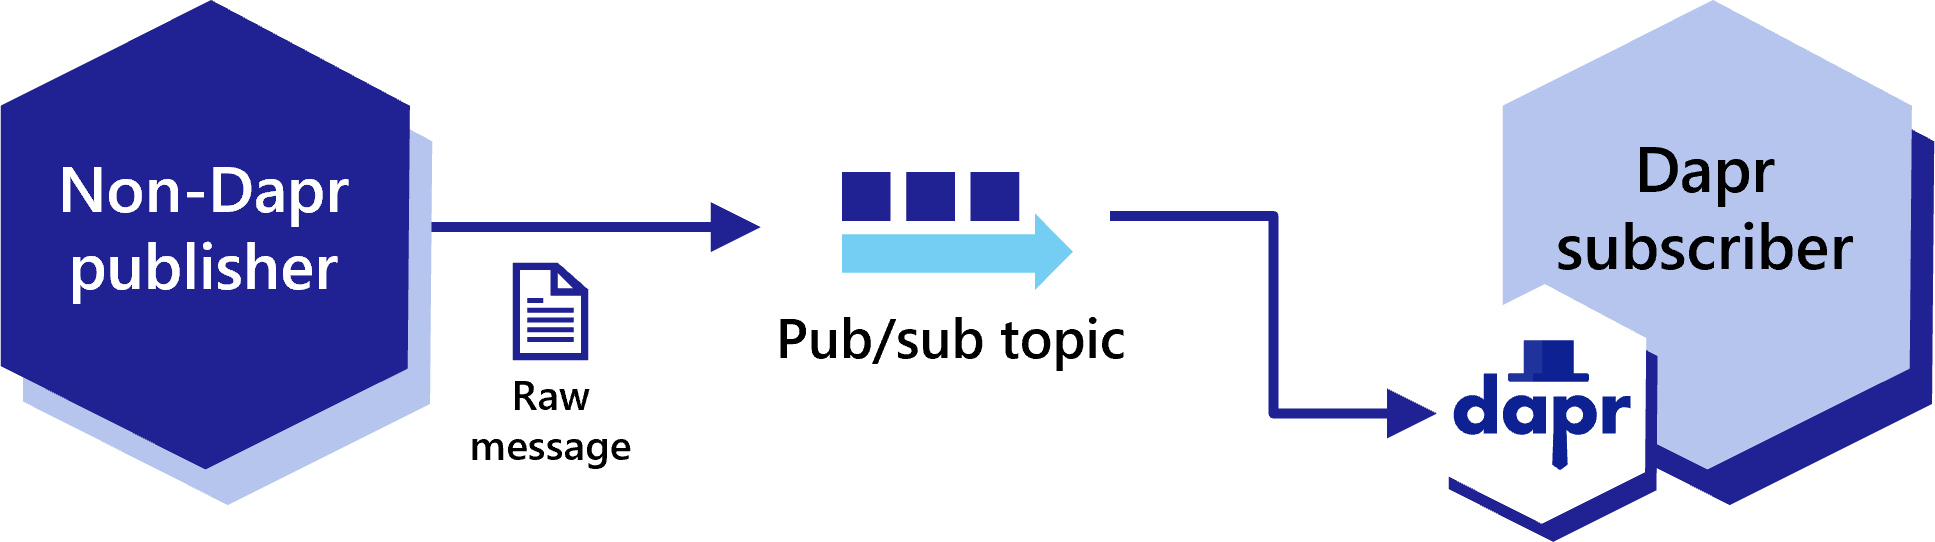
If one of your applications uses Dapr while another doesn’t, you can disable the CloudEvent wrapping for a publisher or subscriber. This allows partial adoption of Dapr pub/sub in applications that cannot adopt Dapr all at once.
For more information, read how to use pub/sub without CloudEvents.
When publishing a message, it’s important to specify the content type of the data being sent. Unless specified, Dapr will assume text/plain.
Content-Type headerIn principle, Dapr considers a message successfully delivered once the subscriber processes the message and responds with a non-error response. For more granular control, Dapr’s pub/sub API also provides explicit statuses, defined in the response payload, with which the subscriber indicates specific handling instructions to Dapr (for example, RETRY or DROP).
Dapr applications can subscribe to published topics via three subscription types that support the same features: declarative, streaming and programmatic.
| Subscription type | Description |
|---|---|
| Declarative | The subscription is defined in an external file. The declarative approach removes the Dapr dependency from your code and allows for existing applications to subscribe to topics, without having to change code. |
| Streaming | The subscription is defined in the user code. Streaming subscriptions are dynamic, meaning they allow for adding or removing subscriptions at runtime. They do not require a subscription endpoint in your application (that is required by both programmatic and declarative subscriptions), making them easy to configure in code. Streaming subscriptions also do not require an app to be configured with the sidecar to receive messages. With streaming subscriptions, since messages are sent to a message handler code, there is no concept of routes or bulk subscriptions. |
| Programmatic | Subscription is defined in the user code. The programmatic approach implements the static subscription and requires an endpoint in your code. |
For more information, read about the subscriptions in Subscription Types.
To reload topic subscriptions that are defined programmatically or declaratively, the Dapr sidecar needs to be restarted.
The Dapr sidecar can be made to dynamically reload changed declarative topic subscriptions without restarting by enabling the HotReload feature gate.
Hot reloading of topic subscriptions is currently a preview feature.
In-flight messages are unaffected when reloading a subscription.
Dapr provides content-based routing pattern. Pub/sub routing is an implementation of this pattern that allows developers to use expressions to route CloudEvents based on their contents to different URIs/paths and event handlers in your application. If no route matches, an optional default route is used. This is useful as your applications expands to support multiple event versions or special cases.
This feature is available to both the declarative and programmatic subscription approaches.
For more information on message routing, read Dapr pub/sub API reference
Sometimes, messages can’t be processed because of a variety of possible issues, such as erroneous conditions within the producer or consumer application or an unexpected state change that causes an issue with your application code. Dapr allows developers to set dead letter topics to deal with messages that cannot be delivered to an application. This feature is available on all pub/sub components and prevents consumer applications from endlessly retrying a failed message. For more information, read about dead letter topics
Dapr enables developers to use the outbox pattern for achieving a single transaction across a transactional state store and any message broker. For more information, read How to enable transactional outbox messaging
Dapr solves multi-tenancy at-scale with namespaces for consumer groups. Simply include the "{namespace}" value in your component metadata for consumer groups to allow multiple namespaces with applications of the same app-id to publish and subscribe to the same message broker.
Dapr guarantees at-least-once semantics for message delivery. When an application publishes a message to a topic using the pub/sub API, Dapr ensures the message is delivered at least once to every subscriber.
Even if the message fails to deliver, or your application crashes, Dapr attempts to redeliver the message until successful delivery.
All Dapr pub/sub components support the at-least-once guarantee.
Dapr handles the burden of dealing with consumer groups and the competing consumers pattern. In the competing consumers pattern, multiple application instances using a single consumer group compete for the message. Dapr enforces the competing consumer pattern when replicas use the same app-id without explicit consumer group overrides.
When multiple instances of the same application (with same app-id) subscribe to a topic, Dapr delivers each message to only one instance of that application. This concept is illustrated in the diagram below.
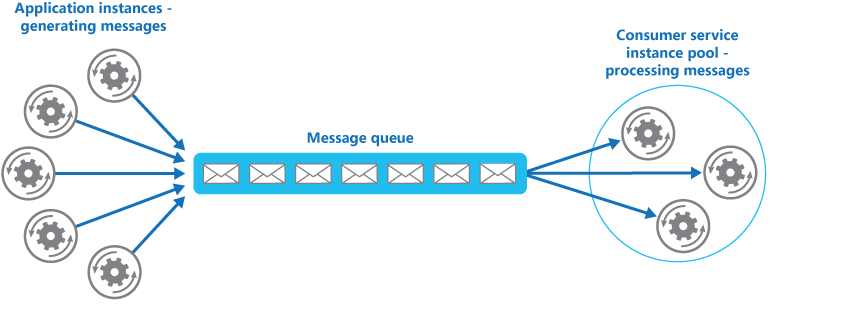
Similarly, if two different applications (with different app-id) subscribe to the same topic, Dapr delivers each message to only one instance of each application.
Not all Dapr pub/sub components support the competing consumer pattern. Currently, the following (non-exhaustive) pub/sub components support this:
By default, all topic messages associated with an instance of a pub/sub component are available to every application configured with that component. You can limit which application can publish or subscribe to topics with Dapr topic scoping. For more information, read: pub/sub topic scoping.
Dapr can set a timeout message on a per-message basis, meaning that if the message is not read from the pub/sub component, then the message is discarded. This timeout message prevents a build up of unread messages. If a message has been in the queue longer than the configured TTL, it is marked as dead. For more information, read pub/sub message TTL.
Dapr supports sending and receiving multiple messages in a single request. When writing applications that need to send or receive a large number of messages, using bulk operations allows achieving high throughput by reducing the overall number of requests. For more information, read pub/sub bulk messages.
When running on Kubernetes, subscribers can have a sticky consumerID per instance when using StatefulSets in combination with the {podName} marker. See how to horizontally scale subscribers with StatefulSets.
Want to put the Dapr pub/sub API to the test? Walk through the following quickstart and tutorials to see pub/sub in action:
| Quickstart/tutorial | Description |
|---|---|
| Pub/sub quickstart | Send and receive messages using the publish and subscribe API. |
| Pub/sub tutorial | Demonstrates how to use Dapr to enable pub-sub applications. Uses Redis as a pub-sub component. |
Want to skip the quickstarts? Not a problem. You can try out the pub/sub building block directly in your application to publish messages and subscribe to a topic. After Dapr is installed, you can begin using the pub/sub API starting with the pub/sub how-to guide.
Now that you’ve learned what the Dapr pub/sub building block provides, learn how it can work in your service. The below code example loosely describes an application that processes orders with two services, each with Dapr sidecars:
Dapr automatically wraps the user payload in a CloudEvents v1.0 compliant envelope, using Content-Type header value for datacontenttype attribute. Learn more about messages with CloudEvents.
The following example demonstrates how your applications publish and subscribe to a topic called orders.
The first step is to set up the pub/sub component:
When you run dapr init, Dapr creates a default Redis pubsub.yaml and runs a Redis container on your local machine, located:
%UserProfile%\.dapr\components\pubsub.yaml~/.dapr/components/pubsub.yamlWith the pubsub.yaml component, you can easily swap out underlying components without application code changes. In this example, RabbitMQ is used.
apiVersion: dapr.io/v1alpha1
kind: Component
metadata:
  name: order-pub-sub
spec:
  type: pubsub.rabbitmq
  version: v1
  metadata:
  - name: host
    value: "amqp://localhost:5672"
  - name: durable
    value: "false"
  - name: deletedWhenUnused
    value: "false"
  - name: autoAck
    value: "false"
  - name: reconnectWait
    value: "0"
  - name: concurrency
    value: parallel
scopes:
  - orderprocessing
  - checkout
You can override this file with another pubsub component by creating a components directory (in this example, myComponents) containing the file and using the flag --resources-path with the dapr run CLI command.
To deploy this into a Kubernetes cluster, fill in the metadata connection details of the pub/sub component in the YAML below, save as pubsub.yaml, and run kubectl apply -f pubsub.yaml.
apiVersion: dapr.io/v1alpha1
kind: Component
metadata:
  name: order-pub-sub
spec:
  type: pubsub.rabbitmq
  version: v1
  metadata:
  - name: connectionString
    value: "amqp://localhost:5672"
  - name: protocol
    value: amqp
  - name: hostname
    value: localhost
  - name: username
    value: username
  - name: password
    value: password
  - name: durable
    value: "false"
  - name: deletedWhenUnused
    value: "false"
  - name: autoAck
    value: "false"
  - name: reconnectWait
    value: "0"
  - name: concurrency
    value: parallel
scopes:
  - orderprocessing
  - checkout
dapr run --app-id myapp --resources-path ./myComponents -- dotnet run
dapr run --app-id myapp --resources-path ./myComponents -- mvn spring-boot:run
dapr run --app-id myapp --resources-path ./myComponents -- python3 app.py
dapr run --app-id myapp --resources-path ./myComponents -- go run app.go
dapr run --app-id myapp --resources-path ./myComponents -- npm start
Dapr provides three methods by which you can subscribe to topics:
Learn more in the declarative, streaming, and programmatic subscriptions doc. This example demonstrates a declarative subscription.
Create a file named subscription.yaml and paste the following:
apiVersion: dapr.io/v2alpha1
kind: Subscription
metadata:
  name: order-pub-sub
spec:
  topic: orders
  routes:
    default: /checkout
  pubsubname: order-pub-sub
scopes:
- orderprocessing
- checkout
The example above shows an event subscription to topic orders, for the pubsub component order-pub-sub.
route field tells Dapr to send all topic messages to the /checkout endpoint in the app.scopes field enables this subscription for apps with IDs orderprocessing and checkout.Place subscription.yaml in the same directory as your pubsub.yaml component. When Dapr starts up, it loads subscriptions along with the components.
HotReload feature gate.
To prevent reprocessing or loss of unprocessed messages, in-flight messages between Dapr and your application are unaffected during hot reload events.
Below are code examples that leverage Dapr SDKs to subscribe to the topic you defined in subscription.yaml.
using System.Collections.Generic;
using System.Threading.Tasks;
using System;
using Microsoft.AspNetCore.Mvc;
using Dapr;
using Dapr.Client;

namespace CheckoutService.Controllers;

[ApiController]
public sealed class CheckoutServiceController : ControllerBase
{
    //Subscribe to a topic called "orders" from the "order-pub-sub" compoennt
    [Topic("order-pub-sub", "orders")]
    [HttpPost("checkout")]
    public void GetCheckout([FromBody] int orderId)
    {
        Console.WriteLine("Subscriber received : " + orderId);
    }
}
Navigate to the directory containing the above code, then run the following command to launch both a Dapr sidecar and the subscriber application:
dapr run --app-id checkout --app-port 6002 --dapr-http-port 3602 --dapr-grpc-port 60002 --app-protocol https dotnet run
//dependencies
import io.dapr.Topic;
import io.dapr.client.domain.CloudEvent;
import org.springframework.web.bind.annotation.*;
import com.fasterxml.jackson.databind.ObjectMapper;
import org.slf4j.Logger;
import org.slf4j.LoggerFactory;
import reactor.core.publisher.Mono;

//code
@RestController
public class CheckoutServiceController {

    private static final Logger log = LoggerFactory.getLogger(CheckoutServiceController.class);
     //Subscribe to a topic
    @Topic(name = "orders", pubsubName = "order-pub-sub")
    @PostMapping(path = "/checkout")
    public Mono<Void> getCheckout(@RequestBody(required = false) CloudEvent<String> cloudEvent) {
        return Mono.fromRunnable(() -> {
            try {
                log.info("Subscriber received: " + cloudEvent.getData());
            } catch (Exception e) {
                throw new RuntimeException(e);
            }
        });
    }
}
Navigate to the directory containing the above code, then run the following command to launch both a Dapr sidecar and the subscriber application:
dapr run --app-id checkout --app-port 6002 --dapr-http-port 3602 --dapr-grpc-port 60002 mvn spring-boot:run
#dependencies
from cloudevents.sdk.event import v1
from dapr.ext.grpc import App
import logging
import json

#code
app = App()
logging.basicConfig(level = logging.INFO)
#Subscribe to a topic
@app.subscribe(pubsub_name='order-pub-sub', topic='orders')
def mytopic(event: v1.Event) -> None:
    data = json.loads(event.Data())
    logging.info('Subscriber received: ' + str(data))

app.run(6002)
Navigate to the directory containing the above code, then run the following command to launch both a Dapr sidecar and the subscriber application:
dapr run --app-id checkout --app-port 6002 --dapr-http-port 3602 --app-protocol grpc -- python3 CheckoutService.py
//dependencies
import (
	"log"
	"net/http"
	"context"

	"github.com/dapr/go-sdk/service/common"
	daprd "github.com/dapr/go-sdk/service/http"
)

//code
var sub = &common.Subscription{
	PubsubName: "order-pub-sub",
	Topic:      "orders",
	Route:      "/checkout",
}

func main() {
	s := daprd.NewService(":6002")
   //Subscribe to a topic
	if err := s.AddTopicEventHandler(sub, eventHandler); err != nil {
		log.Fatalf("error adding topic subscription: %v", err)
	}
	if err := s.Start(); err != nil && err != http.ErrServerClosed {
		log.Fatalf("error listenning: %v", err)
	}
}

func eventHandler(ctx context.Context, e *common.TopicEvent) (retry bool, err error) {
	log.Printf("Subscriber received: %s", e.Data)
	return false, nil
}
Navigate to the directory containing the above code, then run the following command to launch both a Dapr sidecar and the subscriber application:
dapr run --app-id checkout --app-port 6002 --dapr-http-port 3602 --dapr-grpc-port 60002 go run CheckoutService.go
//dependencies
import { DaprServer, CommunicationProtocolEnum } from '@dapr/dapr';

//code
const daprHost = "127.0.0.1";
const serverHost = "127.0.0.1";
const serverPort = "6002";

start().catch((e) => {
    console.error(e);
    process.exit(1);
});

async function start(orderId) {
    const server = new DaprServer({
        serverHost,
        serverPort,
        communicationProtocol: CommunicationProtocolEnum.HTTP,
        clientOptions: {
          daprHost,
          daprPort: process.env.DAPR_HTTP_PORT,
        },
    });
    //Subscribe to a topic
    await server.pubsub.subscribe("order-pub-sub", "orders", async (orderId) => {
        console.log(`Subscriber received: ${JSON.stringify(orderId)}`)
    });
    await server.start();
}
Navigate to the directory containing the above code, then run the following command to launch both a Dapr sidecar and the subscriber application:
dapr run --app-id checkout --app-port 6002 --dapr-http-port 3602 --dapr-grpc-port 60002 npm start
Start an instance of Dapr with an app-id called orderprocessing:
dapr run --app-id orderprocessing --dapr-http-port 3601
Then publish a message to the orders topic:
dapr publish --publish-app-id orderprocessing --pubsub order-pub-sub --topic orders --data '{"orderId": "100"}'
curl -X POST http://localhost:3601/v1.0/publish/order-pub-sub/orders -H "Content-Type: application/json" -d '{"orderId": "100"}'
Invoke-RestMethod -Method Post -ContentType 'application/json' -Body '{"orderId": "100"}' -Uri 'http://localhost:3601/v1.0/publish/order-pub-sub/orders'
Below are code examples that leverage Dapr SDKs to publish a topic.
using System;
using System.Collections.Generic;
using System.Net.Http;
using System.Net.Http.Headers;
using System.Threading.Tasks;
using Dapr.Client;
using System.Threading;

const string PUBSUB_NAME = "order-pub-sub";
const string TOPIC_NAME = "orders";

var builder = WebApplication.CreateBuilder(args);
builder.Services.AddDaprClient();

var app = builder.Build();
var random = new Random();

var client = app.Services.GetRequiredService<DaprClient>();

while(true) {
    await Task.Delay(TimeSpan.FromSeconds(5));
    var orderId = random.Next(1,1000);
    var source = new CancellationTokenSource();
    var cancellationToken = source.Token;

    //Using Dapr SDK to publish a topic
    await client.PublishEventAsync(PUBSUB_NAME, TOPIC_NAME, orderId, cancellationToken);
    Console.WriteLine("Published data: " + orderId);
}
Navigate to the directory containing the above code, then run the following command to launch both a Dapr sidecar and the publisher application:
dapr run --app-id orderprocessing --app-port 6001 --dapr-http-port 3601 --dapr-grpc-port 60001 --app-protocol https dotnet run
//dependencies
import io.dapr.client.DaprClient;
import io.dapr.client.DaprClientBuilder;
import io.dapr.client.domain.Metadata;
import static java.util.Collections.singletonMap;
import org.springframework.boot.autoconfigure.SpringBootApplication;
import org.slf4j.Logger;
import org.slf4j.LoggerFactory;
import java.util.Random;
import java.util.concurrent.TimeUnit;

//code
@SpringBootApplication
public class OrderProcessingServiceApplication {

	private static final Logger log = LoggerFactory.getLogger(OrderProcessingServiceApplication.class);

	public static void main(String[] args) throws InterruptedException{
		String MESSAGE_TTL_IN_SECONDS = "1000";
		String TOPIC_NAME = "orders";
		String PUBSUB_NAME = "order-pub-sub";

		while(true) {
			TimeUnit.MILLISECONDS.sleep(5000);
			Random random = new Random();
			int orderId = random.nextInt(1000-1) + 1;
			DaprClient client = new DaprClientBuilder().build();
      //Using Dapr SDK to publish a topic
			client.publishEvent(
					PUBSUB_NAME,
					TOPIC_NAME,
					orderId,
					singletonMap(Metadata.TTL_IN_SECONDS, MESSAGE_TTL_IN_SECONDS)).block();
			log.info("Published data:" + orderId);
		}
	}
}
Navigate to the directory containing the above code, then run the following command to launch both a Dapr sidecar and the publisher application:
dapr run --app-id orderprocessing --app-port 6001 --dapr-http-port 3601 --dapr-grpc-port 60001 mvn spring-boot:run
#dependencies
import random
from time import sleep
import requests
import logging
import json
from dapr.clients import DaprClient

#code
logging.basicConfig(level = logging.INFO)
while True:
    sleep(random.randrange(50, 5000) / 1000)
    orderId = random.randint(1, 1000)
    PUBSUB_NAME = 'order-pub-sub'
    TOPIC_NAME = 'orders'
    with DaprClient() as client:
        #Using Dapr SDK to publish a topic
        result = client.publish_event(
            pubsub_name=PUBSUB_NAME,
            topic_name=TOPIC_NAME,
            data=json.dumps(orderId),
            data_content_type='application/json',
        )
    logging.info('Published data: ' + str(orderId))
Navigate to the directory containing the above code, then run the following command to launch both a Dapr sidecar and the publisher application:
dapr run --app-id orderprocessing --app-port 6001 --dapr-http-port 3601 --app-protocol grpc python3 OrderProcessingService.py
//dependencies
import (
	"context"
	"log"
	"math/rand"
	"time"
	"strconv"
	dapr "github.com/dapr/go-sdk/client"
)

//code
var (
	PUBSUB_NAME = "order-pub-sub"
	TOPIC_NAME  = "orders"
)

func main() {
	for i := 0; i < 10; i++ {
		time.Sleep(5000)
		orderId := rand.Intn(1000-1) + 1
		client, err := dapr.NewClient()
		if err != nil {
			panic(err)
		}
		defer client.Close()
		ctx := context.Background()
    //Using Dapr SDK to publish a topic
		if err := client.PublishEvent(ctx, PUBSUB_NAME, TOPIC_NAME, []byte(strconv.Itoa(orderId)));
		err != nil {
			panic(err)
		}

		log.Println("Published data: " + strconv.Itoa(orderId))
	}
}
Navigate to the directory containing the above code, then run the following command to launch both a Dapr sidecar and the publisher application:
dapr run --app-id orderprocessing --app-port 6001 --dapr-http-port 3601 --dapr-grpc-port 60001 go run OrderProcessingService.go
//dependencies
import { DaprServer, DaprClient, CommunicationProtocolEnum } from '@dapr/dapr';

const daprHost = "127.0.0.1";

var main = function() {
    for(var i=0;i<10;i++) {
        sleep(5000);
        var orderId = Math.floor(Math.random() * (1000 - 1) + 1);
        start(orderId).catch((e) => {
            console.error(e);
            process.exit(1);
        });
    }
}

async function start(orderId) {
    const PUBSUB_NAME = "order-pub-sub"
    const TOPIC_NAME  = "orders"
    const client = new DaprClient({
        daprHost,
        daprPort: process.env.DAPR_HTTP_PORT,
        communicationProtocol: CommunicationProtocolEnum.HTTP
    });
    console.log("Published data:" + orderId)
    //Using Dapr SDK to publish a topic
    await client.pubsub.publish(PUBSUB_NAME, TOPIC_NAME, orderId);
}

function sleep(ms) {
    return new Promise(resolve => setTimeout(resolve, ms));
}

main();
Navigate to the directory containing the above code, then run the following command to launch both a Dapr sidecar and the publisher application:
dapr run --app-id orderprocessing --app-port 6001 --dapr-http-port 3601 --dapr-grpc-port 60001 npm start
In order to tell Dapr that a message was processed successfully, return a 200 OK response. If Dapr receives any other return status code than 200, or if your app crashes, Dapr will attempt to redeliver the message following at-least-once semantics.
Watch this demo video to learn more about pub/sub messaging with Dapr.
To enable message routing and provide additional context with each message, Dapr uses the CloudEvents 1.0 specification as its message format. Any message sent by an application to a topic using Dapr is automatically wrapped in a CloudEvents envelope, using the Content-Type header value for datacontenttype attribute.
Dapr uses CloudEvents to provide additional context to the event payload, enabling features like:
You can choose any of three methods for publish a CloudEvent via pub/sub:
Sending a publish operation to Dapr automatically wraps it in a CloudEvent envelope containing the following fields:
idsourcespecversiontypetraceparenttraceidtracestatetopicpubsubnametimedatacontenttype (optional)The following example demonstrates a CloudEvent generated by Dapr for a publish operation to the orders topic that includes:
traceid unique to the messagedata and the fields for the CloudEvent where the data content is serialized as JSON{
"topic": "orders",
"pubsubname": "order_pub_sub",
"traceid": "00-113ad9c4e42b27583ae98ba698d54255-e3743e35ff56f219-01",
"tracestate": "",
"data": {
"orderId": 1
},
"id": "5929aaac-a5e2-4ca1-859c-edfe73f11565",
"specversion": "1.0",
"datacontenttype": "application/json; charset=utf-8",
"source": "checkout",
"type": "com.dapr.event.sent",
"time": "2020-09-23T06:23:21Z",
"traceparent": "00-113ad9c4e42b27583ae98ba698d54255-e3743e35ff56f219-01"
}
As another example of a v1.0 CloudEvent, the following shows data as XML content in a CloudEvent message serialized as JSON:
{
  "topic": "orders",
  "pubsubname": "order_pub_sub",
  "traceid": "00-113ad9c4e42b27583ae98ba698d54255-e3743e35ff56f219-01",
  "tracestate": "",
  "data" : "<note><to></to><from>user2</from><message>Order</message></note>",
  "id" : "id-1234-5678-9101",
  "specversion" : "1.0",
  "datacontenttype" : "text/xml",
  "subject" : "Test XML Message",
  "source" : "https://example.com/message",
  "type" : "xml.message",
   "time" : "2020-09-23T06:23:21Z"
}
Dapr automatically generates several CloudEvent properties. You can replace these generated CloudEvent properties by providing the following optional metadata key/value:
cloudevent.id: overrides idcloudevent.source: overrides sourcecloudevent.type: overrides typecloudevent.traceid: overrides traceidcloudevent.tracestate: overrides tracestatecloudevent.traceparent: overrides traceparentThe ability to replace CloudEvents properties using these metadata properties applies to all pub/sub components.
For example, to replace the source and id values from the CloudEvent example above in code:
with DaprClient() as client:
    order = {'orderId': i}
    # Publish an event/message using Dapr PubSub
    result = client.publish_event(
        pubsub_name='order_pub_sub',
        topic_name='orders',
        publish_metadata={'cloudevent.id': 'd99b228f-6c73-4e78-8c4d-3f80a043d317', 'cloudevent.source': 'payment'}
    )

    # or

    cloud_event = {
        'specversion': '1.0',
        'type': 'com.example.event',
        'source': 'payment',
        'id': 'd99b228f-6c73-4e78-8c4d-3f80a043d317',
        'data': {'orderId': i},
        'datacontenttype': 'application/json',
        ...
    }

    # Set the data content type to 'application/cloudevents+json'
    result = client.publish_event(
        pubsub_name='order_pub_sub',
        topic_name='orders',
        data=json.dumps(cloud_event),
        data_content_type='application/cloudevents+json',
    )
var order = new Order(i);
using var client = new DaprClientBuilder().Build();

// Override cloudevent metadata
var metadata = new Dictionary<string,string>() {
    { "cloudevent.source", "payment" },
    { "cloudevent.id", "d99b228f-6c73-4e78-8c4d-3f80a043d317" }
}

// Publish an event/message using Dapr PubSub
await client.PublishEventAsync("order_pub_sub", "orders", order, metadata);
Console.WriteLine("Published data: " + order);

await Task.Delay(TimeSpan.FromSeconds(1));
The JSON payload then reflects the new source and id values:
{
  "topic": "orders",
  "pubsubname": "order_pub_sub",
  "traceid": "00-113ad9c4e42b27583ae98ba698d54255-e3743e35ff56f219-01",
  "tracestate": "",
  "data": {
    "orderId": 1
  },
  "id": "d99b228f-6c73-4e78-8c4d-3f80a043d317",
  "specversion": "1.0",
  "datacontenttype": "application/json; charset=utf-8",
  "source": "payment",
  "type": "com.dapr.event.sent",
  "time": "2020-09-23T06:23:21Z",
  "traceparent": "00-113ad9c4e42b27583ae98ba698d54255-e3743e35ff56f219-01"
}
traceid/traceparent and tracestate, doing this may interfere with tracing events and report inconsistent results in tracing tools. It’s recommended to use Open Telemetry for distributed traces. Learn more about distributed tracing.
If you want to use your own CloudEvent, make sure to specify the datacontenttype as application/cloudevents+json.
If the CloudEvent that was authored by the app does not contain the minimum required fields in the CloudEvent specification, the message is rejected. Dapr adds the following fields to the CloudEvent if they are missing:
timetraceidtraceparenttracestatetopicpubsubnamesourcetypespecversionYou can add additional fields to a custom CloudEvent that are not part of the official CloudEvent specification. Dapr will pass these fields as-is.
Publish a CloudEvent to the orders topic:
dapr publish --publish-app-id orderprocessing --pubsub order-pub-sub --topic orders --data '{\"orderId\": \"100\"}'
Publish a CloudEvent to the orders topic:
curl -X POST http://localhost:3601/v1.0/publish/order-pub-sub/orders -H "Content-Type: application/cloudevents+json" -d '{"specversion" : "1.0", "type" : "com.dapr.cloudevent.sent", "source" : "testcloudeventspubsub", "subject" : "Cloud Events Test", "id" : "someCloudEventId", "time" : "2021-08-02T09:00:00Z", "datacontenttype" : "application/cloudevents+json", "data" : {"orderId": "100"}}'
Publish a CloudEvent to the orders topic:
Invoke-RestMethod -Method Post -ContentType 'application/cloudevents+json' -Body '{"specversion" : "1.0", "type" : "com.dapr.cloudevent.sent", "source" : "testcloudeventspubsub", "subject" : "Cloud Events Test", "id" : "someCloudEventId", "time" : "2021-08-02T09:00:00Z", "datacontenttype" : "application/cloudevents+json", "data" : {"orderId": "100"}}' -Uri 'http://localhost:3601/v1.0/publish/order-pub-sub/orders'
When using cloud events created by Dapr, the envelope contains an id field which can be used by the app to perform message deduplication. Dapr does not handle deduplication automatically. Dapr supports using message brokers that natively enable message deduplication.
When adding Dapr to your application, some services may still need to communicate via pub/sub messages not encapsulated in CloudEvents, due to either compatibility reasons or some apps not using Dapr. These are referred to as “raw” pub/sub messages. Dapr enables apps to publish and subscribe to raw events not wrapped in a CloudEvent for compatibility and to send data that is not JSON serializable.
Dapr apps are able to publish raw events to pub/sub topics without CloudEvent encapsulation, for compatibility with non-Dapr apps.
To disable CloudEvent wrapping, set the rawPayload metadata to true as part of the publishing request. This allows subscribers to receive these messages without having to parse the CloudEvent schema.
curl -X "POST" http://localhost:3500/v1.0/publish/pubsub/TOPIC_A?metadata.rawPayload=true -H "Content-Type: application/json" -d '{"order-number": "345"}'
using Dapr.Client;

var builder = WebApplication.CreateBuilder(args);
builder.Services.AddControllers().AddDapr();

var app = builder.Build();

app.MapPost("/publish", async (DaprClient daprClient) =>
{
    var message = new Message(
        Guid.NewGuid().ToString(),
        $"Hello at {DateTime.UtcNow}",
        DateTime.UtcNow
    );

    await daprClient.PublishEventAsync(
        "pubsub",           // pubsub name
        "messages",         // topic name
        message,           // message data
        new Dictionary<string, string>
        {
            { "rawPayload", "true" },
            { "content-type", "application/json" }
        }
    );

    return Results.Ok(message);
});

app.Run();
from dapr.clients import DaprClient

with DaprClient() as d:
    req_data = {
        'order-number': '345'
    }
    # Create a typed message with content type and body
    resp = d.publish_event(
        pubsub_name='pubsub',
        topic_name='TOPIC_A',
        data=json.dumps(req_data),
        publish_metadata={'rawPayload': 'true'}
    )
    # Print the request
    print(req_data, flush=True)
<?php

require_once __DIR__.'/vendor/autoload.php';

$app = \Dapr\App::create();
$app->run(function(\DI\FactoryInterface $factory) {
    $publisher = $factory->make(\Dapr\PubSub\Publish::class, ['pubsub' => 'pubsub']);
    $publisher->topic('TOPIC_A')->publish('data', ['rawPayload' => 'true']);
});
Dapr apps can subscribe to raw messages from pub/sub topics, even if they weren’t published as CloudEvents. However, the subscribing Dapr process still wraps these raw messages in a CloudEvent before delivering them to the subscribing application.
When subscribing programmatically, add the additional metadata entry for rawPayload to allow the subscriber to receive a message that is not wrapped by a CloudEvent. For .NET, this metadata entry is called isRawPayload.
When using raw payloads the message is always base64 encoded with content type application/octet-stream.
using System.Text.Json;
using System.Text.Json.Serialization;

var builder = WebApplication.CreateBuilder(args);
var app = builder.Build();

app.MapGet("/dapr/subscribe", () =>
{
    var subscriptions = new[]
    {
        new
        {
            pubsubname = "pubsub",
            topic = "messages",
            route = "/messages",
            metadata = new Dictionary<string, string>
            {
                { "isRawPayload", "true" },
                { "content-type", "application/json" }
            }
        }
    };
    return Results.Ok(subscriptions);
});

app.MapPost("/messages", async (HttpContext context) =>
{
    using var reader = new StreamReader(context.Request.Body);
    var json = await reader.ReadToEndAsync();

    Console.WriteLine($"Raw message received: {json}");

    return Results.Ok();
});

app.Run();
import flask
from flask import request, jsonify
from flask_cors import CORS
import json
import sys

app = flask.Flask(__name__)
CORS(app)

@app.route('/dapr/subscribe', methods=['GET'])
def subscribe():
    subscriptions = [{'pubsubname': 'pubsub',
                      'topic': 'deathStarStatus',
                      'route': 'dsstatus',
                      'metadata': {
                          'rawPayload': 'true',
                      } }]
    return jsonify(subscriptions)

@app.route('/dsstatus', methods=['POST'])
def ds_subscriber():
    print(request.json, flush=True)
    return json.dumps({'success':True}), 200, {'ContentType':'application/json'}

app.run()
<?php

require_once __DIR__.'/vendor/autoload.php';

$app = \Dapr\App::create(configure: fn(\DI\ContainerBuilder $builder) => $builder->addDefinitions(['dapr.subscriptions' => [
    new \Dapr\PubSub\Subscription(pubsubname: 'pubsub', topic: 'deathStarStatus', route: '/dsstatus', metadata: [ 'rawPayload' => 'true'] ),
]]));

$app->post('/dsstatus', function(
    #[\Dapr\Attributes\FromBody]
    \Dapr\PubSub\CloudEvent $cloudEvent,
    \Psr\Log\LoggerInterface $logger
    ) {
        $logger->alert('Received event: {event}', ['event' => $cloudEvent]);
        return ['status' => 'SUCCESS'];
    }
);

$app->start();
Similarly, you can subscribe to raw events declaratively by adding the rawPayload metadata entry to your subscription specification.
apiVersion: dapr.io/v2alpha1
kind: Subscription
metadata:
  name: myevent-subscription
spec:
  topic: deathStarStatus
  routes:
    default: /dsstatus
  pubsubname: pubsub
  metadata:
    isRawPayload: "true"
scopes:
- app1
- app2
Pub/sub routing is an implementation of content-based routing, a messaging pattern that utilizes a DSL instead of imperative application code. With pub/sub routing, you use expressions to route CloudEvents (based on their contents) to different URIs/paths and event handlers in your application. If no route matches, then an optional default route is used. This proves useful as your applications expand to support multiple event versions or special cases.
While routing can be implemented with code, keeping routing rules external from the application can improve portability.
This feature is available to both the declarative and programmatic subscription approaches, however does not apply to streaming subscriptions.
For declarative subscriptions, use dapr.io/v2alpha1 as the apiVersion. Here is an example of subscriptions.yaml using routing:
apiVersion: dapr.io/v2alpha1
kind: Subscription
metadata:
  name: myevent-subscription
spec:
  pubsubname: pubsub
  topic: inventory
  routes:
    rules:
      - match: event.type == "widget"
        path: /widgets
      - match: event.type == "gadget"
        path: /gadgets
    default: /products
scopes:
  - app1
  - app2
In the programmatic approach, the routes structure is returned instead of route. The JSON structure matches the declarative YAML:
import flask
from flask import request, jsonify
from flask_cors import CORS
import json
import sys

app = flask.Flask(__name__)
CORS(app)

@app.route('/dapr/subscribe', methods=['GET'])
def subscribe():
    subscriptions = [
      {
        'pubsubname': 'pubsub',
        'topic': 'inventory',
        'routes': {
          'rules': [
            {
              'match': 'event.type == "widget"',
              'path': '/widgets'
            },
            {
              'match': 'event.type == "gadget"',
              'path': '/gadgets'
            },
          ],
          'default': '/products'
        }
      }]
    return jsonify(subscriptions)

@app.route('/products', methods=['POST'])
def ds_subscriber():
    print(request.json, flush=True)
    return json.dumps({'success':True}), 200, {'ContentType':'application/json'}
app.run()
const express = require('express')
const bodyParser = require('body-parser')
const app = express()
app.use(bodyParser.json({ type: 'application/*+json' }));

const port = 3000

app.get('/dapr/subscribe', (req, res) => {
  res.json([
    {
      pubsubname: "pubsub",
      topic: "inventory",
      routes: {
        rules: [
          {
            match: 'event.type == "widget"',
            path: '/widgets'
          },
          {
            match: 'event.type == "gadget"',
            path: '/gadgets'
          },
        ],
        default: '/products'
      }
    }
  ]);
})

app.post('/products', (req, res) => {
  console.log(req.body);
  res.sendStatus(200);
});

app.listen(port, () => console.log(`consumer app listening on port ${port}!`))
        [Topic("pubsub", "inventory", "event.type ==\"widget\"", 1)]
        [HttpPost("widgets")]
        public async Task<ActionResult<Stock>> HandleWidget(Widget widget, [FromServices] DaprClient daprClient)
        {
            // Logic
            return stock;
        }

        [Topic("pubsub", "inventory", "event.type ==\"gadget\"", 2)]
        [HttpPost("gadgets")]
        public async Task<ActionResult<Stock>> HandleGadget(Gadget gadget, [FromServices] DaprClient daprClient)
        {
            // Logic
            return stock;
        }

        [Topic("pubsub", "inventory")]
        [HttpPost("products")]
        public async Task<ActionResult<Stock>> HandleProduct(Product product, [FromServices] DaprClient daprClient)
        {
            // Logic
            return stock;
        }
package main

import (
	"encoding/json"
	"fmt"
	"log"
	"net/http"

	"github.com/gorilla/mux"
)

const appPort = 3000

type subscription struct {
	PubsubName string            `json:"pubsubname"`
	Topic      string            `json:"topic"`
	Metadata   map[string]string `json:"metadata,omitempty"`
	Routes     routes            `json:"routes"`
}

type routes struct {
	Rules   []rule `json:"rules,omitempty"`
	Default string `json:"default,omitempty"`
}

type rule struct {
	Match string `json:"match"`
	Path  string `json:"path"`
}

// This handles /dapr/subscribe
func configureSubscribeHandler(w http.ResponseWriter, _ *http.Request) {
	t := []subscription{
		{
			PubsubName: "pubsub",
			Topic:      "inventory",
			Routes: routes{
				Rules: []rule{
					{
						Match: `event.type == "widget"`,
						Path:  "/widgets",
					},
					{
						Match: `event.type == "gadget"`,
						Path:  "/gadgets",
					},
				},
				Default: "/products",
			},
		},
	}

	w.WriteHeader(http.StatusOK)
	json.NewEncoder(w).Encode(t)
}

func main() {
	router := mux.NewRouter().StrictSlash(true)
	router.HandleFunc("/dapr/subscribe", configureSubscribeHandler).Methods("GET")
	log.Fatal(http.ListenAndServe(fmt.Sprintf(":%d", appPort), router))
}
<?php

require_once __DIR__.'/vendor/autoload.php';

$app = \Dapr\App::create(configure: fn(\DI\ContainerBuilder $builder) => $builder->addDefinitions(['dapr.subscriptions' => [
    new \Dapr\PubSub\Subscription(pubsubname: 'pubsub', topic: 'inventory', routes: (
      rules: => [
        ('match': 'event.type == "widget"', path: '/widgets'),
        ('match': 'event.type == "gadget"', path: '/gadgets'),
      ]
      default: '/products')),
]]));
$app->post('/products', function(
    #[\Dapr\Attributes\FromBody]
    \Dapr\PubSub\CloudEvent $cloudEvent,
    \Psr\Log\LoggerInterface $logger
    ) {
        $logger->alert('Received event: {event}', ['event' => $cloudEvent]);
        return ['status' => 'SUCCESS'];
    }
);
$app->start();
In these examples, depending on the event.type, the application will be called on:
/widgets/gadgets/productsThe expressions are written as Common Expression Language (CEL) where event represents the cloud event. Any of the attributes from the CloudEvents core specification can be referenced in the expression.
Match “important” messages:
has(event.data.important) && event.data.important == true
Match deposits greater than $10,000:
event.type == "deposit" && int(event.data.amount) > 10000
event.data.amount is not cast as integer, the match is not performed. For more information, see the CEL documentation.
Match multiple versions of a message:
event.type == "mymessage.v1"
event.type == "mymessage.v2"
For reference, the following attributes are from the CloudEvents specification.
As defined by the term data, CloudEvents may include domain-specific information about the occurrence. When present, this information will be encapsulated within data.
datacontenttype attribute (e.g. application/json), and adheres to the dataschema format when those respective attributes are present.The following attributes are required in all CloudEvents:
Stringsource + id
are unique for each distinct event. If a duplicate event is re-sent (e.g. due
to a network error), it may have the same id. Consumers may assume that
events with identical source and id are duplicates.Type: URI-reference
Description: Identifies the context in which an event happened. Often this includes information such as:
The exact syntax and semantics behind the data encoded in the URI is defined by the event producer.
Producers must ensure that source + id are unique for each distinct event.
An application may:
source to each distinct producer, making it easier to produce unique IDs and preventing other producers from having the same source.source identifiers.A source may include more than one producer. In this case, the producers must collaborate to ensure that source + id are unique for each distinct event.
Constraints:
Examples:
Type: String
Description: The version of the CloudEvents specification used by the event. This enables the interpretation of the context. Compliant event producers must use a value of 1.0 when referring to this version of the specification.
Currently, this attribute only includes the ‘major’ and ‘minor’ version numbers. This allows patch changes to the specification to be made without changing this property’s value in the serialization.
Note: for ‘release candidate’ releases, a suffix might be used for testing purposes.
Constraints:
Stringtype. See Versioning of CloudEvents in the Primer for more information.The following attributes are optional to appear in CloudEvents. See the Notational Conventions section for more information on the definition of OPTIONAL.
Type: String per RFC 2046
Description: Content type of data value. This attribute enables data to carry any type of content, whereby format and encoding might differ from that of the chosen event format.
For example, an event rendered using the JSON envelope format might carry an XML payload in data. The consumer is informed by this attribute being set to "application/xml".
The rules for how data content is rendered for different datacontenttype values are defined in the event format specifications. For example, the JSON event format defines the relationship in section 3.1.
For some binary mode protocol bindings, this field is directly mapped to the respective protocol’s content-type metadata property. You can find normative rules for the binary mode and the content-type metadata mapping in the respective protocol.
In some event formats, you may omit the datacontenttype attribute. For example, if a JSON format event has no datacontenttype attribute, it’s implied that the data is a JSON value conforming to the "application/json" media type. In other words: a JSON-format event with no datacontenttype is exactly equivalent to one with datacontenttype="application/json".
When translating an event message with no datacontenttype attribute to a different format or protocol binding, the target datacontenttype should be set explicitly to the implied datacontenttype of the source.
Constraints:
For Media Type examples, see IANA Media Types
URIdata adheres to. Incompatible changes to the schema should be reflected by a different URI. See Versioning of CloudEvents in the Primer for more information.Type: String
Description: This describes the event subject in the context of the event producer (identified by source). In publish-subscribe scenarios, a subscriber will typically subscribe to events emitted by a source. The source identifier alone might not be sufficient as a qualifier for any specific event if the source context has internal sub-structure.
Identifying the subject of the event in context metadata (opposed to only in the data payload) is helpful in generic subscription filtering scenarios, where middleware is unable to interpret the data content. In the above example, the subscriber might only be interested in blobs with names ending with ‘.jpg’ or ‘.jpeg’. With the subject attribute, you can construct a simple and efficient string-suffix filter for that subset of events.
Constraints:
Example:
A subscriber might register interest for when new blobs are created inside a blob-storage container. In this case:
source identifies the subscription scope (storage container)type identifies the “blob created” eventid uniquely identifies the event instance to distinguish separately created occurrences of a same-named blob.The name of the newly created blob is carried in subject:
source: https://example.com/storage/tenant/containersubject: mynewfile.jpgTimestampsource must be consistent in this respect. In other words, either they all use the actual time of the occurrence or they all use the same algorithm to determine the value used.Watch this video on how to use message routing with pub/sub:
Dapr applications can subscribe to published topics via three subscription types that support the same features: declarative, streaming and programmatic.
| Subscription type | Description |
|---|---|
| Declarative | Subscription is defined in an external file. The declarative approach removes the Dapr dependency from your code and allows for existing applications to subscribe to topics, without having to change code. |
| Streaming | Subscription is defined in the application code. Streaming subscriptions are dynamic, meaning they allow for adding or removing subscriptions at runtime. They do not require a subscription endpoint in your application (that is required by both programmatic and declarative subscriptions), making them easy to configure in code. Streaming subscriptions also do not require an app to be configured with the sidecar to receive messages. |
| Programmatic | Subscription is defined in the application code. The programmatic approach implements the static subscription and requires an endpoint in your code. |
The examples below demonstrate pub/sub messaging between a checkout app and an orderprocessing app via the orders topic. The examples demonstrate the same Dapr pub/sub component used first declaratively, then programmatically.
HotReload feature gate.
To prevent reprocessing or loss of unprocessed messages, in-flight messages between Dapr and your application are unaffected during hot reload events.
You can subscribe declaratively to a topic using an external component file. This example uses a YAML component file named subscription.yaml:
apiVersion: dapr.io/v2alpha1
kind: Subscription
metadata:
  name: order
spec:
  topic: orders
  routes:
    default: /orders
  pubsubname: pubsub
scopes:
- orderprocessing
Here the subscription called order:
pubsub to subscribes to the topic called orders.route field to send all topic messages to the /orders endpoint in the app.scopes field to scope this subscription for access only by apps with ID orderprocessing.When running Dapr, set the YAML component file path to point Dapr to the component.
dapr run --app-id myapp --resources-path ./myComponents -- dotnet run
dapr run --app-id myapp --resources-path ./myComponents -- mvn spring-boot:run
dapr run --app-id myapp --resources-path ./myComponents -- python3 app.py
dapr run --app-id myapp --resources-path ./myComponents -- npm start
dapr run --app-id myapp --resources-path ./myComponents -- go run app.go
In Kubernetes, apply the component to the cluster:
kubectl apply -f subscription.yaml
In your application code, subscribe to the topic specified in the Dapr pub/sub component.
 //Subscribe to a topic
[HttpPost("orders")]
public void getCheckout([FromBody] int orderId)
{
    Console.WriteLine("Subscriber received : " + orderId);
}
import io.dapr.client.domain.CloudEvent;

 //Subscribe to a topic
@PostMapping(path = "/orders")
public Mono<Void> getCheckout(@RequestBody(required = false) CloudEvent<String> cloudEvent) {
    return Mono.fromRunnable(() -> {
        try {
            log.info("Subscriber received: " + cloudEvent.getData());
        }
    });
}
from cloudevents.sdk.event import v1

#Subscribe to a topic
@app.route('/orders', methods=['POST'])
def checkout(event: v1.Event) -> None:
    data = json.loads(event.Data())
    logging.info('Subscriber received: ' + str(data))
const express = require('express')
const bodyParser = require('body-parser')
const app = express()
app.use(bodyParser.json({ type: 'application/*+json' }));

// listen to the declarative route
app.post('/orders', (req, res) => {
  console.log(req.body);
  res.sendStatus(200);
});
//Subscribe to a topic
var sub = &common.Subscription{
	PubsubName: "pubsub",
	Topic:      "orders",
	Route:      "/orders",
}

func eventHandler(ctx context.Context, e *common.TopicEvent) (retry bool, err error) {
	log.Printf("Subscriber received: %s", e.Data)
	return false, nil
}
The /orders endpoint matches the route defined in the subscriptions and this is where Dapr sends all topic messages to.
Streaming subscriptions are subscriptions defined in application code that can be dynamically stopped and started at runtime. Messages are pulled by the application from Dapr. This means no endpoint is needed to subscribe to a topic, and it’s possible to subscribe without any app configured on the sidecar at all. Any number of pubsubs and topics can be subscribed to at once. As messages are sent to the given message handler code, there is no concept of routes or bulk subscriptions.
Note: Only a single pubsub/topic pair per application may be subscribed at a time.
The example below shows the different ways to stream subscribe to a topic.
You can use the SubscribeAsync method on the DaprPublishSubscribeClient to configure the message handler to use to pull messages from the stream.
using System.Text;
using Dapr.Messaging.PublishSubscribe;
using Dapr.Messaging.PublishSubscribe.Extensions;

var builder = WebApplication.CreateBuilder(args);
builder.Services.AddDaprPubSubClient();
var app = builder.Build();

var messagingClient = app.Services.GetRequiredService<DaprPublishSubscribeClient>();

//Create a dynamic streaming subscription and subscribe with a timeout of 30 seconds and 10 seconds for message handling
var cancellationTokenSource = new CancellationTokenSource(TimeSpan.FromSeconds(30));
var subscription = await messagingClient.SubscribeAsync("pubsub", "myTopic",
    new DaprSubscriptionOptions(new MessageHandlingPolicy(TimeSpan.FromSeconds(10), TopicResponseAction.Retry)),
    HandleMessageAsync, cancellationTokenSource.Token);

await Task.Delay(TimeSpan.FromMinutes(1));

//When you're done with the subscription, simply dispose of it
await subscription.DisposeAsync();
return;

//Process each message returned from the subscription
Task<TopicResponseAction> HandleMessageAsync(TopicMessage message, CancellationToken cancellationToken = default)
{
    try
    {
        //Do something with the message
        Console.WriteLine(Encoding.UTF8.GetString(message.Data.Span));
        return Task.FromResult(TopicResponseAction.Success);
    }
    catch
    {
        return Task.FromResult(TopicResponseAction.Retry);
    }
}
Learn more about streaming subscriptions using the .NET SDK client.
You can use the subscribe method, which returns a Subscription object and allows you to pull messages from the stream by calling the next_message method. This runs in and may block the main thread while waiting for messages.
import time

from dapr.clients import DaprClient
from dapr.clients.grpc.subscription import StreamInactiveError

counter = 0


def process_message(message):
    global counter
    counter += 1
    # Process the message here
    print(f'Processing message: {message.data()} from {message.topic()}...')
    return 'success'


def main():
    with DaprClient() as client:
        global counter

        subscription = client.subscribe(
            pubsub_name='pubsub', topic='orders', dead_letter_topic='orders_dead'
        )

        try:
            while counter < 5:
                try:
                    message = subscription.next_message()

                except StreamInactiveError as e:
                    print('Stream is inactive. Retrying...')
                    time.sleep(1)
                    continue
                if message is None:
                    print('No message received within timeout period.')
                    continue

                # Process the message
                response_status = process_message(message)

                if response_status == 'success':
                    subscription.respond_success(message)
                elif response_status == 'retry':
                    subscription.respond_retry(message)
                elif response_status == 'drop':
                    subscription.respond_drop(message)

        finally:
            print("Closing subscription...")
            subscription.close()


if __name__ == '__main__':
    main()
You can also use the subscribe_with_handler method, which accepts a callback function executed for each message received from the stream. This runs in a separate thread, so it doesn’t block the main thread.
import time

from dapr.clients import DaprClient
from dapr.clients.grpc._response import TopicEventResponse

counter = 0


def process_message(message):
    # Process the message here
    global counter
    counter += 1
    print(f'Processing message: {message.data()} from {message.topic()}...')
    return TopicEventResponse('success')


def main():
    with (DaprClient() as client):
        # This will start a new thread that will listen for messages
        # and process them in the `process_message` function
        close_fn = client.subscribe_with_handler(
            pubsub_name='pubsub', topic='orders', handler_fn=process_message,
            dead_letter_topic='orders_dead'
        )

        while counter < 5:
            time.sleep(1)

        print("Closing subscription...")
        close_fn()


if __name__ == '__main__':
    main()
Learn more about streaming subscriptions using the Python SDK client.
package main

import (
	"context"
	"log"

	"github.com/dapr/go-sdk/client"
)

func main() {
	cl, err := client.NewClient()
	if err != nil {
		log.Fatal(err)
	}

	sub, err := cl.Subscribe(context.Background(), client.SubscriptionOptions{
		PubsubName: "pubsub",
		Topic:      "orders",
	})
	if err != nil {
		panic(err)
	}
	// Close must always be called.
	defer sub.Close()

	for {
		msg, err := sub.Receive()
		if err != nil {
			panic(err)
		}

		// Process the event

		// We _MUST_ always signal the result of processing the message, else the
		// message will not be considered as processed and will be redelivered or
		// dead lettered.
		// msg.Retry()
		// msg.Drop()
		if err := msg.Success(); err != nil {
			panic(err)
		}
	}
}
or
package main

import (
	"context"
	"log"

	"github.com/dapr/go-sdk/client"
	"github.com/dapr/go-sdk/service/common"
)

func main() {
	cl, err := client.NewClient()
	if err != nil {
		log.Fatal(err)
	}

	stop, err := cl.SubscribeWithHandler(context.Background(),
		client.SubscriptionOptions{
			PubsubName: "pubsub",
			Topic:      "orders",
		},
		eventHandler,
	)
	if err != nil {
		panic(err)
	}

	// Stop must always be called.
	defer stop()

	<-make(chan struct{})
}

func eventHandler(e *common.TopicEvent) common.SubscriptionResponseStatus {
	// Process message here
    // common.SubscriptionResponseStatusRetry
    // common.SubscriptionResponseStatusDrop
			common.SubscriptionResponseStatusDrop, status)
	}

	return common.SubscriptionResponseStatusSuccess
}
Watch this video for an overview on streaming subscriptions:
The dynamic programmatic approach returns the routes JSON structure within the code, unlike the declarative approach’s route YAML structure.
Note: Programmatic subscriptions are only read once during application start-up. You cannot dynamically add new programmatic subscriptions, only at new ones at compile time.
In the example below, you define the values found in the declarative YAML subscription above within the application code.
[Topic("pubsub", "orders")]
[HttpPost("/orders")]
public async Task<ActionResult<Order>>Checkout(Order order, [FromServices] DaprClient daprClient)
{
    // Logic
    return order;
}
or
// Dapr subscription in [Topic] routes orders topic to this route
app.MapPost("/orders", [Topic("pubsub", "orders")] (Order order) => {
    Console.WriteLine("Subscriber received : " + order);
    return Results.Ok(order);
});
Both of the handlers defined above also need to be mapped to configure the dapr/subscribe endpoint. This is done in the application startup code while defining endpoints.
app.UseEndpoints(endpoints =>
{
    endpoints.MapSubscribeHandler();
});
private static final ObjectMapper OBJECT_MAPPER = new ObjectMapper();

@Topic(name = "orders", pubsubName = "pubsub")
@PostMapping(path = "/orders")
public Mono<Void> handleMessage(@RequestBody(required = false) CloudEvent<String> cloudEvent) {
  return Mono.fromRunnable(() -> {
    try {
      System.out.println("Subscriber received: " + cloudEvent.getData());
      System.out.println("Subscriber received: " + OBJECT_MAPPER.writeValueAsString(cloudEvent));
    } catch (Exception e) {
      throw new RuntimeException(e);
    }
  });
}
@app.route('/dapr/subscribe', methods=['GET'])
def subscribe():
    subscriptions = [
      {
        'pubsubname': 'pubsub',
        'topic': 'orders',
        'routes': {
          'rules': [
            {
              'match': 'event.type == "order"',
              'path': '/orders'
            },
          ],
          'default': '/orders'
        }
      }]
    return jsonify(subscriptions)

@app.route('/orders', methods=['POST'])
def ds_subscriber():
    print(request.json, flush=True)
    return json.dumps({'success':True}), 200, {'ContentType':'application/json'}
app.run()
const express = require('express')
const bodyParser = require('body-parser')
const app = express()
app.use(bodyParser.json({ type: 'application/*+json' }));

const port = 3000

app.get('/dapr/subscribe', (req, res) => {
  res.json([
    {
      pubsubname: "pubsub",
      topic: "orders",
      routes: {
        rules: [
          {
            match: 'event.type == "order"',
            path: '/orders'
          },
        ],
        default: '/products'
      }
    }
  ]);
})

app.post('/orders', (req, res) => {
  console.log(req.body);
  res.sendStatus(200);
});

app.listen(port, () => console.log(`consumer app listening on port ${port}!`))
package main

import (
	"encoding/json"
	"fmt"
	"log"
	"net/http"

	"github.com/gorilla/mux"
)

const appPort = 3000

type subscription struct {
	PubsubName string            `json:"pubsubname"`
	Topic      string            `json:"topic"`
	Metadata   map[string]string `json:"metadata,omitempty"`
	Routes     routes            `json:"routes"`
}

type routes struct {
	Rules   []rule `json:"rules,omitempty"`
	Default string `json:"default,omitempty"`
}

type rule struct {
	Match string `json:"match"`
	Path  string `json:"path"`
}

// This handles /dapr/subscribe
func configureSubscribeHandler(w http.ResponseWriter, _ *http.Request) {
	t := []subscription{
		{
			PubsubName: "pubsub",
			Topic:      "orders",
			Routes: routes{
				Rules: []rule{
					{
						Match: `event.type == "order"`,
						Path:  "/orders",
					},
				},
				Default: "/orders",
			},
		},
	}

	w.WriteHeader(http.StatusOK)
	json.NewEncoder(w).Encode(t)
}

func main() {
	router := mux.NewRouter().StrictSlash(true)
	router.HandleFunc("/dapr/subscribe", configureSubscribeHandler).Methods("GET")
	log.Fatal(http.ListenAndServe(fmt.Sprintf(":%d", appPort), router))
}
There are times when applications might not be able to handle messages for a variety of reasons. For example, there could be transient issues retrieving data needed to process a message or the app business logic fails returning an error. Dead letter topics are used to forward messages that cannot be delivered to a subscribing app. This eases the pressure on app by freeing them from dealing with these failed messages, allowing developers to write code that reads from the dead letter topic and either fixes the message and resends this, or abandons it completely.
Dead letter topics are typically used in along with a retry resiliency policy and a dead letter subscription that handles the required logic for dealing with the messages forwarded from the dead letter topic.
When a dead letter topic is set, any message that failed to be delivered to an app for a configured topic is put on the dead letter topic to be forwarded to a subscription that handles these messages. This could be the same app or a completely different one.
Dapr enables dead letter topics for all of it’s pub/sub components, even if the underlying system does not support this feature natively. For example the AWS SNS Component has a dead letter queue and RabbitMQ has the dead letter topics. You will need to ensure that you configure components like this appropriately.
The diagram below is an example of how dead letter topics work. First a message is sent from a publisher on an orders topic. Dapr receives the message on behalf of a subscriber application, however the orders topic message fails to be delivered to the /checkout endpoint on the application, even after retries. As a result of the failure to deliver, the message is forwarded to the poisonMessages topic which delivers this to the /failedMessages endpoint to be processed, in this case on the same application. The failedMessages processing code could drop the message or resend a new message.
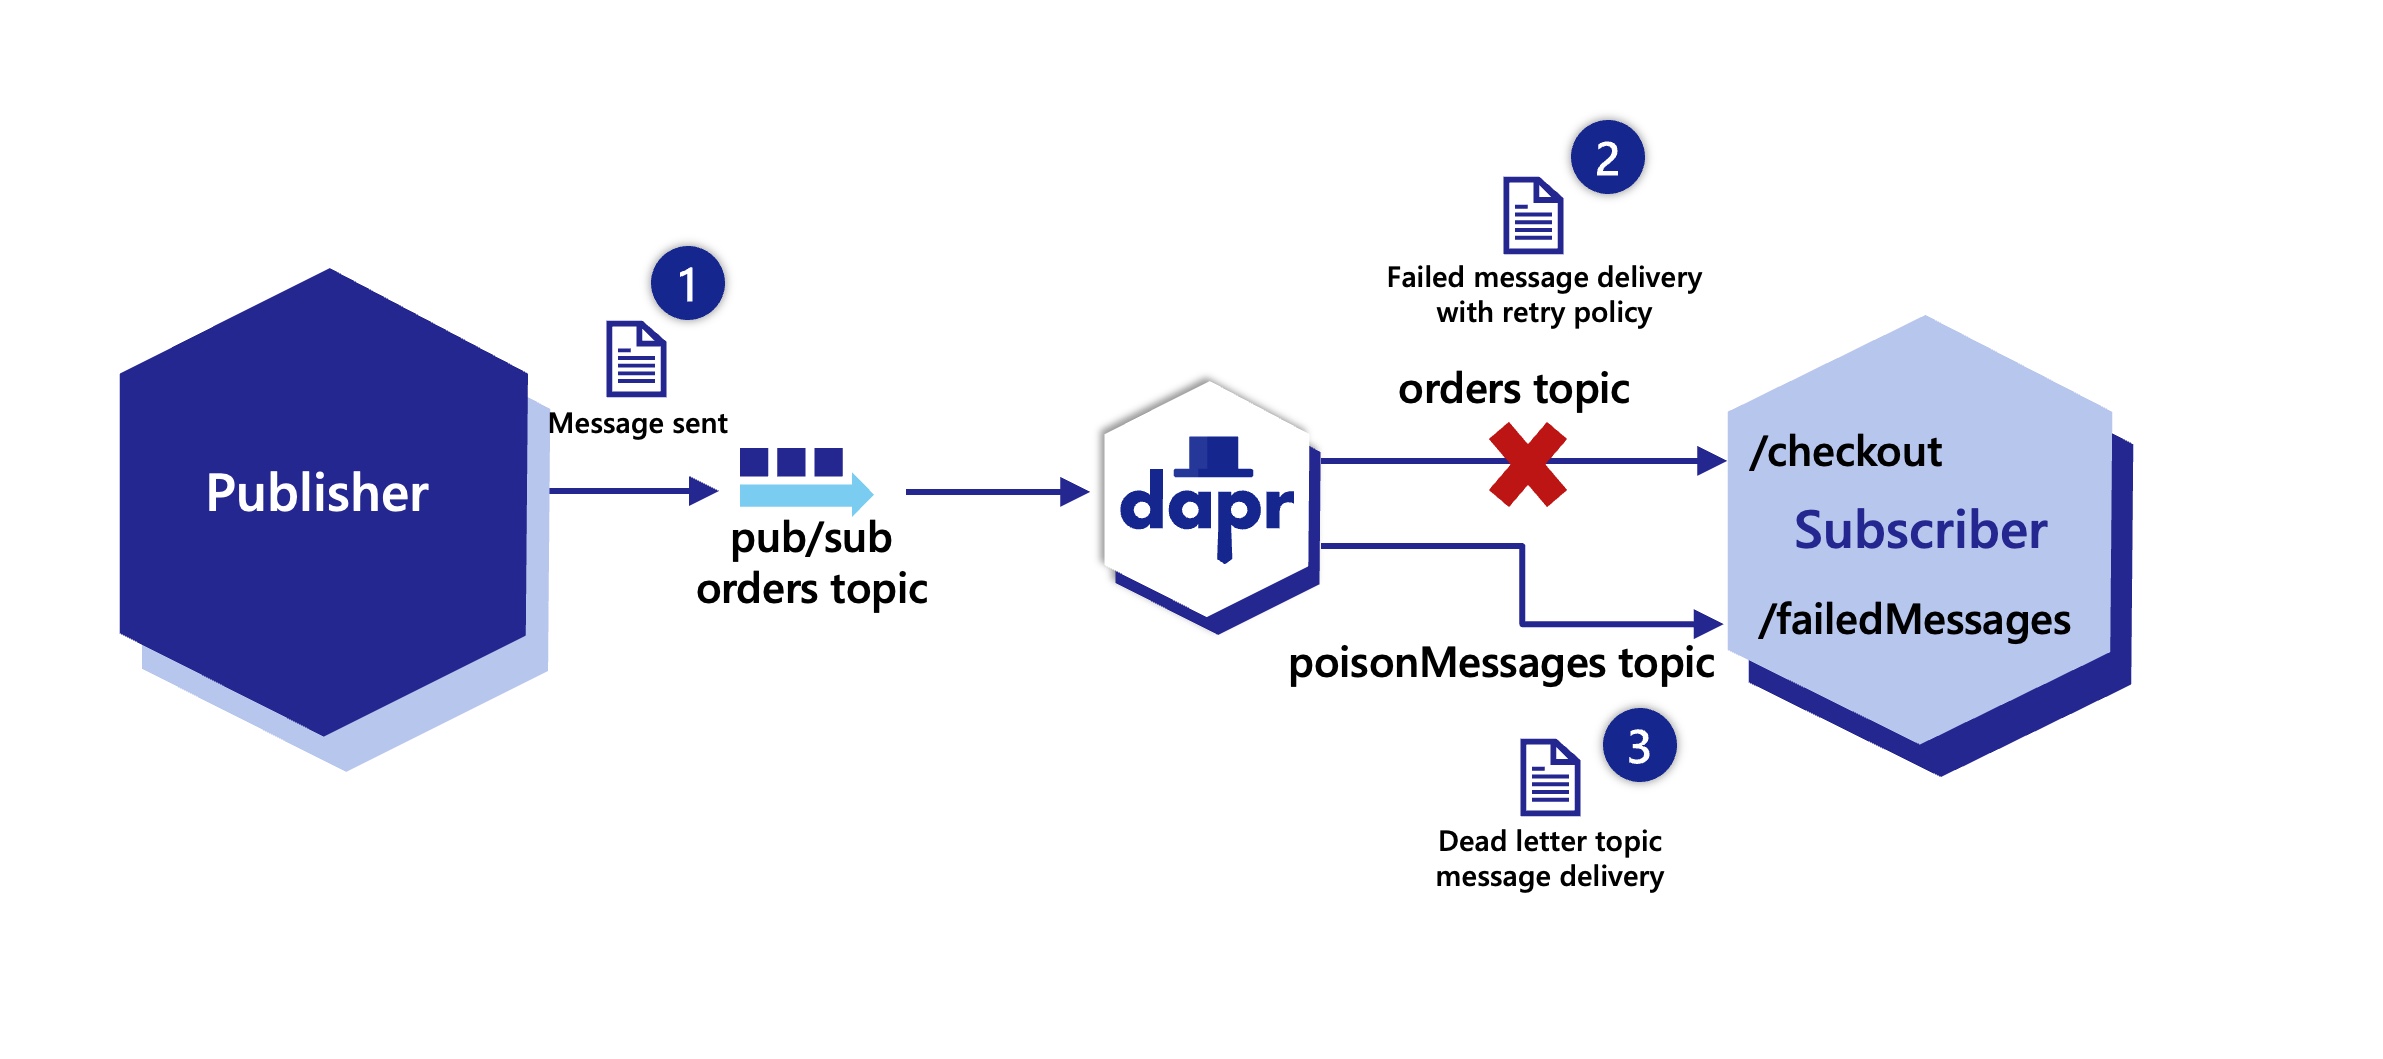
The following YAML shows how to configure a subscription with a dead letter topic named poisonMessages for messages consumed from the orders topic. This subscription is scoped to an app with a checkout ID.
apiVersion: dapr.io/v2alpha1
kind: Subscription
metadata:
  name: order
spec:
  topic: orders
  routes:
    default: /checkout
  pubsubname: pubsub
  deadLetterTopic: poisonMessages
scopes:
- checkout
	var deadLetterTopic = "poisonMessages"
	sub, err := cl.Subscribe(context.Background(), client.SubscriptionOptions{
		PubsubName:      "pubsub",
		Topic:           "orders",
		DeadLetterTopic: &deadLetterTopic,
	})
The JSON returned from the /subscribe endpoint shows how to configure a dead letter topic named poisonMessages for messages consumed from the orders topic.
app.get('/dapr/subscribe', (_req, res) => {
    res.json([
        {
            pubsubname: "pubsub",
            topic: "orders",
            route: "/checkout",
            deadLetterTopic: "poisonMessages"
        }
    ]);
});
By default, when a dead letter topic is set, any failing message immediately goes to the dead letter topic. As a result it is recommend to always have a retry policy set when using dead letter topics in a subscription. To enable the retry of a message before sending it to the dead letter topic, apply a retry resiliency policy to the pub/sub component.
This example shows how to set a constant retry policy named pubsubRetry, with 10 maximum delivery attempts applied every 5 seconds for the pubsub pub/sub component.
apiVersion: dapr.io/v1alpha1
kind: Resiliency
metadata:
  name: myresiliency
spec:
  policies:
    retries:
      pubsubRetry:
        policy: constant
        duration: 5s
        maxRetries: 10
  targets:
    components:
      pubsub:
        inbound:
          retry: pubsubRetry
Remember to now configure a subscription to handling the dead letter topics. For example you can create another declarative subscription to receive these on the same or a different application. The example below shows the checkout application subscribing to the poisonMessages topic with another subscription and sending these to be handled by the /failedmessages endpoint.
apiVersion: dapr.io/v2alpha1
kind: Subscription
metadata:
  name: deadlettertopics
spec:
  topic: poisonMessages
  routes:
    rules:
      - match:
        path: /failedMessages
  pubsubname: pubsub
scopes:
- checkout
Watch this video for an overview of the dead letter topics:
You’ve set up Dapr’s pub/sub API building block, and your applications are publishing and subscribing to topics smoothly, using a centralized message broker. What if you’d like to perform simple A/B testing, blue/green deployments, or even canary deployments for your applications? Even with using Dapr, this can prove difficult.
Dapr solves multi-tenancy at-scale with its pub/sub namespace consumer groups construct.
Let’s say you have a Kubernetes cluster, with two applications (App1 and App2) deployed to the same namespace (namespace-a). App2 publishes to a topic called order, while App1 subscribes to the topic called order. This will create two consumer groups, named after your applications (App1 and App2).
In order to perform simple testing and deployments while using a centralized message broker, you create another namespace with two applications of the same app-id, App1 and App2.
Dapr creates consumer groups using the app-id of individual applications, so the consumer group names will remain App1 and App2.
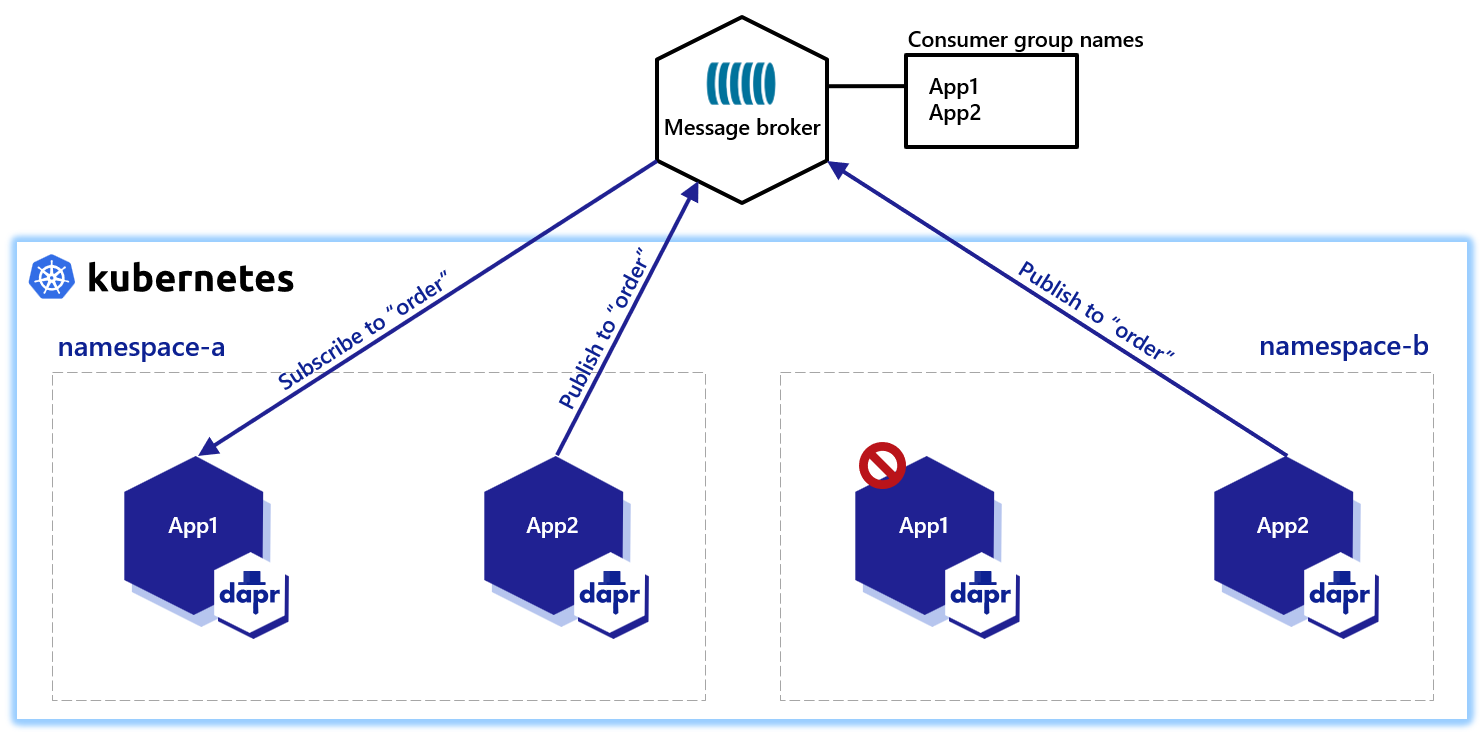
To avoid this, you’d then need to have something “creep” into your code to change the app-id, depending on the namespace on which you’re running. This workaround is cumbersome and a significant painpoint.
Not only can Dapr allow you to change the behavior of a consumer group with a consumerID for your UUID and pod names, Dapr also provides a namespace construct that lives in the pub/sub component metadata. For example, using Redis as your message broker:
apiVersion: dapr.io/v1alpha1
kind: Component
metadata:
  name: pubsub
spec:
  type: pubsub.redis
  version: v1
  metadata:
  - name: redisHost
    value: localhost:6379
  - name: redisPassword
    value: ""
  - name: consumerID
    value: "{namespace}"
By configuring consumerID with the {namespace} value, you’ll be able to use the same app-id with the same topics from different namespaces.
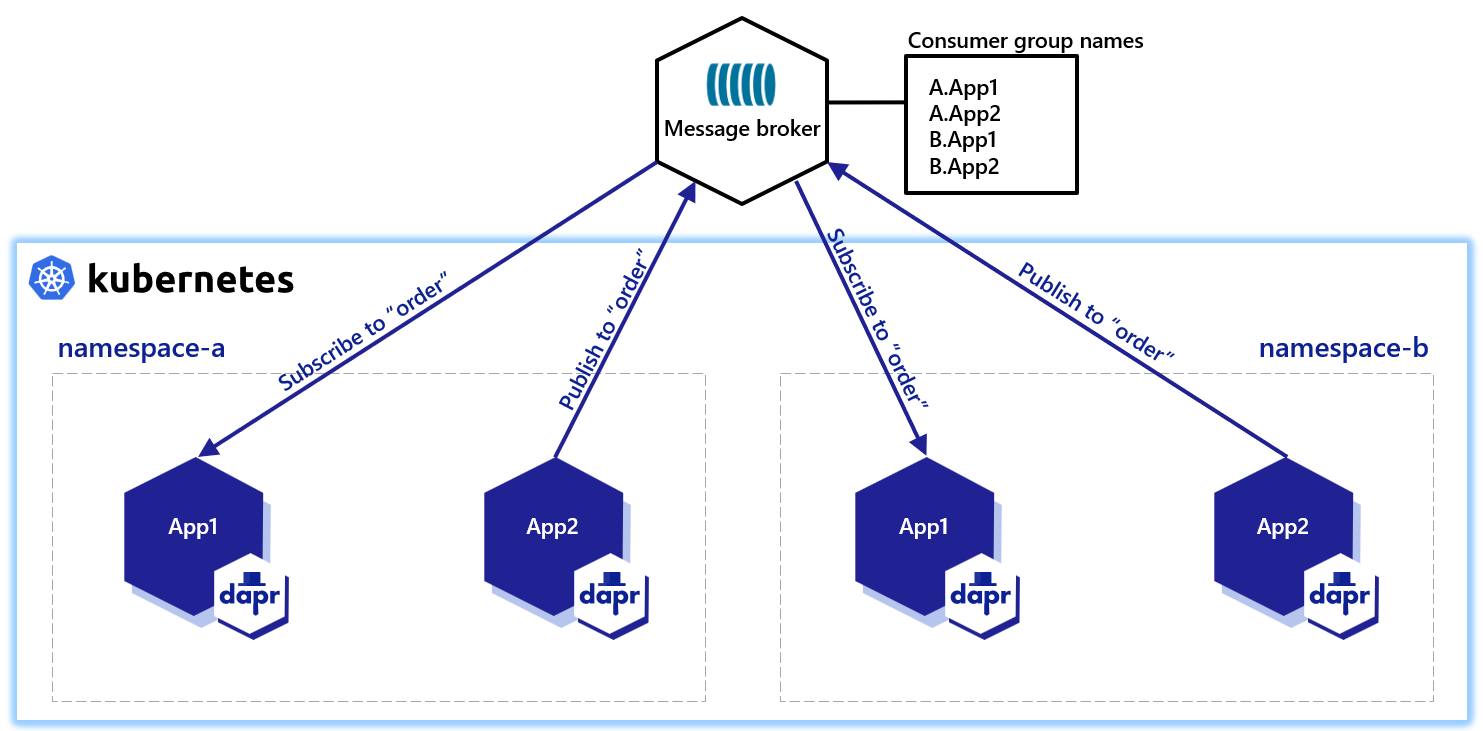
In the diagram above, you have two namespaces, each with applications of the same app-id, publishing and subscribing to the same centralized message broker orders. This time, however, Dapr has created consumer group names prefixed with the namespace in which they’re running.
Without you needing to change your code/app-id, the namespace consumer group allows you to:
app-id across namespacesSimply include the "{namespace}" consumer group construct in your component metadata. You don’t need to encode the namespace in the metadata. Dapr understands the namespace it is running in and completes the namespace value for you, like a dynamic metadata value injected by the runtime.
Watch this video for an overview on pub/sub multi-tenancy:
Unlike Deployments, where Pods are ephemeral, StatefulSets allows deployment of stateful applications on Kubernetes by keeping a sticky identity for each Pod.
Below is an example of a StatefulSet with Dapr:
apiVersion: apps/v1
kind: StatefulSet
metadata:
  name: python-subscriber
spec:
  selector:
    matchLabels:
      app: python-subscriber  # has to match .spec.template.metadata.labels
  serviceName: "python-subscriber"
  replicas: 3
  template:
    metadata:
      labels:
        app: python-subscriber # has to match .spec.selector.matchLabels
      annotations:
        dapr.io/enabled: "true"
        dapr.io/app-id: "python-subscriber"
        dapr.io/app-port: "5001"
    spec:
      containers:
      - name: python-subscriber
        image: ghcr.io/dapr/samples/pubsub-python-subscriber:latest
        ports:
        - containerPort: 5001
        imagePullPolicy: Always
When subscribing to a pub/sub topic via Dapr, the application can define the consumerID, which determines the subscriber’s position in the queue or topic. With the StatefulSets sticky identity of Pods, you can have a unique consumerID per Pod, allowing each horizontal scale of the subscriber application. Dapr keeps track of the name of each Pod, which can be used when declaring components using the {podName} marker.
On scaling the number of subscribers of a given topic, each Dapr component has unique settings that determine the behavior. Usually, there are two options for multiple consumers:
Kafka isolates each subscriber by consumerID with its own position in the topic. When an instance restarts, it reuses the same consumerID and continues from its last known position, without skipping messages. The component below demonstrates how a Kafka component can be used by multiple Pods:
apiVersion: dapr.io/v1alpha1
kind: Component
metadata:
  name: pubsub
spec:
  type: pubsub.kafka
  version: v1
  metadata:
  - name: brokers
    value: my-cluster-kafka-bootstrap.kafka.svc.cluster.local:9092
  - name: consumerID
    value: "{podName}"
  - name: authRequired
    value: "false"
The MQTT3 protocol has shared topics, allowing multiple subscribers to “compete” for messages from the topic, meaning a message is only processed by one of them. For example:
apiVersion: dapr.io/v1alpha1
kind: Component
metadata:
  name: mqtt-pubsub
spec:
  type: pubsub.mqtt3
  version: v1
  metadata:
    - name: consumerID
      value: "{podName}"
    - name: cleanSession
      value: "true"
    - name: url
      value: "tcp://admin:public@localhost:1883"
    - name: qos
      value: 1
    - name: retain
      value: "false"
Namespaces or component scopes can be used to limit component access to particular applications. These application scopes added to a component limit only the applications with specific IDs to be able to use the component.
In addition to this general component scope, the following can be limited for pub/sub components:
This is called pub/sub topic scoping.
Pub/sub scopes are defined for each pub/sub component. You may have a pub/sub component named pubsub that has one set of scopes, and another pubsub2 with a different set.
To use this topic scoping three metadata properties can be set for a pub/sub component:
spec.metadata.publishingScopes
publishingScopes (default behavior), all apps can publish to all topicsapp1=;app2=topic2)app1=topic1;app2=topic2,topic3;app3= will allow app1 to publish to topic1 and nothing else, app2 to publish to topic2 and topic3 only, and app3 to publish to nothing.spec.metadata.subscriptionScopes
subscriptionScopes (default behavior), all apps can subscribe to all topicsapp1=topic1;app2=topic2,topic3 will allow app1 to subscribe to topic1 only and app2 to subscribe to topic2 and topic3spec.metadata.allowedTopics
allowedTopics is not set (default behavior), all topics are valid. subscriptionScopes and publishingScopes still take place if present.publishingScopes or subscriptionScopes can be used in conjunction with allowedTopics to add granular limitationsspec.metadata.protectedTopics
publishingScopes or subscriptionScopes to publish/subscribe to it.These metadata properties can be used for all pub/sub components. The following examples use Redis as pub/sub component.
Limiting which applications can publish/subscribe to topics can be useful if you have topics which contain sensitive information and only a subset of your applications are allowed to publish or subscribe to these.
It can also be used for all topics to have always a “ground truth” for which applications are using which topics as publishers/subscribers.
Here is an example of three applications and three topics:
apiVersion: dapr.io/v1alpha1
kind: Component
metadata:
  name: pubsub
spec:
  type: pubsub.redis
  version: v1
  metadata:
  - name: redisHost
    value: "localhost:6379"
  - name: redisPassword
    value: ""
  - name: publishingScopes
    value: "app1=topic1;app2=topic2,topic3;app3="
  - name: subscriptionScopes
    value: "app2=;app3=topic1"
The table below shows which applications are allowed to publish into the topics:
| topic1 | topic2 | topic3 | |
|---|---|---|---|
| app1 | ✅ | ||
| app2 | ✅ | ✅ | |
| app3 |
The table below shows which applications are allowed to subscribe to the topics:
| topic1 | topic2 | topic3 | |
|---|---|---|---|
| app1 | ✅ | ✅ | ✅ |
| app2 | |||
| app3 | ✅ |
Note: If an application is not listed (e.g. app1 in subscriptionScopes) it is allowed to subscribe to all topics. Because
allowedTopicsis not used and app1 does not have any subscription scopes, it can also use additional topics not listed above.
A topic is created if a Dapr application sends a message to it. In some scenarios this topic creation should be governed. For example:
In these situations allowedTopics can be used.
Here is an example of three allowed topics:
apiVersion: dapr.io/v1alpha1
kind: Component
metadata:
  name: pubsub
spec:
  type: pubsub.redis
  version: v1
  metadata:
  - name: redisHost
    value: "localhost:6379"
  - name: redisPassword
    value: ""
  - name: allowedTopics
    value: "topic1,topic2,topic3"
All applications can use these topics, but only those topics, no others are allowed.
allowedTopics and scopesSometimes you want to combine both scopes, thus only having a fixed set of allowed topics and specify scoping to certain applications.
Here is an example of three applications and two topics:
apiVersion: dapr.io/v1alpha1
kind: Component
metadata:
  name: pubsub
spec:
  type: pubsub.redis
  version: v1
  metadata:
  - name: redisHost
    value: "localhost:6379"
  - name: redisPassword
    value: ""
  - name: allowedTopics
    value: "A,B"
  - name: publishingScopes
    value: "app1=A"
  - name: subscriptionScopes
    value: "app1=;app2=A"
Note: The third application is not listed, because if an app is not specified inside the scopes, it is allowed to use all topics.
The table below shows which application is allowed to publish into the topics:
| A | B | C | |
|---|---|---|---|
| app1 | ✅ | ||
| app2 | ✅ | ✅ | |
| app3 | ✅ | ✅ |
The table below shows which application is allowed to subscribe to the topics:
| A | B | C | |
|---|---|---|---|
| app1 | |||
| app2 | ✅ | ||
| app3 | ✅ | ✅ |
If your topic involves sensitive data, each new application must be explicitly listed in the publishingScopes and subscriptionScopes to ensure it cannot read from or write to that topic. Alternatively, you can designate the topic as ‘protected’ (using protectedTopics) and grant access only to specific applications that genuinely require it.
Here is an example of three applications and three topics, two of which are protected:
apiVersion: dapr.io/v1alpha1
kind: Component
metadata:
  name: pubsub
spec:
  type: pubsub.redis
  version: v1
  metadata:
  - name: redisHost
    value: "localhost:6379"
  - name: redisPassword
    value: ""
  - name: protectedTopics
    value: "A,B"
  - name: publishingScopes
    value: "app1=A,B;app2=B"
  - name: subscriptionScopes
    value: "app1=A,B;app2=B"
In the example above, topics A and B are marked as protected. As a result, even though app3 is not listed under publishingScopes or subscriptionScopes, it cannot interact with these topics.
The table below shows which application is allowed to publish into the topics:
| A | B | C | |
|---|---|---|---|
| app1 | ✅ | ✅ | |
| app2 | ✅ | ||
| app3 | ✅ |
The table below shows which application is allowed to subscribe to the topics:
| A | B | C | |
|---|---|---|---|
| app1 | ✅ | ✅ | |
| app2 | ✅ | ||
| app3 | ✅ |
Dapr enables per-message time-to-live (TTL). This means that applications can set time-to-live per message, and subscribers do not receive those messages after expiration.
All Dapr pub/sub components are compatible with message TTL, as Dapr handles the TTL logic within the runtime. Simply set the ttlInSeconds metadata when publishing a message.
In some components, such as Kafka, time-to-live can be configured in the topic via retention.ms as per documentation. With message TTL in Dapr, applications using Kafka can now set time-to-live per message in addition to per topic.
When message time-to-live has native support in the pub/sub component, Dapr simply forwards the time-to-live configuration without adding any extra logic, keeping predictable behavior. This is helpful when the expired messages are handled differently by the component. For example, with Azure Service Bus, where expired messages are stored in the dead letter queue and are not simply deleted.
Azure Service Bus supports entity level time-to-live. This means that messages have a default time-to-live but can also be set with a shorter timespan at publishing time. Dapr propagates the time-to-live metadata for the message and lets Azure Service Bus handle the expiration directly.
If messages are consumed by subscribers not using Dapr, the expired messages are not automatically dropped, as expiration is handled by the Dapr runtime when a Dapr sidecar receives a message. However, subscribers can programmatically drop expired messages by adding logic to handle the expiration attribute in the cloud event, which follows the RFC3339 format.
When non-Dapr subscribers use components such as Azure Service Bus, which natively handle message TTL, they do not receive expired messages. Here, no extra logic is needed.
Message TTL can be set in the metadata as part of the publishing request:
curl -X "POST" http://localhost:3500/v1.0/publish/pubsub/TOPIC_A?metadata.ttlInSeconds=120 -H "Content-Type: application/json" -d '{"order-number": "345"}'
from dapr.clients import DaprClient

with DaprClient() as d:
    req_data = {
        'order-number': '345'
    }
    # Create a typed message with content type and body
    resp = d.publish_event(
        pubsub_name='pubsub',
        topic='TOPIC_A',
        data=json.dumps(req_data),
        publish_metadata={'ttlInSeconds': '120'}
    )
    # Print the request
    print(req_data, flush=True)
<?php

require_once __DIR__.'/vendor/autoload.php';

$app = \Dapr\App::create();
$app->run(function(\DI\FactoryInterface $factory) {
    $publisher = $factory->make(\Dapr\PubSub\Publish::class, ['pubsub' => 'pubsub']);
    $publisher->topic('TOPIC_A')->publish('data', ['ttlInSeconds' => '120']);
});
See this guide for a reference on the pub/sub API.
With the bulk publish and subscribe APIs, you can publish and subscribe to multiple messages in a single request. When writing applications that need to send or receive a large number of messages, using bulk operations allows achieving high throughput by reducing the overall number of requests between the Dapr sidecar, the application, and the underlying pub/sub broker.
The bulk publish API allows you to publish multiple messages to a topic in a single request. It is non-transactional, i.e., from a single bulk request, some messages can succeed and some can fail. If any of the messages fail to publish, the bulk publish operation returns a list of failed messages.
The bulk publish operation also does not guarantee any ordering of messages.
import io.dapr.client.DaprClientBuilder;
import io.dapr.client.DaprPreviewClient;
import io.dapr.client.domain.BulkPublishResponse;
import io.dapr.client.domain.BulkPublishResponseFailedEntry;
import java.util.ArrayList;
import java.util.List;

class BulkPublisher {
  private static final String PUBSUB_NAME = "my-pubsub-name";
  private static final String TOPIC_NAME = "topic-a";

  public void publishMessages() {
    try (DaprPreviewClient client = (new DaprClientBuilder()).buildPreviewClient()) {
      // Create a list of messages to publish
      List<String> messages = new ArrayList<>();
      for (int i = 0; i < 10; i++) {
        String message = String.format("This is message #%d", i);
        messages.add(message);
      }

      // Publish list of messages using the bulk publish API
      BulkPublishResponse<String> res = client.publishEvents(PUBSUB_NAME, TOPIC_NAME, "text/plain", messages).block();
    }
  }
}
import { DaprClient } from "@dapr/dapr";

const pubSubName = "my-pubsub-name";
const topic = "topic-a";

async function start() {
    const client = new DaprClient();

    // Publish multiple messages to a topic.
    await client.pubsub.publishBulk(pubSubName, topic, ["message 1", "message 2", "message 3"]);

    // Publish multiple messages to a topic with explicit bulk publish messages.
    const bulkPublishMessages = [
    {
      entryID: "entry-1",
      contentType: "application/json",
      event: { hello: "foo message 1" },
    },
    {
      entryID: "entry-2",
      contentType: "application/cloudevents+json",
      event: {
        specversion: "1.0",
        source: "/some/source",
        type: "example",
        id: "1234",
        data: "foo message 2",
        datacontenttype: "text/plain"
      },
    },
    {
      entryID: "entry-3",
      contentType: "text/plain",
      event: "foo message 3",
    },
  ];
  await client.pubsub.publishBulk(pubSubName, topic, bulkPublishMessages);
}

start().catch((e) => {
  console.error(e);
  process.exit(1);
});
using System;
using System.Collections.Generic;
using Dapr.Client;

const string PubsubName = "my-pubsub-name";
const string TopicName = "topic-a";
IReadOnlyList<object> BulkPublishData = new List<object>() {
    new { Id = "17", Amount = 10m },
    new { Id = "18", Amount = 20m },
    new { Id = "19", Amount = 30m }
};

using var client = new DaprClientBuilder().Build();

var res = await client.BulkPublishEventAsync(PubsubName, TopicName, BulkPublishData);
if (res == null) {
    throw new Exception("null response from dapr");
}
if (res.FailedEntries.Count > 0)
{
    Console.WriteLine("Some events failed to be published!");
    foreach (var failedEntry in res.FailedEntries)
    {
        Console.WriteLine("EntryId: " + failedEntry.Entry.EntryId + " Error message: " +
                          failedEntry.ErrorMessage);
    }
}
else
{
    Console.WriteLine("Published all events!");
}
import requests
import json

base_url = "http://localhost:3500/v1.0-alpha1/publish/bulk/{}/{}"
pubsub_name = "my-pubsub-name"
topic_name = "topic-a"
payload = [
  {
    "entryId": "ae6bf7c6-4af2-11ed-b878-0242ac120002",
    "event": "first text message",
    "contentType": "text/plain"
  },
  {
    "entryId": "b1f40bd6-4af2-11ed-b878-0242ac120002",
    "event": {
      "message": "second JSON message"
    },
    "contentType": "application/json"
  }
]

response = requests.post(base_url.format(pubsub_name, topic_name), json=payload)
print(response.status_code)
package main

import (
  "fmt"
  "strings"
  "net/http"
  "io/ioutil"
)

const (
  pubsubName = "my-pubsub-name"
  topicName = "topic-a"
  baseUrl = "http://localhost:3500/v1.0-alpha1/publish/bulk/%s/%s"
)

func main() {
  url := fmt.Sprintf(baseUrl, pubsubName, topicName)
  method := "POST"
  payload := strings.NewReader(`[
        {
            "entryId": "ae6bf7c6-4af2-11ed-b878-0242ac120002",
            "event":  "first text message",
            "contentType": "text/plain"
        },
        {
            "entryId": "b1f40bd6-4af2-11ed-b878-0242ac120002",
            "event":  {
                "message": "second JSON message"
            },
            "contentType": "application/json"
        }
]`)

  client := &http.Client {}
  req, _ := http.NewRequest(method, url, payload)

  req.Header.Add("Content-Type", "application/json")
  res, err := client.Do(req)
  // ...
}
curl -X POST http://localhost:3500/v1.0-alpha1/publish/bulk/my-pubsub-name/topic-a \
  -H 'Content-Type: application/json' \
  -d '[
        {
            "entryId": "ae6bf7c6-4af2-11ed-b878-0242ac120002",
            "event":  "first text message",
            "contentType": "text/plain"
        },
        {
            "entryId": "b1f40bd6-4af2-11ed-b878-0242ac120002",
            "event":  {
                "message": "second JSON message"
            },
            "contentType": "application/json"
        },
      ]'
Invoke-RestMethod -Method Post -ContentType 'application/json' -Uri 'http://localhost:3500/v1.0-alpha1/publish/bulk/my-pubsub-name/topic-a' `
-Body '[
        {
            "entryId": "ae6bf7c6-4af2-11ed-b878-0242ac120002",
            "event":  "first text message",
            "contentType": "text/plain"
        },
        {
            "entryId": "b1f40bd6-4af2-11ed-b878-0242ac120002",
            "event":  {
                "message": "second JSON message"
            },
            "contentType": "application/json"
        },
      ]'
The bulk subscribe API allows you to subscribe multiple messages from a topic in a single request. As we know from How to: Publish & Subscribe to topics, there are three ways to subscribe to topic(s):
To Bulk Subscribe to topic(s), we just need to use bulkSubscribe spec attribute, something like following:
apiVersion: dapr.io/v2alpha1
kind: Subscription
metadata:
  name: order-pub-sub
spec:
  topic: orders
  routes:
    default: /checkout
  pubsubname: order-pub-sub
  bulkSubscribe:
    enabled: true
    maxMessagesCount: 100
    maxAwaitDurationMs: 40
scopes:
- orderprocessing
- checkout
In the example above, bulkSubscribe is optional. If you use bulkSubscribe, then:
enabled is mandatory and enables or disables bulk subscriptions on this topicmaxMessagesCount) delivered in a bulk message.
Default value of maxMessagesCount for components not supporting bulk subscribe is 100 i.e. for default bulk events between App and Dapr. Please refer How components handle publishing and subscribing to bulk messages.
If a component supports bulk subscribe, then default value for this parameter can be found in that component doc.maxAwaitDurationMs) before a bulk message is sent to the app.
Default value of maxAwaitDurationMs for components not supporting bulk subscribe is 1000 i.e. for default bulk events between App and Dapr. Please refer How components handle publishing and subscribing to bulk messages.
If a component supports bulk subscribe, then default value for this parameter can be found in that component doc.The application receives an EntryId associated with each entry (individual message) in the bulk message. This EntryId must be used by the app to communicate the status of that particular entry. If the app fails to notify on an EntryId status, it’s considered a RETRY.
A JSON-encoded payload body with the processing status against each entry needs to be sent:
{
  "statuses":
  [
    {
    "entryId": "<entryId1>",
    "status": "<status>"
    },
    {
    "entryId": "<entryId2>",
    "status": "<status>"
    }
  ]
}
Possible status values:
| Status | Description |
|---|---|
SUCCESS |
Message is processed successfully |
RETRY |
Message to be retried by Dapr |
DROP |
Warning is logged and message is dropped |
Refer to Expected HTTP Response for Bulk Subscribe for further insights on response.
The following code examples demonstrate how to use Bulk Subscribe.
import io.dapr.Topic;
import io.dapr.client.domain.BulkSubscribeAppResponse;
import io.dapr.client.domain.BulkSubscribeAppResponseEntry;
import io.dapr.client.domain.BulkSubscribeAppResponseStatus;
import io.dapr.client.domain.BulkSubscribeMessage;
import io.dapr.client.domain.BulkSubscribeMessageEntry;
import io.dapr.client.domain.CloudEvent;
import io.dapr.springboot.annotations.BulkSubscribe;
import org.springframework.web.bind.annotation.PostMapping;
import org.springframework.web.bind.annotation.RequestBody;
import reactor.core.publisher.Mono;

class BulkSubscriber {
  @BulkSubscribe()
  // @BulkSubscribe(maxMessagesCount = 100, maxAwaitDurationMs = 40)
  @Topic(name = "topicbulk", pubsubName = "orderPubSub")
  @PostMapping(path = "/topicbulk")
  public Mono<BulkSubscribeAppResponse> handleBulkMessage(
          @RequestBody(required = false) BulkSubscribeMessage<CloudEvent<String>> bulkMessage) {
    return Mono.fromCallable(() -> {
      List<BulkSubscribeAppResponseEntry> entries = new ArrayList<BulkSubscribeAppResponseEntry>();
      for (BulkSubscribeMessageEntry<?> entry : bulkMessage.getEntries()) {
        try {
          CloudEvent<?> cloudEvent = (CloudEvent<?>) entry.getEvent();
          System.out.printf("Bulk Subscriber got: %s\n", cloudEvent.getData());
          entries.add(new BulkSubscribeAppResponseEntry(entry.getEntryId(), BulkSubscribeAppResponseStatus.SUCCESS));
        } catch (Exception e) {
          e.printStackTrace();
          entries.add(new BulkSubscribeAppResponseEntry(entry.getEntryId(), BulkSubscribeAppResponseStatus.RETRY));
        }
      }
      return new BulkSubscribeAppResponse(entries);
    });
  }
}
import { DaprServer } from "@dapr/dapr";

const pubSubName = "orderPubSub";
const topic = "topicbulk";

const daprHost = process.env.DAPR_HOST || "127.0.0.1";
const daprPort = process.env.DAPR_HTTP_PORT || "3502";
const serverHost = process.env.SERVER_HOST || "127.0.0.1";
const serverPort = process.env.APP_PORT || 5001;

async function start() {
    const server = new DaprServer({
        serverHost,
        serverPort,
        clientOptions: {
            daprHost,
            daprPort,
        },
    });

    // Publish multiple messages to a topic with default config.
    await client.pubsub.bulkSubscribeWithDefaultConfig(pubSubName, topic, (data) => console.log("Subscriber received: " + JSON.stringify(data)));

    // Publish multiple messages to a topic with specific maxMessagesCount and maxAwaitDurationMs.
    await client.pubsub.bulkSubscribeWithConfig(pubSubName, topic, (data) => console.log("Subscriber received: " + JSON.stringify(data)), 100, 40);
}
using Microsoft.AspNetCore.Mvc;
using Dapr.AspNetCore;
using Dapr;

namespace DemoApp.Controllers;

[ApiController]
[Route("[controller]")]
public class BulkMessageController : ControllerBase
{
    private readonly ILogger<BulkMessageController> logger;

    public BulkMessageController(ILogger<BulkMessageController> logger)
    {
        this.logger = logger;
    }

    [BulkSubscribe("messages", 10, 10)]
    [Topic("pubsub", "messages")]
    public ActionResult<BulkSubscribeAppResponse> HandleBulkMessages([FromBody] BulkSubscribeMessage<BulkMessageModel<BulkMessageModel>> bulkMessages)
    {
        List<BulkSubscribeAppResponseEntry> responseEntries = new List<BulkSubscribeAppResponseEntry>();
        logger.LogInformation($"Received {bulkMessages.Entries.Count()} messages");
        foreach (var message in bulkMessages.Entries)
        {
            try
            {
                logger.LogInformation($"Received a message with data '{message.Event.Data.MessageData}'");
                responseEntries.Add(new BulkSubscribeAppResponseEntry(message.EntryId, BulkSubscribeAppResponseStatus.SUCCESS));
            }
            catch (Exception e)
            {
                logger.LogError(e.Message);
                responseEntries.Add(new BulkSubscribeAppResponseEntry(message.EntryId, BulkSubscribeAppResponseStatus.RETRY));
            }
        }
        return new BulkSubscribeAppResponse(responseEntries);
    }
    public class BulkMessageModel
    {
        public string MessageData { get; set; }
    }
}
Currently, you can only bulk subscribe in Python using an HTTP client.
import json
from flask import Flask, request, jsonify

app = Flask(__name__)

@app.route('/dapr/subscribe', methods=['GET'])
def subscribe():
    # Define the bulk subscribe configuration
    subscriptions = [{
        "pubsubname": "pubsub",
        "topic": "TOPIC_A",
        "route": "/checkout",
        "bulkSubscribe": {
            "enabled": True,
            "maxMessagesCount": 3,
            "maxAwaitDurationMs": 40
        }
    }]
    print('Dapr pub/sub is subscribed to: ' + json.dumps(subscriptions))
    return jsonify(subscriptions)


# Define the endpoint to handle incoming messages
@app.route('/checkout', methods=['POST'])
def checkout():
    messages = request.json
    print(messages)
    for message in messages:
        print(f"Received message: {message}")
    return json.dumps({'success': True}), 200, {'ContentType': 'application/json'}

if __name__ == '__main__':
    app.run(port=5000)
For event publish/subscribe, two kinds of network transfers are involved.
These are the opportunities where optimization is possible. When optimized, Bulk requests are made, which reduce the overall number of calls and thus increases throughput and provides better latency.
On enabling Bulk Publish and/or Bulk Subscribe, the communication between the App and Dapr sidecar (Point 1 above) is optimized for all components.
Optimization from Dapr sidecar to the pub/sub broker depends on a number of factors, for example:
Currently, the following components are updated to support this level of optimization:
| Component | Bulk Publish | Bulk Subscribe |
|---|---|---|
| Kafka | Yes | Yes |
| Azure Servicebus | Yes | Yes |
| Azure Eventhubs | Yes | Yes |
Watch the following demos and presentations about bulk pub/sub.
Learn more about how to use Dapr Workflow:
Dapr workflow makes it easy for developers to write business logic and integrations in a reliable way. Since Dapr workflows are stateful, they support long-running and fault-tolerant applications, ideal for orchestrating microservices. Dapr workflow works seamlessly with other Dapr building blocks, such as service invocation, pub/sub, state management, and bindings.
The durable, resilient Dapr Workflow capability:
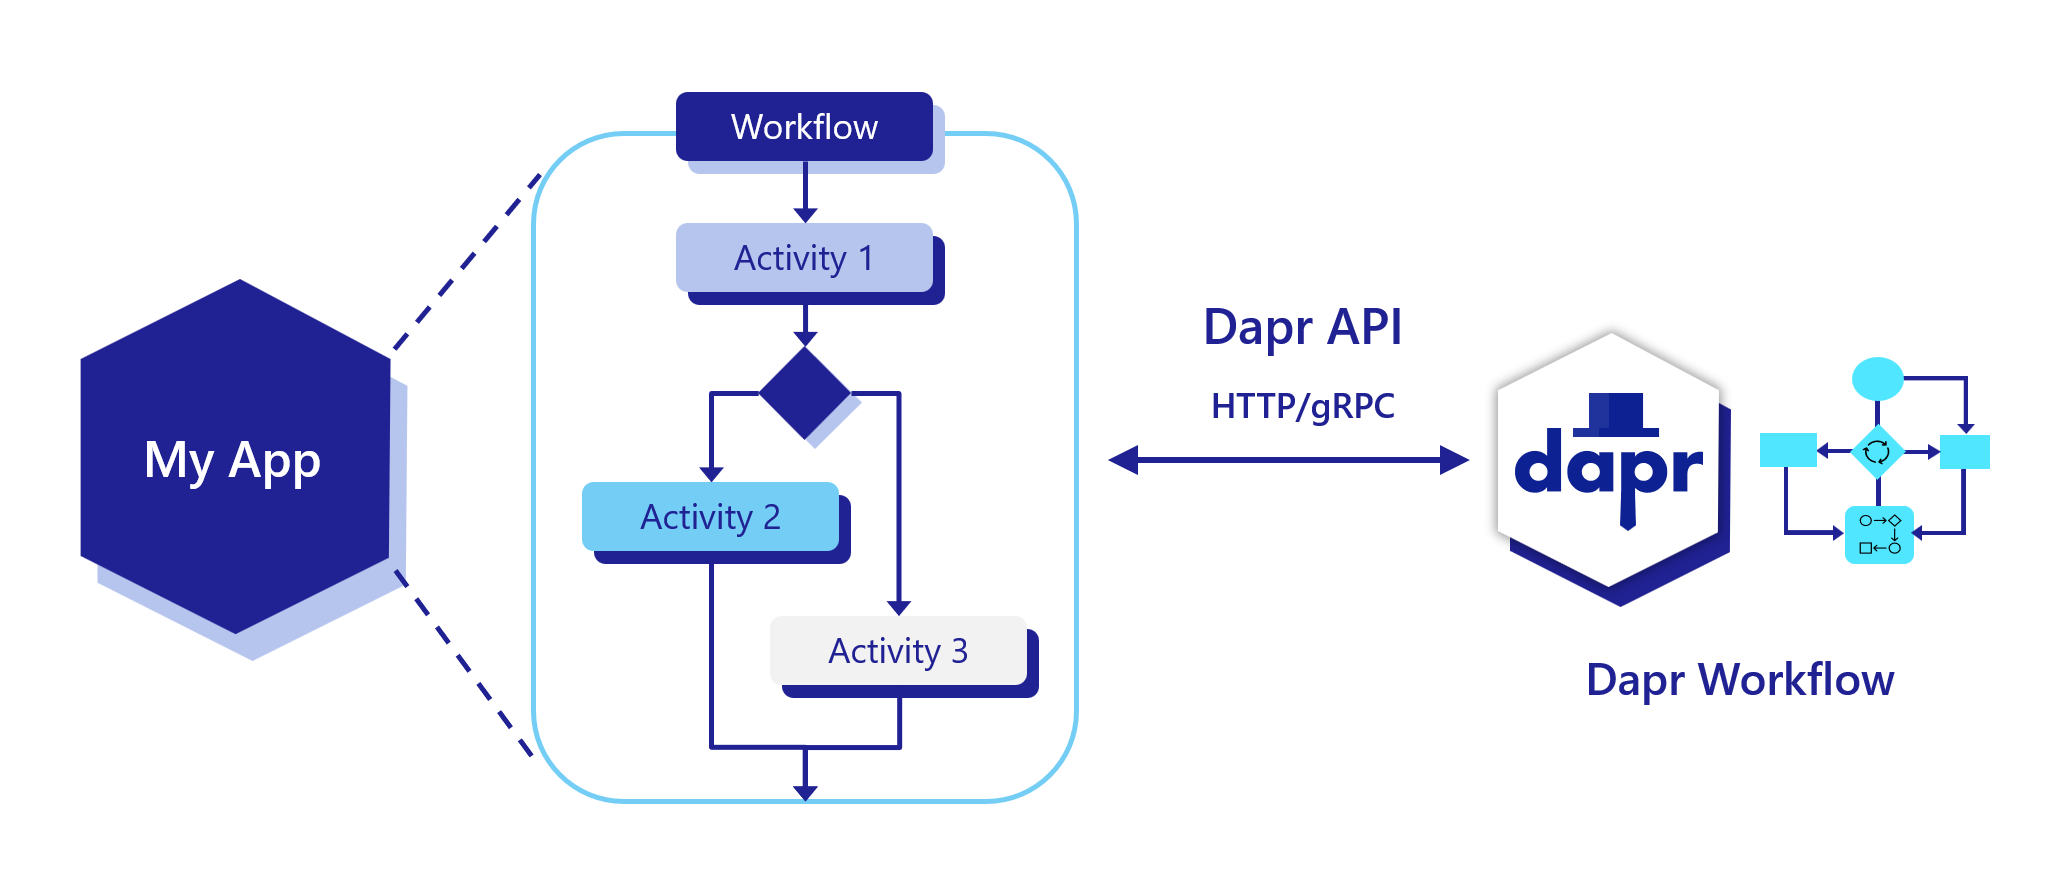
Some example scenarios that Dapr Workflow can perform are:
With Dapr Workflow, you can write activities and then orchestrate those activities in a workflow. Workflow activities are:
Learn more about workflow activities.
In addition to activities, you can write workflows to schedule other workflows as child workflows. A child workflow has its own instance ID, history, and status that is independent of the parent workflow that started it, except for the fact that terminating the parent workflow terminates all of the child workflows created by it. Child workflow also supports automatic retry policies.
Learn more about child workflows.
Same as Dapr actors, you can schedule reminder-like durable delays for any time range.
Learn more about workflow timers and reminders
When you create an application with workflow code and run it with Dapr, you can call specific workflows that reside in the application. Each individual workflow can be:
Learn more about how manage a workflow using HTTP calls.
Dapr Workflow simplifies complex, stateful coordination requirements in microservice architectures. The following sections describe several application patterns that can benefit from Dapr Workflow.
Learn more about different types of workflow patterns
The Dapr Workflow authoring SDKs are language-specific SDKs that contain types and functions to implement workflow logic. The workflow logic lives in your application and is orchestrated by the Dapr Workflow engine running in the Dapr sidecar via a gRPC stream.
You can use the following SDKs to author a workflow.
| Language stack | Package |
|---|---|
| Python | dapr-ext-workflow |
| JavaScript | DaprWorkflowClient |
| .NET | Dapr.Workflow |
| Java | io.dapr.workflows |
| Go | workflow |
Want to put workflows to the test? Walk through the following quickstart and tutorials to see workflows in action:
| Quickstart/tutorial | Description |
|---|---|
| Workflow quickstart | Run a workflow application with four workflow activities to see Dapr Workflow in action |
| Workflow Python SDK example | Learn how to create a Dapr Workflow and invoke it using the Python dapr-ext-workflow package. |
| Workflow JavaScript SDK example | Learn how to create a Dapr Workflow and invoke it using the JavaScript SDK. |
| Workflow .NET SDK example | Learn how to create a Dapr Workflow and invoke it using ASP.NET Core web APIs. |
| Workflow Java SDK example | Learn how to create a Dapr Workflow and invoke it using the Java io.dapr.workflows package. |
| Workflow Go SDK example | Learn how to create a Dapr Workflow and invoke it using the Go workflow package. |
Want to skip the quickstarts? Not a problem. You can try out the workflow building block directly in your application. After Dapr is installed, you can begin using workflows, starting with how to author a workflow.
Watch this video for an overview on Dapr Workflow:
Now that you’ve learned about the workflow building block at a high level, let’s deep dive into the features and concepts included with the Dapr Workflow engine and SDKs. Dapr Workflow exposes several core features and concepts which are common across all supported languages.
Dapr Workflows are functions you write that define a series of tasks to be executed in a particular order. The Dapr Workflow engine takes care of scheduling and execution of the tasks, including managing failures and retries. If the app hosting your workflows is scaled out across multiple machines, the workflow engine may also load balance the execution of workflows and their tasks across multiple machines.
There are several different kinds of tasks that a workflow can schedule, including
Each workflow you define has a type name, and individual executions of a workflow require a unique instance ID. Workflow instance IDs can be generated by your app code, which is useful when workflows correspond to business entities like documents or jobs, or can be auto-generated UUIDs. A workflow’s instance ID is useful for debugging and also for managing workflows using the Workflow APIs.
Only one workflow instance with a given ID can exist at any given time. However, if a workflow instance completes or fails, its ID can be reused by a new workflow instance. Note, however, that the new workflow instance effectively replaces the old one in the configured state store.
Dapr Workflows maintain their execution state by using a technique known as event sourcing. Instead of storing the current state of a workflow as a snapshot, the workflow engine manages an append-only log of history events that describe the various steps that a workflow has taken. When using the workflow SDK, these history events are stored automatically whenever the workflow “awaits” for the result of a scheduled task.
When a workflow “awaits” a scheduled task, it unloads itself from memory until the task completes. Once the task completes, the workflow engine schedules the workflow function to run again. This second workflow function execution is known as a replay.
When a workflow function is replayed, it runs again from the beginning. However, when it encounters a task that already completed, instead of scheduling that task again, the workflow engine:
This “replay” behavior continues until the workflow function completes or fails with an error.
Using this replay technique, a workflow is able to resume execution from any “await” point as if it had never been unloaded from memory. Even the values of local variables from previous runs can be restored without the workflow engine knowing anything about what data they stored. This ability to restore state makes Dapr Workflows durable and fault tolerant.
As discussed in the workflow replay section, workflows maintain a write-only event-sourced history log of all its operations. To avoid runaway resource usage, workflows must limit the number of operations they schedule. For example, ensure your workflow doesn’t:
You can use the following two techniques to write workflows that may need to schedule extreme numbers of tasks:
Use the continue-as-new API:
Each workflow SDK exposes a continue-as-new API that workflows can invoke to restart themselves with a new input and history. The continue-as-new API is especially ideal for implementing “eternal workflows”, like monitoring agents, which would otherwise be implemented using a while (true)-like construct. Using continue-as-new is a great way to keep the workflow history size small.
The continue-as-new API truncates the existing history, replacing it with a new history.
Use child workflows:
Each workflow SDK exposes an API for creating child workflows. A child workflow behaves like any other workflow, except that it’s scheduled by a parent workflow. Child workflows have:
If a workflow needs to schedule thousands of tasks or more, it’s recommended that those tasks be distributed across child workflows so that no single workflow’s history size grows too large.
Because workflows are long-running and durable, updating workflow code must be done with extreme care. As discussed in the workflow determinism limitation section, workflow code must be deterministic. Updates to workflow code must preserve this determinism if there are any non-completed workflow instances in the system. Otherwise, updates to workflow code can result in runtime failures the next time those workflows execute.
Workflow activities are the basic unit of work in a workflow and are the tasks that get orchestrated in the business process. For example, you might create a workflow to process an order. The tasks may involve checking the inventory, charging the customer, and creating a shipment. Each task would be a separate activity. These activities may be executed serially, in parallel, or some combination of both.
Unlike workflows, activities aren’t restricted in the type of work you can do in them. Activities are frequently used to make network calls or run CPU intensive operations. An activity can also return data back to the workflow.
The Dapr Workflow engine guarantees that each called activity is executed at least once as part of a workflow’s execution. Because activities only guarantee at-least-once execution, it’s recommended that activity logic be implemented as idempotent whenever possible.
In addition to activities, workflows can schedule other workflows as child workflows. A child workflow has its own instance ID, history, and status that is independent of the parent workflow that started it.
Child workflows have many benefits:
The return value of a child workflow is its output. If a child workflow fails with an exception, then that exception is surfaced to the parent workflow, just like it is when an activity task fails with an exception. Child workflows also support automatic retry policies.
Terminating a parent workflow terminates all of the child workflows created by the workflow instance. See the terminate workflow api for more information.
Dapr Workflows allow you to schedule reminder-like durable delays for any time range, including minutes, days, or even years. These durable timers can be scheduled by workflows to implement simple delays or to set up ad-hoc timeouts on other async tasks. More specifically, a durable timer can be set to trigger on a particular date or after a specified duration. There are no limits to the maximum duration of durable timers, which are internally backed by internal actor reminders. For example, a workflow that tracks a 30-day free subscription to a service could be implemented using a durable timer that fires 30-days after the workflow is created. Workflows can be safely unloaded from memory while waiting for a durable timer to fire.
Workflows support durable retry policies for activities and child workflows. Workflow retry policies are separate and distinct from Dapr resiliency policies in the following ways.
Retries are internally implemented using durable timers. This means that workflows can be safely unloaded from memory while waiting for a retry to fire, conserving system resources. This also means that delays between retries can be arbitrarily long, including minutes, hours, or even days.
It’s possible to use both workflow retry policies and Dapr Resiliency policies together. For example, if a workflow activity uses a Dapr client to invoke a service, the Dapr client uses the configured resiliency policy. See Quickstart: Service-to-service resiliency for more information with an example. However, if the activity itself fails for any reason, including exhausting the retries on the resiliency policy, then the workflow’s resiliency policy kicks in.
Because workflow retry policies are configured in code, the exact developer experience may vary depending on the version of the workflow SDK. In general, workflow retry policies can be configured with the following parameters.
| Parameter | Description |
|---|---|
| Maximum number of attempts | The maximum number of times to execute the activity or child workflow. |
| First retry interval | The amount of time to wait before the first retry. |
| Backoff coefficient | The coefficient used to determine the rate of increase of back-off. For example a coefficient of 2 doubles the wait of each subsequent retry. |
| Maximum retry interval | The maximum amount of time to wait before each subsequent retry. |
| Retry timeout | The overall timeout for retries, regardless of any configured max number of attempts. |
Sometimes workflows will need to wait for events that are raised by external systems. For example, an approval workflow may require a human to explicitly approve an order request within an order processing workflow if the total cost exceeds some threshold. Another example is a trivia game orchestration workflow that pauses while waiting for all participants to submit their answers to trivia questions. These mid-execution inputs are referred to as external events.
External events have a name and a payload and are delivered to a single workflow instance. Workflows can create “wait for external event” tasks that subscribe to external events and await those tasks to block execution until the event is received. The workflow can then read the payload of these events and make decisions about which next steps to take. External events can be processed serially or in parallel. External events can be raised by other workflows or by workflow code.
Workflows can also wait for multiple external event signals of the same name, in which case they are dispatched to the corresponding workflow tasks in a first-in, first-out (FIFO) manner. If a workflow receives an external event signal but has not yet created a “wait for external event” task, the event will be saved into the workflow’s history and consumed immediately after the workflow requests the event.
Learn more about external system interaction.
Dapr Workflow relies on the Durable Task Framework for Go (a.k.a. durabletask-go) as the core engine for executing workflows. This engine is designed to support multiple backend implementations. For example, the durabletask-go repo includes a SQLite implementation and the Dapr repo includes an Actors implementation.
By default, Dapr Workflow supports the Actors backend, which is stable and scalable. However, you can choose a different backend supported in Dapr Workflow. For example, SQLite(TBD future release) could be an option for backend for local development and testing.
The backend implementation is largely decoupled from the workflow core engine or the programming model that you see. The backend primarily impacts:
In that sense, it’s similar to Dapr’s state store abstraction, except designed specifically for workflow. All APIs and programming model features are the same, regardless of which backend is used.
Workflow state can be purged from a state store, purging all its history and removing all metadata related to a specific workflow instance. The purge capability is used for workflows that have run to a COMPLETED, FAILED, or TERMINATED state.
Learn more in the workflow API reference guide.
To take advantage of the workflow replay technique, your workflow code needs to be deterministic. For your workflow code to be deterministic, you may need to work around some limitations.
APIs that generate random numbers, random UUIDs, or the current date are non-deterministic. To work around this limitation, you can:
For example, instead of this:
// DON'T DO THIS!
DateTime currentTime = DateTime.UtcNow;
Guid newIdentifier = Guid.NewGuid();
string randomString = GetRandomString();
// DON'T DO THIS!
Instant currentTime = Instant.now();
UUID newIdentifier = UUID.randomUUID();
String randomString = getRandomString();
// DON'T DO THIS!
const currentTime = new Date();
const newIdentifier = uuidv4();
const randomString = getRandomString();
// DON'T DO THIS!
const currentTime = time.Now()
Do this:
// Do this!!
DateTime currentTime = context.CurrentUtcDateTime;
Guid newIdentifier = context.NewGuid();
string randomString = await context.CallActivityAsync<string>(nameof("GetRandomString")); //Use "nameof" to prevent specifying an activity name that does not exist in your application
// Do this!!
Instant currentTime = context.getCurrentInstant();
Guid newIdentifier = context.newGuid();
String randomString = context.callActivity(GetRandomString.class.getName(), String.class).await();
// Do this!!
const currentTime = context.getCurrentUtcDateTime();
const randomString = yield context.callActivity(getRandomString);
const currentTime = ctx.CurrentUTCDateTime()
External data includes any data that isn’t stored in the workflow state. Workflows must not interact with global variables, environment variables, the file system, or make network calls.
Instead, workflows should interact with external state indirectly using workflow inputs, activity tasks, and through external event handling.
For example, instead of this:
// DON'T DO THIS!
string configuration = Environment.GetEnvironmentVariable("MY_CONFIGURATION")!;
string data = await new HttpClient().GetStringAsync("https://example.com/api/data");
// DON'T DO THIS!
String configuration = System.getenv("MY_CONFIGURATION");

HttpRequest request = HttpRequest.newBuilder().uri(new URI("https://postman-echo.com/post")).GET().build();
HttpResponse<String> response = HttpClient.newBuilder().build().send(request, HttpResponse.BodyHandlers.ofString());
// DON'T DO THIS!
// Accessing an Environment Variable (Node.js)
const configuration = process.env.MY_CONFIGURATION;

fetch('https://postman-echo.com/get')
  .then(response => response.text())
  .then(data => {
    console.log(data);
  })
  .catch(error => {
    console.error('Error:', error);
  });
// DON'T DO THIS!
resp, err := http.Get("http://example.com/api/data")
Do this:
// Do this!!
string configuration = workflowInput.Configuration; // imaginary workflow input argument
string data = await context.CallActivityAsync<string>(nameof("MakeHttpCall"), "https://example.com/api/data");
// Do this!!
String configuration = ctx.getInput(InputType.class).getConfiguration(); // imaginary workflow input argument
String data = ctx.callActivity(MakeHttpCall.class, "https://example.com/api/data", String.class).await();
// Do this!!
const configuration = workflowInput.getConfiguration(); // imaginary workflow input argument
const data = yield ctx.callActivity(makeHttpCall, "https://example.com/api/data");
// Do this!!
err := ctx.CallActivity(MakeHttpCallActivity, workflow.ActivityInput("https://example.com/api/data")).Await(&output)
The implementation of each language SDK requires that all workflow function operations operate on the same thread (goroutine, etc.) that the function was scheduled on. Workflow functions must never:
Failure to follow this rule could result in undefined behavior. Any background processing should instead be delegated to activity tasks, which can be scheduled to run serially or concurrently.
For example, instead of this:
// DON'T DO THIS!
Task t = Task.Run(() => context.CallActivityAsync("DoSomething"));
await context.CreateTimer(5000).ConfigureAwait(false);
// DON'T DO THIS!
new Thread(() -> {
    ctx.callActivity(DoSomethingActivity.class.getName()).await();
}).start();
ctx.createTimer(Duration.ofSeconds(5)).await();
Don’t declare JavaScript workflow as async. The Node.js runtime doesn’t guarantee that asynchronous functions are deterministic.
// DON'T DO THIS!
go func() {
  err := ctx.CallActivity(DoSomething).Await(nil)
}()
err := ctx.CreateTimer(time.Second).Await(nil)
Do this:
// Do this!!
Task t = context.CallActivityAsync(nameof("DoSomething"));
await context.CreateTimer(5000).ConfigureAwait(true);
// Do this!!
ctx.callActivity(DoSomethingActivity.class.getName()).await();
ctx.createTimer(Duration.ofSeconds(5)).await();
Since the Node.js runtime doesn’t guarantee that asynchronous functions are deterministic, always declare JavaScript workflow as synchronous generator functions.
// Do this!
task := ctx.CallActivity(DoSomething)
task.Await(nil)
Make sure updates you make to the workflow code maintain its determinism. A couple examples of code updates that can break workflow determinism:
Changing workflow function signatures:
Changing the name, input, or output of a workflow or activity function is considered a breaking change and must be avoided.
Changing the number or order of workflow tasks:
Changing the number or order of workflow tasks causes a workflow instance’s history to no longer match the code and may result in runtime errors or other unexpected behavior.
To work around these constraints:
Dapr Workflows simplify complex, stateful coordination requirements in microservice architectures. The following sections describe several application patterns that can benefit from Dapr Workflows.
In the task chaining pattern, multiple steps in a workflow are run in succession, and the output of one step may be passed as the input to the next step. Task chaining workflows typically involve creating a sequence of operations that need to be performed on some data, such as filtering, transforming, and reducing.
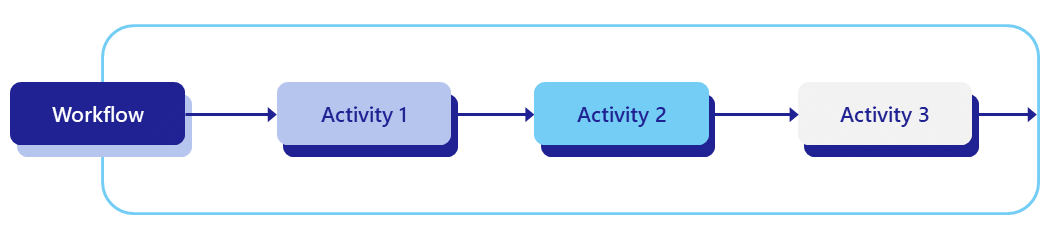
In some cases, the steps of the workflow may need to be orchestrated across multiple microservices. For increased reliability and scalability, you’re also likely to use queues to trigger the various steps.
While the pattern is simple, there are many complexities hidden in the implementation. For example:
Dapr Workflow solves these complexities by allowing you to implement the task chaining pattern concisely as a simple function in the programming language of your choice, as shown in the following example.
import dapr.ext.workflow as wf


def task_chain_workflow(ctx: wf.DaprWorkflowContext, wf_input: int):
    try:
        result1 = yield ctx.call_activity(step1, input=wf_input)
        result2 = yield ctx.call_activity(step2, input=result1)
        result3 = yield ctx.call_activity(step3, input=result2)
    except Exception as e:
        yield ctx.call_activity(error_handler, input=str(e))
        raise
    return [result1, result2, result3]


def step1(ctx, activity_input):
    print(f'Step 1: Received input: {activity_input}.')
    # Do some work
    return activity_input + 1


def step2(ctx, activity_input):
    print(f'Step 2: Received input: {activity_input}.')
    # Do some work
    return activity_input * 2


def step3(ctx, activity_input):
    print(f'Step 3: Received input: {activity_input}.')
    # Do some work
    return activity_input ^ 2


def error_handler(ctx, error):
    print(f'Executing error handler: {error}.')
    # Do some compensating work
Note Workflow retry policies will be available in a future version of the Python SDK.
import { DaprWorkflowClient, WorkflowActivityContext, WorkflowContext, WorkflowRuntime, TWorkflow } from "@dapr/dapr";

async function start() {
  // Update the gRPC client and worker to use a local address and port
  const daprHost = "localhost";
  const daprPort = "50001";
  const workflowClient = new DaprWorkflowClient({
    daprHost,
    daprPort,
  });
  const workflowRuntime = new WorkflowRuntime({
    daprHost,
    daprPort,
  });

  const hello = async (_: WorkflowActivityContext, name: string) => {
    return `Hello ${name}!`;
  };

  const sequence: TWorkflow = async function* (ctx: WorkflowContext): any {
    const cities: string[] = [];

    const result1 = yield ctx.callActivity(hello, "Tokyo");
    cities.push(result1);
    const result2 = yield ctx.callActivity(hello, "Seattle");
    cities.push(result2);
    const result3 = yield ctx.callActivity(hello, "London");
    cities.push(result3);

    return cities;
  };

  workflowRuntime.registerWorkflow(sequence).registerActivity(hello);

  // Wrap the worker startup in a try-catch block to handle any errors during startup
  try {
    await workflowRuntime.start();
    console.log("Workflow runtime started successfully");
  } catch (error) {
    console.error("Error starting workflow runtime:", error);
  }

  // Schedule a new orchestration
  try {
    const id = await workflowClient.scheduleNewWorkflow(sequence);
    console.log(`Orchestration scheduled with ID: ${id}`);

    // Wait for orchestration completion
    const state = await workflowClient.waitForWorkflowCompletion(id, undefined, 30);

    console.log(`Orchestration completed! Result: ${state?.serializedOutput}`);
  } catch (error) {
    console.error("Error scheduling or waiting for orchestration:", error);
  }

  await workflowRuntime.stop();
  await workflowClient.stop();

  // stop the dapr side car
  process.exit(0);
}

start().catch((e) => {
  console.error(e);
  process.exit(1);
});
// Expotential backoff retry policy that survives long outages
var retryOptions = new WorkflowTaskOptions
{
    RetryPolicy = new WorkflowRetryPolicy(
        firstRetryInterval: TimeSpan.FromMinutes(1),
        backoffCoefficient: 2.0,
        maxRetryInterval: TimeSpan.FromHours(1),
        maxNumberOfAttempts: 10),
};

try
{
    var result1 = await context.CallActivityAsync<string>("Step1", wfInput, retryOptions);
    var result2 = await context.CallActivityAsync<byte[]>("Step2", result1, retryOptions);
    var result3 = await context.CallActivityAsync<long[]>("Step3", result2, retryOptions);
    return string.Join(", ", result4);
}
catch (TaskFailedException) // Task failures are surfaced as TaskFailedException
{
    // Retries expired - apply custom compensation logic
    await context.CallActivityAsync<long[]>("MyCompensation", options: retryOptions);
    throw;
}
Note In the example above,
"Step1","Step2","Step3", and"MyCompensation"represent workflow activities, which are functions in your code that actually implement the steps of the workflow. For brevity, these activity implementations are left out of this example.
public class ChainWorkflow extends Workflow {
    @Override
    public WorkflowStub create() {
        return ctx -> {
            StringBuilder sb = new StringBuilder();
            String wfInput = ctx.getInput(String.class);
            String result1 = ctx.callActivity("Step1", wfInput, String.class).await();
            String result2 = ctx.callActivity("Step2", result1, String.class).await();
            String result3 = ctx.callActivity("Step3", result2, String.class).await();
            String result = sb.append(result1).append(',').append(result2).append(',').append(result3).toString();
            ctx.complete(result);
        };
    }
}

    class Step1 implements WorkflowActivity {

        @Override
        public Object run(WorkflowActivityContext ctx) {
            Logger logger = LoggerFactory.getLogger(Step1.class);
            logger.info("Starting Activity: " + ctx.getName());
            // Do some work
            return null;
        }
    }

    class Step2 implements WorkflowActivity {

        @Override
        public Object run(WorkflowActivityContext ctx) {
            Logger logger = LoggerFactory.getLogger(Step2.class);
            logger.info("Starting Activity: " + ctx.getName());
            // Do some work
            return null;
        }
    }

    class Step3 implements WorkflowActivity {

        @Override
        public Object run(WorkflowActivityContext ctx) {
            Logger logger = LoggerFactory.getLogger(Step3.class);
            logger.info("Starting Activity: " + ctx.getName());
            // Do some work
            return null;
        }
    }
func TaskChainWorkflow(ctx *workflow.WorkflowContext) (any, error) {
	var input int
	if err := ctx.GetInput(&input); err != nil {
		return "", err
	}
	var result1 int
	if err := ctx.CallActivity(Step1, workflow.ActivityInput(input)).Await(&result1); err != nil {
		return nil, err
	}
	var result2 int
	if err := ctx.CallActivity(Step2, workflow.ActivityInput(input)).Await(&result2); err != nil {
		return nil, err
	}
	var result3 int
	if err := ctx.CallActivity(Step3, workflow.ActivityInput(input)).Await(&result3); err != nil {
		return nil, err
	}
	return []int{result1, result2, result3}, nil
}
func Step1(ctx workflow.ActivityContext) (any, error) {
	var input int
	if err := ctx.GetInput(&input); err != nil {
		return "", err
	}
	fmt.Printf("Step 1: Received input: %s", input)
	return input + 1, nil
}
func Step2(ctx workflow.ActivityContext) (any, error) {
	var input int
	if err := ctx.GetInput(&input); err != nil {
		return "", err
	}
	fmt.Printf("Step 2: Received input: %s", input)
	return input * 2, nil
}
func Step3(ctx workflow.ActivityContext) (any, error) {
	var input int
	if err := ctx.GetInput(&input); err != nil {
		return "", err
	}
	fmt.Printf("Step 3: Received input: %s", input)
	return int(math.Pow(float64(input), 2)), nil
}
As you can see, the workflow is expressed as a simple series of statements in the programming language of your choice. This allows any engineer in the organization to quickly understand the end-to-end flow without necessarily needing to understand the end-to-end system architecture.
Behind the scenes, the Dapr Workflow runtime:
In the fan-out/fan-in design pattern, you execute multiple tasks simultaneously across potentially multiple workers, wait for them to finish, and perform some aggregation on the result.
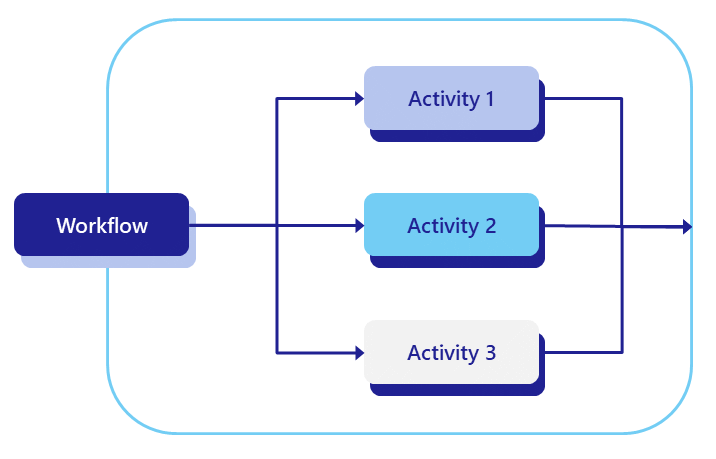
In addition to the challenges mentioned in the previous pattern, there are several important questions to consider when implementing the fan-out/fan-in pattern manually:
Dapr Workflows provides a way to express the fan-out/fan-in pattern as a simple function, as shown in the following example:
import time
from typing import List
import dapr.ext.workflow as wf


def batch_processing_workflow(ctx: wf.DaprWorkflowContext, wf_input: int):
    # get a batch of N work items to process in parallel
    work_batch = yield ctx.call_activity(get_work_batch, input=wf_input)

    # schedule N parallel tasks to process the work items and wait for all to complete
    parallel_tasks = [ctx.call_activity(process_work_item, input=work_item) for work_item in work_batch]
    outputs = yield wf.when_all(parallel_tasks)

    # aggregate the results and send them to another activity
    total = sum(outputs)
    yield ctx.call_activity(process_results, input=total)


def get_work_batch(ctx, batch_size: int) -> List[int]:
    return [i + 1 for i in range(batch_size)]


def process_work_item(ctx, work_item: int) -> int:
    print(f'Processing work item: {work_item}.')
    time.sleep(5)
    result = work_item * 2
    print(f'Work item {work_item} processed. Result: {result}.')
    return result


def process_results(ctx, final_result: int):
    print(f'Final result: {final_result}.')
import {
  Task,
  DaprWorkflowClient,
  WorkflowActivityContext,
  WorkflowContext,
  WorkflowRuntime,
  TWorkflow,
} from "@dapr/dapr";

// Wrap the entire code in an immediately-invoked async function
async function start() {
  // Update the gRPC client and worker to use a local address and port
  const daprHost = "localhost";
  const daprPort = "50001";
  const workflowClient = new DaprWorkflowClient({
    daprHost,
    daprPort,
  });
  const workflowRuntime = new WorkflowRuntime({
    daprHost,
    daprPort,
  });

  function getRandomInt(min: number, max: number): number {
    return Math.floor(Math.random() * (max - min + 1)) + min;
  }

  async function getWorkItemsActivity(_: WorkflowActivityContext): Promise<string[]> {
    const count: number = getRandomInt(2, 10);
    console.log(`generating ${count} work items...`);

    const workItems: string[] = Array.from({ length: count }, (_, i) => `work item ${i}`);
    return workItems;
  }

  function sleep(ms: number): Promise<void> {
    return new Promise((resolve) => setTimeout(resolve, ms));
  }

  async function processWorkItemActivity(context: WorkflowActivityContext, item: string): Promise<number> {
    console.log(`processing work item: ${item}`);

    // Simulate some work that takes a variable amount of time
    const sleepTime = Math.random() * 5000;
    await sleep(sleepTime);

    // Return a result for the given work item, which is also a random number in this case
    // For more information about random numbers in workflow please check
    // https://learn.microsoft.com/azure/azure-functions/durable/durable-functions-code-constraints?tabpane=csharp#random-numbers
    return Math.floor(Math.random() * 11);
  }

  const workflow: TWorkflow = async function* (ctx: WorkflowContext): any {
    const tasks: Task<any>[] = [];
    const workItems = yield ctx.callActivity(getWorkItemsActivity);
    for (const workItem of workItems) {
      tasks.push(ctx.callActivity(processWorkItemActivity, workItem));
    }
    const results: number[] = yield ctx.whenAll(tasks);
    const sum: number = results.reduce((accumulator, currentValue) => accumulator + currentValue, 0);
    return sum;
  };

  workflowRuntime.registerWorkflow(workflow);
  workflowRuntime.registerActivity(getWorkItemsActivity);
  workflowRuntime.registerActivity(processWorkItemActivity);

  // Wrap the worker startup in a try-catch block to handle any errors during startup
  try {
    await workflowRuntime.start();
    console.log("Worker started successfully");
  } catch (error) {
    console.error("Error starting worker:", error);
  }

  // Schedule a new orchestration
  try {
    const id = await workflowClient.scheduleNewWorkflow(workflow);
    console.log(`Orchestration scheduled with ID: ${id}`);

    // Wait for orchestration completion
    const state = await workflowClient.waitForWorkflowCompletion(id, undefined, 30);

    console.log(`Orchestration completed! Result: ${state?.serializedOutput}`);
  } catch (error) {
    console.error("Error scheduling or waiting for orchestration:", error);
  }

  // stop worker and client
  await workflowRuntime.stop();
  await workflowClient.stop();

  // stop the dapr side car
  process.exit(0);
}

start().catch((e) => {
  console.error(e);
  process.exit(1);
});
// Get a list of N work items to process in parallel.
object[] workBatch = await context.CallActivityAsync<object[]>("GetWorkBatch", null);

// Schedule the parallel tasks, but don't wait for them to complete yet.
var parallelTasks = new List<Task<int>>(workBatch.Length);
for (int i = 0; i < workBatch.Length; i++)
{
    Task<int> task = context.CallActivityAsync<int>("ProcessWorkItem", workBatch[i]);
    parallelTasks.Add(task);
}

// Everything is scheduled. Wait here until all parallel tasks have completed.
await Task.WhenAll(parallelTasks);

// Aggregate all N outputs and publish the result.
int sum = parallelTasks.Sum(t => t.Result);
await context.CallActivityAsync("PostResults", sum);
public class FaninoutWorkflow extends Workflow {
    @Override
    public WorkflowStub create() {
        return ctx -> {
            // Get a list of N work items to process in parallel.
            Object[] workBatch = ctx.callActivity("GetWorkBatch", Object[].class).await();
            // Schedule the parallel tasks, but don't wait for them to complete yet.
            List<Task<Integer>> tasks = Arrays.stream(workBatch)
                    .map(workItem -> ctx.callActivity("ProcessWorkItem", workItem, int.class))
                    .collect(Collectors.toList());
            // Everything is scheduled. Wait here until all parallel tasks have completed.
            List<Integer> results = ctx.allOf(tasks).await();
            // Aggregate all N outputs and publish the result.
            int sum = results.stream().mapToInt(Integer::intValue).sum();
            ctx.complete(sum);
        };
    }
}
func BatchProcessingWorkflow(ctx *workflow.WorkflowContext) (any, error) {
	var input int
	if err := ctx.GetInput(&input); err != nil {
		return 0, err
	}
	var workBatch []int
	if err := ctx.CallActivity(GetWorkBatch, workflow.ActivityInput(input)).Await(&workBatch); err != nil {
		return 0, err
	}
	parallelTasks := workflow.NewTaskSlice(len(workBatch))
	for i, workItem := range workBatch {
		parallelTasks[i] = ctx.CallActivity(ProcessWorkItem, workflow.ActivityInput(workItem))
	}
	var outputs int
	for _, task := range parallelTasks {
		var output int
		err := task.Await(&output)
		if err == nil {
			outputs += output
		} else {
			return 0, err
		}
	}
	if err := ctx.CallActivity(ProcessResults, workflow.ActivityInput(outputs)).Await(nil); err != nil {
		return 0, err
	}
	return 0, nil
}
func GetWorkBatch(ctx workflow.ActivityContext) (any, error) {
	var batchSize int
	if err := ctx.GetInput(&batchSize); err != nil {
		return 0, err
	}
	batch := make([]int, batchSize)
	for i := 0; i < batchSize; i++ {
		batch[i] = i
	}
	return batch, nil
}
func ProcessWorkItem(ctx workflow.ActivityContext) (any, error) {
	var workItem int
	if err := ctx.GetInput(&workItem); err != nil {
		return 0, err
	}
	fmt.Printf("Processing work item: %d\n", workItem)
	time.Sleep(time.Second * 5)
	result := workItem * 2
	fmt.Printf("Work item %d processed. Result: %d\n", workItem, result)
	return result, nil
}
func ProcessResults(ctx workflow.ActivityContext) (any, error) {
	var finalResult int
	if err := ctx.GetInput(&finalResult); err != nil {
		return 0, err
	}
	fmt.Printf("Final result: %d\n", finalResult)
	return finalResult, nil
}
The key takeaways from this example are:
Furthermore, the execution of the workflow is durable. If a workflow starts 100 parallel task executions and only 40 complete before the process crashes, the workflow restarts itself automatically and only schedules the remaining 60 tasks.
It’s possible to go further and limit the degree of concurrency using simple, language-specific constructs. The sample code below illustrates how to restrict the degree of fan-out to just 5 concurrent activity executions:
//Revisiting the earlier example...
// Get a list of N work items to process in parallel.
object[] workBatch = await context.CallActivityAsync<object[]>("GetWorkBatch", null);

const int MaxParallelism = 5;
var results = new List<int>();
var inFlightTasks = new HashSet<Task<int>>();
foreach(var workItem in workBatch)
{
  if (inFlightTasks.Count >= MaxParallelism)
  {
    var finishedTask = await Task.WhenAny(inFlightTasks);
    results.Add(finishedTask.Result);
    inFlightTasks.Remove(finishedTask);
  }

  inFlightTasks.Add(context.CallActivityAsync<int>("ProcessWorkItem", workItem));
}
results.AddRange(await Task.WhenAll(inFlightTasks));

var sum = results.Sum(t => t);
await context.CallActivityAsync("PostResults", sum);
With the release of 1.16, it’s even easier to process workflow activities in parallel while putting an upper cap on
concurrency by using the following extension methods on the WorkflowContext:
//Revisiting the earlier example...
// Get a list of work items to process
var workBatch = await context.CallActivityAsync<object[]>("GetWorkBatch", null);

// Process deterministically in parallel with an upper cap of 5 activities at a time
var results = await context.ProcessInParallelAsync(workBatch, workItem => context.CallActivityAsync<int>("ProcessWorkItem", workItem), maxConcurrency: 5);

var sum = results.Sum(t => t);
await context.CallActivityAsync("PostResults", sum);
Limiting the degree of concurrency in this way can be useful for limiting contention against shared resources. For example, if the activities need to call into external resources that have their own concurrency limits, like a databases or external APIs, it can be useful to ensure that no more than a specified number of activities call that resource concurrently.
Asynchronous HTTP APIs are typically implemented using the Asynchronous Request-Reply pattern. Implementing this pattern traditionally involves the following:
The end-to-end flow is illustrated in the following diagram.
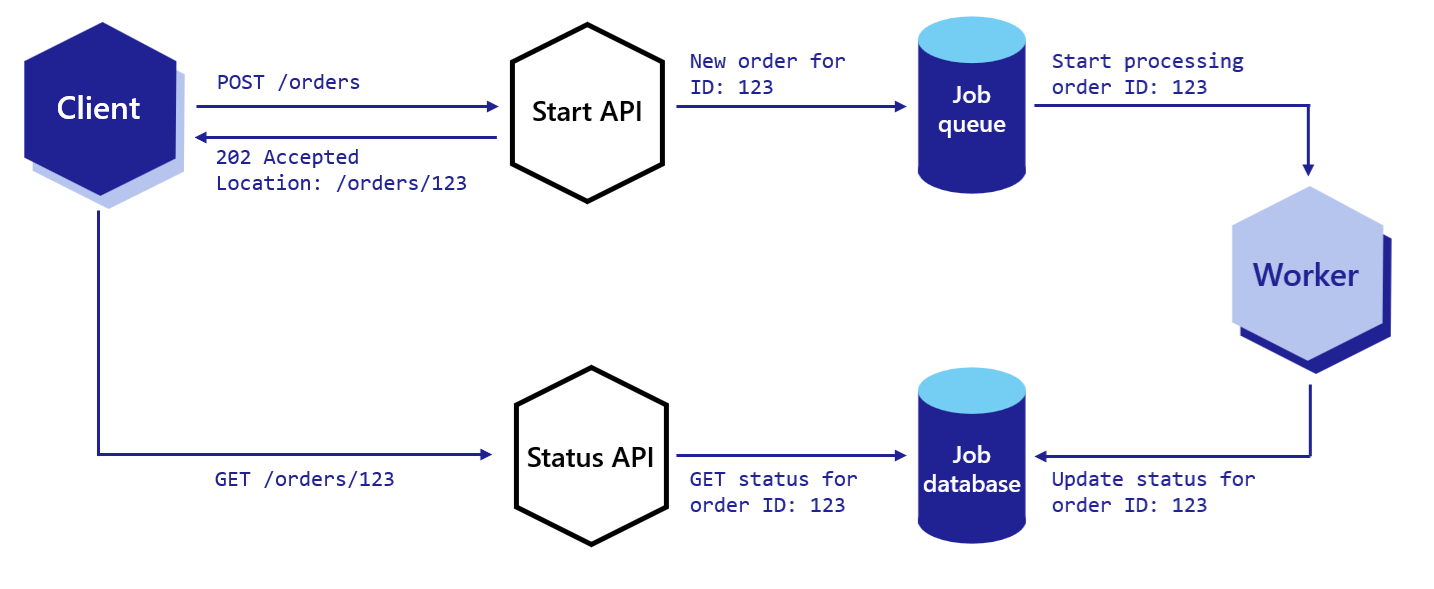
The challenge with implementing the asynchronous request-reply pattern is that it involves the use of multiple APIs and state stores. It also involves implementing the protocol correctly so that the client knows how to automatically poll for status and know when the operation is complete.
The Dapr workflow HTTP API supports the asynchronous request-reply pattern out-of-the box, without requiring you to write any code or do any state management.
The following curl commands illustrate how the workflow APIs support this pattern.
curl -X POST http://localhost:3500/v1.0/workflows/dapr/OrderProcessingWorkflow/start?instanceID=12345678 -d '{"Name":"Paperclips","Quantity":1,"TotalCost":9.95}'
The previous command will result in the following response JSON:
{"instanceID":"12345678"}
The HTTP client can then construct the status query URL using the workflow instance ID and poll it repeatedly until it sees the “COMPLETE”, “FAILURE”, or “TERMINATED” status in the payload.
curl http://localhost:3500/v1.0/workflows/dapr/12345678
The following is an example of what an in-progress workflow status might look like.
{
  "instanceID": "12345678",
  "workflowName": "OrderProcessingWorkflow",
  "createdAt": "2023-05-03T23:22:11.143069826Z",
  "lastUpdatedAt": "2023-05-03T23:22:22.460025267Z",
  "runtimeStatus": "RUNNING",
  "properties": {
    "dapr.workflow.custom_status": "",
    "dapr.workflow.input": "{\"Name\":\"Paperclips\",\"Quantity\":1,\"TotalCost\":9.95}"
  }
}
As you can see from the previous example, the workflow’s runtime status is RUNNING, which lets the client know that it should continue polling.
If the workflow has completed, the status might look as follows.
{
  "instanceID": "12345678",
  "workflowName": "OrderProcessingWorkflow",
  "createdAt": "2023-05-03T23:30:11.381146313Z",
  "lastUpdatedAt": "2023-05-03T23:30:52.923870615Z",
  "runtimeStatus": "COMPLETED",
  "properties": {
    "dapr.workflow.custom_status": "",
    "dapr.workflow.input": "{\"Name\":\"Paperclips\",\"Quantity\":1,\"TotalCost\":9.95}",
    "dapr.workflow.output": "{\"Processed\":true}"
  }
}
As you can see from the previous example, the runtime status of the workflow is now COMPLETED, which means the client can stop polling for updates.
The monitor pattern is recurring process that typically:
The following diagram provides a rough illustration of this pattern.
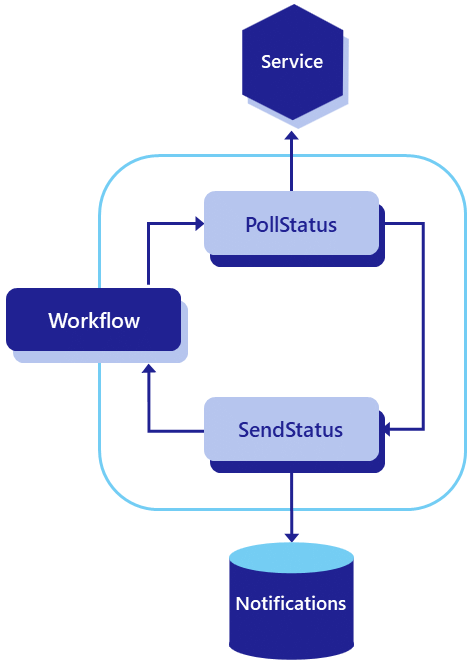
Depending on the business needs, there may be a single monitor or there may be multiple monitors, one for each business entity (for example, a stock). Furthermore, the amount of time to sleep may need to change, depending on the circumstances. These requirements make using cron-based scheduling systems impractical.
Dapr Workflow supports this pattern natively by allowing you to implement eternal workflows. Rather than writing infinite while-loops (which is an anti-pattern), Dapr Workflow exposes a continue-as-new API that workflow authors can use to restart a workflow function from the beginning with a new input.
from dataclasses import dataclass
from datetime import timedelta
import random
import dapr.ext.workflow as wf


@dataclass
class JobStatus:
    job_id: str
    is_healthy: bool


def status_monitor_workflow(ctx: wf.DaprWorkflowContext, job: JobStatus):
    # poll a status endpoint associated with this job
    status = yield ctx.call_activity(check_status, input=job)
    if not ctx.is_replaying:
        print(f"Job '{job.job_id}' is {status}.")

    if status == "healthy":
        job.is_healthy = True
        next_sleep_interval = 60  # check less frequently when healthy
    else:
        if job.is_healthy:
            job.is_healthy = False
            ctx.call_activity(send_alert, input=f"Job '{job.job_id}' is unhealthy!")
        next_sleep_interval = 5  # check more frequently when unhealthy

    yield ctx.create_timer(fire_at=ctx.current_utc_datetime + timedelta(minutes=next_sleep_interval))

    # restart from the beginning with a new JobStatus input
    ctx.continue_as_new(job)


def check_status(ctx, _) -> str:
    return random.choice(["healthy", "unhealthy"])


def send_alert(ctx, message: str):
    print(f'*** Alert: {message}')
const statusMonitorWorkflow: TWorkflow = async function* (ctx: WorkflowContext): any {
    let duration;
    const status = yield ctx.callActivity(checkStatusActivity);
    if (status === "healthy") {
      // Check less frequently when in a healthy state
      // set duration to 1 hour
      duration = 60 * 60;
    } else {
      yield ctx.callActivity(alertActivity, "job unhealthy");
      // Check more frequently when in an unhealthy state
      // set duration to 5 minutes
      duration = 5 * 60;
    }

    // Put the workflow to sleep until the determined time
    ctx.createTimer(duration);

    // Restart from the beginning with the updated state
    ctx.continueAsNew();
  };
public override async Task<object> RunAsync(WorkflowContext context, MyEntityState myEntityState)
{
    TimeSpan nextSleepInterval;

    var status = await context.CallActivityAsync<string>("GetStatus");
    if (status == "healthy")
    {
        myEntityState.IsHealthy = true;

        // Check less frequently when in a healthy state
        nextSleepInterval = TimeSpan.FromMinutes(60);
    }
    else
    {
        if (myEntityState.IsHealthy)
        {
            myEntityState.IsHealthy = false;
            await context.CallActivityAsync("SendAlert", myEntityState);
        }

        // Check more frequently when in an unhealthy state
        nextSleepInterval = TimeSpan.FromMinutes(5);
    }

    // Put the workflow to sleep until the determined time
    await context.CreateTimer(nextSleepInterval);

    // Restart from the beginning with the updated state
    context.ContinueAsNew(myEntityState);
    return null;
}
This example assumes you have a predefined
MyEntityStateclass with a booleanIsHealthyproperty.
public class MonitorWorkflow extends Workflow {

  @Override
  public WorkflowStub create() {
    return ctx -> {

      Duration nextSleepInterval;

      var status = ctx.callActivity(DemoWorkflowStatusActivity.class.getName(), DemoStatusActivityOutput.class).await();
      var isHealthy = status.getIsHealthy();

      if (isHealthy) {
        // Check less frequently when in a healthy state
        nextSleepInterval = Duration.ofMinutes(60);
      } else {

        ctx.callActivity(DemoWorkflowAlertActivity.class.getName()).await();

        // Check more frequently when in an unhealthy state
        nextSleepInterval = Duration.ofMinutes(5);
      }

      // Put the workflow to sleep until the determined time
      try {
        ctx.createTimer(nextSleepInterval);
      } catch (InterruptedException e) {
        throw new RuntimeException(e);
      }

      // Restart from the beginning with the updated state
      ctx.continueAsNew();
    }
  }
}
type JobStatus struct {
	JobID     string `json:"job_id"`
	IsHealthy bool   `json:"is_healthy"`
}
func StatusMonitorWorkflow(ctx *workflow.WorkflowContext) (any, error) {
	var sleepInterval time.Duration
	var job JobStatus
	if err := ctx.GetInput(&job); err != nil {
		return "", err
	}
	var status string
	if err := ctx.CallActivity(CheckStatus, workflow.ActivityInput(job)).Await(&status); err != nil {
		return "", err
	}
	if status == "healthy" {
		job.IsHealthy = true
		sleepInterval = time.Minutes * 60
	} else {
		if job.IsHealthy {
			job.IsHealthy = false
			err := ctx.CallActivity(SendAlert, workflow.ActivityInput(fmt.Sprintf("Job '%s' is unhealthy!", job.JobID))).Await(nil)
			if err != nil {
				return "", err
			}
		}
		sleepInterval = time.Minutes * 5
	}
	if err := ctx.CreateTimer(sleepInterval).Await(nil); err != nil {
		return "", err
	}
	ctx.ContinueAsNew(job, false)
	return "", nil
}
func CheckStatus(ctx workflow.ActivityContext) (any, error) {
	statuses := []string{"healthy", "unhealthy"}
	return statuses[rand.Intn(1)], nil
}
func SendAlert(ctx workflow.ActivityContext) (any, error) {
	var message string
	if err := ctx.GetInput(&message); err != nil {
		return "", err
	}
	fmt.Printf("*** Alert: %s", message)
	return "", nil
}
A workflow implementing the monitor pattern can loop forever or it can terminate itself gracefully by not calling continue-as-new.
In some cases, a workflow may need to pause and wait for an external system to perform some action. For example, a workflow may need to pause and wait for a payment to be received. In this case, a payment system might publish an event to a pub/sub topic on receipt of a payment, and a listener on that topic can raise an event to the workflow using the raise event workflow API.
Another very common scenario is when a workflow needs to pause and wait for a human, for example when approving a purchase order. Dapr Workflow supports this event pattern via the external events feature.
Here’s an example workflow for a purchase order involving a human:
The following diagram illustrates this flow.
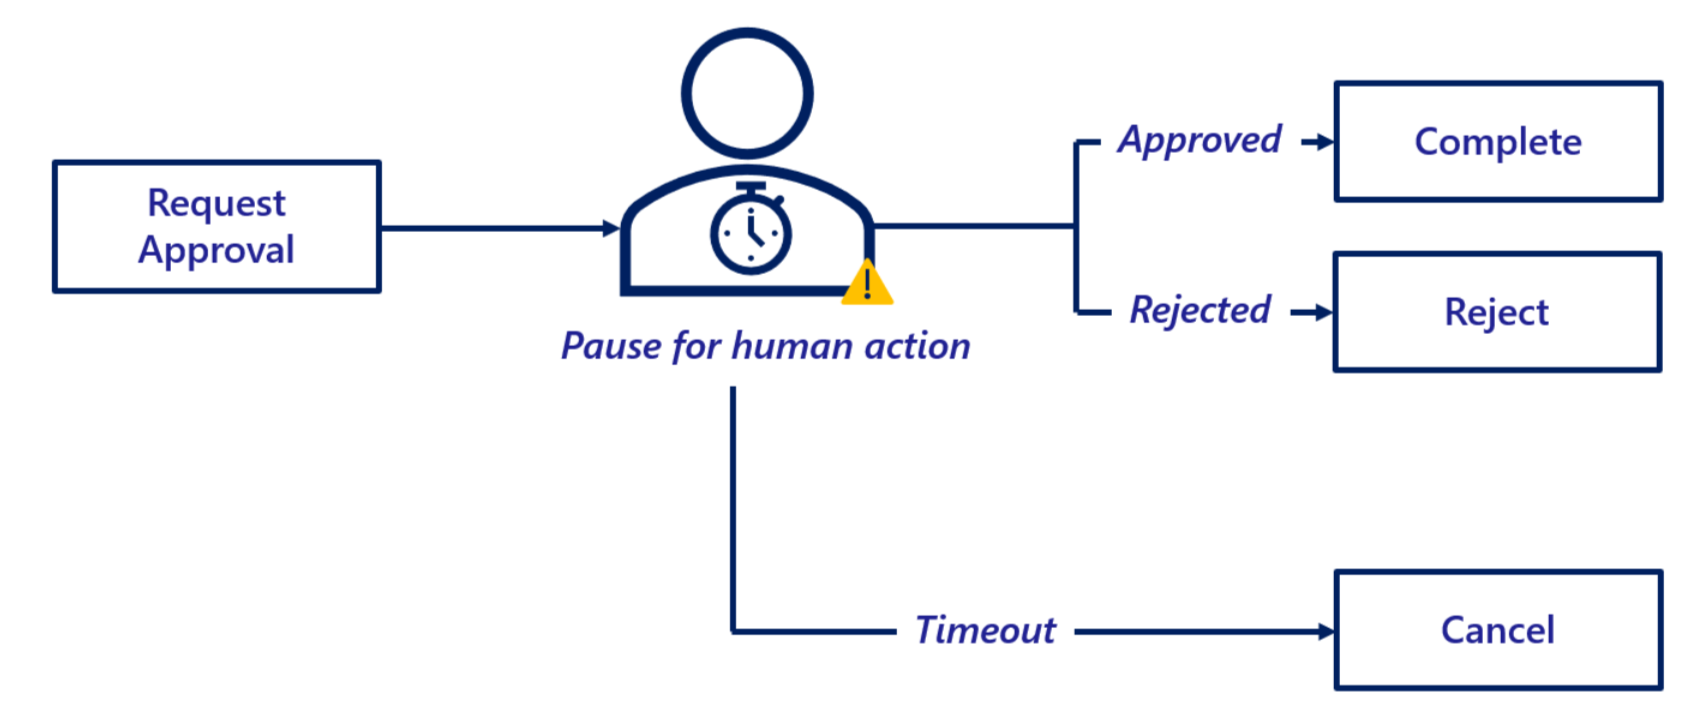
The following example code shows how this pattern can be implemented using Dapr Workflow.
from dataclasses import dataclass
from datetime import timedelta
import dapr.ext.workflow as wf


@dataclass
class Order:
    cost: float
    product: str
    quantity: int

    def __str__(self):
        return f'{self.product} ({self.quantity})'


@dataclass
class Approval:
    approver: str

    @staticmethod
    def from_dict(dict):
        return Approval(**dict)


def purchase_order_workflow(ctx: wf.DaprWorkflowContext, order: Order):
    # Orders under $1000 are auto-approved
    if order.cost < 1000:
        return "Auto-approved"

    # Orders of $1000 or more require manager approval
    yield ctx.call_activity(send_approval_request, input=order)

    # Approvals must be received within 24 hours or they will be canceled.
    approval_event = ctx.wait_for_external_event("approval_received")
    timeout_event = ctx.create_timer(timedelta(hours=24))
    winner = yield wf.when_any([approval_event, timeout_event])
    if winner == timeout_event:
        return "Cancelled"

    # The order was approved
    yield ctx.call_activity(place_order, input=order)
    approval_details = Approval.from_dict(approval_event.get_result())
    return f"Approved by '{approval_details.approver}'"


def send_approval_request(_, order: Order) -> None:
    print(f'*** Sending approval request for order: {order}')


def place_order(_, order: Order) -> None:
    print(f'*** Placing order: {order}')
import {
  Task,
  DaprWorkflowClient,
  WorkflowActivityContext,
  WorkflowContext,
  WorkflowRuntime,
  TWorkflow,
} from "@dapr/dapr";
import * as readlineSync from "readline-sync";

// Wrap the entire code in an immediately-invoked async function
async function start() {
  class Order {
    cost: number;
    product: string;
    quantity: number;
    constructor(cost: number, product: string, quantity: number) {
      this.cost = cost;
      this.product = product;
      this.quantity = quantity;
    }
  }

  function sleep(ms: number): Promise<void> {
    return new Promise((resolve) => setTimeout(resolve, ms));
  }

  // Update the gRPC client and worker to use a local address and port
  const daprHost = "localhost";
  const daprPort = "50001";
  const workflowClient = new DaprWorkflowClient({
    daprHost,
    daprPort,
  });
  const workflowRuntime = new WorkflowRuntime({
    daprHost,
    daprPort,
  });

  // Activity function that sends an approval request to the manager
  const sendApprovalRequest = async (_: WorkflowActivityContext, order: Order) => {
    // Simulate some work that takes an amount of time
    await sleep(3000);
    console.log(`Sending approval request for order: ${order.product}`);
  };

  // Activity function that places an order
  const placeOrder = async (_: WorkflowActivityContext, order: Order) => {
    console.log(`Placing order: ${order.product}`);
  };

  // Orchestrator function that represents a purchase order workflow
  const purchaseOrderWorkflow: TWorkflow = async function* (ctx: WorkflowContext, order: Order): any {
    // Orders under $1000 are auto-approved
    if (order.cost < 1000) {
      return "Auto-approved";
    }

    // Orders of $1000 or more require manager approval
    yield ctx.callActivity(sendApprovalRequest, order);

    // Approvals must be received within 24 hours or they will be cancled.
    const tasks: Task<any>[] = [];
    const approvalEvent = ctx.waitForExternalEvent("approval_received");
    const timeoutEvent = ctx.createTimer(24 * 60 * 60);
    tasks.push(approvalEvent);
    tasks.push(timeoutEvent);
    const winner = ctx.whenAny(tasks);

    if (winner == timeoutEvent) {
      return "Cancelled";
    }

    yield ctx.callActivity(placeOrder, order);
    const approvalDetails = approvalEvent.getResult();
    return `Approved by ${approvalDetails.approver}`;
  };

  workflowRuntime
    .registerWorkflow(purchaseOrderWorkflow)
    .registerActivity(sendApprovalRequest)
    .registerActivity(placeOrder);

  // Wrap the worker startup in a try-catch block to handle any errors during startup
  try {
    await workflowRuntime.start();
    console.log("Worker started successfully");
  } catch (error) {
    console.error("Error starting worker:", error);
  }

  // Schedule a new orchestration
  try {
    const cost = readlineSync.questionInt("Cost of your order:");
    const approver = readlineSync.question("Approver of your order:");
    const timeout = readlineSync.questionInt("Timeout for your order in seconds:");
    const order = new Order(cost, "MyProduct", 1);
    const id = await workflowClient.scheduleNewWorkflow(purchaseOrderWorkflow, order);
    console.log(`Orchestration scheduled with ID: ${id}`);

    // prompt for approval asynchronously
    promptForApproval(approver, workflowClient, id);

    // Wait for orchestration completion
    const state = await workflowClient.waitForWorkflowCompletion(id, undefined, timeout + 2);

    console.log(`Orchestration completed! Result: ${state?.serializedOutput}`);
  } catch (error) {
    console.error("Error scheduling or waiting for orchestration:", error);
  }

  // stop worker and client
  await workflowRuntime.stop();
  await workflowClient.stop();

  // stop the dapr side car
  process.exit(0);
}

async function promptForApproval(approver: string, workflowClient: DaprWorkflowClient, id: string) {
  if (readlineSync.keyInYN("Press [Y] to approve the order... Y/yes, N/no")) {
    const approvalEvent = { approver: approver };
    await workflowClient.raiseEvent(id, "approval_received", approvalEvent);
  } else {
    return "Order rejected";
  }
}

start().catch((e) => {
  console.error(e);
  process.exit(1);
});
public override async Task<OrderResult> RunAsync(WorkflowContext context, OrderPayload order)
{
    // ...(other steps)...

    // Require orders over a certain threshold to be approved
    if (order.TotalCost > OrderApprovalThreshold)
    {
        try
        {
            // Request human approval for this order
            await context.CallActivityAsync(nameof(RequestApprovalActivity), order);

            // Pause and wait for a human to approve the order
            ApprovalResult approvalResult = await context.WaitForExternalEventAsync<ApprovalResult>(
                eventName: "ManagerApproval",
                timeout: TimeSpan.FromDays(3));
            if (approvalResult == ApprovalResult.Rejected)
            {
                // The order was rejected, end the workflow here
                return new OrderResult(Processed: false);
            }
        }
        catch (TaskCanceledException)
        {
            // An approval timeout results in automatic order cancellation
            return new OrderResult(Processed: false);
        }
    }

    // ...(other steps)...

    // End the workflow with a success result
    return new OrderResult(Processed: true);
}
Note In the example above,
RequestApprovalActivityis the name of a workflow activity to invoke andApprovalResultis an enumeration defined by the workflow app. For brevity, these definitions were left out of the example code.
public class ExternalSystemInteractionWorkflow extends Workflow {
    @Override
    public WorkflowStub create() {
        return ctx -> {
            // ...other steps...
            Integer orderCost = ctx.getInput(int.class);
            // Require orders over a certain threshold to be approved
            if (orderCost > ORDER_APPROVAL_THRESHOLD) {
                try {
                    // Request human approval for this order
                    ctx.callActivity("RequestApprovalActivity", orderCost, Void.class).await();
                    // Pause and wait for a human to approve the order
                    boolean approved = ctx.waitForExternalEvent("ManagerApproval", Duration.ofDays(3), boolean.class).await();
                    if (!approved) {
                        // The order was rejected, end the workflow here
                        ctx.complete("Process reject");
                    }
                } catch (TaskCanceledException e) {
                    // An approval timeout results in automatic order cancellation
                    ctx.complete("Process cancel");
                }
            }
            // ...other steps...

            // End the workflow with a success result
            ctx.complete("Process approved");
        };
    }
}
type Order struct {
	Cost     float64 `json:"cost"`
	Product  string  `json:"product"`
	Quantity int     `json:"quantity"`
}
type Approval struct {
	Approver string `json:"approver"`
}
func PurchaseOrderWorkflow(ctx *workflow.WorkflowContext) (any, error) {
	var order Order
	if err := ctx.GetInput(&order); err != nil {
		return "", err
	}
	// Orders under $1000 are auto-approved
	if order.Cost < 1000 {
		return "Auto-approved", nil
	}
	// Orders of $1000 or more require manager approval
	if err := ctx.CallActivity(SendApprovalRequest, workflow.ActivityInput(order)).Await(nil); err != nil {
		return "", err
	}
	// Approvals must be received within 24 hours or they will be cancelled
	var approval Approval
	if err := ctx.WaitForExternalEvent("approval_received", time.Hour*24).Await(&approval); err != nil {
		// Assuming that a timeout has taken place - in any case; an error.
		return "error/cancelled", err
	}
	// The order was approved
	if err := ctx.CallActivity(PlaceOrder, workflow.ActivityInput(order)).Await(nil); err != nil {
		return "", err
	}
	return fmt.Sprintf("Approved by %s", approval.Approver), nil
}
func SendApprovalRequest(ctx workflow.ActivityContext) (any, error) {
	var order Order
	if err := ctx.GetInput(&order); err != nil {
		return "", err
	}
	fmt.Printf("*** Sending approval request for order: %v\n", order)
	return "", nil
}
func PlaceOrder(ctx workflow.ActivityContext) (any, error) {
	var order Order
	if err := ctx.GetInput(&order); err != nil {
		return "", err
	}
	fmt.Printf("*** Placing order: %v", order)
	return "", nil
}
The code that delivers the event to resume the workflow execution is external to the workflow. Workflow events can be delivered to a waiting workflow instance using the raise event workflow management API, as shown in the following example:
from dapr.clients import DaprClient
from dataclasses import asdict

with DaprClient() as d:
    d.raise_workflow_event(
        instance_id=instance_id,
        workflow_component="dapr",
        event_name="approval_received",
        event_data=asdict(Approval("Jane Doe")))
import { DaprClient } from "@dapr/dapr";

  public async raiseEvent(workflowInstanceId: string, eventName: string, eventPayload?: any) {
    this._innerClient.raiseOrchestrationEvent(workflowInstanceId, eventName, eventPayload);
  }
// Raise the workflow event to the waiting workflow
await daprClient.RaiseWorkflowEventAsync(
    instanceId: orderId,
    workflowComponent: "dapr",
    eventName: "ManagerApproval",
    eventData: ApprovalResult.Approved);
System.out.println("**SendExternalMessage: RestartEvent**");
client.raiseEvent(restartingInstanceId, "RestartEvent", "RestartEventPayload");
func raiseEvent() {
  daprClient, err := client.NewClient()
  if err != nil {
    log.Fatalf("failed to initialize the client")
  }
  err = daprClient.RaiseEventWorkflow(context.Background(), &client.RaiseEventWorkflowRequest{
    InstanceID: "instance_id",
    WorkflowComponent: "dapr",
    EventName: "approval_received",
    EventData: Approval{
      Approver: "Jane Doe",
    },
  })
  if err != nil {
    log.Fatalf("failed to raise event on workflow")
  }
  log.Println("raised an event on specified workflow")
}
External events don’t have to be directly triggered by humans. They can also be triggered by other systems. For example, a workflow may need to pause and wait for a payment to be received. In this case, a payment system might publish an event to a pub/sub topic on receipt of a payment, and a listener on that topic can raise an event to the workflow using the raise event workflow API.
Dapr Workflows allow developers to define workflows using ordinary code in a variety of programming languages. The workflow engine runs inside of the Dapr sidecar and orchestrates workflow code deployed as part of your application. Dapr Workflows are built on top of Dapr Actors providing durability and scalability for workflow execution.
This article describes:
For more information on how to author Dapr Workflows in your application, see How to: Author a workflow.
The Dapr Workflow engine is internally powered by Dapr’s actor runtime. The following diagram illustrates the Dapr Workflow architecture in Kubernetes mode:

To use the Dapr Workflow building block, you write workflow code in your application using the Dapr Workflow SDK, which internally connects to the sidecar using a gRPC stream. This registers the workflow and any workflow activities, or tasks that workflows can schedule.
The engine is embedded directly into the sidecar and implemented using the durabletask-go framework library. This framework allows you to swap out different storage providers, including a storage provider created for Dapr that leverages internal actors behind the scenes. Since Dapr Workflows use actors, you can store workflow state in state stores.
When a workflow application starts up, it uses a workflow authoring SDK to send a gRPC request to the Dapr sidecar and get back a stream of workflow work items, following the server streaming RPC pattern. These work items can be anything from “start a new X workflow” (where X is the type of a workflow) to “schedule activity Y with input Z to run on behalf of workflow X”.
The workflow app executes the appropriate workflow code and then sends a gRPC request back to the sidecar with the execution results.
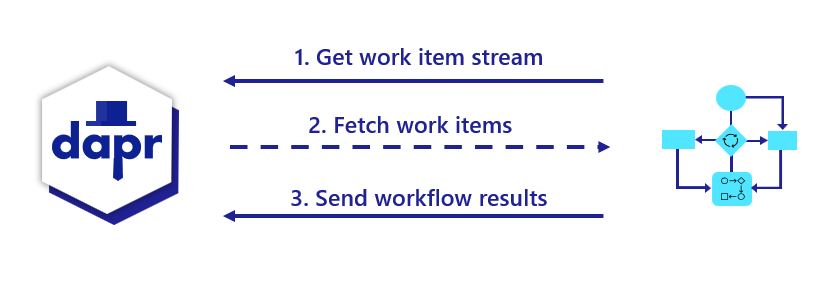
All interactions happen over a single gRPC channel and are initiated by the application, which means the application doesn’t need to open any inbound ports. The details of these interactions are internally handled by the language-specific Dapr Workflow authoring SDK.
If you’re familiar with Dapr actors, you may notice a few differences in terms of how sidecar interactions works for workflows compared to actors.
| Actors | Workflows |
|---|---|
| Actors can interact with the sidecar using either HTTP or gRPC. | Workflows only use gRPC. Due to the workflow gRPC protocol’s complexity, an SDK is required when implementing workflows. |
| Actor operations are pushed to application code from the sidecar. This requires the application to listen on a particular app port. | For workflows, operations are pulled from the sidecar by the application using a streaming protocol. The application doesn’t need to listen on any ports to run workflows. |
| Actors explicitly register themselves with the sidecar. | Workflows do not register themselves with the sidecar. The embedded engine doesn’t keep track of workflow types. This responsibility is instead delegated to the workflow application and its SDK. |
The durabletask-go core used by the workflow engine writes distributed traces using Open Telemetry SDKs. These traces are captured automatically by the Dapr sidecar and exported to the configured Open Telemetry provider, such as Zipkin.
Each workflow instance managed by the engine is represented as one or more spans. There is a single parent span representing the full workflow execution and child spans for the various tasks, including spans for activity task execution and durable timers.
Workflow activity code currently does not have access to the trace context.
There are two types of actors that are internally registered within the Dapr sidecar in support of the workflow engine:
dapr.internal.{namespace}.{appID}.workflowdapr.internal.{namespace}.{appID}.activityThe {namespace} value is the Dapr namespace and defaults to default if no namespace is configured. The {appID} value is the app’s ID. For example, if you have a workflow app named “wfapp”, then the type of the workflow actor would be dapr.internal.default.wfapp.workflow and the type of the activity actor would be dapr.internal.default.wfapp.activity.
The following diagram demonstrates how internal workflow actors operate in a Kubernetes scenario:
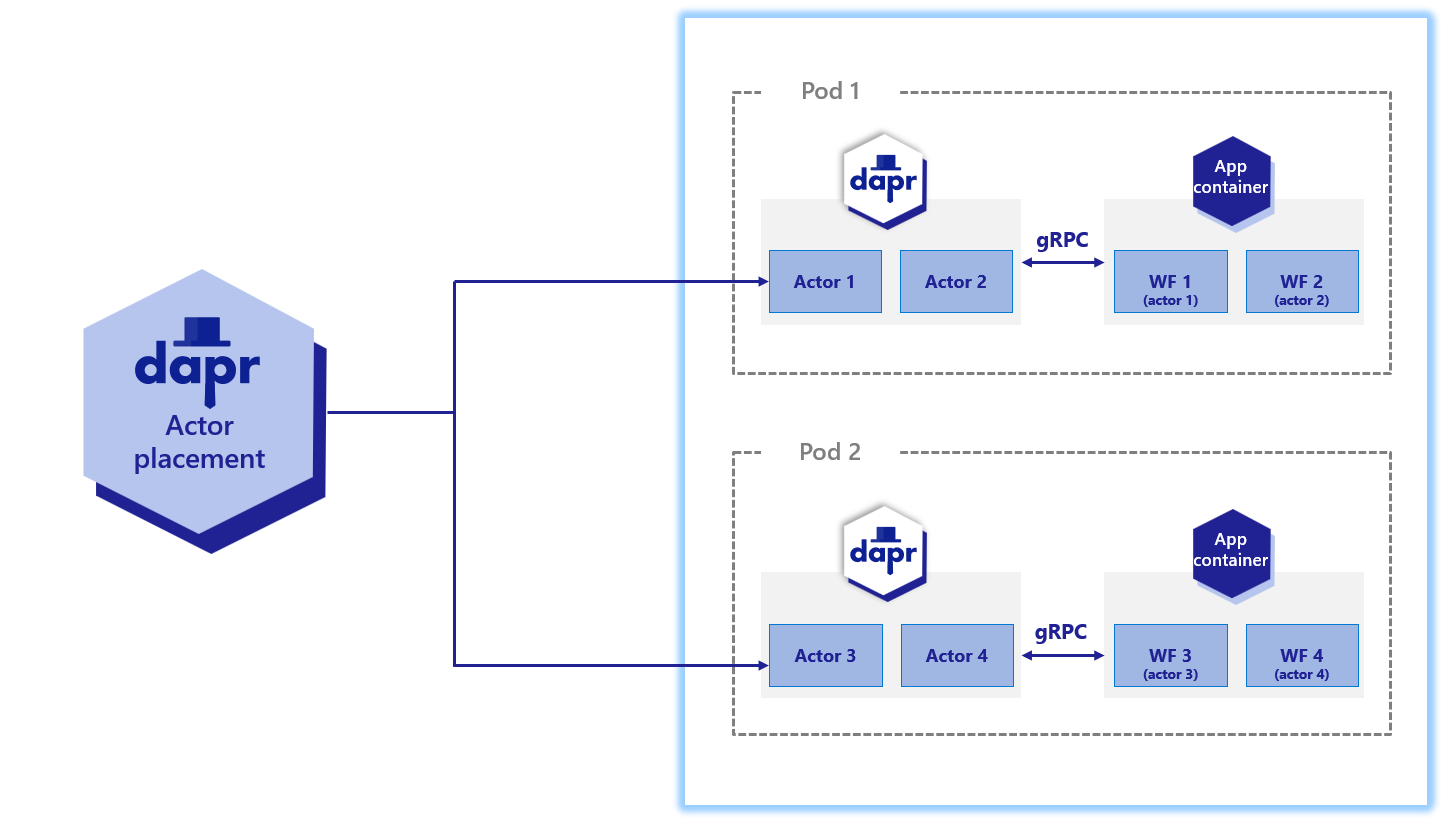
Just like user-defined actors, internal workflow actors are distributed across the cluster by the actor placement service. They also maintain their own state and make use of reminders. However, unlike actors that live in application code, these internal actors are embedded into the Dapr sidecar. Application code is completely unaware that these actors exist.
There are 2 different types of actors used with workflows: workflow actors and activity actors. Workflow actors are responsible for managing the state and placement of all workflows running in the app. A new instance of the workflow actor is activated for every workflow instance that gets created. The ID of the workflow actor is the ID of the workflow. This internal actor stores the state of the workflow as it progresses and determines the node on which the workflow code executes via the actor placement service.
Each workflow actor saves its state using the following keys in the configured state store:
| Key | Description |
|---|---|
inbox-NNNNNN |
A workflow’s inbox is effectively a FIFO queue of messages that drive a workflow’s execution. Example messages include workflow creation messages, activity task completion messages, etc. Each message is stored in its own key in the state store with the name inbox-NNNNNN where NNNNNN is a 6-digit number indicating the ordering of the messages. These state keys are removed once the corresponding messages are consumed by the workflow. |
history-NNNNNN |
A workflow’s history is an ordered list of events that represent a workflow’s execution history. Each key in the history holds the data for a single history event. Like an append-only log, workflow history events are only added and never removed (except when a workflow performs a “continue as new” operation, which purges all history and restarts a workflow with a new input). |
customStatus |
Contains a user-defined workflow status value. There is exactly one customStatus key for each workflow actor instance. |
metadata |
Contains meta information about the workflow as a JSON blob and includes details such as the length of the inbox, the length of the history, and a 64-bit integer representing the workflow generation (for cases where the instance ID gets reused). The length information is used to determine which keys need to be read or written to when loading or saving workflow state updates. |
The following diagram illustrates the typical lifecycle of a workflow actor.
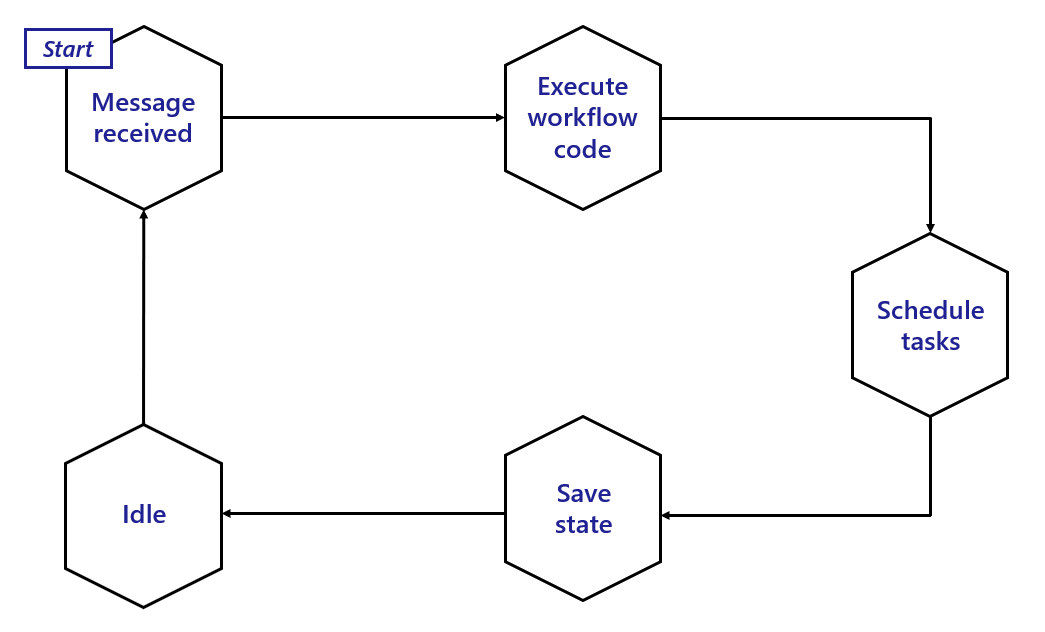
To summarize:
Activity actors are responsible for managing the state and placement of all workflow activity invocations. A new instance of the activity actor is activated for every activity task that gets scheduled by a workflow. The ID of the activity actor is the ID of the workflow combined with a sequence number (sequence numbers start with 0). For example, if a workflow has an ID of 876bf371 and is the third activity to be scheduled by the workflow, it’s ID will be 876bf371::2 where 2 is the sequence number.
Each activity actor stores a single key into the state store:
| Key | Description |
|---|---|
activityState |
The key contains the activity invocation payload, which includes the serialized activity input data. This key is deleted automatically after the activity invocation has completed. |
The following diagram illustrates the typical lifecycle of an activity actor.
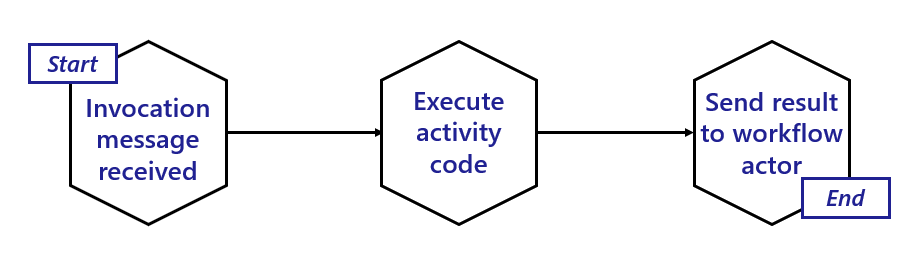
Activity actors are short-lived:
The Dapr Workflow ensures workflow fault-tolerance by using actor reminders to recover from transient system failures. Prior to invoking application workflow code, the workflow or activity actor will create a new reminder. If the application code executes without interruption, the reminder is deleted. However, if the node or the sidecar hosting the associated workflow or activity crashes, the reminder will reactivate the corresponding actor and the execution will be retried.
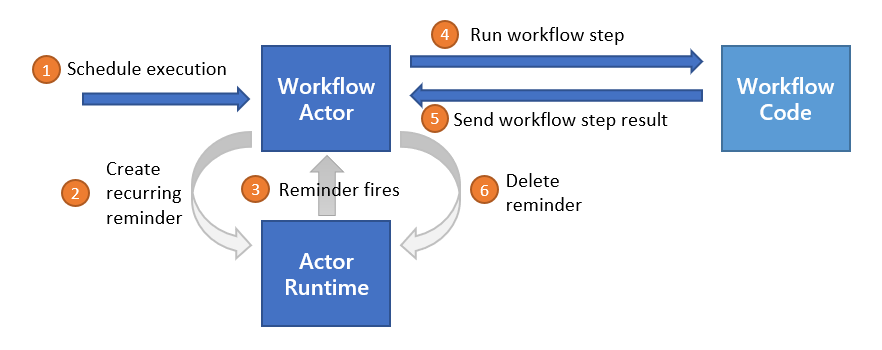
Dapr Workflows use actors internally to drive the execution of workflows. Like any actors, these internal workflow actors store their state in the configured state store. Any state store that supports actors implicitly supports Dapr Workflow.
As discussed in the workflow actors section, workflows save their state incrementally by appending to a history log. The history log for a workflow is distributed across multiple state store keys so that each “checkpoint” only needs to append the newest entries.
The size of each checkpoint is determined by the number of concurrent actions scheduled by the workflow before it goes into an idle state. Sequential workflows will therefore make smaller batch updates to the state store, while fan-out/fan-in workflows will require larger batches. The size of the batch is also impacted by the size of inputs and outputs when workflows invoke activities or child workflows.
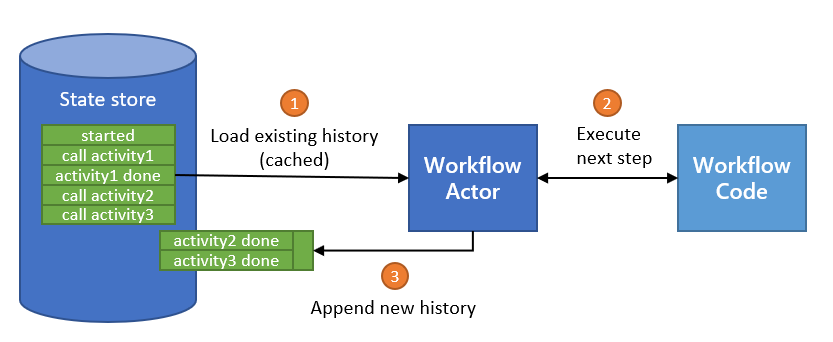
Different state store implementations may implicitly put restrictions on the types of workflows you can author. For example, the Azure Cosmos DB state store limits item sizes to 2 MB of UTF-8 encoded JSON (source). The input or output payload of an activity or child workflow is stored as a single record in the state store, so a item limit of 2 MB means that workflow and activity inputs and outputs can’t exceed 2 MB of JSON-serialized data.
Similarly, if a state store imposes restrictions on the size of a batch transaction, that may limit the number of parallel actions that can be scheduled by a workflow.
Workflow state can be purged from a state store, including all its history. Each Dapr SDK exposes APIs for purging all metadata related to specific workflow instances.
Because Dapr Workflows are internally implemented using actors, Dapr Workflows have the same scalability characteristics as actors. The placement service:
The expected scalability of a workflow is determined by the following factors:
The implementation details of the workflow code in the target application also plays a role in the scalability of individual workflow instances. Each workflow instance executes on a single node at a time, but a workflow can schedule activities and child workflows which run on other nodes.
Workflows can also schedule these activities and child workflows to run in parallel, allowing a single workflow to potentially distribute compute tasks across all available nodes in the cluster.
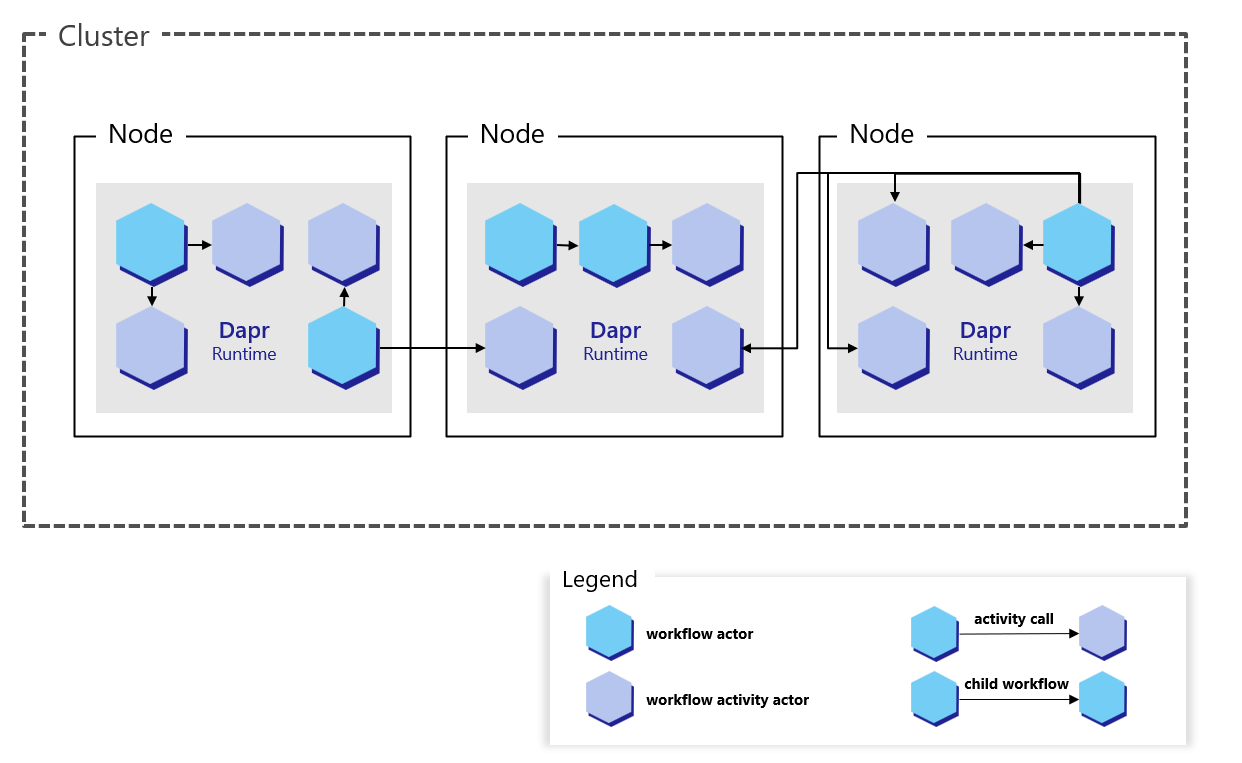
Currently, there are no global limits imposed on workflow and activity concurrency. A runaway workflow could therefore potentially consume all resources in a cluster if it attempts to schedule too many tasks in parallel. Use care when authoring Dapr Workflows that schedule large batches of work in parallel.
Also, the Dapr Workflow engine requires that all instances of each workflow app register the exact same set of workflows and activities. In other words, it’s not possible to scale certain workflows or activities independently. All workflows and activities within an app must be scaled together.
Workflows don’t control the specifics of how load is distributed across the cluster. For example, if a workflow schedules 10 activity tasks to run in parallel, all 10 tasks may run on as many as 10 different compute nodes or as few as a single compute node. The actual scale behavior is determined by the actor placement service, which manages the distribution of the actors that represent each of the workflow’s tasks.
The workflow backend is responsible for orchestrating and preserving the state of workflows. At any given time, only one backend can be supported. You can configure the workflow backend as a component, similar to any other component in Dapr. Configuration requires:
For instance, the following sample demonstrates how to define a actor backend component. Dapr workflow currently supports only the actor backend by default, and users are not required to define an actor backend component to use it.
apiVersion: dapr.io/v1alpha1
kind: Component
metadata:
  name: actorbackend
spec:
  type: workflowbackend.actor
  version: v1
In order to provide guarantees around durability and resiliency, Dapr Workflows frequently write to the state store and rely on reminders to drive execution. Dapr Workflows therefore may not be appropriate for latency-sensitive workloads. Expected sources of high latency include:
See the Reminder usage and execution guarantees section for more details on how the design of workflow actors may impact execution latency.
This article provides a high-level overview of how to author workflows that are executed by the Dapr Workflow engine.
Dapr Workflow logic is implemented using general purpose programming languages, allowing you to:
The Dapr sidecar doesn’t load any workflow definitions. Rather, the sidecar simply drives the execution of the workflows, leaving all the workflow activities to be part of the application.
Workflow activities are the basic unit of work in a workflow and are the tasks that get orchestrated in the business process.
Define the workflow activities you’d like your workflow to perform. Activities are a function definition and can take inputs and outputs. The following example creates a counter (activity) called hello_act that notifies users of the current counter value. hello_act is a function derived from a class called WorkflowActivityContext.
@wfr.activity(name='hello_act')
def hello_act(ctx: WorkflowActivityContext, wf_input):
    global counter
    counter += wf_input
    print(f'New counter value is: {counter}!', flush=True)
Define the workflow activities you’d like your workflow to perform. Activities are wrapped in the WorkflowActivityContext class, which implements the workflow activities.
export default class WorkflowActivityContext {
  private readonly _innerContext: ActivityContext;
  constructor(innerContext: ActivityContext) {
    if (!innerContext) {
      throw new Error("ActivityContext cannot be undefined");
    }
    this._innerContext = innerContext;
  }

  public getWorkflowInstanceId(): string {
    return this._innerContext.orchestrationId;
  }

  public getWorkflowActivityId(): number {
    return this._innerContext.taskId;
  }
}
Define the workflow activities you’d like your workflow to perform. Activities are a class definition and can take inputs and outputs. Activities also participate in dependency injection, like binding to a Dapr client.
The activities called in the example below are:
NotifyActivity: Receive notification of a new order.ReserveInventoryActivity: Check for sufficient inventory to meet the new order.ProcessPaymentActivity: Process payment for the order. Includes NotifyActivity to send notification of successful order.public class NotifyActivity : WorkflowActivity<Notification, object>
{
//...
public NotifyActivity(ILoggerFactory loggerFactory)
{
this.logger = loggerFactory.CreateLogger<NotifyActivity>();
}
//...
}
See the full NotifyActivity.cs workflow activity example.
public class ReserveInventoryActivity : WorkflowActivity<InventoryRequest, InventoryResult>
{
    //...

    public ReserveInventoryActivity(ILoggerFactory loggerFactory, DaprClient client)
    {
        this.logger = loggerFactory.CreateLogger<ReserveInventoryActivity>();
        this.client = client;
    }

    //...

}
See the full ReserveInventoryActivity.cs workflow activity example.
public class ProcessPaymentActivity : WorkflowActivity<PaymentRequest, object>
{
    //...
    public ProcessPaymentActivity(ILoggerFactory loggerFactory)
    {
        this.logger = loggerFactory.CreateLogger<ProcessPaymentActivity>();
    }

    //...

}
See the full ProcessPaymentActivity.cs workflow activity example.
Define the workflow activities you’d like your workflow to perform. Activities are wrapped in the public DemoWorkflowActivity class, which implements the workflow activities.
@JsonAutoDetect(fieldVisibility = JsonAutoDetect.Visibility.ANY)
public class DemoWorkflowActivity implements WorkflowActivity {

  @Override
  public DemoActivityOutput run(WorkflowActivityContext ctx) {
    Logger logger = LoggerFactory.getLogger(DemoWorkflowActivity.class);
    logger.info("Starting Activity: " + ctx.getName());

    var message = ctx.getInput(DemoActivityInput.class).getMessage();
    var newMessage = message + " World!, from Activity";
    logger.info("Message Received from input: " + message);
    logger.info("Sending message to output: " + newMessage);

    logger.info("Sleeping for 5 seconds to simulate long running operation...");

    try {
      TimeUnit.SECONDS.sleep(5);
    } catch (InterruptedException e) {
      throw new RuntimeException(e);
    }


    logger.info("Activity finished");

    var output = new DemoActivityOutput(message, newMessage);
    logger.info("Activity returned: " + output);

    return output;
  }
}
Define each workflow activity you’d like your workflow to perform. The Activity input can be unmarshalled from the context with ctx.GetInput. Activities should be defined as taking a ctx workflow.ActivityContext parameter and returning an interface and error.
func TestActivity(ctx workflow.ActivityContext) (any, error) {
	var input int
	if err := ctx.GetInput(&input); err != nil {
		return "", err
	}

	// Do something here
	return "result", nil
}
Next, register and call the activites in a workflow.
The hello_world_wf function is a function derived from a class called DaprWorkflowContext with input and output parameter types. It also includes a yield statement that does the heavy lifting of the workflow and calls the workflow activities.
@wfr.workflow(name='hello_world_wf')
def hello_world_wf(ctx: DaprWorkflowContext, wf_input):
    print(f'{wf_input}')
    yield ctx.call_activity(hello_act, input=1)
    yield ctx.call_activity(hello_act, input=10)
    yield ctx.call_activity(hello_retryable_act, retry_policy=retry_policy)
    yield ctx.call_child_workflow(child_retryable_wf, retry_policy=retry_policy)

    # Change in event handling: Use when_any to handle both event and timeout
    event = ctx.wait_for_external_event(event_name)
    timeout = ctx.create_timer(timedelta(seconds=30))
    winner = yield when_any([event, timeout])

    if winner == timeout:
        print('Workflow timed out waiting for event')
        return 'Timeout'

    yield ctx.call_activity(hello_act, input=100)
    yield ctx.call_activity(hello_act, input=1000)
    return 'Completed'
Next, register the workflow with the WorkflowRuntime class and start the workflow runtime.
export default class WorkflowRuntime {

  //..
  // Register workflow implementation for handling orchestrations
  public registerWorkflow(workflow: TWorkflow): WorkflowRuntime {
    const name = getFunctionName(workflow);
    const workflowWrapper = (ctx: OrchestrationContext, input: any): any => {
      const workflowContext = new WorkflowContext(ctx);
      return workflow(workflowContext, input);
    };
    this.worker.addNamedOrchestrator(name, workflowWrapper);
    return this;
  }

  // Register workflow activities
  public registerActivity(fn: TWorkflowActivity<TInput, TOutput>): WorkflowRuntime {
    const name = getFunctionName(fn);
    const activityWrapper = (ctx: ActivityContext, intput: TInput): TOutput => {
      const wfActivityContext = new WorkflowActivityContext(ctx);
      return fn(wfActivityContext, intput);
    };
    this.worker.addNamedActivity(name, activityWrapper);
    return this;
  }

  // Start the workflow runtime processing items and block.
  public async start() {
    await this.worker.start();
  }

}
The OrderProcessingWorkflow class is derived from a base class called Workflow with input and output parameter types. It also includes a RunAsync method that does the heavy lifting of the workflow and calls the workflow activities.
 class OrderProcessingWorkflow : Workflow<OrderPayload, OrderResult>
    {
        public override async Task<OrderResult> RunAsync(WorkflowContext context, OrderPayload order)
        {
            //...

            await context.CallActivityAsync(
                nameof(NotifyActivity),
                new Notification($"Received order {orderId} for {order.Name} at {order.TotalCost:c}"));

            //...

            InventoryResult result = await context.CallActivityAsync<InventoryResult>(
                nameof(ReserveInventoryActivity),
                new InventoryRequest(RequestId: orderId, order.Name, order.Quantity));
            //...

            await context.CallActivityAsync(
                nameof(ProcessPaymentActivity),
                new PaymentRequest(RequestId: orderId, order.TotalCost, "USD"));

            await context.CallActivityAsync(
                nameof(NotifyActivity),
                new Notification($"Order {orderId} processed successfully!"));

            // End the workflow with a success result
            return new OrderResult(Processed: true);
        }
    }
See the full workflow example in OrderProcessingWorkflow.cs.
Next, register the workflow with the WorkflowRuntimeBuilder and start the workflow runtime.
public class DemoWorkflowWorker {

  public static void main(String[] args) throws Exception {

    // Register the Workflow with the builder.
    WorkflowRuntimeBuilder builder = new WorkflowRuntimeBuilder().registerWorkflow(DemoWorkflow.class);
    builder.registerActivity(DemoWorkflowActivity.class);

    // Build and then start the workflow runtime pulling and executing tasks
    try (WorkflowRuntime runtime = builder.build()) {
      System.out.println("Start workflow runtime");
      runtime.start();
    }

    System.exit(0);
  }
}
Define your workflow function with the parameter ctx *workflow.WorkflowContext and return any and error. Invoke your defined activities from within your workflow.
func TestWorkflow(ctx *workflow.WorkflowContext) (any, error) {
	var input int
	if err := ctx.GetInput(&input); err != nil {
		return nil, err
	}
	var output string
	if err := ctx.CallActivity(TestActivity, workflow.ActivityInput(input)).Await(&output); err != nil {
		return nil, err
	}
	if err := ctx.WaitForExternalEvent("testEvent", time.Second*60).Await(&output); err != nil {
		return nil, err
	}

	if err := ctx.CreateTimer(time.Second).Await(nil); err != nil {
		return nil, nil
	}
	return output, nil
}
Finally, compose the application using the workflow.
In the following example, for a basic Python hello world application using the Python SDK, your project code would include:
DaprClient to receive the Python SDK capabilities.WorkflowRuntime: Allows you to register the workflow runtime.DaprWorkflowContext: Allows you to create workflowsWorkflowActivityContext: Allows you to create workflow activitiesfrom datetime import timedelta
from time import sleep
from dapr.ext.workflow import (
WorkflowRuntime,
DaprWorkflowContext,
WorkflowActivityContext,
RetryPolicy,
DaprWorkflowClient,
when_any,
)
from dapr.conf import Settings
from dapr.clients.exceptions import DaprInternalError
settings = Settings()
counter = 0
retry_count = 0
child_orchestrator_count = 0
child_orchestrator_string = ''
child_act_retry_count = 0
instance_id = 'exampleInstanceID'
child_instance_id = 'childInstanceID'
workflow_name = 'hello_world_wf'
child_workflow_name = 'child_wf'
input_data = 'Hi Counter!'
event_name = 'event1'
event_data = 'eventData'
non_existent_id_error = 'no such instance exists'
retry_policy = RetryPolicy(
first_retry_interval=timedelta(seconds=1),
max_number_of_attempts=3,
backoff_coefficient=2,
max_retry_interval=timedelta(seconds=10),
retry_timeout=timedelta(seconds=100),
)
wfr = WorkflowRuntime()
@wfr.workflow(name='hello_world_wf')
def hello_world_wf(ctx: DaprWorkflowContext, wf_input):
print(f'{wf_input}')
yield ctx.call_activity(hello_act, input=1)
yield ctx.call_activity(hello_act, input=10)
yield ctx.call_activity(hello_retryable_act, retry_policy=retry_policy)
yield ctx.call_child_workflow(child_retryable_wf, retry_policy=retry_policy)
# Change in event handling: Use when_any to handle both event and timeout
event = ctx.wait_for_external_event(event_name)
timeout = ctx.create_timer(timedelta(seconds=30))
winner = yield when_any([event, timeout])
if winner == timeout:
print('Workflow timed out waiting for event')
return 'Timeout'
yield ctx.call_activity(hello_act, input=100)
yield ctx.call_activity(hello_act, input=1000)
return 'Completed'
@wfr.activity(name='hello_act')
def hello_act(ctx: WorkflowActivityContext, wf_input):
global counter
counter += wf_input
print(f'New counter value is: {counter}!', flush=True)
@wfr.activity(name='hello_retryable_act')
def hello_retryable_act(ctx: WorkflowActivityContext):
global retry_count
if (retry_count % 2) == 0:
print(f'Retry count value is: {retry_count}!', flush=True)
retry_count += 1
raise ValueError('Retryable Error')
print(f'Retry count value is: {retry_count}! This print statement verifies retry', flush=True)
retry_count += 1
@wfr.workflow(name='child_retryable_wf')
def child_retryable_wf(ctx: DaprWorkflowContext):
global child_orchestrator_string, child_orchestrator_count
if not ctx.is_replaying:
child_orchestrator_count += 1
print(f'Appending {child_orchestrator_count} to child_orchestrator_string!', flush=True)
child_orchestrator_string += str(child_orchestrator_count)
yield ctx.call_activity(
act_for_child_wf, input=child_orchestrator_count, retry_policy=retry_policy
)
if child_orchestrator_count < 3:
raise ValueError('Retryable Error')
@wfr.activity(name='act_for_child_wf')
def act_for_child_wf(ctx: WorkflowActivityContext, inp):
global child_orchestrator_string, child_act_retry_count
inp_char = chr(96 + inp)
print(f'Appending {inp_char} to child_orchestrator_string!', flush=True)
child_orchestrator_string += inp_char
if child_act_retry_count % 2 == 0:
child_act_retry_count += 1
raise ValueError('Retryable Error')
child_act_retry_count += 1
def main():
wfr.start()
wf_client = DaprWorkflowClient()
print('==========Start Counter Increase as per Input:==========')
wf_client.schedule_new_workflow(
workflow=hello_world_wf, input=input_data, instance_id=instance_id
)
wf_client.wait_for_workflow_start(instance_id)
# Sleep to let the workflow run initial activities
sleep(12)
assert counter == 11
assert retry_count == 2
assert child_orchestrator_string == '1aa2bb3cc'
# Pause Test
wf_client.pause_workflow(instance_id=instance_id)
metadata = wf_client.get_workflow_state(instance_id=instance_id)
print(f'Get response from {workflow_name} after pause call: {metadata.runtime_status.name}')
# Resume Test
wf_client.resume_workflow(instance_id=instance_id)
metadata = wf_client.get_workflow_state(instance_id=instance_id)
print(f'Get response from {workflow_name} after resume call: {metadata.runtime_status.name}')
sleep(2) # Give the workflow time to reach the event wait state
wf_client.raise_workflow_event(instance_id=instance_id, event_name=event_name, data=event_data)
print('========= Waiting for Workflow completion', flush=True)
try:
state = wf_client.wait_for_workflow_completion(instance_id, timeout_in_seconds=30)
if state.runtime_status.name == 'COMPLETED':
print('Workflow completed! Result: {}'.format(state.serialized_output.strip('"')))
else:
print(f'Workflow failed! Status: {state.runtime_status.name}')
except TimeoutError:
print('*** Workflow timed out!')
wf_client.purge_workflow(instance_id=instance_id)
try:
wf_client.get_workflow_state(instance_id=instance_id)
except DaprInternalError as err:
if non_existent_id_error in err._message:
print('Instance Successfully Purged')
wfr.shutdown()
if __name__ == '__main__':
main()
The following example is a basic JavaScript application using the JavaScript SDK. As in this example, your project code would include:
WorkflowRuntime: Allows you to register workflows and workflow activitiesDaprWorkflowContext: Allows you to create workflowsWorkflowActivityContext: Allows you to create workflow activitiesimport { TaskHubGrpcClient } from "@microsoft/durabletask-js";
import { WorkflowState } from "./WorkflowState";
import { generateApiTokenClientInterceptors, generateEndpoint, getDaprApiToken } from "../internal/index";
import { TWorkflow } from "../../types/workflow/Workflow.type";
import { getFunctionName } from "../internal";
import { WorkflowClientOptions } from "../../types/workflow/WorkflowClientOption";
/** DaprWorkflowClient class defines client operations for managing workflow instances. */
export default class DaprWorkflowClient {
private readonly _innerClient: TaskHubGrpcClient;
/** Initialize a new instance of the DaprWorkflowClient.
*/
constructor(options: Partial<WorkflowClientOptions> = {}) {
const grpcEndpoint = generateEndpoint(options);
options.daprApiToken = getDaprApiToken(options);
this._innerClient = this.buildInnerClient(grpcEndpoint.endpoint, options);
}
private buildInnerClient(hostAddress: string, options: Partial<WorkflowClientOptions>): TaskHubGrpcClient {
let innerOptions = options?.grpcOptions;
if (options.daprApiToken !== undefined && options.daprApiToken !== "") {
innerOptions = {
...innerOptions,
interceptors: [generateApiTokenClientInterceptors(options), ...(innerOptions?.interceptors ?? [])],
};
}
return new TaskHubGrpcClient(hostAddress, innerOptions);
}
/**
* Schedule a new workflow using the DurableTask client.
*/
public async scheduleNewWorkflow(
workflow: TWorkflow | string,
input?: any,
instanceId?: string,
startAt?: Date,
): Promise<string> {
if (typeof workflow === "string") {
return await this._innerClient.scheduleNewOrchestration(workflow, input, instanceId, startAt);
}
return await this._innerClient.scheduleNewOrchestration(getFunctionName(workflow), input, instanceId, startAt);
}
/**
* Terminate the workflow associated with the provided instance id.
*
* @param {string} workflowInstanceId - Workflow instance id to terminate.
* @param {any} output - The optional output to set for the terminated workflow instance.
*/
public async terminateWorkflow(workflowInstanceId: string, output: any) {
await this._innerClient.terminateOrchestration(workflowInstanceId, output);
}
/**
* Fetch workflow instance metadata from the configured durable store.
*/
public async getWorkflowState(
workflowInstanceId: string,
getInputsAndOutputs: boolean,
): Promise<WorkflowState | undefined> {
const state = await this._innerClient.getOrchestrationState(workflowInstanceId, getInputsAndOutputs);
if (state !== undefined) {
return new WorkflowState(state);
}
}
/**
* Waits for a workflow to start running
*/
public async waitForWorkflowStart(
workflowInstanceId: string,
fetchPayloads = true,
timeoutInSeconds = 60,
): Promise<WorkflowState | undefined> {
const state = await this._innerClient.waitForOrchestrationStart(
workflowInstanceId,
fetchPayloads,
timeoutInSeconds,
);
if (state !== undefined) {
return new WorkflowState(state);
}
}
/**
* Waits for a workflow to complete running
*/
public async waitForWorkflowCompletion(
workflowInstanceId: string,
fetchPayloads = true,
timeoutInSeconds = 60,
): Promise<WorkflowState | undefined> {
const state = await this._innerClient.waitForOrchestrationCompletion(
workflowInstanceId,
fetchPayloads,
timeoutInSeconds,
);
if (state != undefined) {
return new WorkflowState(state);
}
}
/**
* Sends an event notification message to an awaiting workflow instance
*/
public async raiseEvent(workflowInstanceId: string, eventName: string, eventPayload?: any) {
this._innerClient.raiseOrchestrationEvent(workflowInstanceId, eventName, eventPayload);
}
/**
* Purges the workflow instance state from the workflow state store.
*/
public async purgeWorkflow(workflowInstanceId: string): Promise<boolean> {
const purgeResult = await this._innerClient.purgeOrchestration(workflowInstanceId);
if (purgeResult !== undefined) {
return purgeResult.deletedInstanceCount > 0;
}
return false;
}
/**
* Closes the inner DurableTask client and shutdown the GRPC channel.
*/
public async stop() {
await this._innerClient.stop();
}
}
In the following Program.cs example, for a basic ASP.NET order processing application using the .NET SDK, your project code would include:
Dapr.Workflow to receive the .NET SDK capabilitiesAddDaprWorkflow
using Dapr.Workflow;
//...

// Dapr Workflows are registered as part of the service configuration
builder.Services.AddDaprWorkflow(options =>
{
    // Note that it's also possible to register a lambda function as the workflow
    // or activity implementation instead of a class.
    options.RegisterWorkflow<OrderProcessingWorkflow>();

    // These are the activities that get invoked by the workflow(s).
    options.RegisterActivity<NotifyActivity>();
    options.RegisterActivity<ReserveInventoryActivity>();
    options.RegisterActivity<ProcessPaymentActivity>();
});

WebApplication app = builder.Build();

// POST starts new order workflow instance
app.MapPost("/orders", async (DaprWorkflowClient client, [FromBody] OrderPayload orderInfo) =>
{
    if (orderInfo?.Name == null)
    {
        return Results.BadRequest(new
        {
            message = "Order data was missing from the request",
            example = new OrderPayload("Paperclips", 99.95),
        });
    }

//...
});

// GET fetches state for order workflow to report status
app.MapGet("/orders/{orderId}", async (string orderId, DaprWorkflowClient client) =>
{
    WorkflowState state = await client.GetWorkflowStateAsync(orderId, true);
    if (!state.Exists)
    {
        return Results.NotFound($"No order with ID = '{orderId}' was found.");
    }

    var httpResponsePayload = new
    {
        details = state.ReadInputAs<OrderPayload>(),
        status = state.RuntimeStatus.ToString(),
        result = state.ReadOutputAs<OrderResult>(),
    };

//...
}).WithName("GetOrderInfoEndpoint");

app.Run();
As in the following example, a hello-world application using the Java SDK and Dapr Workflow would include:
io.dapr.workflows.client to receive the Java SDK client capabilities.io.dapr.workflows.WorkflowDemoWorkflow class which extends Workflowpackage io.dapr.examples.workflows;
import com.microsoft.durabletask.CompositeTaskFailedException;
import com.microsoft.durabletask.Task;
import com.microsoft.durabletask.TaskCanceledException;
import io.dapr.workflows.Workflow;
import io.dapr.workflows.WorkflowStub;
import java.time.Duration;
import java.util.Arrays;
import java.util.List;
/**
* Implementation of the DemoWorkflow for the server side.
*/
public class DemoWorkflow extends Workflow {
@Override
public WorkflowStub create() {
return ctx -> {
ctx.getLogger().info("Starting Workflow: " + ctx.getName());
// ...
ctx.getLogger().info("Calling Activity...");
var input = new DemoActivityInput("Hello Activity!");
var output = ctx.callActivity(DemoWorkflowActivity.class.getName(), input, DemoActivityOutput.class).await();
// ...
};
}
}
As in the following example, a hello-world application using the Go SDK and Dapr Workflow would include:
client to receive the Go SDK client capabilities.TestWorkflow methodpackage main
import (
"context"
"fmt"
"log"
"time"
"github.com/dapr/go-sdk/client"
"github.com/dapr/go-sdk/workflow"
)
var stage = 0
const (
workflowComponent = "dapr"
)
func main() {
w, err := workflow.NewWorker()
if err != nil {
log.Fatal(err)
}
fmt.Println("Worker initialized")
if err := w.RegisterWorkflow(TestWorkflow); err != nil {
log.Fatal(err)
}
fmt.Println("TestWorkflow registered")
if err := w.RegisterActivity(TestActivity); err != nil {
log.Fatal(err)
}
fmt.Println("TestActivity registered")
// Start workflow runner
if err := w.Start(); err != nil {
log.Fatal(err)
}
fmt.Println("runner started")
daprClient, err := client.NewClient()
if err != nil {
log.Fatalf("failed to intialise client: %v", err)
}
defer daprClient.Close()
ctx := context.Background()
// Start workflow test
respStart, err := daprClient.StartWorkflow(ctx, &client.StartWorkflowRequest{
InstanceID: "a7a4168d-3a1c-41da-8a4f-e7f6d9c718d9",
WorkflowComponent: workflowComponent,
WorkflowName: "TestWorkflow",
Options: nil,
Input: 1,
SendRawInput: false,
})
if err != nil {
log.Fatalf("failed to start workflow: %v", err)
}
fmt.Printf("workflow started with id: %v\n", respStart.InstanceID)
// Pause workflow test
err = daprClient.PauseWorkflow(ctx, &client.PauseWorkflowRequest{
InstanceID: "a7a4168d-3a1c-41da-8a4f-e7f6d9c718d9",
WorkflowComponent: workflowComponent,
})
if err != nil {
log.Fatalf("failed to pause workflow: %v", err)
}
respGet, err := daprClient.GetWorkflow(ctx, &client.GetWorkflowRequest{
InstanceID: "a7a4168d-3a1c-41da-8a4f-e7f6d9c718d9",
WorkflowComponent: workflowComponent,
})
if err != nil {
log.Fatalf("failed to get workflow: %v", err)
}
if respGet.RuntimeStatus != workflow.StatusSuspended.String() {
log.Fatalf("workflow not paused: %v", respGet.RuntimeStatus)
}
fmt.Printf("workflow paused\n")
// Resume workflow test
err = daprClient.ResumeWorkflow(ctx, &client.ResumeWorkflowRequest{
InstanceID: "a7a4168d-3a1c-41da-8a4f-e7f6d9c718d9",
WorkflowComponent: workflowComponent,
})
if err != nil {
log.Fatalf("failed to resume workflow: %v", err)
}
respGet, err = daprClient.GetWorkflow(ctx, &client.GetWorkflowRequest{
InstanceID: "a7a4168d-3a1c-41da-8a4f-e7f6d9c718d9",
WorkflowComponent: workflowComponent,
})
if err != nil {
log.Fatalf("failed to get workflow: %v", err)
}
if respGet.RuntimeStatus != workflow.StatusRunning.String() {
log.Fatalf("workflow not running")
}
fmt.Println("workflow resumed")
fmt.Printf("stage: %d\n", stage)
// Raise Event Test
err = daprClient.RaiseEventWorkflow(ctx, &client.RaiseEventWorkflowRequest{
InstanceID: "a7a4168d-3a1c-41da-8a4f-e7f6d9c718d9",
WorkflowComponent: workflowComponent,
EventName: "testEvent",
EventData: "testData",
SendRawData: false,
})
if err != nil {
fmt.Printf("failed to raise event: %v", err)
}
fmt.Println("workflow event raised")
time.Sleep(time.Second) // allow workflow to advance
fmt.Printf("stage: %d\n", stage)
respGet, err = daprClient.GetWorkflow(ctx, &client.GetWorkflowRequest{
InstanceID: "a7a4168d-3a1c-41da-8a4f-e7f6d9c718d9",
WorkflowComponent: workflowComponent,
})
if err != nil {
log.Fatalf("failed to get workflow: %v", err)
}
fmt.Printf("workflow status: %v\n", respGet.RuntimeStatus)
// Purge workflow test
err = daprClient.PurgeWorkflow(ctx, &client.PurgeWorkflowRequest{
InstanceID: "a7a4168d-3a1c-41da-8a4f-e7f6d9c718d9",
WorkflowComponent: workflowComponent,
})
if err != nil {
log.Fatalf("failed to purge workflow: %v", err)
}
respGet, err = daprClient.GetWorkflow(ctx, &client.GetWorkflowRequest{
InstanceID: "a7a4168d-3a1c-41da-8a4f-e7f6d9c718d9",
WorkflowComponent: workflowComponent,
})
if err != nil && respGet != nil {
log.Fatal("failed to purge workflow")
}
fmt.Println("workflow purged")
fmt.Printf("stage: %d\n", stage)
// Terminate workflow test
respStart, err = daprClient.StartWorkflow(ctx, &client.StartWorkflowRequest{
InstanceID: "a7a4168d-3a1c-41da-8a4f-e7f6d9c718d9",
WorkflowComponent: workflowComponent,
WorkflowName: "TestWorkflow",
Options: nil,
Input: 1,
SendRawInput: false,
})
if err != nil {
log.Fatalf("failed to start workflow: %v", err)
}
fmt.Printf("workflow started with id: %s\n", respStart.InstanceID)
err = daprClient.TerminateWorkflow(ctx, &client.TerminateWorkflowRequest{
InstanceID: "a7a4168d-3a1c-41da-8a4f-e7f6d9c718d9",
WorkflowComponent: workflowComponent,
})
if err != nil {
log.Fatalf("failed to terminate workflow: %v", err)
}
respGet, err = daprClient.GetWorkflow(ctx, &client.GetWorkflowRequest{
InstanceID: "a7a4168d-3a1c-41da-8a4f-e7f6d9c718d9",
WorkflowComponent: workflowComponent,
})
if err != nil {
log.Fatalf("failed to get workflow: %v", err)
}
if respGet.RuntimeStatus != workflow.StatusTerminated.String() {
log.Fatal("failed to terminate workflow")
}
fmt.Println("workflow terminated")
err = daprClient.PurgeWorkflow(ctx, &client.PurgeWorkflowRequest{
InstanceID: "a7a4168d-3a1c-41da-8a4f-e7f6d9c718d9",
WorkflowComponent: workflowComponent,
})
respGet, err = daprClient.GetWorkflow(ctx, &client.GetWorkflowRequest{
InstanceID: "a7a4168d-3a1c-41da-8a4f-e7f6d9c718d9",
WorkflowComponent: workflowComponent,
})
if err == nil || respGet != nil {
log.Fatalf("failed to purge workflow: %v", err)
}
fmt.Println("workflow purged")
stage = 0
fmt.Println("workflow client test")
wfClient, err := workflow.NewClient()
if err != nil {
log.Fatalf("[wfclient] faield to initialize: %v", err)
}
id, err := wfClient.ScheduleNewWorkflow(ctx, "TestWorkflow", workflow.WithInstanceID("a7a4168d-3a1c-41da-8a4f-e7f6d9c718d9"), workflow.WithInput(1))
if err != nil {
log.Fatalf("[wfclient] failed to start workflow: %v", err)
}
fmt.Printf("[wfclient] started workflow with id: %s\n", id)
metadata, err := wfClient.FetchWorkflowMetadata(ctx, id)
if err != nil {
log.Fatalf("[wfclient] failed to get worfklow: %v", err)
}
fmt.Printf("[wfclient] workflow status: %v\n", metadata.RuntimeStatus.String())
if stage != 1 {
log.Fatalf("Workflow assertion failed while validating the wfclient. Stage 1 expected, current: %d", stage)
}
fmt.Printf("[wfclient] stage: %d\n", stage)
// raise event
if err := wfClient.RaiseEvent(ctx, id, "testEvent", workflow.WithEventPayload("testData")); err != nil {
log.Fatalf("[wfclient] failed to raise event: %v", err)
}
fmt.Println("[wfclient] event raised")
// Sleep to allow the workflow to advance
time.Sleep(time.Second)
if stage != 2 {
log.Fatalf("Workflow assertion failed while validating the wfclient. Stage 2 expected, current: %d", stage)
}
fmt.Printf("[wfclient] stage: %d\n", stage)
// stop workflow
if err := wfClient.TerminateWorkflow(ctx, id); err != nil {
log.Fatalf("[wfclient] failed to terminate workflow: %v", err)
}
fmt.Println("[wfclient] workflow terminated")
if err := wfClient.PurgeWorkflow(ctx, id); err != nil {
log.Fatalf("[wfclient] failed to purge workflow: %v", err)
}
fmt.Println("[wfclient] workflow purged")
// stop workflow runtime
if err := w.Shutdown(); err != nil {
log.Fatalf("failed to shutdown runtime: %v", err)
}
fmt.Println("workflow worker successfully shutdown")
}
func TestWorkflow(ctx *workflow.WorkflowContext) (any, error) {
var input int
if err := ctx.GetInput(&input); err != nil {
return nil, err
}
var output string
if err := ctx.CallActivity(TestActivity, workflow.ActivityInput(input)).Await(&output); err != nil {
return nil, err
}
err := ctx.WaitForExternalEvent("testEvent", time.Second*60).Await(&output)
if err != nil {
return nil, err
}
if err := ctx.CallActivity(TestActivity, workflow.ActivityInput(input)).Await(&output); err != nil {
return nil, err
}
return output, nil
}
func TestActivity(ctx workflow.ActivityContext) (any, error) {
var input int
if err := ctx.GetInput(&input); err != nil {
return "", err
}
stage += input
return fmt.Sprintf("Stage: %d", stage), nil
}
Now that you’ve authored a workflow, learn how to manage it.
Manage workflows >>Now that you’ve authored the workflow and its activities in your application, you can start, terminate, and get information about the workflow using HTTP API calls. For more information, read the workflow API reference.
Manage your workflow within your code. In the workflow example from the Author a workflow guide, the workflow is registered in the code using the following APIs:
from dapr.ext.workflow import WorkflowRuntime, DaprWorkflowContext, WorkflowActivityContext
from dapr.clients import DaprClient

# Sane parameters
instanceId = "exampleInstanceID"
workflowComponent = "dapr"
workflowName = "hello_world_wf"
eventName = "event1"
eventData = "eventData"

# Start the workflow
wf_client.schedule_new_workflow(
        workflow=hello_world_wf, input=input_data, instance_id=instance_id
    )

# Get info on the workflow
wf_client.get_workflow_state(instance_id=instance_id)

# Pause the workflow
wf_client.pause_workflow(instance_id=instance_id)
    metadata = wf_client.get_workflow_state(instance_id=instance_id)

# Resume the workflow
wf_client.resume_workflow(instance_id=instance_id)

# Raise an event on the workflow.
wf_client.raise_workflow_event(instance_id=instance_id, event_name=event_name, data=event_data)

# Purge the workflow
wf_client.purge_workflow(instance_id=instance_id)

# Wait for workflow completion
wf_client.wait_for_workflow_completion(instance_id, timeout_in_seconds=30)
Manage your workflow within your code. In the workflow example from the Author a workflow guide, the workflow is registered in the code using the following APIs:
import { DaprClient } from "@dapr/dapr";

async function printWorkflowStatus(client: DaprClient, instanceId: string) {
  const workflow = await client.workflow.get(instanceId);
  console.log(
    `Workflow ${workflow.workflowName}, created at ${workflow.createdAt.toUTCString()}, has status ${
      workflow.runtimeStatus
    }`,
  );
  console.log(`Additional properties: ${JSON.stringify(workflow.properties)}`);
  console.log("--------------------------------------------------\n\n");
}

async function start() {
  const client = new DaprClient();

  // Start a new workflow instance
  const instanceId = await client.workflow.start("OrderProcessingWorkflow", {
    Name: "Paperclips",
    TotalCost: 99.95,
    Quantity: 4,
  });
  console.log(`Started workflow instance ${instanceId}`);
  await printWorkflowStatus(client, instanceId);

  // Pause a workflow instance
  await client.workflow.pause(instanceId);
  console.log(`Paused workflow instance ${instanceId}`);
  await printWorkflowStatus(client, instanceId);

  // Resume a workflow instance
  await client.workflow.resume(instanceId);
  console.log(`Resumed workflow instance ${instanceId}`);
  await printWorkflowStatus(client, instanceId);

  // Terminate a workflow instance
  await client.workflow.terminate(instanceId);
  console.log(`Terminated workflow instance ${instanceId}`);
  await printWorkflowStatus(client, instanceId);

  // Wait for the workflow to complete, 30 seconds!
  await new Promise((resolve) => setTimeout(resolve, 30000));
  await printWorkflowStatus(client, instanceId);

  // Purge a workflow instance
  await client.workflow.purge(instanceId);
  console.log(`Purged workflow instance ${instanceId}`);
  // This will throw an error because the workflow instance no longer exists.
  await printWorkflowStatus(client, instanceId);
}

start().catch((e) => {
  console.error(e);
  process.exit(1);
});
Manage your workflow within your code. In the OrderProcessingWorkflow example from the Author a workflow guide, the workflow is registered in the code. You can now start, terminate, and get information about a running workflow:
string orderId = "exampleOrderId";
OrderPayload input = new OrderPayload("Paperclips", 99.95);
Dictionary<string, string> workflowOptions; // This is an optional parameter

// Start the workflow using the orderId as our workflow ID. This returns a string containing the instance ID for the particular workflow instance, whether we provide it ourselves or not.
await daprWorkflowClient.ScheduleNewWorkflowAsync(nameof(OrderProcessingWorkflow), orderId, input, workflowOptions);

// Get information on the workflow. This response contains information such as the status of the workflow, when it started, and more!
WorkflowState currentState = await daprWorkflowClient.GetWorkflowStateAsync(orderId, orderId);

// Terminate the workflow
await daprWorkflowClient.TerminateWorkflowAsync(orderId);

// Raise an event (an incoming purchase order) that your workflow will wait for
await daprWorkflowClient.RaiseEventAsync(orderId, "incoming-purchase-order", input);

// Pause
await daprWorkflowClient.SuspendWorkflowAsync(orderId);

// Resume
await daprWorkflowClient.ResumeWorkflowAsync(orderId);

// Purge the workflow, removing all inbox and history information from associated instance
await daprWorkflowClient.PurgeInstanceAsync(orderId);
Manage your workflow within your code. In the workflow example from the Java SDK, the workflow is registered in the code using the following APIs:
package io.dapr.examples.workflows;

import io.dapr.workflows.client.DaprWorkflowClient;
import io.dapr.workflows.client.WorkflowInstanceStatus;

// ...
public class DemoWorkflowClient {

  // ...
  public static void main(String[] args) throws InterruptedException {
    DaprWorkflowClient client = new DaprWorkflowClient();

    try (client) {
      // Start a workflow
      String instanceId = client.scheduleNewWorkflow(DemoWorkflow.class, "input data");

      // Get status information on the workflow
      WorkflowInstanceStatus workflowMetadata = client.getInstanceState(instanceId, true);

      // Wait or pause for the workflow instance start
      try {
        WorkflowInstanceStatus waitForInstanceStartResult =
            client.waitForInstanceStart(instanceId, Duration.ofSeconds(60), true);
      }

      // Raise an event for the workflow; you can raise several events in parallel
      client.raiseEvent(instanceId, "TestEvent", "TestEventPayload");
      client.raiseEvent(instanceId, "event1", "TestEvent 1 Payload");
      client.raiseEvent(instanceId, "event2", "TestEvent 2 Payload");
      client.raiseEvent(instanceId, "event3", "TestEvent 3 Payload");

      // Wait for workflow to complete running through tasks
      try {
        WorkflowInstanceStatus waitForInstanceCompletionResult =
            client.waitForInstanceCompletion(instanceId, Duration.ofSeconds(60), true);
      }

      // Purge the workflow instance, removing all metadata associated with it
      boolean purgeResult = client.purgeInstance(instanceId);

      // Terminate the workflow instance
      client.terminateWorkflow(instanceToTerminateId, null);

    System.exit(0);
  }
}
Manage your workflow within your code. In the workflow example from the Go SDK, the workflow is registered in the code using the following APIs:
// Start workflow
type StartWorkflowRequest struct {
	InstanceID        string // Optional instance identifier
	WorkflowComponent string
	WorkflowName      string
	Options           map[string]string // Optional metadata
	Input             any               // Optional input
	SendRawInput      bool              // Set to True in order to disable serialization on the input
}

type StartWorkflowResponse struct {
	InstanceID string
}

// Get the workflow status
type GetWorkflowRequest struct {
	InstanceID        string
	WorkflowComponent string
}

type GetWorkflowResponse struct {
	InstanceID    string
	WorkflowName  string
	CreatedAt     time.Time
	LastUpdatedAt time.Time
	RuntimeStatus string
	Properties    map[string]string
}

// Purge workflow
type PurgeWorkflowRequest struct {
	InstanceID        string
	WorkflowComponent string
}

// Terminate workflow
type TerminateWorkflowRequest struct {
	InstanceID        string
	WorkflowComponent string
}

// Pause workflow
type PauseWorkflowRequest struct {
	InstanceID        string
	WorkflowComponent string
}

// Resume workflow
type ResumeWorkflowRequest struct {
	InstanceID        string
	WorkflowComponent string
}

// Raise an event for the running workflow
type RaiseEventWorkflowRequest struct {
	InstanceID        string
	WorkflowComponent string
	EventName         string
	EventData         any
	SendRawData       bool // Set to True in order to disable serialization on the data
}
Manage your workflow using HTTP calls. The example below plugs in the properties from the Author a workflow example with a random instance ID number.
To start your workflow with an ID 12345678, run:
curl -X POST "http://localhost:3500/v1.0/workflows/dapr/OrderProcessingWorkflow/start?instanceID=12345678"
Note that workflow instance IDs can only contain alphanumeric characters, underscores, and dashes.
To terminate your workflow with an ID 12345678, run:
curl -X POST "http://localhost:3500/v1.0/workflows/dapr/12345678/terminate"
For workflow components that support subscribing to external events, such as the Dapr Workflow engine, you can use the following “raise event” API to deliver a named event to a specific workflow instance.
curl -X POST "http://localhost:3500/v1.0/workflows/<workflowComponentName>/<instanceID>/raiseEvent/<eventName>"
An
eventNamecan be any function.
To plan for down-time, wait for inputs, and more, you can pause and then resume a workflow. To pause a workflow with an ID 12345678 until triggered to resume, run:
curl -X POST "http://localhost:3500/v1.0/workflows/dapr/12345678/pause"
To resume a workflow with an ID 12345678, run:
curl -X POST "http://localhost:3500/v1.0/workflows/dapr/12345678/resume"
The purge API can be used to permanently delete workflow metadata from the underlying state store, including any stored inputs, outputs, and workflow history records. This is often useful for implementing data retention policies and for freeing resources.
Only workflow instances in the COMPLETED, FAILED, or TERMINATED state can be purged. If the workflow is in any other state, calling purge returns an error.
curl -X POST "http://localhost:3500/v1.0/workflows/dapr/12345678/purge"
To fetch workflow information (outputs and inputs) with an ID 12345678, run:
curl -X GET "http://localhost:3500/v1.0/workflows/dapr/12345678"
Learn more about these HTTP calls in the workflow API reference guide.
Try out the full SDK examples:
Learn more about how to use Dapr State Management:
Your application can use Dapr’s state management API to save, read, and query key/value pairs in the supported state stores. Using a state store component, you can build stateful, long running applications that save and retrieve their state (like a shopping cart or a game’s session state). For example, in the diagram below:
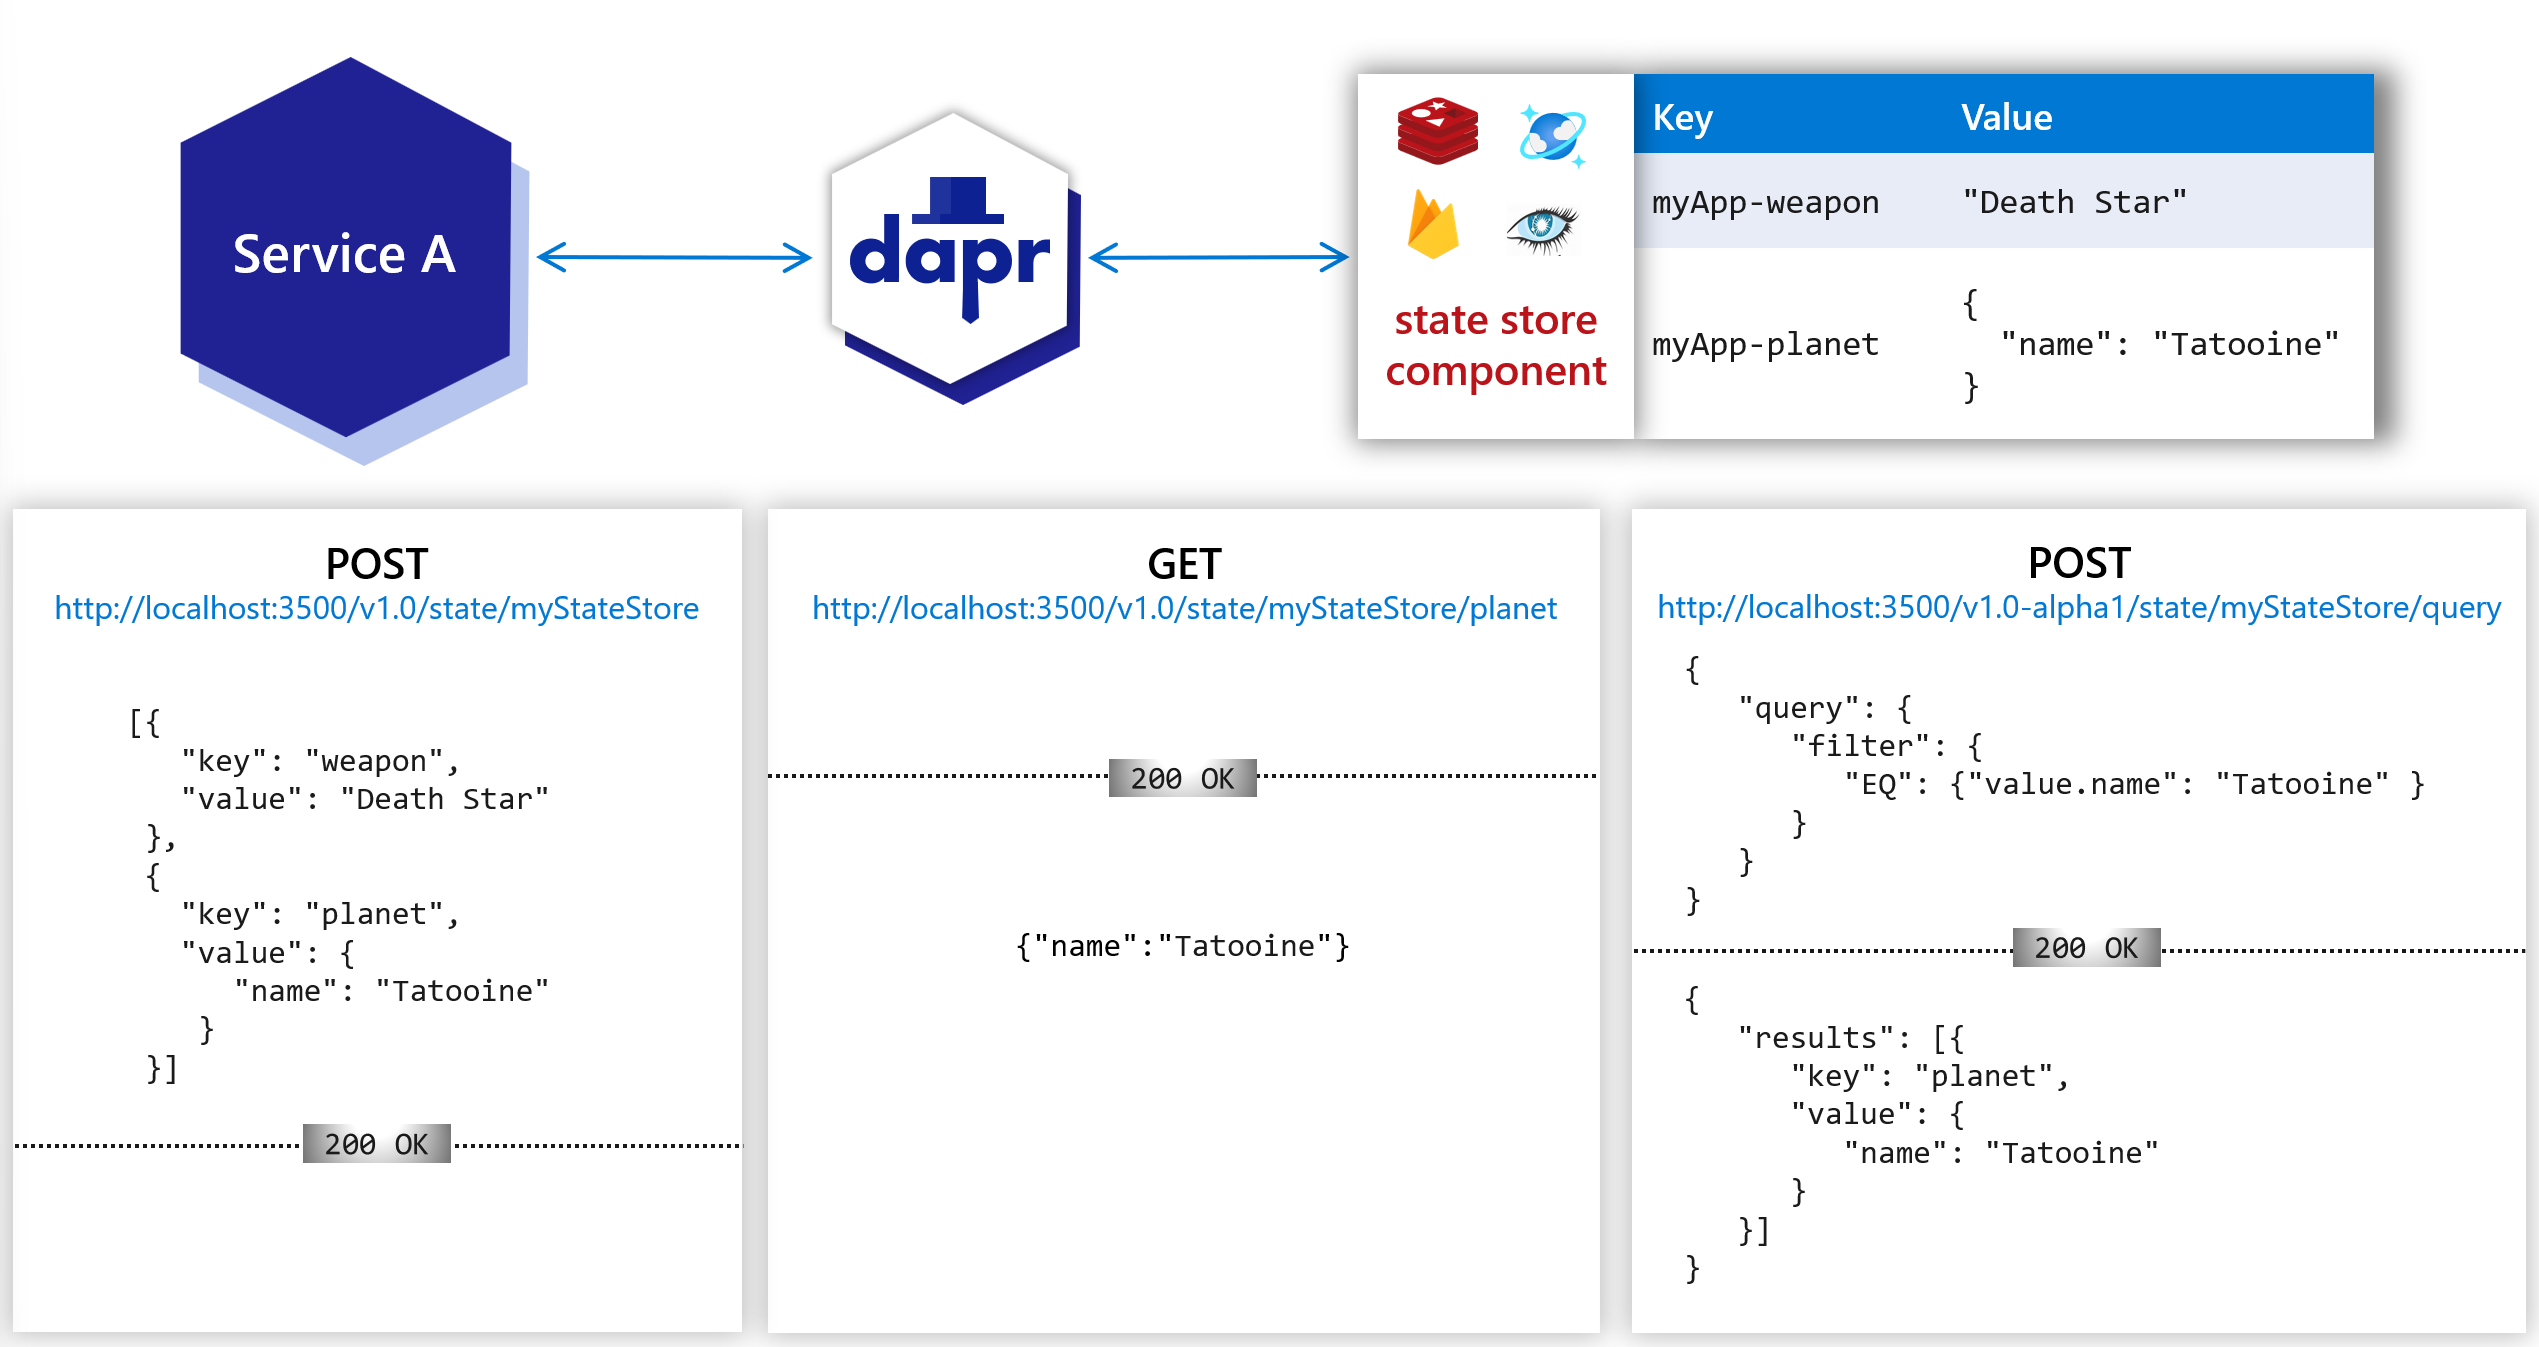
The following overview video and demo demonstrates how Dapr state management works.
With the state management API building block, your application can leverage features that are typically complicated and error-prone to build, including:
These are the features available as part of the state management API:
Dapr data stores are modeled as components, which can be swapped out without any changes to your service code. See supported state stores to see the list.
With Dapr, you can include additional metadata in a state operation request that describes how you expect the request to be handled. You can attach:
By default, your application should assume a data store is eventually consistent and uses a last-write-wins concurrency pattern.
Not all stores are created equal. To ensure your application’s portability, you can query the metadata capabilities of the store and make your code adaptive to different store capabilities.
Dapr supports Optimistic Concurrency Control (OCC) using ETags. When a state value is requested, Dapr always attaches an ETag property to the returned state. When the user code:
If-Match header.The write operation succeeds when the provided ETag matches the ETag in the state store.
Data update conflicts are rare in many applications, since clients are naturally partitioned by business contexts to operate on different data. However, if your application chooses to use ETags, mismatched ETags may cause a request rejection. It’s recommended you use a retry policy in your code to compensate for conflicts when using ETags.
If your application omits ETags in writing requests, Dapr skips ETag checks while handling the requests. This enables the last-write-wins pattern, compared to the first-write-wins pattern with ETags.
Read the API reference to learn how to set concurrency options.
Dapr supports both strong consistency and eventual consistency, with eventual consistency as the default behavior.
Read the API reference to learn how to set consistency options.
State store components may maintain and manipulate data differently, depending on the content type. Dapr supports passing content type in state management API as part of request metadata.
Setting the content type is optional, and the component decides whether to make use of it. Dapr only provides the means of passing this information to the component.
metadata.contentType. For example, http://localhost:3500/v1.0/state/store?metadata.contentType=application/json."contentType" : <content type> to the request metadata.Dapr supports two types of multi-read or multi-write operations: bulk or transactional. Read the API reference to learn how use bulk and multi options.
You can group multiple read requests into a bulk (or batch) operation. In the bulk operation, Dapr submits the read requests as individual requests to the underlying data store, and returns them as a single result.
You can group write, update, and delete operations into a request, which are then handled as an atomic transaction. The request will succeed or fail as a transactional set of operations.
Transactional state stores can be used to store actor state. To specify which state store to use for actors, specify value of property actorStateStore as true in the state store component’s metadata section. Actors state is stored with a specific scheme in transactional state stores, allowing for consistent querying. Only a single state store component can be used as the state store for all actors. Read the state API reference and the actors API reference to learn more about state stores for actors.
You should always set the TTL metadata field (ttlInSeconds), or the equivalent API call in your chosen SDK when saving actor state to ensure that state eventually removed. Read actors overview for more information.
Dapr supports automatic client encryption of application state with support for key rotations. This is supported on all Dapr state stores. For more info, read the How-To: Encrypt application state topic.
Different applications’ needs vary when it comes to sharing state. In one scenario, you may want to encapsulate all state within a given application and have Dapr manage the access for you. In another scenario, you may want two applications working on the same state to get and save the same keys.
Dapr enables states to be:
For more details read How-To: Share state between applications,
Dapr enables developers to use the outbox pattern for achieving a single transaction across a transactional state store and any message broker. For more information, read How to enable transactional outbox messaging
There are two ways to query the state:
Using the optional state management query API, you can query the key/value data saved in state stores, regardless of underlying database or storage technology. With the state management query API, you can filter, sort, and paginate the key/value data. For more details read How-To: Query state.
Dapr saves and retrieves state values without any transformation. You can query and aggregate state directly from the underlying state store. For example, to get all state keys associated with an application ID “myApp” in Redis, use:
KEYS "myApp*"
If the data store supports SQL queries, you can query an actor’s state using SQL queries. For example:
SELECT * FROM StateTable WHERE Id='<app-id>||<actor-type>||<actor-id>||<key>'
You can also avoid the common turn-based concurrency limitations of actor frameworks by performing aggregate queries across actor instances. For example, to calculate the average temperature of all thermometer actors, use:
SELECT AVG(value) FROM StateTable WHERE Id LIKE '<app-id>||<thermometer>||*||temperature'
Dapr enables per state set request time-to-live (TTL). This means that applications can set time-to-live per state stored, and these states cannot be retrieved after expiration.
The state management API can be found in the state management API reference, which describes how to retrieve, save, delete, and query state values by providing keys.
Want to put the Dapr state management API to the test? Walk through the following quickstart and tutorials to see state management in action:
| Quickstart/tutorial | Description |
|---|---|
| State management quickstart | Create stateful applications using the state management API. |
| Hello World | Recommended Demonstrates how to run Dapr locally. Highlights service invocation and state management. |
| Hello World Kubernetes | Recommended Demonstrates how to run Dapr in Kubernetes. Highlights service invocation and state management. |
Want to skip the quickstarts? Not a problem. You can try out the state management building block directly in your application. After Dapr is installed, you can begin using the state management API starting with the state management how-to guide.
State management is one of the most common needs of any new, legacy, monolith, or microservice application. Dealing with and testing different database libraries and handling retries and faults can be both difficult and time consuming.
In this guide, you’ll learn the basics of using the key/value state API to allow an application to save, get, and delete state.
The code example below loosely describes an application that processes orders with an order processing service which has a Dapr sidecar. The order processing service uses Dapr to store state in a Redis state store.
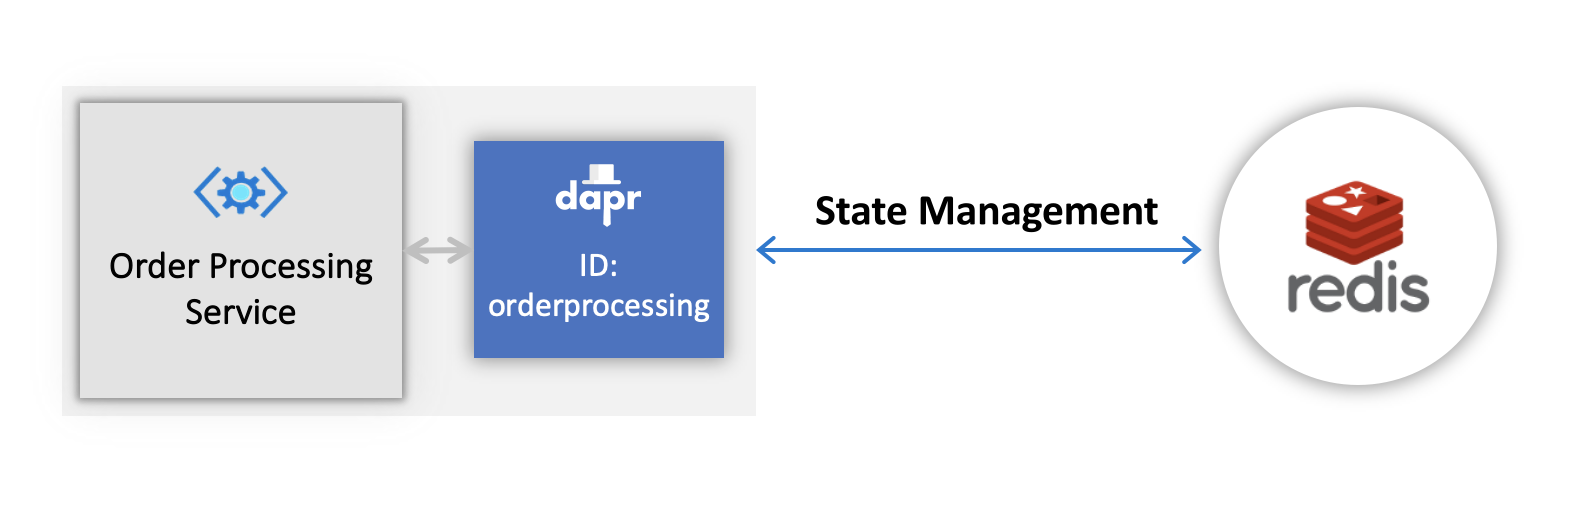
A state store component represents a resource that Dapr uses to communicate with a database.
For the purpose of this guide we’ll use a Redis state store, but any state store from the supported list will work.
When you run dapr init in self-hosted mode, Dapr creates a default Redis statestore.yaml and runs a Redis state store on your local machine, located:
%UserProfile%\.dapr\components\statestore.yaml~/.dapr/components/statestore.yamlWith the statestore.yaml component, you can easily swap out underlying components without application code changes.
To deploy this into a Kubernetes cluster, fill in the metadata connection details of your state store component in the YAML below, save as statestore.yaml, and run kubectl apply -f statestore.yaml.
apiVersion: dapr.io/v1alpha1
kind: Component
metadata:
  name: statestore
spec:
  type: state.redis
  version: v1
  metadata:
  - name: redisHost
    value: localhost:6379
  - name: redisPassword
    value: ""
app-id, as the state keys are prefixed with this value. If you don’t set an app-id, one is generated for you at runtime. The next time you run the command, a new app-id is generated and you will no longer have access to the previously saved state.
The following example shows how to save and retrieve a single key/value pair using the Dapr state management API.
using System.Text;
using System.Threading.Tasks;
using Dapr.Client;

var builder = WebApplication.CreateBuilder(args);
builder.Services.AddDaprClient();
var app = builder.Build();

var random = new Random();
//Resolve the DaprClient from its dependency injection registration
using var client = app.Services.GetRequiredService<DaprClient>();

while(true)
{
    await Task.Delay(TimeSpan.FromSeconds(5));
    var orderId = random.Next(1,1000);
    //Using Dapr SDK to save and get state
    await client.SaveStateAsync(DAPR_STORE_NAME, "order_1", orderId.ToString());
    await client.SaveStateAsync(DAPR_STORE_NAME, "order_2", orderId.ToString());
    var result = await client.GetStateAsync<string>(DAPR_STORE_NAME, "order_1");
    Console.WriteLine($"Result after get: {result}");
}
To launch a Dapr sidecar for the above example application, run a command similar to the following:
dapr run --app-id orderprocessing --app-port 6001 --dapr-http-port 3601 --dapr-grpc-port 60001 dotnet run
//dependencies
import io.dapr.client.DaprClient;
import io.dapr.client.DaprClientBuilder;
import io.dapr.client.domain.State;
import io.dapr.client.domain.TransactionalStateOperation;
import org.springframework.boot.autoconfigure.SpringBootApplication;
import org.slf4j.Logger;
import org.slf4j.LoggerFactory;
import reactor.core.publisher.Mono;
import java.util.Random;
import java.util.concurrent.TimeUnit;

//code
@SpringBootApplication
public class OrderProcessingServiceApplication {

	private static final Logger log = LoggerFactory.getLogger(OrderProcessingServiceApplication.class);

	private static final String STATE_STORE_NAME = "statestore";

	public static void main(String[] args) throws InterruptedException{
		while(true) {
			TimeUnit.MILLISECONDS.sleep(5000);
			Random random = new Random();
			int orderId = random.nextInt(1000-1) + 1;
			DaprClient client = new DaprClientBuilder().build();
            //Using Dapr SDK to save and get state
			client.saveState(STATE_STORE_NAME, "order_1", Integer.toString(orderId)).block();
			client.saveState(STATE_STORE_NAME, "order_2", Integer.toString(orderId)).block();
			Mono<State<String>> result = client.getState(STATE_STORE_NAME, "order_1", String.class);
			log.info("Result after get" + result);
		}
	}

}
To launch a Dapr sidecar for the above example application, run a command similar to the following:
dapr run --app-id orderprocessing --app-port 6001 --dapr-http-port 3601 --dapr-grpc-port 60001 mvn spring-boot:run
#dependencies
import random
from time import sleep
import requests
import logging
from dapr.clients import DaprClient
from dapr.clients.grpc._state import StateItem
from dapr.clients.grpc._request import TransactionalStateOperation, TransactionOperationType

#code
logging.basicConfig(level = logging.INFO)
DAPR_STORE_NAME = "statestore"
while True:
    sleep(random.randrange(50, 5000) / 1000)
    orderId = random.randint(1, 1000)
    with DaprClient() as client:
        #Using Dapr SDK to save and get state
        client.save_state(DAPR_STORE_NAME, "order_1", str(orderId))
        result = client.get_state(DAPR_STORE_NAME, "order_1")
        logging.info('Result after get: ' + result.data.decode('utf-8'))
To launch a Dapr sidecar for the above example application, run a command similar to the following:
dapr run --app-id orderprocessing --app-port 6001 --dapr-http-port 3601 --dapr-grpc-port 60001 -- python3 OrderProcessingService.py
// dependencies
import (
	"context"
	"log"
	"math/rand"
	"strconv"
	"time"

	dapr "github.com/dapr/go-sdk/client"
)

// code
func main() {
	const STATE_STORE_NAME = "statestore"
	rand.Seed(time.Now().UnixMicro())
	for i := 0; i < 10; i++ {
		orderId := rand.Intn(1000-1) + 1
		client, err := dapr.NewClient()
		if err != nil {
			panic(err)
		}
		defer client.Close()
		ctx := context.Background()
		err = client.SaveState(ctx, STATE_STORE_NAME, "order_1", []byte(strconv.Itoa(orderId)), nil)
		if err != nil {
			panic(err)
		}
		result, err := client.GetState(ctx, STATE_STORE_NAME, "order_1", nil)
		if err != nil {
			panic(err)
		}
		log.Println("Result after get:", string(result.Value))
		time.Sleep(2 * time.Second)
	}
}
To launch a Dapr sidecar for the above example application, run a command similar to the following:
dapr run --app-id orderprocessing --app-port 6001 --dapr-http-port 3601 --dapr-grpc-port 60001 go run OrderProcessingService.go
//dependencies
import { DaprClient, HttpMethod, CommunicationProtocolEnum } from '@dapr/dapr';

//code
const daprHost = "127.0.0.1";
var main = function() {
    for(var i=0;i<10;i++) {
        sleep(5000);
        var orderId = Math.floor(Math.random() * (1000 - 1) + 1);
        start(orderId).catch((e) => {
            console.error(e);
            process.exit(1);
        });
    }
}

async function start(orderId) {
    const client = new DaprClient({
        daprHost,
        daprPort: process.env.DAPR_HTTP_PORT,
        communicationProtocol: CommunicationProtocolEnum.HTTP,
    });
    const STATE_STORE_NAME = "statestore";
    //Using Dapr SDK to save and get state
    await client.state.save(STATE_STORE_NAME, [
        {
            key: "order_1",
            value: orderId.toString()
        },
        {
            key: "order_2",
            value: orderId.toString()
        }
    ]);
    var result = await client.state.get(STATE_STORE_NAME, "order_1");
    console.log("Result after get: " + result);
}

function sleep(ms) {
    return new Promise(resolve => setTimeout(resolve, ms));
}

main();
To launch a Dapr sidecar for the above example application, run a command similar to the following:
dapr run --app-id orderprocessing --app-port 6001 --dapr-http-port 3601 --dapr-grpc-port 60001 npm start
Launch a Dapr sidecar:
dapr run --app-id orderprocessing --dapr-http-port 3601
In a separate terminal, save a key/value pair into your statestore:
curl -X POST -H "Content-Type: application/json" -d '[{ "key": "order_1", "value": "250"}]' http://localhost:3601/v1.0/state/statestore
Now get the state you just saved:
curl http://localhost:3601/v1.0/state/statestore/order_1
Restart your sidecar and try retrieving state again to observe that state persists separately from the app.
Launch a Dapr sidecar:
dapr --app-id orderprocessing --dapr-http-port 3601 run
In a separate terminal, save a key/value pair into your statestore:
Invoke-RestMethod -Method Post -ContentType 'application/json' -Body '[{"key": "order_1", "value": "250"}]' -Uri 'http://localhost:3601/v1.0/state/statestore'
Now get the state you just saved:
Invoke-RestMethod -Uri 'http://localhost:3601/v1.0/state/statestore/order_1'
Restart your sidecar and try retrieving state again to observe that state persists separately from the app.
Below are code examples that leverage Dapr SDKs for deleting the state.
using Dapr.Client;
using System.Threading.Tasks;

const string DAPR_STORE_NAME = "statestore";

var builder = WebApplication.CreateBuilder(args);
builder.Services.AddDaprClient();
var app = builder.Build();

//Resolve the DaprClient from the dependency injection registration
using var client = app.Services.GetRequiredService<DaprClient>();

//Use the DaprClient to delete the state
await client.DeleteStateAsync(DAPR_STORE_NAME, "order_1", cancellationToken: cancellationToken);
To launch a Dapr sidecar for the above example application, run a command similar to the following:
dapr run --app-id orderprocessing --app-port 6001 --dapr-http-port 3601 --dapr-grpc-port 60001 dotnet run
//dependencies
import io.dapr.client.DaprClient;
import io.dapr.client.DaprClientBuilder;
import org.springframework.boot.autoconfigure.SpringBootApplication;

//code
@SpringBootApplication
public class OrderProcessingServiceApplication {
	public static void main(String[] args) throws InterruptedException{
        String STATE_STORE_NAME = "statestore";

        //Using Dapr SDK to delete the state
        DaprClient client = new DaprClientBuilder().build();
        String storedEtag = client.getState(STATE_STORE_NAME, "order_1", String.class).block().getEtag();
        client.deleteState(STATE_STORE_NAME, "order_1", storedEtag, null).block();
	}
}
To launch a Dapr sidecar for the above example application, run a command similar to the following:
dapr run --app-id orderprocessing --app-port 6001 --dapr-http-port 3601 --dapr-grpc-port 60001 mvn spring-boot:run
#dependencies
from dapr.clients.grpc._request import TransactionalStateOperation, TransactionOperationType

#code
logging.basicConfig(level = logging.INFO)
DAPR_STORE_NAME = "statestore"

#Using Dapr SDK to delete the state
with DaprClient() as client:
    client.delete_state(store_name=DAPR_STORE_NAME, key="order_1")
To launch a Dapr sidecar for the above example application, run a command similar to the following:
dapr run --app-id orderprocessing --app-port 6001 --dapr-http-port 3601 --dapr-grpc-port 60001 -- python3 OrderProcessingService.py
//dependencies
import (
	"context"
	dapr "github.com/dapr/go-sdk/client"

)

//code
func main() {
    STATE_STORE_NAME := "statestore"
    //Using Dapr SDK to delete the state
    client, err := dapr.NewClient()
    if err != nil {
        panic(err)
    }
    defer client.Close()
    ctx := context.Background()

    if err := client.DeleteState(ctx, STATE_STORE_NAME, "order_1"); err != nil {
        panic(err)
    }
}
To launch a Dapr sidecar for the above example application, run a command similar to the following:
dapr run --app-id orderprocessing --app-port 6001 --dapr-http-port 3601 --dapr-grpc-port 60001 go run OrderProcessingService.go
//dependencies
import { DaprClient, HttpMethod, CommunicationProtocolEnum } from '@dapr/dapr';

//code
const daprHost = "127.0.0.1";
var main = function() {
    const STATE_STORE_NAME = "statestore";
    //Using Dapr SDK to save and get state
    const client = new DaprClient({
        daprHost,
        daprPort: process.env.DAPR_HTTP_PORT,
        communicationProtocol: CommunicationProtocolEnum.HTTP,
    });

    await client.state.delete(STATE_STORE_NAME, "order_1");
}

main();
To launch a Dapr sidecar for the above example application, run a command similar to the following:
dapr run --app-id orderprocessing --app-port 6001 --dapr-http-port 3601 --dapr-grpc-port 60001 npm start
With the same Dapr instance running from above, run:
curl -X DELETE 'http://localhost:3601/v1.0/state/statestore/order_1'
Try getting state again. Note that no value is returned.
With the same Dapr instance running from above, run:
Invoke-RestMethod -Method Delete -Uri 'http://localhost:3601/v1.0/state/statestore/order_1'
Try getting state again. Note that no value is returned.
Below are code examples that leverage Dapr SDKs for saving and retrieving multiple states.
using Dapr.Client;
using System.Threading.Tasks;

const string DAPR_STORE_NAME = "statestore";

var builder = WebApplication.CreateBuilder(args);
builder.Services.AddDaprClient();
var app = builder.Build();

//Resolve the DaprClient from the dependency injection registration
using var client = app.Services.GetRequiredService<DaprClient>();

IReadOnlyList<BulkStateItem> multipleStateResult = await client.GetBulkStateAsync(DAPR_STORE_NAME, new List<string> { "order_1", "order_2" }, parallelism: 1);
To launch a Dapr sidecar for the above example application, run a command similar to the following:
dapr run --app-id orderprocessing --app-port 6001 --dapr-http-port 3601 --dapr-grpc-port 60001 dotnet run
The above example returns a BulkStateItem with the serialized format of the value you saved to state. If you prefer that the value be deserialized by the SDK across each of your bulk response items, you can instead use the following:
using Dapr.Client;
using System.Threading.Tasks;

const string DAPR_STORE_NAME = "statestore";

var builder = WebApplication.CreateBuilder(args);
builder.Serivces.AddDaprClient();
var app = builder.Build();

//Resolve the DaprClient from the dependency injection registration
using var client = app.Services.GetRequiredService<DaprClient>();

IReadOnlyList<BulkStateItem<Widget>> mulitpleStateResult = await client.GetBulkStateAsync<Widget>(DAPR_STORE_NAME, new List<string> { "widget_1", "widget_2" }, parallelism: 1);

record Widget(string Size, string Color);
//dependencies
import io.dapr.client.DaprClient;
import io.dapr.client.DaprClientBuilder;
import io.dapr.client.domain.State;
import java.util.Arrays;

//code
@SpringBootApplication
public class OrderProcessingServiceApplication {

	private static final Logger log = LoggerFactory.getLogger(OrderProcessingServiceApplication.class);

	public static void main(String[] args) throws InterruptedException{
        String STATE_STORE_NAME = "statestore";
        //Using Dapr SDK to retrieve multiple states
        DaprClient client = new DaprClientBuilder().build();
        Mono<List<State<String>>> resultBulk = client.getBulkState(STATE_STORE_NAME,
        Arrays.asList("order_1", "order_2"), String.class);
	}
}
To launch a Dapr sidecar for the above example application, run a command similar to the following:
dapr run --app-id orderprocessing --app-port 6001 --dapr-http-port 3601 --dapr-grpc-port 60001 mvn spring-boot:run
#dependencies
from dapr.clients import DaprClient
from dapr.clients.grpc._state import StateItem

#code
logging.basicConfig(level = logging.INFO)
DAPR_STORE_NAME = "statestore"
orderId = 100
#Using Dapr SDK to save and retrieve multiple states
with DaprClient() as client:
    client.save_bulk_state(store_name=DAPR_STORE_NAME, states=[StateItem(key="order_2", value=str(orderId))])
    result = client.get_bulk_state(store_name=DAPR_STORE_NAME, keys=["order_1", "order_2"], states_metadata={"metakey": "metavalue"}).items
    logging.info('Result after get bulk: ' + str(result))
To launch a Dapr sidecar for the above example application, run a command similar to the following:
dapr run --app-id orderprocessing --app-port 6001 --dapr-http-port 3601 --dapr-grpc-port 60001 -- python3 OrderProcessingService.py
// dependencies
import (
	"context"
	"log"
	"math/rand"
	"strconv"
	"time"

	dapr "github.com/dapr/go-sdk/client"
)

// code
func main() {
	const STATE_STORE_NAME = "statestore"
	rand.Seed(time.Now().UnixMicro())
	for i := 0; i < 10; i++ {
		orderId := rand.Intn(1000-1) + 1
		client, err := dapr.NewClient()
		if err != nil {
			panic(err)
		}
		defer client.Close()
		ctx := context.Background()
		err = client.SaveState(ctx, STATE_STORE_NAME, "order_1", []byte(strconv.Itoa(orderId)), nil)
		if err != nil {
			panic(err)
		}
		keys := []string{"key1", "key2", "key3"}
        items, err := client.GetBulkState(ctx, STATE_STORE_NAME, keys, nil, 100)
		if err != nil {
			panic(err)
		}
		for _, item := range items {
			log.Println("Item from GetBulkState:", string(item.Value))
		}
	}
}
To launch a Dapr sidecar for the above example application, run a command similar to the following:
dapr run --app-id orderprocessing --app-port 6001 --dapr-http-port 3601 --dapr-grpc-port 60001 go run OrderProcessingService.go
//dependencies
import { DaprClient, HttpMethod, CommunicationProtocolEnum } from '@dapr/dapr';
//code
const daprHost = "127.0.0.1";
var main = function() {
const STATE_STORE_NAME = "statestore";
var orderId = 100;
//Using Dapr SDK to save and retrieve multiple states
const client = new DaprClient({
daprHost,
daprPort: process.env.DAPR_HTTP_PORT,
communicationProtocol: CommunicationProtocolEnum.HTTP,
});
await client.state.save(STATE_STORE_NAME, [
{
key: "order_1",
value: orderId.toString()
},
{
key: "order_2",
value: orderId.toString()
}
]);
result = await client.state.getBulk(STATE_STORE_NAME, ["order_1", "order_2"]);
}
main();
To launch a Dapr sidecar for the above example application, run a command similar to the following:
dapr run --app-id orderprocessing --app-port 6001 --dapr-http-port 3601 --dapr-grpc-port 60001 npm start
With the same Dapr instance running from above, save two key/value pairs into your statestore:
curl -X POST -H "Content-Type: application/json" -d '[{ "key": "order_1", "value": "250"}, { "key": "order_2", "value": "550"}]' http://localhost:3601/v1.0/state/statestore
Now get the states you just saved:
curl -X POST -H "Content-Type: application/json" -d '{"keys":["order_1", "order_2"]}' http://localhost:3601/v1.0/state/statestore/bulk
With the same Dapr instance running from above, save two key/value pairs into your statestore:
Invoke-RestMethod -Method Post -ContentType 'application/json' -Body '[{ "key": "order_1", "value": "250"}, { "key": "order_2", "value": "550"}]' -Uri 'http://localhost:3601/v1.0/state/statestore'
Now get the states you just saved:
Invoke-RestMethod -Method Post -ContentType 'application/json' -Body '{"keys":["order_1", "order_2"]}' -Uri 'http://localhost:3601/v1.0/state/statestore/bulk'
Below are code examples that leverage Dapr SDKs for performing state transactions.
using Dapr.Client;
using System.Threading.Tasks;
const string DAPR_STORE_NAME = "statestore";
var builder = WebApplication.CreateBuilder(args);
builder.Serivces.AddDaprClient();
var app = builder.Build();
//Resolve the DaprClient from the dependency injection registration
using var client = app.Services.GetRequiredService<DaprClient>();
var random = new Random();
while (true)
{
await Task.Delay(TimeSpan.FromSeconds(5));
var orderId = random.Next(1, 1000);
var requests = new List<StateTransactionRequest>
{
new StateTransactionRequest("order_3", JsonSerializer.SerializeToUtf8Bytes(orderId.ToString()), StateOperationType.Upsert),
new StateTransactionRequest("order_2", null, StateOperationType.Delete)
};
var cancellationTokenSource = new CancellationTokenSource();
var cancellationToken = cancellationTokenSource.Token;
//Use the DaprClient to perform the state transactions
await client.ExecuteStateTransactionAsync(DAPR_STORE_NAME, requests, cancellationToken: cancellationToken);
Console.WriteLine($"Order requested: {orderId}");
Console.WriteLine($"Result: {result}");
}
To launch a Dapr sidecar for the above example application, run a command similar to the following:
dapr run --app-id orderprocessing --app-port 6001 --dapr-http-port 3601 --dapr-grpc-port 60001 dotnet run
//dependencies
import io.dapr.client.DaprClient;
import io.dapr.client.DaprClientBuilder;
import io.dapr.client.domain.State;
import io.dapr.client.domain.TransactionalStateOperation;
import org.springframework.boot.autoconfigure.SpringBootApplication;
import org.slf4j.Logger;
import org.slf4j.LoggerFactory;
import reactor.core.publisher.Mono;
import java.util.ArrayList;
import java.util.List;
import java.util.Random;
import java.util.concurrent.TimeUnit;
//code
@SpringBootApplication
public class OrderProcessingServiceApplication {
private static final Logger log = LoggerFactory.getLogger(OrderProcessingServiceApplication.class);
private static final String STATE_STORE_NAME = "statestore";
public static void main(String[] args) throws InterruptedException{
while(true) {
TimeUnit.MILLISECONDS.sleep(5000);
Random random = new Random();
int orderId = random.nextInt(1000-1) + 1;
DaprClient client = new DaprClientBuilder().build();
List<TransactionalStateOperation<?>> operationList = new ArrayList<>();
operationList.add(new TransactionalStateOperation<>(TransactionalStateOperation.OperationType.UPSERT,
new State<>("order_3", Integer.toString(orderId), "")));
operationList.add(new TransactionalStateOperation<>(TransactionalStateOperation.OperationType.DELETE,
new State<>("order_2")));
//Using Dapr SDK to perform the state transactions
client.executeStateTransaction(STATE_STORE_NAME, operationList).block();
log.info("Order requested: " + orderId);
}
}
}
To launch a Dapr sidecar for the above example application, run a command similar to the following:
dapr run --app-id orderprocessing --app-port 6001 --dapr-http-port 3601 --dapr-grpc-port 60001 mvn spring-boot:run
#dependencies
import random
from time import sleep
import requests
import logging
from dapr.clients import DaprClient
from dapr.clients.grpc._state import StateItem
from dapr.clients.grpc._request import TransactionalStateOperation, TransactionOperationType
#code
logging.basicConfig(level = logging.INFO)
DAPR_STORE_NAME = "statestore"
while True:
sleep(random.randrange(50, 5000) / 1000)
orderId = random.randint(1, 1000)
with DaprClient() as client:
#Using Dapr SDK to perform the state transactions
client.execute_state_transaction(store_name=DAPR_STORE_NAME, operations=[
TransactionalStateOperation(
operation_type=TransactionOperationType.upsert,
key="order_3",
data=str(orderId)),
TransactionalStateOperation(key="order_3", data=str(orderId)),
TransactionalStateOperation(
operation_type=TransactionOperationType.delete,
key="order_2",
data=str(orderId)),
TransactionalStateOperation(key="order_2", data=str(orderId))
])
client.delete_state(store_name=DAPR_STORE_NAME, key="order_1")
logging.basicConfig(level = logging.INFO)
logging.info('Order requested: ' + str(orderId))
logging.info('Result: ' + str(result))
To launch a Dapr sidecar for the above example application, run a command similar to the following:
dapr run --app-id orderprocessing --app-port 6001 --dapr-http-port 3601 --dapr-grpc-port 60001 -- python3 OrderProcessingService.py
// dependencies
package main
import (
"context"
"log"
"math/rand"
"strconv"
"time"
dapr "github.com/dapr/go-sdk/client"
)
// code
func main() {
const STATE_STORE_NAME = "statestore"
rand.Seed(time.Now().UnixMicro())
for i := 0; i < 10; i++ {
orderId := rand.Intn(1000-1) + 1
client, err := dapr.NewClient()
if err != nil {
panic(err)
}
defer client.Close()
ctx := context.Background()
err = client.SaveState(ctx, STATE_STORE_NAME, "order_1", []byte(strconv.Itoa(orderId)), nil)
if err != nil {
panic(err)
}
result, err := client.GetState(ctx, STATE_STORE_NAME, "order_1", nil)
if err != nil {
panic(err)
}
ops := make([]*dapr.StateOperation, 0)
data1 := "data1"
data2 := "data2"
op1 := &dapr.StateOperation{
Type: dapr.StateOperationTypeUpsert,
Item: &dapr.SetStateItem{
Key: "key1",
Value: []byte(data1),
},
}
op2 := &dapr.StateOperation{
Type: dapr.StateOperationTypeDelete,
Item: &dapr.SetStateItem{
Key: "key2",
Value: []byte(data2),
},
}
ops = append(ops, op1, op2)
meta := map[string]string{}
err = client.ExecuteStateTransaction(ctx, STATE_STORE_NAME, meta, ops)
log.Println("Result after get:", string(result.Value))
time.Sleep(2 * time.Second)
}
}
To launch a Dapr sidecar for the above example application, run a command similar to the following:
dapr run --app-id orderprocessing --app-port 6001 --dapr-http-port 3601 --dapr-grpc-port 60001 go run OrderProcessingService.go
//dependencies
import { DaprClient, HttpMethod, CommunicationProtocolEnum } from '@dapr/dapr';
//code
const daprHost = "127.0.0.1";
var main = function() {
for(var i=0;i<10;i++) {
sleep(5000);
var orderId = Math.floor(Math.random() * (1000 - 1) + 1);
start(orderId).catch((e) => {
console.error(e);
process.exit(1);
});
}
}
async function start(orderId) {
const client = new DaprClient({
daprHost,
daprPort: process.env.DAPR_HTTP_PORT,
communicationProtocol: CommunicationProtocolEnum.HTTP,
});
const STATE_STORE_NAME = "statestore";
//Using Dapr SDK to save and retrieve multiple states
await client.state.transaction(STATE_STORE_NAME, [
{
operation: "upsert",
request: {
key: "order_3",
value: orderId.toString()
}
},
{
operation: "delete",
request: {
key: "order_2"
}
}
]);
}
function sleep(ms) {
return new Promise(resolve => setTimeout(resolve, ms));
}
main();
To launch a Dapr sidecar for the above example application, run a command similar to the following:
dapr run --app-id orderprocessing --app-port 6001 --dapr-http-port 3601 --dapr-grpc-port 60001 npm start
With the same Dapr instance running from above, perform two state transactions:
curl -X POST -H "Content-Type: application/json" -d '{"operations": [{"operation":"upsert", "request": {"key": "order_1", "value": "250"}}, {"operation":"delete", "request": {"key": "order_2"}}]}' http://localhost:3601/v1.0/state/statestore/transaction
Now see the results of your state transactions:
curl -X POST -H "Content-Type: application/json" -d '{"keys":["order_1", "order_2"]}' http://localhost:3601/v1.0/state/statestore/bulk
With the same Dapr instance running from above, save two key/value pairs into your statestore:
Invoke-RestMethod -Method Post -ContentType 'application/json' -Body '{"operations": [{"operation":"upsert", "request": {"key": "order_1", "value": "250"}}, {"operation":"delete", "request": {"key": "order_2"}}]}' -Uri 'http://localhost:3601/v1.0/state/statestore/transaction'
Now see the results of your state transactions:
Invoke-RestMethod -Method Post -ContentType 'application/json' -Body '{"keys":["order_1", "order_2"]}' -Uri 'http://localhost:3601/v1.0/state/statestore/bulk'
With the state query API, you can retrieve, filter, and sort the key/value data stored in state store components. The query API is not a replacement for a complete query language.
Even though the state store is a key/value store, the value might be a JSON document with its own hierarchy, keys, and values. The query API allows you to use those keys/values to retrieve corresponding documents.
Submit query requests via HTTP POST/PUT or gRPC. The body of the request is the JSON map with 3 entries:
filtersortpagefilterThe filter specifies the query conditions in the form of a tree, where each node represents either unary or multi-operand operation.
The following operations are supported:
| Operator | Operands | Description |
|---|---|---|
EQ |
key:value | key == value |
NEQ |
key:value | key != value |
GT |
key:value | key > value |
GTE |
key:value | key >= value |
LT |
key:value | key < value |
LTE |
key:value | key <= value |
IN |
key:[]value | key == value[0] OR key == value[1] OR … OR key == value[n] |
AND |
[]operation | operation[0] AND operation[1] AND … AND operation[n] |
OR |
[]operation | operation[0] OR operation[1] OR … OR operation[n] |
The key in the operand is similar to the JSONPath notation. Each dot in the key indicates a nested JSON structure. For example, consider this structure:
{
"shape": {
"name": "rectangle",
"dimensions": {
"height": 24,
"width": 10
},
"color": {
"name": "red",
"code": "#FF0000"
}
}
}
To compare the value of the color code, the key will be shape.color.code.
If the filter section is omitted, the query returns all entries.
sortThe sort is an ordered array of key:order pairs, where:
key is a key in the state storeorder is an optional string indicating sorting order:
"ASC" for ascending"DESC" for descendingpageThe page contains limit and token parameters.
limit sets the page size.token is an iteration token returned by the component, used in subsequent queries.Behind the scenes, this query request is translated into the native query language and executed by the state store component.
Let’s look at some real examples, ranging from simple to complex.
As a dataset, consider a collection of employee records containing employee ID, organization, state, and city. Notice that this dataset is an array of key/value pairs, where:
key is the unique IDvalue is the JSON object with employee record.To better illustrate functionality, organization name (org) and employee ID (id) are a nested JSON person object.
Get started by creating an instance of MongoDB, which is your state store.
docker run -d --rm -p 27017:27017 --name mongodb mongo:5
Next, start a Dapr application. Refer to the component configuration file, which instructs Dapr to use MongoDB as its state store.
dapr run --app-id demo --dapr-http-port 3500 --resources-path query-api-examples/components/mongodb
Populate the state store with the employee dataset, so you can query it later.
curl -X POST -H "Content-Type: application/json" -d @query-api-examples/dataset.json http://localhost:3500/v1.0/state/statestore
Once populated, you can examine the data in the state store. In the image below, a section of the MongoDB UI displays employee records.
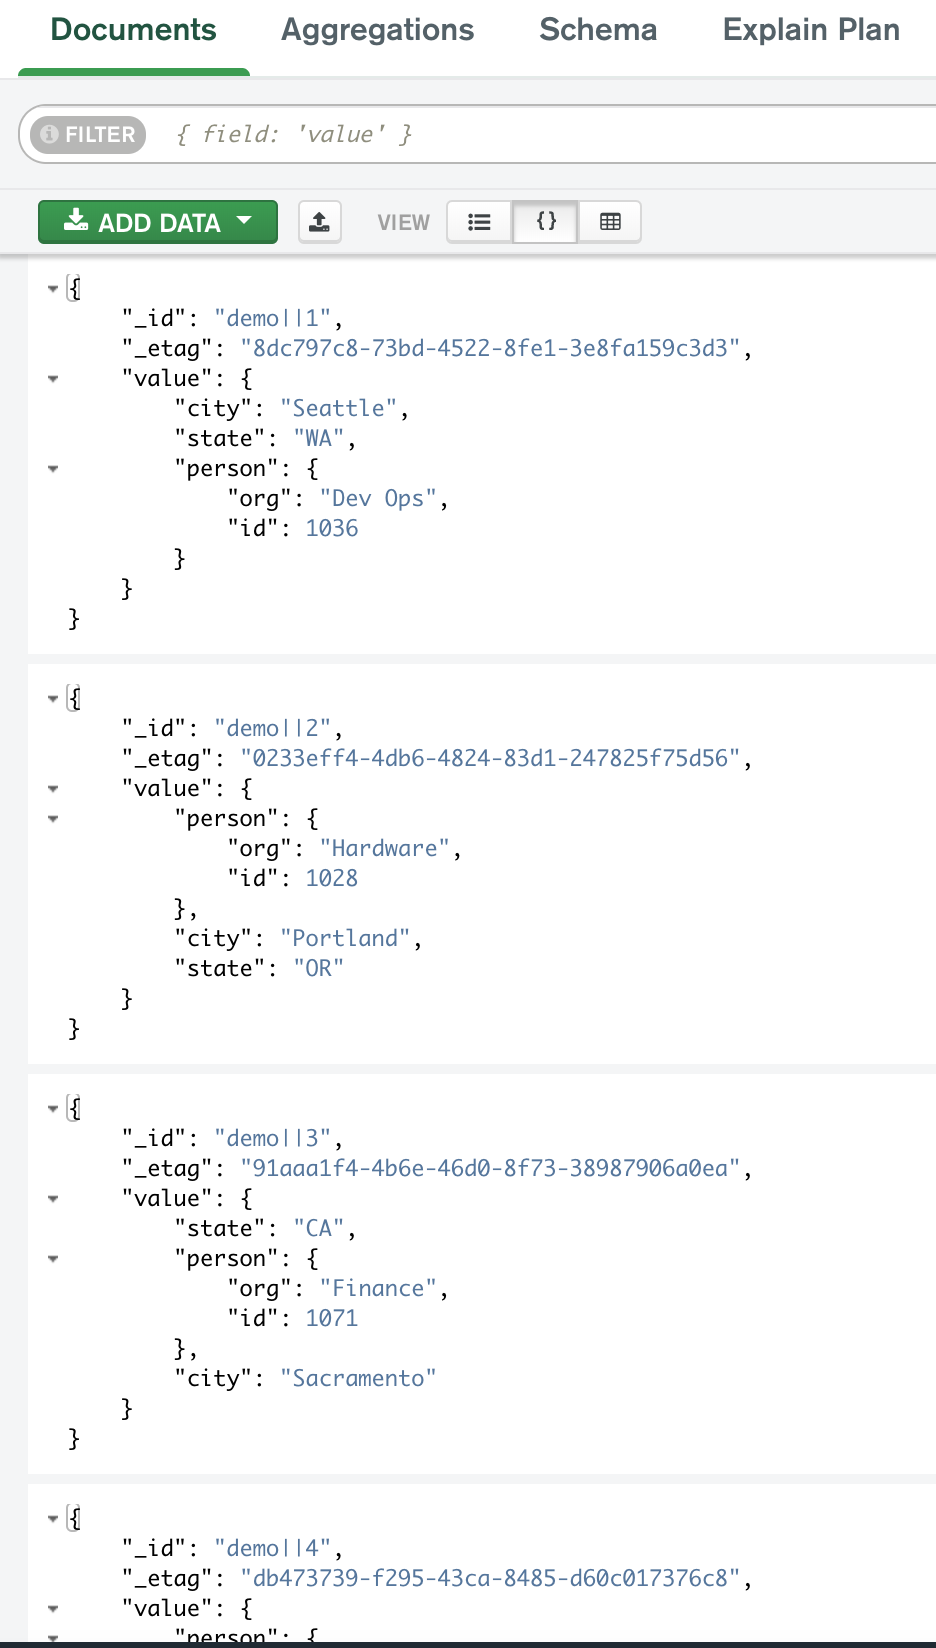
Each entry has the _id member as a concatenated object key, and the value member containing the JSON record.
The query API allows you to select records from this JSON structure.
Now you can run the example queries.
First, find all employees in the state of California and sort them by their employee ID in descending order.
This is the query:
{
"filter": {
"EQ": { "state": "CA" }
},
"sort": [
{
"key": "person.id",
"order": "DESC"
}
]
}
An equivalent of this query in SQL is:
SELECT * FROM c WHERE
state = "CA"
ORDER BY
person.id DESC
Execute the query with the following command:
curl -s -X POST -H "Content-Type: application/json" -d @query-api-examples/query1.json http://localhost:3500/v1.0-alpha1/state/statestore/query | jq .
Invoke-RestMethod -Method Post -ContentType 'application/json' -InFile query-api-examples/query1.json -Uri 'http://localhost:3500/v1.0-alpha1/state/statestore/query'
The query result is an array of matching key/value pairs in the requested order:
{
"results": [
{
"key": "3",
"data": {
"person": {
"org": "Finance",
"id": 1071
},
"city": "Sacramento",
"state": "CA"
},
"etag": "44723d41-deb1-4c23-940e-3e6896c3b6f7"
},
{
"key": "7",
"data": {
"city": "San Francisco",
"state": "CA",
"person": {
"id": 1015,
"org": "Dev Ops"
}
},
"etag": "0e69e69f-3dbc-423a-9db8-26767fcd2220"
},
{
"key": "5",
"data": {
"state": "CA",
"person": {
"org": "Hardware",
"id": 1007
},
"city": "Los Angeles"
},
"etag": "f87478fa-e5c5-4be0-afa5-f9f9d75713d8"
},
{
"key": "9",
"data": {
"person": {
"org": "Finance",
"id": 1002
},
"city": "San Diego",
"state": "CA"
},
"etag": "f5cf05cd-fb43-4154-a2ec-445c66d5f2f8"
}
]
}
Now, find all employees from the “Dev Ops” and “Hardware” organizations.
This is the query:
{
"filter": {
"IN": { "person.org": [ "Dev Ops", "Hardware" ] }
}
}
An equivalent of this query in SQL is:
SELECT * FROM c WHERE
person.org IN ("Dev Ops", "Hardware")
Execute the query with the following command:
curl -s -X POST -H "Content-Type: application/json" -d @query-api-examples/query2.json http://localhost:3500/v1.0-alpha1/state/statestore/query | jq .
Invoke-RestMethod -Method Post -ContentType 'application/json' -InFile query-api-examples/query2.json -Uri 'http://localhost:3500/v1.0-alpha1/state/statestore/query'
Similar to the previous example, the result is an array of matching key/value pairs.
In this example, find:
In addition, sort the results first by state in descending alphabetical order, then by employee ID in ascending order. Let’s process up to 3 records at a time.
This is the query:
{
"filter": {
"OR": [
{
"EQ": { "person.org": "Dev Ops" }
},
{
"AND": [
{
"EQ": { "person.org": "Finance" }
},
{
"IN": { "state": [ "CA", "WA" ] }
}
]
}
]
},
"sort": [
{
"key": "state",
"order": "DESC"
},
{
"key": "person.id"
}
],
"page": {
"limit": 3
}
}
An equivalent of this query in SQL is:
SELECT * FROM c WHERE
person.org = "Dev Ops" OR
(person.org = "Finance" AND state IN ("CA", "WA"))
ORDER BY
state DESC,
person.id ASC
LIMIT 3
Execute the query with the following command:
curl -s -X POST -H "Content-Type: application/json" -d @query-api-examples/query3.json http://localhost:3500/v1.0-alpha1/state/statestore/query | jq .
Invoke-RestMethod -Method Post -ContentType 'application/json' -InFile query-api-examples/query3.json -Uri 'http://localhost:3500/v1.0-alpha1/state/statestore/query'
Upon successful execution, the state store returns a JSON object with a list of matching records and the pagination token:
{
"results": [
{
"key": "1",
"data": {
"person": {
"org": "Dev Ops",
"id": 1036
},
"city": "Seattle",
"state": "WA"
},
"etag": "6f54ad94-dfb9-46f0-a371-e42d550adb7d"
},
{
"key": "4",
"data": {
"person": {
"org": "Dev Ops",
"id": 1042
},
"city": "Spokane",
"state": "WA"
},
"etag": "7415707b-82ce-44d0-bf15-6dc6305af3b1"
},
{
"key": "10",
"data": {
"person": {
"org": "Dev Ops",
"id": 1054
},
"city": "New York",
"state": "NY"
},
"etag": "26bbba88-9461-48d1-8a35-db07c374e5aa"
}
],
"token": "3"
}
The pagination token is used “as is” in the subsequent query to get the next batch of records:
{
"filter": {
"OR": [
{
"EQ": { "person.org": "Dev Ops" }
},
{
"AND": [
{
"EQ": { "person.org": "Finance" }
},
{
"IN": { "state": [ "CA", "WA" ] }
}
]
}
]
},
"sort": [
{
"key": "state",
"order": "DESC"
},
{
"key": "person.id"
}
],
"page": {
"limit": 3,
"token": "3"
}
}
curl -s -X POST -H "Content-Type: application/json" -d @query-api-examples/query3-token.json http://localhost:3500/v1.0-alpha1/state/statestore/query | jq .
Invoke-RestMethod -Method Post -ContentType 'application/json' -InFile query-api-examples/query3-token.json -Uri 'http://localhost:3500/v1.0-alpha1/state/statestore/query'
And the result of this query is:
{
"results": [
{
"key": "9",
"data": {
"person": {
"org": "Finance",
"id": 1002
},
"city": "San Diego",
"state": "CA"
},
"etag": "f5cf05cd-fb43-4154-a2ec-445c66d5f2f8"
},
{
"key": "7",
"data": {
"city": "San Francisco",
"state": "CA",
"person": {
"id": 1015,
"org": "Dev Ops"
}
},
"etag": "0e69e69f-3dbc-423a-9db8-26767fcd2220"
},
{
"key": "3",
"data": {
"person": {
"org": "Finance",
"id": 1071
},
"city": "Sacramento",
"state": "CA"
},
"etag": "44723d41-deb1-4c23-940e-3e6896c3b6f7"
}
],
"token": "6"
}
That way you can update the pagination token in the query and iterate through the results until no more records are returned.
The state query API has the following limitations:
You can find additional information in the related links section.
In this article, you’ll learn how to create a stateful service which can be horizontally scaled, using opt-in concurrency and consistency models. Consuming the state management API frees developers from difficult state coordination, conflict resolution, and failure handling.
A state store component represents a resource that Dapr uses to communicate with a database. For the purpose of this guide, we’ll use the default Redis state store.
When you run dapr init in self-hosted mode, Dapr creates a default Redis statestore.yaml and runs a Redis state store on your local machine, located:
%UserProfile%\.dapr\components\statestore.yaml~/.dapr/components/statestore.yamlWith the statestore.yaml component, you can easily swap out underlying components without application code changes.
See a list of supported state stores.
See how to setup different state stores on Kubernetes.
Using strong consistency, Dapr makes sure that the underlying state store:
For get requests, Dapr ensures the store returns the most up-to-date data consistently among replicas. The default is eventual consistency, unless specified otherwise in the request to the state API.
The following examples illustrate how to save, get, and delete state using strong consistency. The example is written in Python, but is applicable to any programming language.
import requests
import json
store_name = "redis-store" # name of the state store as specified in state store component yaml file
dapr_state_url = "http://localhost:3500/v1.0/state/{}".format(store_name)
stateReq = '[{ "key": "k1", "value": "Some Data", "options": { "consistency": "strong" }}]'
response = requests.post(dapr_state_url, json=stateReq)
import requests
import json
store_name = "redis-store" # name of the state store as specified in state store component yaml file
dapr_state_url = "http://localhost:3500/v1.0/state/{}".format(store_name)
response = requests.get(dapr_state_url + "/key1", headers={"consistency":"strong"})
print(response.headers['ETag'])
import requests
import json
store_name = "redis-store" # name of the state store as specified in state store component yaml file
dapr_state_url = "http://localhost:3500/v1.0/state/{}".format(store_name)
response = requests.delete(dapr_state_url + "/key1", headers={"consistency":"strong"})
If the concurrency option hasn’t been specified, the default is last-write concurrency mode.
Dapr allows developers to opt-in for two common concurrency patterns when working with data stores:
Dapr uses version numbers to determine whether a specific key has been updated. You can:
If the version information has changed since the version number was retrieved, an error is thrown, requiring you to perform another read to get the latest version information and state.
Dapr utilizes ETags to determine the state’s version number. ETags are returned from state requests in an ETag header. Using ETags, your application knows that a resource has been updated since the last time they checked by erroring during an ETag mismatch.
The following example shows how to:
The following example is written in Python, but is applicable to any programming language.
import requests
import json
store_name = "redis-store" # name of the state store as specified in state store component yaml file
dapr_state_url = "http://localhost:3500/v1.0/state/{}".format(store_name)
response = requests.get(dapr_state_url + "/key1", headers={"concurrency":"first-write"})
etag = response.headers['ETag']
newState = '[{ "key": "k1", "value": "New Data", "etag": {}, "options": { "concurrency": "first-write" }}]'.format(etag)
requests.post(dapr_state_url, json=newState)
response = requests.delete(dapr_state_url + "/key1", headers={"If-Match": "{}".format(etag)})
In the following example, you’ll see how to retry a save state operation when the version has changed:
import requests
import json
# This method saves the state and returns false if failed to save state
def save_state(data):
try:
store_name = "redis-store" # name of the state store as specified in state store component yaml file
dapr_state_url = "http://localhost:3500/v1.0/state/{}".format(store_name)
response = requests.post(dapr_state_url, json=data)
if response.status_code == 200:
return True
except:
return False
return False
# This method gets the state and returns the response, with the ETag in the header -->
def get_state(key):
response = requests.get("http://localhost:3500/v1.0/state/<state_store_name>/{}".format(key), headers={"concurrency":"first-write"})
return response
# Exit when save state is successful. success will be False if there's an ETag mismatch -->
success = False
while success != True:
response = get_state("key1")
etag = response.headers['ETag']
newState = '[{ "key": "key1", "value": "New Data", "etag": {}, "options": { "concurrency": "first-write" }}]'.format(etag)
success = save_state(newState)
The transactional outbox pattern is a well known design pattern for sending notifications regarding changes in an application’s state. The transactional outbox pattern uses a single transaction that spans across the database and the message broker delivering the notification.
Developers are faced with many difficult technical challenges when trying to implement this pattern on their own, which often involves writing error-prone central coordination managers that, at most, support a combination of one or two databases and message brokers.
For example, you can use the outbox pattern to:
With Dapr’s outbox support, you can notify subscribers when an application’s state is created or updated when calling Dapr’s transactions API.
The diagram below is an overview of how the outbox feature works:
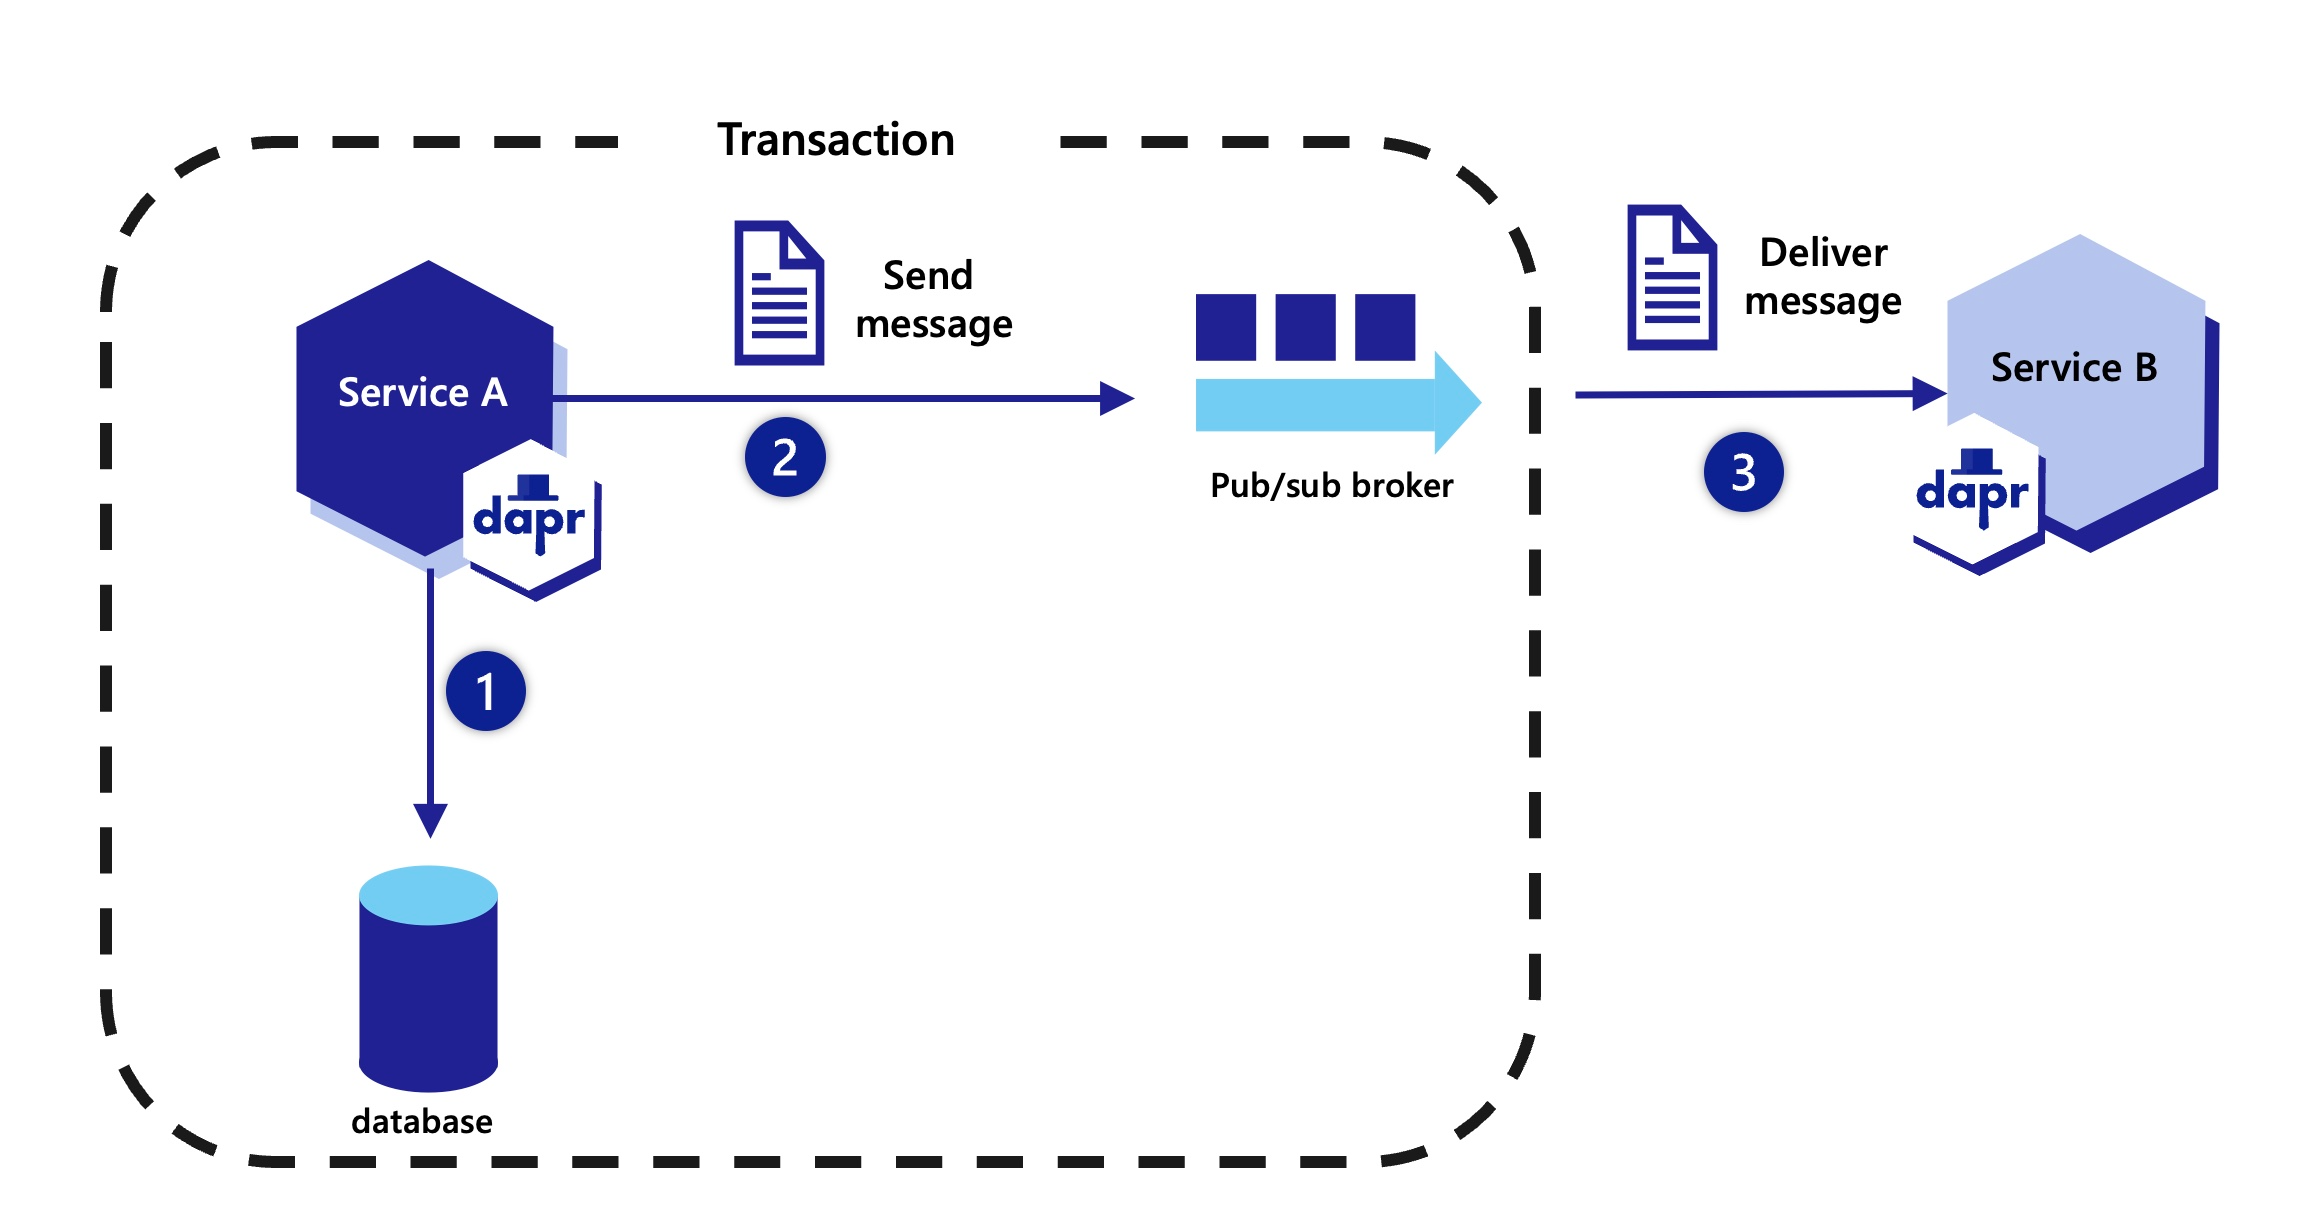
The outbox feature can be used with using any transactional state store supported by Dapr. All pub/sub brokers are supported with the outbox feature.
Learn more about the transactional methods you can use.
To enable the outbox feature, add the following required and optional fields on a state store component:
apiVersion: dapr.io/v1alpha1
kind: Component
metadata:
name: mysql-outbox
spec:
type: state.mysql
version: v1
metadata:
- name: connectionString
value: "<CONNECTION STRING>"
- name: outboxPublishPubsub # Required
value: "mypubsub"
- name: outboxPublishTopic # Required
value: "newOrder"
- name: outboxPubsub # Optional
value: "myOutboxPubsub"
- name: outboxDiscardWhenMissingState #Optional. Defaults to false
value: false
| Name | Required | Default Value | Description |
|---|---|---|---|
| outboxPublishPubsub | Yes | N/A | Sets the name of the pub/sub component to deliver the notifications when publishing state changes |
| outboxPublishTopic | Yes | N/A | Sets the topic that receives the state changes on the pub/sub configured with outboxPublishPubsub. The message body will be a state transaction item for an insert or update operation |
| outboxPubsub | No | outboxPublishPubsub |
Sets the pub/sub component used by Dapr to coordinate the state and pub/sub transactions. If not set, the pub/sub component configured with outboxPublishPubsub is used. This is useful if you want to separate the pub/sub component used to send the notification state changes from the one used to coordinate the transaction |
| outboxDiscardWhenMissingState | No | false |
By setting outboxDiscardWhenMissingState to true, Dapr discards the transaction if it cannot find the state in the database and does not retry. This setting can be useful if the state store data has been deleted for any reason before Dapr was able to deliver the message and you would like Dapr to drop the items from the pub/sub and stop retrying to fetch the state |
If you want to use the same state store for sending both outbox and non-outbox messages, simply define two state store components that connect to the same state store, where one has the outbox feature and the other does not.
apiVersion: dapr.io/v1alpha1
kind: Component
metadata:
name: mysql
spec:
type: state.mysql
version: v1
metadata:
- name: connectionString
value: "<CONNECTION STRING>"
apiVersion: dapr.io/v1alpha1
kind: Component
metadata:
name: mysql-outbox
spec:
type: state.mysql
version: v1
metadata:
- name: connectionString
value: "<CONNECTION STRING>"
- name: outboxPublishPubsub # Required
value: "mypubsub"
- name: outboxPublishTopic # Required
value: "newOrder"
You can override the outbox pattern message published to the pub/sub broker by setting another transaction that is not be saved to the database and is explicitly mentioned as a projection. This transaction is added a metadata key named outbox.projection with a value set to true. When added to the state array saved in a transaction, this payload is ignored when the state is written and the data is used as the payload sent to the upstream subscriber.
To use correctly, the key values must match between the operation on the state store and the message projection. If the keys do not match, the whole transaction fails.
If you have two or more outbox.projection enabled state items for the same key, the first one defined is used and the others are ignored.
Learn more about default and custom CloudEvent messages.
In the following Python SDK example of a state transaction, the value of "2" is saved to the database, but the value of "3" is published to the end-user topic.
DAPR_STORE_NAME = "statestore"
async def main():
client = DaprClient()
# Define the first state operation to save the value "2"
op1 = StateItem(
key="key1",
value=b"2"
)
# Define the second state operation to publish the value "3" with metadata
op2 = StateItem(
key="key1",
value=b"3",
options=StateOptions(
metadata={
"outbox.projection": "true"
}
)
)
# Create the list of state operations
ops = [op1, op2]
# Execute the state transaction
await client.state.transaction(DAPR_STORE_NAME, operations=ops)
print("State transaction executed.")
By setting the metadata item "outbox.projection" to "true" and making sure the key values match (key1):
In the following JavaScript SDK example of a state transaction, the value of "2" is saved to the database, but the value of "3" is published to the end-user topic.
const { DaprClient, StateOperationType } = require('@dapr/dapr');
const DAPR_STORE_NAME = "statestore";
async function main() {
const client = new DaprClient();
// Define the first state operation to save the value "2"
const op1 = {
operation: StateOperationType.UPSERT,
request: {
key: "key1",
value: "2"
}
};
// Define the second state operation to publish the value "3" with metadata
const op2 = {
operation: StateOperationType.UPSERT,
request: {
key: "key1",
value: "3",
metadata: {
"outbox.projection": "true"
}
}
};
// Create the list of state operations
const ops = [op1, op2];
// Execute the state transaction
await client.state.transaction(DAPR_STORE_NAME, ops);
console.log("State transaction executed.");
}
main().catch(err => {
console.error(err);
});
By setting the metadata item "outbox.projection" to "true" and making sure the key values match (key1):
In the following .NET SDK example of a state transaction, the value of "2" is saved to the database, but the value of "3" is published to the end-user topic.
public class Program
{
private const string DAPR_STORE_NAME = "statestore";
public static async Task Main(string[] args)
{
var client = new DaprClientBuilder().Build();
// Define the first state operation to save the value "2"
var op1 = new StateTransactionRequest(
key: "key1",
value: Encoding.UTF8.GetBytes("2"),
operationType: StateOperationType.Upsert
);
// Define the second state operation to publish the value "3" with metadata
var metadata = new Dictionary<string, string>
{
{ "outbox.projection", "true" }
};
var op2 = new StateTransactionRequest(
key: "key1",
value: Encoding.UTF8.GetBytes("3"),
operationType: StateOperationType.Upsert,
metadata: metadata
);
// Create the list of state operations
var ops = new List<StateTransactionRequest> { op1, op2 };
// Execute the state transaction
await client.ExecuteStateTransactionAsync(DAPR_STORE_NAME, ops);
Console.WriteLine("State transaction executed.");
}
}
By setting the metadata item "outbox.projection" to "true" and making sure the key values match (key1):
In the following Java SDK example of a state transaction, the value of "2" is saved to the database, but the value of "3" is published to the end-user topic.
public class Main {
private static final String DAPR_STORE_NAME = "statestore";
public static void main(String[] args) {
try (DaprClient client = new DaprClientBuilder().build()) {
// Define the first state operation to save the value "2"
StateOperation<String> op1 = new StateOperation<>(
StateOperationType.UPSERT,
"key1",
"2"
);
// Define the second state operation to publish the value "3" with metadata
Map<String, String> metadata = new HashMap<>();
metadata.put("outbox.projection", "true");
StateOperation<String> op2 = new StateOperation<>(
StateOperationType.UPSERT,
"key1",
"3",
metadata
);
// Create the list of state operations
List<StateOperation<?>> ops = new ArrayList<>();
ops.add(op1);
ops.add(op2);
// Execute the state transaction
client.executeStateTransaction(DAPR_STORE_NAME, ops).block();
System.out.println("State transaction executed.");
} catch (Exception e) {
e.printStackTrace();
}
}
}
By setting the metadata item "outbox.projection" to "true" and making sure the key values match (key1):
In the following Go SDK example of a state transaction, the value of "2" is saved to the database, but the value of "3" is published to the end-user topic.
ops := make([]*dapr.StateOperation, 0)
op1 := &dapr.StateOperation{
Type: dapr.StateOperationTypeUpsert,
Item: &dapr.SetStateItem{
Key: "key1",
Value: []byte("2"),
},
}
op2 := &dapr.StateOperation{
Type: dapr.StateOperationTypeUpsert,
Item: &dapr.SetStateItem{
Key: "key1",
Value: []byte("3"),
// Override the data payload saved to the database
Metadata: map[string]string{
"outbox.projection": "true",
},
},
}
ops = append(ops, op1, op2)
meta := map[string]string{}
err := testClient.ExecuteStateTransaction(ctx, store, meta, ops)
By setting the metadata item "outbox.projection" to "true" and making sure the key values match (key1):
You can pass the message override using the following HTTP request:
curl -X POST http://localhost:3500/v1.0/state/starwars/transaction \
-H "Content-Type: application/json" \
-d '{
"operations": [
{
"operation": "upsert",
"request": {
"key": "order1",
"value": {
"orderId": "7hf8374s",
"type": "book",
"name": "The name of the wind"
}
}
},
{
"operation": "upsert",
"request": {
"key": "order1",
"value": {
"orderId": "7hf8374s"
},
"metadata": {
"outbox.projection": "true"
},
"contentType": "application/json"
}
}
]
}'
By setting the metadata item "outbox.projection" to "true" and making sure the key values match (key1):
You can override the Dapr-generated CloudEvent fields on the published outbox event with custom CloudEvent metadata.
async def execute_state_transaction():
async with DaprClient() as client:
# Define state operations
ops = []
op1 = {
'operation': 'upsert',
'request': {
'key': 'key1',
'value': b'2', # Convert string to byte array
'metadata': {
'cloudevent.id': 'unique-business-process-id',
'cloudevent.source': 'CustomersApp',
'cloudevent.type': 'CustomerCreated',
'cloudevent.subject': '123',
'my-custom-ce-field': 'abc'
}
}
}
ops.append(op1)
# Execute state transaction
store_name = 'your-state-store-name'
try:
await client.execute_state_transaction(store_name, ops)
print('State transaction executed.')
except Exception as e:
print('Error executing state transaction:', e)
# Run the async function
if __name__ == "__main__":
asyncio.run(execute_state_transaction())
const { DaprClient } = require('dapr-client');
async function executeStateTransaction() {
// Initialize Dapr client
const daprClient = new DaprClient();
// Define state operations
const ops = [];
const op1 = {
operationType: 'upsert',
request: {
key: 'key1',
value: Buffer.from('2'),
metadata: {
'id': 'unique-business-process-id',
'source': 'CustomersApp',
'type': 'CustomerCreated',
'subject': '123',
'my-custom-ce-field': 'abc'
}
}
};
ops.push(op1);
// Execute state transaction
const storeName = 'your-state-store-name';
const metadata = {};
}
executeStateTransaction();
public class StateOperationExample
{
public async Task ExecuteStateTransactionAsync()
{
var daprClient = new DaprClientBuilder().Build();
// Define the value "2" as a string and serialize it to a byte array
var value = "2";
var valueBytes = JsonSerializer.SerializeToUtf8Bytes(value);
// Define the first state operation to save the value "2" with metadata
// Override Cloudevent metadata
var metadata = new Dictionary<string, string>
{
{ "cloudevent.id", "unique-business-process-id" },
{ "cloudevent.source", "CustomersApp" },
{ "cloudevent.type", "CustomerCreated" },
{ "cloudevent.subject", "123" },
{ "my-custom-ce-field", "abc" }
};
var op1 = new StateTransactionRequest(
key: "key1",
value: valueBytes,
operationType: StateOperationType.Upsert,
metadata: metadata
);
// Create the list of state operations
var ops = new List<StateTransactionRequest> { op1 };
// Execute the state transaction
var storeName = "your-state-store-name";
await daprClient.ExecuteStateTransactionAsync(storeName, ops);
Console.WriteLine("State transaction executed.");
}
public static async Task Main(string[] args)
{
var example = new StateOperationExample();
await example.ExecuteStateTransactionAsync();
}
}
public class StateOperationExample {
public static void main(String[] args) {
executeStateTransaction();
}
public static void executeStateTransaction() {
// Build Dapr client
try (DaprClient daprClient = new DaprClientBuilder().build()) {
// Define the value "2"
String value = "2";
// Override CloudEvent metadata
Map<String, String> metadata = new HashMap<>();
metadata.put("cloudevent.id", "unique-business-process-id");
metadata.put("cloudevent.source", "CustomersApp");
metadata.put("cloudevent.type", "CustomerCreated");
metadata.put("cloudevent.subject", "123");
metadata.put("my-custom-ce-field", "abc");
// Define state operations
List<StateOperation<?>> ops = new ArrayList<>();
StateOperation<String> op1 = new StateOperation<>(
StateOperationType.UPSERT,
"key1",
value,
metadata
);
ops.add(op1);
// Execute state transaction
String storeName = "your-state-store-name";
daprClient.executeStateTransaction(storeName, ops).block();
System.out.println("State transaction executed.");
} catch (Exception e) {
e.printStackTrace();
}
}
}
func main() {
// Create a Dapr client
client, err := dapr.NewClient()
if err != nil {
log.Fatalf("failed to create Dapr client: %v", err)
}
defer client.Close()
ctx := context.Background()
store := "your-state-store-name"
// Define state operations
ops := make([]*dapr.StateOperation, 0)
op1 := &dapr.StateOperation{
Type: dapr.StateOperationTypeUpsert,
Item: &dapr.SetStateItem{
Key: "key1",
Value: []byte("2"),
// Override Cloudevent metadata
Metadata: map[string]string{
"cloudevent.id": "unique-business-process-id",
"cloudevent.source": "CustomersApp",
"cloudevent.type": "CustomerCreated",
"cloudevent.subject": "123",
"my-custom-ce-field": "abc",
},
},
}
ops = append(ops, op1)
// Metadata for the transaction (if any)
meta := map[string]string{}
// Execute state transaction
err = client.ExecuteStateTransaction(ctx, store, meta, ops)
if err != nil {
log.Fatalf("failed to execute state transaction: %v", err)
}
log.Println("State transaction executed.")
}
curl -X POST http://localhost:3500/v1.0/state/starwars/transaction \
-H "Content-Type: application/json" \
-d '{
"operations": [
{
"operation": "upsert",
"request": {
"key": "key1",
"value": "2"
}
},
],
"metadata": {
"id": "unique-business-process-id",
"source": "CustomersApp",
"type": "CustomerCreated",
"subject": "123",
"my-custom-ce-field": "abc",
}
}'
data CloudEvent field is reserved for Dapr’s use only, and is non-customizable.
Dapr provides different ways to share state between applications.
Different architectures might have different needs when it comes to sharing state. In one scenario, you may want to:
In a different scenario, you may need two applications working on the same state to get and save the same keys.
To enable state sharing, Dapr supports the following key prefixes strategies:
| Key prefixes | Description |
|---|---|
appid |
The default strategy allowing you to manage state only by the app with the specified appid. All state keys will be prefixed with the appid, and are scoped for the application. |
name |
Uses the name of the state store component as the prefix. Multiple applications can share the same state for a given state store. |
namespace |
If set, this setting prefixes the appid key with the configured namespace, resulting in a key that is scoped to a given namespace. This allows apps in different namespace with the same appid to reuse the same state store. If a namespace is not configured, the setting fallbacks to the appid strategy. For more information on namespaces in Dapr see How-To: Scope components to one or more applications |
none |
Uses no prefixing. Multiple applications share state across different state stores. |
To specify a prefix strategy, add a metadata key named keyPrefix on a state component:
apiVersion: dapr.io/v1alpha1
kind: Component
metadata:
name: statestore
namespace: production
spec:
type: state.redis
version: v1
metadata:
- name: keyPrefix
value: <key-prefix-strategy>
The following examples demonstrate what state retrieval looks like with each of the supported prefix strategies.
appid (default)In the example below, a Dapr application with app id myApp is saving state into a state store named redis:
curl -X POST http://localhost:3500/v1.0/state/redis \
-H "Content-Type: application/json"
-d '[
{
"key": "darth",
"value": "nihilus"
}
]'
The key will be saved as myApp||darth.
namespaceA Dapr application running in namespace production with app id myApp is saving state into a state store named redis:
curl -X POST http://localhost:3500/v1.0/state/redis \
-H "Content-Type: application/json"
-d '[
{
"key": "darth",
"value": "nihilus"
}
]'
The key will be saved as production.myApp||darth.
nameIn the example below, a Dapr application with app id myApp is saving state into a state store named redis:
curl -X POST http://localhost:3500/v1.0/state/redis \
-H "Content-Type: application/json"
-d '[
{
"key": "darth",
"value": "nihilus"
}
]'
The key will be saved as redis||darth.
noneIn the example below, a Dapr application with app id myApp is saving state into a state store named redis:
curl -X POST http://localhost:3500/v1.0/state/redis \
-H "Content-Type: application/json"
-d '[
{
"key": "darth",
"value": "nihilus"
}
]'
The key will be saved as darth.
Encrypt application state at rest to provide stronger security in enterprise workloads or regulated environments. Dapr offers automatic client-side encryption based on AES in Galois/Counter Mode (GCM), supporting keys of 128, 192, and 256-bits.
In addition to automatic encryption, Dapr supports primary and secondary encryption keys to make it easier for developers and ops teams to enable a key rotation strategy. This feature is supported by all Dapr state stores.
The encryption keys are always fetched from a secret, and cannot be supplied as plaintext values on the metadata section.
Add the following metadata section to any Dapr supported state store:
metadata:
- name: primaryEncryptionKey
secretKeyRef:
name: mysecret
key: mykey # key is optional.
For example, this is the full YAML of a Redis encrypted state store:
apiVersion: dapr.io/v1alpha1
kind: Component
metadata:
name: statestore
spec:
type: state.redis
version: v1
metadata:
- name: redisHost
value: localhost:6379
- name: redisPassword
value: ""
- name: primaryEncryptionKey
secretKeyRef:
name: mysecret
key: mykey
You now have a Dapr state store configured to fetch the encryption key from a secret named mysecret, containing the actual encryption key in a key named mykey.
The actual encryption key must be a valid, hex-encoded encryption key. While 192-bit and 256-bit keys are supported, it’s recommended you use 128-bit encryption keys. Dapr errors and exists if the encryption key is invalid.
For example, you can generate a random, hex-encoded 128-bit (16-byte) key with:
openssl rand 16 | hexdump -v -e '/1 "%02x"'
# Result will be similar to "cb321007ad11a9d23f963bff600d58e0"
Note that the secret store does not have to support keys.
To support key rotation, Dapr provides a way to specify a secondary encryption key:
metadata:
- name: primaryEncryptionKey
secretKeyRef:
name: mysecret
key: mykey
- name: secondaryEncryptionKey
secretKeyRef:
name: mysecret2
key: mykey2
When Dapr starts, it fetches the secrets containing the encryption keys listed in the metadata section. Dapr automatically knows which state item has been encrypted with which key, as it appends the secretKeyRef.name field to the end of the actual state key.
To rotate a key,
primaryEncryptionKey to point to a secret containing your new key.secondaryEncryptionKey.New data will be encrypted using the new key, and any retrieved old data will be decrypted using the secondary key.
Any updates to data items encrypted with the old key will be re-encrypted using the new key.
Explore the Operations section to see a list of supported state stores and how to setup state store components.
Dapr doesn’t transform state values while saving and retrieving states. Dapr requires all state store implementations to abide by a certain key format scheme (see the state management spec. You can directly interact with the underlying store to manipulate the state data, such as:
To connect to your Cosmos DB instance, you can either:
To get all state keys associated with application “myapp”, use the query:
SELECT * FROM states WHERE CONTAINS(states.id, 'myapp||')
The above query returns all documents with an id containing “myapp-”, which is the prefix of the state keys.
To get the state data by a key “balance” for the application “myapp”, use the query:
SELECT * FROM states WHERE states.id = 'myapp||balance'
Read the value field of the returned document. To get the state version/ETag, use the command:
SELECT states._etag FROM states WHERE states.id = 'myapp||balance'
To get all the state keys associated with an actor with the instance ID “leroy” of actor type “cat” belonging to the application with ID “mypets”, use the command:
SELECT * FROM states WHERE CONTAINS(states.id, 'mypets||cat||leroy||')
And to get a specific actor state such as “food”, use the command:
SELECT * FROM states WHERE states.id = 'mypets||cat||leroy||food'
Dapr doesn’t transform state values while saving and retrieving states. Dapr requires all state store implementations to abide by a certain key format scheme (see the state management spec. You can directly interact with the underlying store to manipulate the state data, such as:
You can use the official redis-cli or any other Redis compatible tools to connect to the Redis state store to query Dapr states directly. If you are running Redis in a container, the easiest way to use redis-cli is via a container:
docker run --rm -it --link <name of the Redis container> redis redis-cli -h <name of the Redis container>
To get all state keys associated with application “myapp”, use the command:
KEYS myapp*
The above command returns a list of existing keys, for example:
1) "myapp||balance"
2) "myapp||amount"
Dapr saves state values as hash values. Each hash value contains a “data” field, which contains:
For example, to get the state data by a key “balance” for the application “myapp”, use the command:
HGET myapp||balance data
To get the state version/ETag, use the command:
HGET myapp||balance version
To get all the state keys associated with an actor with the instance ID “leroy” of actor type “cat” belonging to the application with ID “mypets”, use the command:
KEYS mypets||cat||leroy*
To get a specific actor state such as “food”, use the command:
HGET mypets||cat||leroy||food value
Dapr doesn’t transform state values while saving and retrieving states. Dapr requires all state store implementations to abide by a certain key format scheme (see the state management spec. You can directly interact with the underlying store to manipulate the state data, such as:
The easiest way to connect to your SQL Server instance is to use the:
To get all state keys associated with application “myapp”, use the query:
SELECT * FROM states WHERE [Key] LIKE 'myapp||%'
The above query returns all rows with id containing “myapp||”, which is the prefix of the state keys.
To get the state data by a key “balance” for the application “myapp”, use the query:
SELECT * FROM states WHERE [Key] = 'myapp||balance'
Read the Data field of the returned row. To get the state version/ETag, use the command:
SELECT [RowVersion] FROM states WHERE [Key] = 'myapp||balance'
To get all state data where the value “color” in json data equals to “blue”, use the query:
SELECT * FROM states WHERE JSON_VALUE([Data], '$.color') = 'blue'
To get all the state keys associated with an actor with the instance ID “leroy” of actor type “cat” belonging to the application with ID “mypets”, use the command:
SELECT * FROM states WHERE [Key] LIKE 'mypets||cat||leroy||%'
To get a specific actor state such as “food”, use the command:
SELECT * FROM states WHERE [Key] = 'mypets||cat||leroy||food'
Dapr enables per state set request time-to-live (TTL). This means that applications can set time-to-live per state stored, and these states cannot be retrieved after expiration.
For supported state stores, you simply set the ttlInSeconds metadata when publishing a message. Other state stores will ignore this value. For some state stores, you can specify a default expiration on a per-table/container basis.
When state TTL has native support in the state store component, Dapr forwards the TTL configuration without adding any extra logic, maintaining predictable behavior. This is helpful when the expired state is handled differently by the component.
When a TTL is not specified, the default behavior of the state store is retained.
Persisting state applies to all state stores that let you specify a default TTL used for all data, either:
When no specific TTL is specified, the data expires after that global TTL period of time. This is not facilitated by Dapr.
In addition, all state stores also support the option to explicitly persist data. This means you can ignore the default database policy (which may have been set outside of Dapr or via a Dapr Component) to indefinitely retain a given database record. You can do this by setting ttlInSeconds to the value of -1. This value indicates to ignore any TTL value set.
Refer to the TTL column in the state store components guide.
You can set state TTL in the metadata as part of the state store set request:
#dependencies
from dapr.clients import DaprClient
#code
DAPR_STORE_NAME = "statestore"
with DaprClient() as client:
client.save_state(DAPR_STORE_NAME, "order_1", str(orderId), state_metadata={
'ttlInSeconds': '120'
})
To launch a Dapr sidecar and run the above example application, you’d then run a command similar to the following:
dapr run --app-id orderprocessing --app-port 6001 --dapr-http-port 3601 --dapr-grpc-port 60001 -- python3 OrderProcessingService.py
// dependencies
using Dapr.Client;
// code
await client.SaveStateAsync(storeName, stateKeyName, state, metadata: new Dictionary<string, string>() {
{
"ttlInSeconds", "120"
}
});
To launch a Dapr sidecar and run the above example application, you’d then run a command similar to the following:
dapr run --app-id orderprocessing --app-port 6001 --dapr-http-port 3601 --dapr-grpc-port 60001 dotnet run
// dependencies
import (
dapr "github.com/dapr/go-sdk/client"
)
// code
md := map[string]string{"ttlInSeconds": "120"}
if err := client.SaveState(ctx, store, "key1", []byte("hello world"), md); err != nil {
panic(err)
}
To launch a Dapr sidecar and run the above example application, you’d then run a command similar to the following:
dapr run --app-id orderprocessing --app-port 6001 --dapr-http-port 3601 --dapr-grpc-port 60001 go run .
curl -X POST -H "Content-Type: application/json" -d '[{ "key": "order_1", "value": "250", "metadata": { "ttlInSeconds": "120" } }]' http://localhost:3601/v1.0/state/statestore
Invoke-RestMethod -Method Post -ContentType 'application/json' -Body '[{"key": "order_1", "value": "250", "metadata": {"ttlInSeconds": "120"}}]' -Uri 'http://localhost:3601/v1.0/state/statestore'
Learn more about how to use Dapr Bindings:
Using Dapr’s bindings API, you can trigger your app with events coming in from external systems and interface with external systems. With the bindings API, you can:
For example, with bindings, your application can respond to incoming Twilio/SMS messages without:
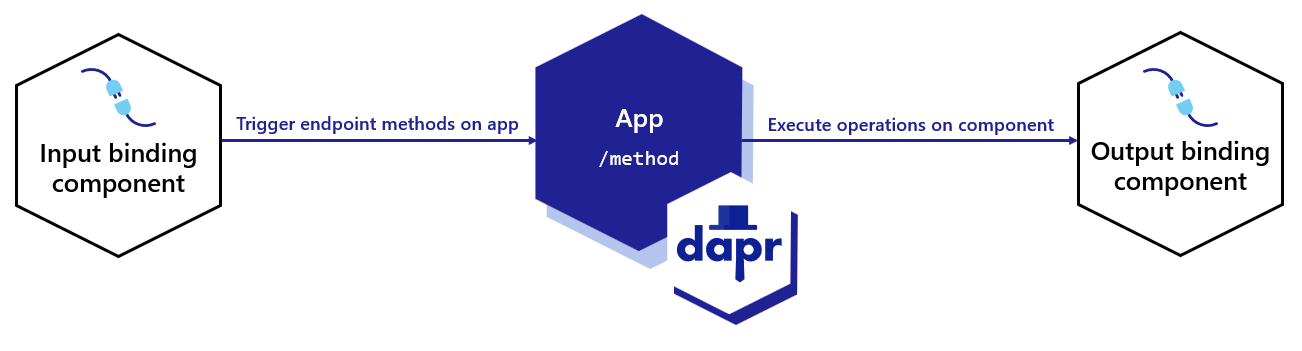
In the above diagram:
"create".Bindings are developed independently of Dapr runtime. You can view and contribute to the bindings.
With input bindings, you can trigger your application when an event from an external resource occurs. An optional payload and metadata may be sent with the request.
The following overview video and demo demonstrates how Dapr input binding works.
To receive events from an input binding:
Read the Create an event-driven app using input bindings guide to get started with input bindings.
With output bindings, you can invoke external resources. An optional payload and metadata can be sent with the invocation request.
The following overview video and demo demonstrates how Dapr output binding works.
To invoke an output binding:
"create""update""delete""exec"Read the Use output bindings to interface with external resources guide to get started with output bindings.
You can provide the direction metadata field to indicate the direction(s) supported by the binding component. In doing so, the Dapr sidecar avoids the "wait for the app to become ready" state, reducing the lifecycle dependency between the Dapr sidecar and the application:
"input""output""input, output"direction property.
See a full example of the bindings direction metadata.
Want to put the Dapr bindings API to the test? Walk through the following quickstart and tutorials to see bindings in action:
| Quickstart/tutorial | Description |
|---|---|
| Bindings quickstart | Work with external systems using input bindings to respond to events and output bindings to call operations. |
| Bindings tutorial | Demonstrates how to use Dapr to create input and output bindings to other components. Uses bindings to Kafka. |
Want to skip the quickstarts? Not a problem. You can try out the bindings building block directly in your application to invoke output bindings and trigger input bindings. After Dapr is installed, you can begin using the bindings API starting with the input bindings how-to guide.
With input bindings, you can trigger your application when an event from an external resource occurs. An external resource could be a queue, messaging pipeline, cloud-service, filesystem, etc. An optional payload and metadata may be sent with the request.
Input bindings are ideal for event-driven processing, data pipelines, or generally reacting to events and performing further processing. Dapr input bindings allow you to:
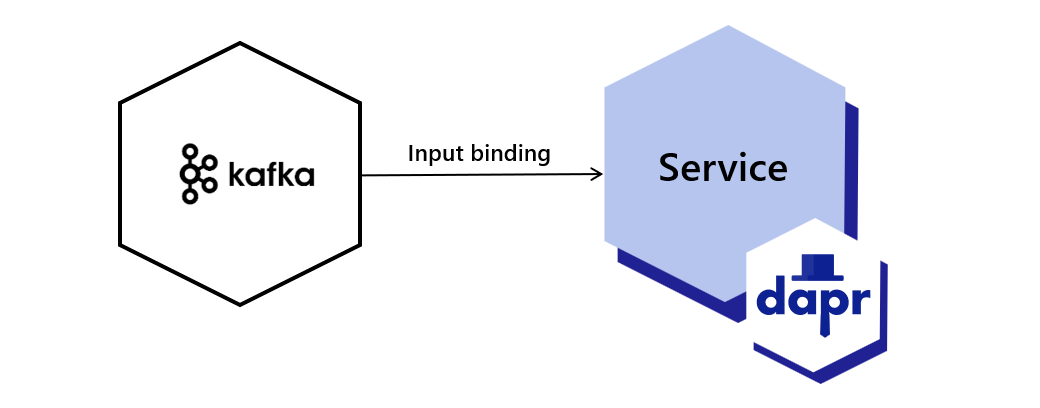
This guide uses a Kafka binding as an example. You can find your preferred binding spec from the list of bindings components. In this guide:
/binding endpoint with checkout, the name of the binding to invoke.data field, and can be any JSON serializable value.operation field tells the binding what action it needs to take. For example, the Kafka binding supports the create operation.
Create a binding.yaml file and save to a components sub-folder in your application directory.
Create a new binding component named checkout. Within the metadata section, configure the following Kafka-related properties:
When creating the binding component, specify the supported direction of the binding.
Use the --resources-path flag with the dapr run command to point to your custom resources directory.
apiVersion: dapr.io/v1alpha1
kind: Component
metadata:
name: checkout
spec:
type: bindings.kafka
version: v1
metadata:
# Kafka broker connection setting
- name: brokers
value: localhost:9092
# consumer configuration: topic and consumer group
- name: topics
value: sample
- name: consumerGroup
value: group1
# publisher configuration: topic
- name: publishTopic
value: sample
- name: authRequired
value: false
- name: direction
value: input
To deploy into a Kubernetes cluster, run kubectl apply -f binding.yaml.
apiVersion: dapr.io/v1alpha1
kind: Component
metadata:
name: checkout
spec:
type: bindings.kafka
version: v1
metadata:
# Kafka broker connection setting
- name: brokers
value: localhost:9092
# consumer configuration: topic and consumer group
- name: topics
value: sample
- name: consumerGroup
value: group1
# publisher configuration: topic
- name: publishTopic
value: sample
- name: authRequired
value: false
- name: direction
value: input
Configure your application to receive incoming events. If you’re using HTTP, you need to:
POST endpoint with the name of the binding, as specified in metadata.name in the binding.yaml file.OPTIONS request for this endpoint.Below are code examples that leverage Dapr SDKs to demonstrate an input binding.
The following example demonstrates how to configure an input binding using ASP.NET Core controllers.
The following example demonstrates how to configure an input binding using ASP.NET Core controllers.
using System.Collections.Generic;
using System.Threading.Tasks;
using System;
using Microsoft.AspNetCore.Mvc;
namespace CheckoutService.controller;
[ApiController]
public sealed class CheckoutServiceController : ControllerBase
{
[HttpPost("/checkout")]
public ActionResult<string> getCheckout([FromBody] int orderId)
{
Console.WriteLine($"Received Message: {orderId}");
return $"CID{orderId}";
}
}
The following example demonstrates how to configure the same input binding using a minimal API approach:
app.MapPost("checkout", ([FromBody] int orderId) =>
{
Console.WriteLine($"Received Message: {orderId}");
return $"CID{orderId}"
});
//dependencies
import org.springframework.web.bind.annotation.*;
import org.slf4j.Logger;
import org.slf4j.LoggerFactory;
import reactor.core.publisher.Mono;
//code
@RestController
@RequestMapping("/")
public class CheckoutServiceController {
private static final Logger log = LoggerFactory.getLogger(CheckoutServiceController.class);
@PostMapping(path = "/checkout")
public Mono<String> getCheckout(@RequestBody(required = false) byte[] body) {
return Mono.fromRunnable(() ->
log.info("Received Message: " + new String(body)));
}
}
#dependencies
import logging
from dapr.ext.grpc import App, BindingRequest
#code
app = App()
@app.binding('checkout')
def getCheckout(request: BindingRequest):
logging.basicConfig(level = logging.INFO)
logging.info('Received Message : ' + request.text())
app.run(6002)
//dependencies
import (
"encoding/json"
"log"
"net/http"
"github.com/gorilla/mux"
)
//code
func getCheckout(w http.ResponseWriter, r *http.Request) {
w.Header().Set("Content-Type", "application/json")
var orderId int
err := json.NewDecoder(r.Body).Decode(&orderId)
log.Println("Received Message: ", orderId)
if err != nil {
log.Printf("error parsing checkout input binding payload: %s", err)
w.WriteHeader(http.StatusOK)
return
}
}
func main() {
r := mux.NewRouter()
r.HandleFunc("/checkout", getCheckout).Methods("POST", "OPTIONS")
http.ListenAndServe(":6002", r)
}
//dependencies
import { DaprServer, CommunicationProtocolEnum } from '@dapr/dapr';
//code
const daprHost = "127.0.0.1";
const serverHost = "127.0.0.1";
const serverPort = "6002";
const daprPort = "3602";
start().catch((e) => {
console.error(e);
process.exit(1);
});
async function start() {
const server = new DaprServer({
serverHost,
serverPort,
communicationProtocol: CommunicationProtocolEnum.HTTP,
clientOptions: {
daprHost,
daprPort,
}
});
await server.binding.receive('checkout', async (orderId) => console.log(`Received Message: ${JSON.stringify(orderId)}`));
await server.start();
}
Tell Dapr you’ve successfully processed an event in your application by returning a 200 OK response from your HTTP handler.
Tell Dapr the event was not processed correctly in your application and schedule it for redelivery by returning any response other than 200 OK. For example, a 500 Error.
By default, incoming events will be sent to an HTTP endpoint that corresponds to the name of the input binding. You can override this by setting the following metadata property in binding.yaml:
name: mybinding
spec:
type: binding.rabbitmq
metadata:
- name: route
value: /onevent
Event delivery guarantees are controlled by the binding implementation. Depending on the binding implementation, the event delivery can be exactly once or at least once.
With output bindings, you can invoke external resources. An optional payload and metadata can be sent with the invocation request.
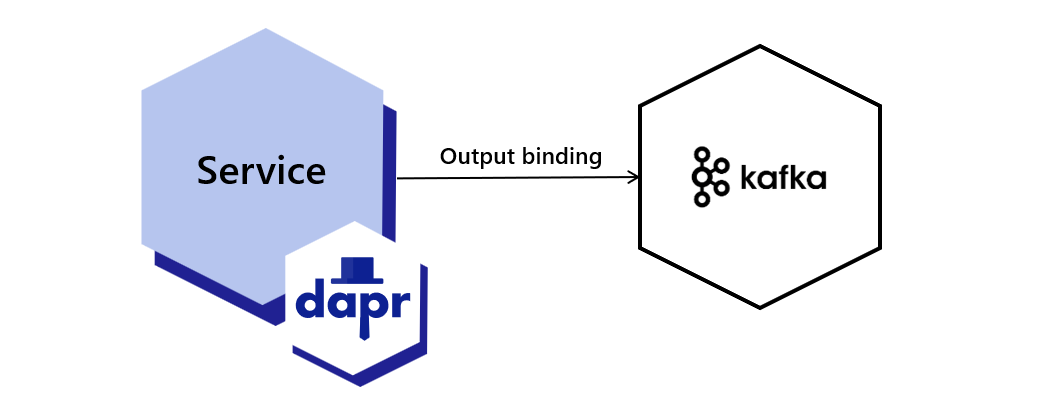
This guide uses a Kafka binding as an example. You can find your preferred binding spec from the list of bindings components. In this guide:
/binding endpoint with checkout, the name of the binding to invoke.data field, and can be any JSON serializable value.operation field tells the binding what action it needs to take. For example, the Kafka binding supports the create operation.
Create a binding.yaml file and save to a components sub-folder in your application directory.
Create a new binding component named checkout. Within the metadata section, configure the following Kafka-related properties:
When creating the binding component, specify the supported direction of the binding.
Use the --resources-path flag with dapr run to point to your custom resources directory.
apiVersion: dapr.io/v1alpha1
kind: Component
metadata:
name: checkout
spec:
type: bindings.kafka
version: v1
metadata:
# Kafka broker connection setting
- name: brokers
value: localhost:9092
# consumer configuration: topic and consumer group
- name: topics
value: sample
- name: consumerGroup
value: group1
# publisher configuration: topic
- name: publishTopic
value: sample
- name: authRequired
value: false
- name: direction
value: output
To deploy the following binding.yaml file into a Kubernetes cluster, run kubectl apply -f binding.yaml.
apiVersion: dapr.io/v1alpha1
kind: Component
metadata:
name: checkout
spec:
type: bindings.kafka
version: v1
metadata:
# Kafka broker connection setting
- name: brokers
value: localhost:9092
# consumer configuration: topic and consumer group
- name: topics
value: sample
- name: consumerGroup
value: group1
# publisher configuration: topic
- name: publishTopic
value: sample
- name: authRequired
value: false
- name: direction
value: output
The code examples below leverage Dapr SDKs to invoke the output bindings endpoint on a running Dapr instance.
Here’s an example of using a console app with top-level statements in .NET 6+:
Here’s an example of using a console app with top-level statements in .NET 6+:
using System.Text;
using System.Threading.Tasks;
using Dapr.Client;
var builder = WebApplication.CreateBuilder(args);
builder.Services.AddDaprClient();
var app = builder.Build();
const string BINDING_NAME = "checkout";
const string BINDING_OPERATION = "create";
var random = new Random();
using var daprClient = app.Services.GetRequiredService<DaprClient>();
while (true)
{
await Task.Delay(TimeSpan.FromSeconds(5));
var orderId = random.Next(1, 1000);
await client.InvokeBindingAsync(BINDING_NAME, BINDING_OPERATION, orderId);
Console.WriteLine($"Sending message: {orderId}");
}
//dependencies
import io.dapr.client.DaprClient;
import io.dapr.client.DaprClientBuilder;
import io.dapr.client.domain.HttpExtension;
import org.springframework.boot.autoconfigure.SpringBootApplication;
import org.slf4j.Logger;
import org.slf4j.LoggerFactory;
import java.util.Random;
import java.util.concurrent.TimeUnit;
//code
@SpringBootApplication
public class OrderProcessingServiceApplication {
private static final Logger log = LoggerFactory.getLogger(OrderProcessingServiceApplication.class);
public static void main(String[] args) throws InterruptedException{
String BINDING_NAME = "checkout";
String BINDING_OPERATION = "create";
while(true) {
TimeUnit.MILLISECONDS.sleep(5000);
Random random = new Random();
int orderId = random.nextInt(1000-1) + 1;
DaprClient client = new DaprClientBuilder().build();
//Using Dapr SDK to invoke output binding
client.invokeBinding(BINDING_NAME, BINDING_OPERATION, orderId).block();
log.info("Sending message: " + orderId);
}
}
}
#dependencies
import random
from time import sleep
import requests
import logging
import json
from dapr.clients import DaprClient
#code
logging.basicConfig(level = logging.INFO)
BINDING_NAME = 'checkout'
BINDING_OPERATION = 'create'
while True:
sleep(random.randrange(50, 5000) / 1000)
orderId = random.randint(1, 1000)
with DaprClient() as client:
#Using Dapr SDK to invoke output binding
resp = client.invoke_binding(BINDING_NAME, BINDING_OPERATION, json.dumps(orderId))
logging.basicConfig(level = logging.INFO)
logging.info('Sending message: ' + str(orderId))
//dependencies
import (
"context"
"log"
"math/rand"
"time"
"strconv"
dapr "github.com/dapr/go-sdk/client"
)
//code
func main() {
BINDING_NAME := "checkout";
BINDING_OPERATION := "create";
for i := 0; i < 10; i++ {
time.Sleep(5000)
orderId := rand.Intn(1000-1) + 1
client, err := dapr.NewClient()
if err != nil {
panic(err)
}
defer client.Close()
ctx := context.Background()
//Using Dapr SDK to invoke output binding
in := &dapr.InvokeBindingRequest{ Name: BINDING_NAME, Operation: BINDING_OPERATION , Data: []byte(strconv.Itoa(orderId))}
err = client.InvokeOutputBinding(ctx, in)
log.Println("Sending message: " + strconv.Itoa(orderId))
}
}
//dependencies
import { DaprClient, CommunicationProtocolEnum } from "@dapr/dapr";
//code
const daprHost = "127.0.0.1";
(async function () {
for (var i = 0; i < 10; i++) {
await sleep(2000);
const orderId = Math.floor(Math.random() * (1000 - 1) + 1);
try {
await sendOrder(orderId)
} catch (err) {
console.error(e);
process.exit(1);
}
}
})();
async function sendOrder(orderId) {
const BINDING_NAME = "checkout";
const BINDING_OPERATION = "create";
const client = new DaprClient({
daprHost,
daprPort: process.env.DAPR_HTTP_PORT,
communicationProtocol: CommunicationProtocolEnum.HTTP,
});
//Using Dapr SDK to invoke output binding
const result = await client.binding.send(BINDING_NAME, BINDING_OPERATION, orderId);
console.log("Sending message: " + orderId);
}
function sleep(ms) {
return new Promise(resolve => setTimeout(resolve, ms));
}
You can also invoke the output bindings endpoint using HTTP:
curl -X POST -H 'Content-Type: application/json' http://localhost:3601/v1.0/bindings/checkout -d '{ "data": 100, "operation": "create" }'
Watch this video on how to use bi-directional output bindings.
Learn more about how to use Dapr Actors:
The actor pattern describes actors as the lowest-level “unit of computation”. In other words, you write your code in a self-contained unit (called an actor) that receives messages and processes them one at a time, without any kind of concurrency or threading.
While your code processes a message, it can send one or more messages to other actors, or create new actors. An underlying runtime manages how, when and where each actor runs, and also routes messages between actors.
A large number of actors can execute simultaneously, and actors execute independently from each other.
Dapr includes a runtime that specifically implements the Virtual Actor pattern. With Dapr’s implementation, you write your Dapr actors according to the actor model, and Dapr leverages the scalability and reliability guarantees that the underlying platform provides.
Every actor is defined as an instance of an actor type, identical to the way an object is an instance of a class. For example, there may be an actor type that implements the functionality of a calculator and there could be many actors of that type that are distributed on various nodes across a cluster. Each such actor is uniquely identified by an actor ID.
The following overview video and demo demonstrates how actors in Dapr work.
Dapr actors builds on the state management and service invocation APIs to create stateful, long running objects with identity. Dapr Workflow and Dapr Actors are related, with workflows building on actors to provide a higher level of abstraction to orchestrate a set of actors, implementing common workflow patterns and managing the lifecycle of actors on your behalf.
Dapr actors are designed to provide a way to encapsulate state and behavior within a distributed system. An actor can be activated on demand by a client application. When an actor is activated, it is assigned a unique identity, which allows it to maintain its state across multiple invocations. This makes actors useful for building stateful, scalable, and fault-tolerant distributed applications.
On the other hand, Dapr Workflow provides a way to define and orchestrate complex workflows that involve multiple services and components within a distributed system. Workflows allow you to define a sequence of steps or tasks that need to be executed in a specific order, and can be used to implement business processes, event-driven workflows, and other similar scenarios.
As mentioned above, Dapr Workflow builds on Dapr Actors managing their activation and lifecycle.
As with any other technology decision, you should decide whether to use actors based on the problem you’re trying to solve. For example, if you were building a chat application, you might use Dapr actors to implement the chat rooms and the individual chat sessions between users, as each chat session needs to maintain its own state and be scalable and fault-tolerant.
Generally speaking, consider the actor pattern to model your problem or scenario if:
You would use Dapr Workflow when you need to define and orchestrate complex workflows that involve multiple services and components. For example, using the chat application example earlier, you might use Dapr Workflows to define the overall workflow of the application, such as how new users are registered, how messages are sent and received, and how the application handles errors and exceptions.
Learn more about Dapr Workflow and how to use workflows in your application.
Actors are uniquely defined as an instance of an actor type, similar to how an object is an instance of a class. For example, you might have an actor type that implements the functionality of a calculator. There could be many actors of that type distributed across various nodes in a cluster.
Each actor is uniquely identified by an actor ID. An actor ID can be any string value you choose. If you do not provide an actor ID, Dapr generates a random string for you as an ID.
Dapr supports namespaced actors. An actor type can be deployed into different namespaces. You can call instances of these actors in the same namespace.
Learn more about namespaced actors and how they work.
Since Dapr actors are virtual, they do not need to be explicitly created or destroyed. The Dapr actor runtime:
An actor’s state outlives the object’s lifetime, as state is stored in the configured state provider for Dapr runtime.
Learn more about actor lifetimes.
To provide scalability and reliability, actors instances are throughout the cluster and Dapr distributes actor instances throughout the cluster and automatically migrates them to healthy nodes.
Learn more about Dapr actor placement.
You can invoke actor methods by calling them over HTTP, as shown in the general example below.
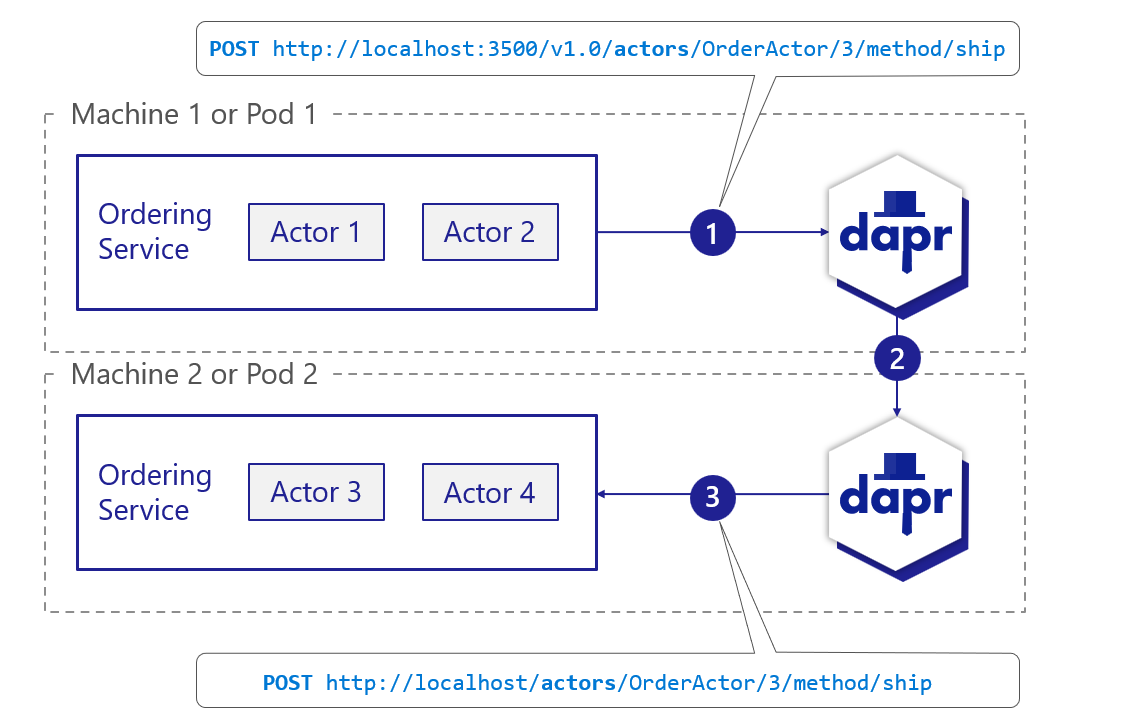
Learn more about calling actor methods.
The Dapr actor runtime provides a simple turn-based access model for accessing actor methods. Turn-based access greatly simplifies concurrent systems as there is no need for synchronization mechanisms for data access.
Transactional state stores can be used to store actor state. Regardless of whether you intend to store any state in your actor, you must specify a value for property actorStateStore as true in the state store component’s metadata section. Actors state is stored with a specific scheme in transactional state stores, allowing for consistent querying. Only a single state store component can be used as the state store for all actors. Read the state API reference and the actors API reference to learn more about state stores for actors.
Actors can schedule periodic work on themselves by registering either timers or reminders.
The functionality of timers and reminders is very similar. The main difference is that Dapr actor runtime is not retaining any information about timers after deactivation, while persisting the information about reminders using Dapr actor state provider.
This distinction allows users to trade off between light-weight but stateless timers vs. more resource-demanding but stateful reminders.
The following overview video and demo demonstrates how actor timers and reminders work.
Now that you’ve learned about the actor building block at a high level, let’s deep dive into the features and concepts included with actors in Dapr.
Dapr actors are virtual, meaning that their lifetime is not tied to their in-memory representation. As a result, they do not need to be explicitly created or destroyed. The Dapr actor runtime automatically activates an actor the first time it receives a request for that actor ID. If an actor is not used for a period of time, the Dapr actor runtime garbage-collects the in-memory object. It will also maintain knowledge of the actor’s existence should it need to be reactivated later.
Invocation of actor methods, timers, and reminders reset the actor idle time. For example, a reminder firing keeps the actor active.
The idle timeout and scan interval Dapr runtime uses to see if an actor can be garbage-collected is configurable. This information can be passed when Dapr runtime calls into the actor service to get supported actor types.
This virtual actor lifetime abstraction carries some caveats as a result of the virtual actor model, and in fact the Dapr Actors implementation deviates at times from this model.
An actor is automatically activated (causing an actor object to be constructed) the first time a message is sent to its actor ID. After some period of time, the actor object is garbage collected. In the future, using the actor ID again, causes a new actor object to be constructed. An actor’s state outlives the object’s lifetime as state is stored in configured state provider for Dapr runtime.
To provide scalability and reliability, actors instances are distributed throughout the cluster and Dapr automatically migrates them from failed nodes to healthy ones as required.
Actors are distributed across the instances of the actor service, and those instance are distributed across the nodes in a cluster. Each service instance contains a set of actors for a given actor type.
The Dapr actor runtime manages distribution scheme and key range settings for you via the actor Placement service. When a new instance of a service is created:
Placement service calculates the partitioning across all the instances for a given actor type.This partition data table for each actor type is updated and stored in each Dapr instance running in the environment and can change dynamically as new instances of actor services are created and destroyed.
When a client calls an actor with a particular id (for example, actor id 123), the Dapr instance for the client hashes the actor type and id, and uses the information to call onto the corresponding Dapr instance that can serve the requests for that particular actor id. As a result, the same partition (or service instance) is always called for any given actor id. This is shown in the diagram below.

This simplifies some choices, but also carries some consideration:
You can interact with Dapr to invoke the actor method by calling the HTTP endpoint.
POST/GET/PUT/DELETE http://localhost:3500/v1.0/actors/<actorType>/<actorId>/<method/state/timers/reminders>
You can provide any data for the actor method in the request body, and the response for the request would be in the response body which is the data from actor call.
Another, and perhaps more convenient, way of interacting with actors is via SDKs. Dapr currently supports actors SDKs in .NET, Java, and Python.
Refer to Dapr Actor Features for more details.
The Dapr actor runtime provides a simple turn-based access model for accessing actor methods. This means that no more than one thread can be active inside an actor object’s code at any time. Turn-based access greatly simplifies concurrent systems as there is no need for synchronization mechanisms for data access. It also means systems must be designed with special considerations for the single-threaded access nature of each actor instance.
A single actor instance cannot process more than one request at a time. An actor instance can cause a throughput bottleneck if it is expected to handle concurrent requests.
Actors can deadlock on each other if there is a circular request between two actors while an external request is made to one of the actors simultaneously. The Dapr actor runtime automatically times out on actor calls and throw an exception to the caller to interrupt possible deadlock situations.
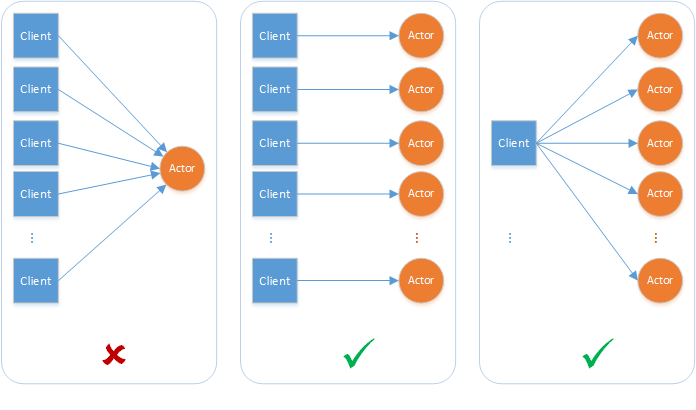
To allow actors to “re-enter” and invoke methods on themselves, see Actor Reentrancy.
A turn consists of the complete execution of an actor method in response to a request from other actors or clients, or the complete execution of a timer/reminder callback. Even though these methods and callbacks are asynchronous, the Dapr actor runtime does not interleave them. A turn must be fully finished before a new turn is allowed. In other words, an actor method or timer/reminder callback that is currently executing must be fully finished before a new call to a method or callback is allowed. A method or callback is considered to have finished if the execution has returned from the method or callback and the task returned by the method or callback has finished. It is worth emphasizing that turn-based concurrency is respected even across different methods, timers, and callbacks.
The Dapr actor runtime enforces turn-based concurrency by acquiring a per-actor lock at the beginning of a turn and releasing the lock at the end of the turn. Thus, turn-based concurrency is enforced on a per-actor basis and not across actors. Actor methods and timer/reminder callbacks can execute simultaneously on behalf of different actors.
The following example illustrates the above concepts. Consider an actor type that implements two asynchronous methods (say, Method1 and Method2), a timer, and a reminder. The diagram below shows an example of a timeline for the execution of these methods and callbacks on behalf of two actors (ActorId1 and ActorId2) that belong to this actor type.
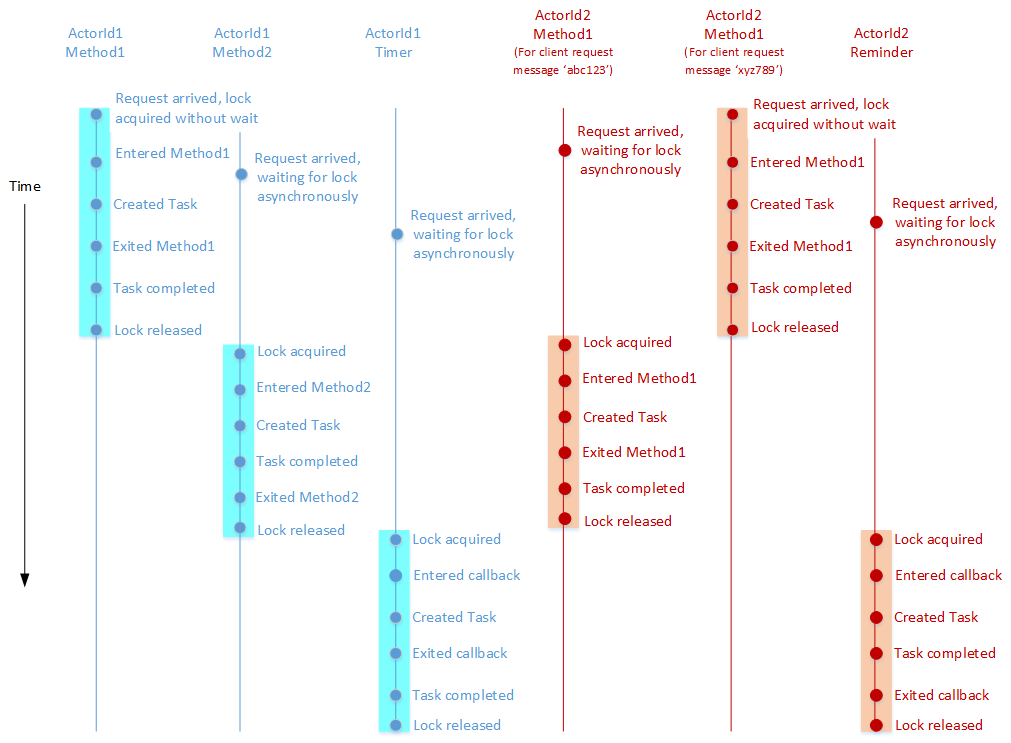
You can modify the default Dapr actor runtime behavior using the following configuration parameters.
| Parameter | Description | Default |
|---|---|---|
entities |
The actor types supported by this host. | N/A |
actorIdleTimeout |
The timeout before deactivating an idle actor. Checks for timeouts occur every actorScanInterval interval. |
60 minutes |
actorScanInterval |
The duration which specifies how often to scan for actors to deactivate idle actors. Actors that have been idle longer than actor_idle_timeout will be deactivated. | 30 seconds |
drainOngoingCallTimeout |
The duration when in the process of draining rebalanced actors. This specifies the timeout for the current active actor method to finish. If there is no current actor method call, this is ignored. | 60 seconds |
drainRebalancedActors |
If true, Dapr will wait for drainOngoingCallTimeout duration to allow a current actor call to complete before trying to deactivate an actor. |
true |
reentrancy (ActorReentrancyConfig) |
Configure the reentrancy behavior for an actor. If not provided, reentrancy is disabled. | disabled, false |
remindersStoragePartitions |
Configure the number of partitions for actor’s reminders. If not provided, all reminders are saved as a single record in actor’s state store. | 0 |
entitiesConfig |
Configure each actor type individually with an array of configurations. Any entity specified in the individual entity configurations must also be specified in the top level entities field. |
N/A |
// In Startup.cs
public void ConfigureServices(IServiceCollection services)
{
// Register actor runtime with DI
services.AddActors(options =>
{
// Register actor types and configure actor settings
options.Actors.RegisterActor<MyActor>();
// Configure default settings
options.ActorIdleTimeout = TimeSpan.FromMinutes(60);
options.ActorScanInterval = TimeSpan.FromSeconds(30);
options.DrainOngoingCallTimeout = TimeSpan.FromSeconds(60);
options.DrainRebalancedActors = true;
options.RemindersStoragePartitions = 7;
options.ReentrancyConfig = new() { Enabled = false };
// Add a configuration for a specific actor type.
// This actor type must have a matching value in the base level 'entities' field. If it does not, the configuration will be ignored.
// If there is a matching entity, the values here will be used to overwrite any values specified in the root configuration.
// In this example, `ReentrantActor` has reentrancy enabled; however, 'MyActor' will not have reentrancy enabled.
options.Actors.RegisterActor<ReentrantActor>(typeOptions: new()
{
ReentrancyConfig = new()
{
Enabled = true,
}
});
});
// Register additional services for use with actors
services.AddSingleton<BankService>();
}
import { CommunicationProtocolEnum, DaprClient, DaprServer } from "@dapr/dapr";
// Configure the actor runtime with the DaprClientOptions.
const clientOptions = {
actor: {
actorIdleTimeout: "1h",
actorScanInterval: "30s",
drainOngoingCallTimeout: "1m",
drainRebalancedActors: true,
reentrancy: {
enabled: true,
maxStackDepth: 32,
},
remindersStoragePartitions: 0,
},
};
// Use the options when creating DaprServer and DaprClient.
// Note, DaprServer creates a DaprClient internally, which needs to be configured with clientOptions.
const server = new DaprServer(serverHost, serverPort, daprHost, daprPort, clientOptions);
const client = new DaprClient(daprHost, daprPort, CommunicationProtocolEnum.HTTP, clientOptions);
See the documentation on writing actors with the JavaScript SDK.
from datetime import timedelta
from dapr.actor.runtime.config import ActorRuntimeConfig, ActorReentrancyConfig
ActorRuntime.set_actor_config(
ActorRuntimeConfig(
actor_idle_timeout=timedelta(hours=1),
actor_scan_interval=timedelta(seconds=30),
drain_ongoing_call_timeout=timedelta(minutes=1),
drain_rebalanced_actors=True,
reentrancy=ActorReentrancyConfig(enabled=False),
remindersStoragePartitions=7
)
)
// import io.dapr.actors.runtime.ActorRuntime;
// import java.time.Duration;
ActorRuntime.getInstance().getConfig().setActorIdleTimeout(Duration.ofMinutes(60));
ActorRuntime.getInstance().getConfig().setActorScanInterval(Duration.ofSeconds(30));
ActorRuntime.getInstance().getConfig().setDrainOngoingCallTimeout(Duration.ofSeconds(60));
ActorRuntime.getInstance().getConfig().setDrainBalancedActors(true);
ActorRuntime.getInstance().getConfig().setActorReentrancyConfig(false, null);
ActorRuntime.getInstance().getConfig().setRemindersStoragePartitions(7);
const (
defaultActorType = "basicType"
reentrantActorType = "reentrantType"
)
type daprConfig struct {
Entities []string `json:"entities,omitempty"`
ActorIdleTimeout string `json:"actorIdleTimeout,omitempty"`
ActorScanInterval string `json:"actorScanInterval,omitempty"`
DrainOngoingCallTimeout string `json:"drainOngoingCallTimeout,omitempty"`
DrainRebalancedActors bool `json:"drainRebalancedActors,omitempty"`
Reentrancy config.ReentrancyConfig `json:"reentrancy,omitempty"`
EntitiesConfig []config.EntityConfig `json:"entitiesConfig,omitempty"`
}
var daprConfigResponse = daprConfig{
Entities: []string{defaultActorType, reentrantActorType},
ActorIdleTimeout: actorIdleTimeout,
ActorScanInterval: actorScanInterval,
DrainOngoingCallTimeout: drainOngoingCallTimeout,
DrainRebalancedActors: drainRebalancedActors,
Reentrancy: config.ReentrancyConfig{Enabled: false},
EntitiesConfig: []config.EntityConfig{
{
// Add a configuration for a specific actor type.
// This actor type must have a matching value in the base level 'entities' field. If it does not, the configuration will be ignored.
// If there is a matching entity, the values here will be used to overwrite any values specified in the root configuration.
// In this example, `reentrantActorType` has reentrancy enabled; however, 'defaultActorType' will not have reentrancy enabled.
Entities: []string{reentrantActorType},
Reentrancy: config.ReentrancyConfig{
Enabled: true,
MaxStackDepth: &maxStackDepth,
},
},
},
}
func configHandler(w http.ResponseWriter, r *http.Request) {
w.Header().Set("Content-Type", "application/json")
w.WriteHeader(http.StatusOK)
json.NewEncoder(w).Encode(daprConfigResponse)
}
Namespacing in Dapr provides isolation, and thus multi-tenancy. With actor namespacing, the same actor type can be deployed into different namespaces. You can call instances of these actors in the same namespace.
You can use namespaces either in self-hosted mode or on Kubernetes.
In self-hosted mode, you can specify the namespace for a Dapr instance by setting the NAMESPACE environment variable.
On Kubernetes, you can create and configure namepaces when deploying actor applications. For example, start with the following kubectl commands:
kubectl create namespace namespace-actorA
kubectl config set-context --current --namespace=namespace-actorA
Then, deploy your actor applications into this namespace (in the example, namespace-actorA).
Each namespaced actor deployment must use its own separate state store. While you could use different physical databases for each actor namespace, some state store components provide a way to logically separate data by table, prefix, collection, and more. This allows you to use the same physical database for multiple namespaces, as long as you provide the logical separation in the Dapr component definition.
Some examples are provided below.
apiVersion: dapr.io/v1alpha1
kind: Component
metadata:
name: statestore
spec:
type: state.etcd
version: v2
metadata:
- name: endpoints
value: localhost:2379
- name: keyPrefixPath
value: namespace-actorA
- name: actorStateStore
value: "true"
apiVersion: dapr.io/v1alpha1
kind: Component
metadata:
name: statestore
spec:
type: state.sqlite
version: v1
metadata:
- name: connectionString
value: "data.db"
- name: tableName
value: "namespace-actorA"
- name: actorStateStore
value: "true"
apiVersion: dapr.io/v1alpha1
kind: Component
metadata:
name: statestore
spec:
type: state.redis
version: v1
metadata:
- name: redisHost
value: localhost:6379
- name: redisPassword
value: ""
- name: actorStateStore
value: "true"
- name: redisDB
value: "1"
- name: redisPassword
secretKeyRef:
name: redis-secret
key: redis-password
- name: actorStateStore
value: "true"
- name: redisDB
value: "1"
auth:
secretStore: <SECRET_STORE_NAME>
Check your state store component specs to see what it provides.
Actors can schedule periodic work on themselves by registering either timers or reminders.
The functionality of timers and reminders is very similar. The main difference is that Dapr actor runtime is not retaining any information about timers after deactivation, while persisting the information about reminders using Dapr actor state provider.
This distinction allows users to trade off between light-weight but stateless timers vs. more resource-demanding but stateful reminders.
The scheduling configuration of timers and reminders is identical, as summarized below:
dueTime is an optional parameter that sets time at which or time interval before the callback is invoked for the first time. If dueTime is omitted, the callback is invoked immediately after timer/reminder registration.
Supported formats:
2020-10-02T15:00:00Z2h30mPT2H30Mperiod is an optional parameter that sets time interval between two consecutive callback invocations. When specified in ISO 8601-1 duration format, you can also configure the number of repetition in order to limit the total number of callback invocations.
If period is omitted, the callback will be invoked only once.
Supported formats:
2h30mPT2H30M, R5/PT1M30Sttl is an optional parameter that sets time at which or time interval after which the timer/reminder will be expired and deleted. If ttl is omitted, no restrictions are applied.
Supported formats:
2020-10-02T15:00:00Z2h30mPT2H30MThe actor runtime validates correctness of the scheduling configuration and returns error on invalid input.
When you specify both the number of repetitions in period as well as ttl, the timer/reminder will be stopped when either condition is met.
You can register a callback on actor to be executed based on a timer.
The Dapr actor runtime ensures that the callback methods respect the turn-based concurrency guarantees. This means that no other actor methods or timer/reminder callbacks will be in progress until this callback completes execution.
The Dapr actor runtime saves changes made to the actor’s state when the callback finishes. If an error occurs in saving the state, that actor object is deactivated and a new instance will be activated.
All timers are stopped when the actor is deactivated as part of garbage collection. No timer callbacks are invoked after that. Also, the Dapr actor runtime does not retain any information about the timers that were running before deactivation. It is up to the actor to register any timers that it needs when it is reactivated in the future.
You can create a timer for an actor by calling the HTTP/gRPC request to Dapr as shown below, or via Dapr SDK.
POST/PUT http://localhost:3500/v1.0/actors/<actorType>/<actorId>/timers/<name>
The timer parameters are specified in the request body.
The following request body configures a timer with a dueTime of 9 seconds and a period of 3 seconds. This means it will first fire after 9 seconds, then every 3 seconds after that.
{
"dueTime":"0h0m9s0ms",
"period":"0h0m3s0ms"
}
The following request body configures a timer with a period of 3 seconds (in ISO 8601 duration format). It also limits the number of invocations to 10. This means it will fire 10 times: first, immediately after registration, then every 3 seconds after that.
{
"period":"R10/PT3S",
}
The following request body configures a timer with a period of 3 seconds (in ISO 8601 duration format) and a ttl of 20 seconds. This means it fires immediately after registration, then every 3 seconds after that for the duration of 20 seconds.
{
"period":"PT3S",
"ttl":"20s"
}
The following request body configures a timer with a dueTime of 10 seconds, a period of 3 seconds, and a ttl of 10 seconds. It also limits the number of invocations to 4. This means it will first fire after 10 seconds, then every 3 seconds after that for the duration of 10 seconds, but no more than 4 times in total.
{
"dueTime":"10s",
"period":"R4/PT3S",
"ttl":"10s"
}
You can remove the actor timer by calling
DELETE http://localhost:3500/v1.0/actors/<actorType>/<actorId>/timers/<name>
Refer api spec for more details.
Reminders are a mechanism to trigger persistent callbacks on an actor at specified times. Their functionality is similar to timers. But unlike timers, reminders are triggered under all circumstances until the actor explicitly unregisters them or the actor is explicitly deleted or the number in invocations is exhausted. Specifically, reminders are triggered across actor deactivations and failovers because the Dapr actor runtime persists the information about the actors’ reminders using Dapr actor state provider.
You can create a persistent reminder for an actor by calling the HTTP/gRPC request to Dapr as shown below, or via Dapr SDK.
POST/PUT http://localhost:3500/v1.0/actors/<actorType>/<actorId>/reminders/<name>
The request structure for reminders is identical to those of actors. Please refer to the actor timers examples.
You can retrieve the actor reminder by calling
GET http://localhost:3500/v1.0/actors/<actorType>/<actorId>/reminders/<name>
You can remove the actor reminder by calling
DELETE http://localhost:3500/v1.0/actors/<actorType>/<actorId>/reminders/<name>
If an actor reminder is triggered and the app does not return a 2** code to the runtime (for example, because of a connection issue), actor reminders will be retried up to three times with a backoff interval of one second between each attempt. There may be additional retries attempted in accordance with any optionally applied actor resiliency policy.
Refer api spec for more details.
When an actor’s method completes successfully, the runtime will continue to invoke the method at the specified timer or reminder schedule. However, if the method throws an exception, the runtime catches it and logs the error message in the Dapr sidecar logs, without retrying.
To allow actors to recover from failures and retry after a crash or restart, you can persist an actor’s state by configuring a state store, like Redis or Azure Cosmos DB.
If an invocation of the method fails, the timer is not removed. Timers are only removed when:
Actor reminder data is serialized to JSON by default. Dapr v1.13 onwards supports a protobuf serialization format for internal reminders data for workflow via both the Placement and Scheduler services. Depending on throughput and size of the payload, this can result in significant performance improvements, giving developers a higher throughput and lower latency.
Another benefit is storing smaller data in the actor underlying database, which can result in cost optimizations when using some cloud databases. A restriction with using protobuf serialization is that the reminder data can no longer be queried.
Reminder data saved in protobuf format cannot be read in Dapr 1.12.x and earlier versions. Its recommended to test this feature in Dapr v1.13 and verify that it works as expected with your database before taking this into production.
To use protobuf serialization for actor reminders on Kubernetes, use the following Helm value:
--set dapr_placement.maxActorApiLevel=20
To use protobuf serialization for actor reminders on self-hosted, use the following daprd flag:
--max-api-level=20
SchedulerReminders feature flag to false.
It is highly recommended you use using the Scheduler Actor Reminders feature.
Actor reminders are persisted and continue to be triggered after sidecar restarts. Applications with multiple reminders registered can experience the following issues:
To sidestep these issues, applications can enable partitioning of actor reminders while data is distributed in multiple keys in the state store.
actors\|\|<actor type>\|\|metadata is used to store the persisted configuration for a given actor type.| Key | Value |
|---|---|
actors||<actor type>||metadata |
{ "id": <actor metadata identifier>, "actorRemindersMetadata": { "partitionCount": <number of partitions for reminders> } } |
actors||<actor type>||<actor metadata identifier>||reminders||1 |
[ <reminder 1-1>, <reminder 1-2>, ... , <reminder 1-n> ] |
actors||<actor type>||<actor metadata identifier>||reminders||2 |
[ <reminder 1-1>, <reminder 1-2>, ... , <reminder 1-m> ] |
If you need to change the number of partitions, Dapr’s sidecar will automatically redistribute the reminders’ set.
Similar to other actor configuration elements, the actor runtime provides the appropriate configuration to partition actor reminders via the actor’s endpoint for GET /dapr/config. Select your preferred language for an actor runtime configuration example.
// In Startup.cs
public void ConfigureServices(IServiceCollection services)
{
// Register actor runtime with DI
services.AddActors(options =>
{
// Register actor types and configure actor settings
options.Actors.RegisterActor<MyActor>();
// Configure default settings
options.ActorIdleTimeout = TimeSpan.FromMinutes(60);
options.ActorScanInterval = TimeSpan.FromSeconds(30);
options.RemindersStoragePartitions = 7;
});
// Register additional services for use with actors
services.AddSingleton<BankService>();
}
import { CommunicationProtocolEnum, DaprClient, DaprServer } from "@dapr/dapr";
// Configure the actor runtime with the DaprClientOptions.
const clientOptions = {
actor: {
remindersStoragePartitions: 0,
},
};
const actor = builder.build(new ActorId("my-actor"));
// Register a reminder, it has a default callback: `receiveReminder`
await actor.registerActorReminder(
"reminder-id", // Unique name of the reminder.
Temporal.Duration.from({ seconds: 2 }), // DueTime
Temporal.Duration.from({ seconds: 1 }), // Period
Temporal.Duration.from({ seconds: 1 }), // TTL
100, // State to be sent to reminder callback.
);
// Delete the reminder
await actor.unregisterActorReminder("reminder-id");
See the documentation on writing actors with the JavaScript SDK.
from datetime import timedelta
ActorRuntime.set_actor_config(
ActorRuntimeConfig(
actor_idle_timeout=timedelta(hours=1),
actor_scan_interval=timedelta(seconds=30),
remindersStoragePartitions=7
)
)
// import io.dapr.actors.runtime.ActorRuntime;
// import java.time.Duration;
ActorRuntime.getInstance().getConfig().setActorIdleTimeout(Duration.ofMinutes(60));
ActorRuntime.getInstance().getConfig().setActorScanInterval(Duration.ofSeconds(30));
ActorRuntime.getInstance().getConfig().setRemindersStoragePartitions(7);
type daprConfig struct {
Entities []string `json:"entities,omitempty"`
ActorIdleTimeout string `json:"actorIdleTimeout,omitempty"`
ActorScanInterval string `json:"actorScanInterval,omitempty"`
DrainOngoingCallTimeout string `json:"drainOngoingCallTimeout,omitempty"`
DrainRebalancedActors bool `json:"drainRebalancedActors,omitempty"`
RemindersStoragePartitions int `json:"remindersStoragePartitions,omitempty"`
}
var daprConfigResponse = daprConfig{
[]string{defaultActorType},
actorIdleTimeout,
actorScanInterval,
drainOngoingCallTimeout,
drainRebalancedActors,
7,
}
func configHandler(w http.ResponseWriter, r *http.Request) {
w.Header().Set("Content-Type", "application/json")
w.WriteHeader(http.StatusOK)
json.NewEncoder(w).Encode(daprConfigResponse)
}
The following is an example of a valid configuration for reminder partitioning:
{
"entities": [ "MyActorType", "AnotherActorType" ],
"remindersStoragePartitions": 7
}
To configure actor reminders partitioning, Dapr persists the actor type metadata in the actor’s state store. This allows the configuration changes to be applied globally, not just in a single sidecar instance.
In addition, you can only increase the number of partitions, not decrease. This allows Dapr to automatically redistribute the data on a rolling restart, where one or more partition configurations might be active.
Watch this video for a demo of actor reminder partitioning:
Learn how to use virtual actors by calling HTTP/gRPC endpoints.
You can interact with Dapr to invoke the actor method by calling HTTP/gRPC endpoint.
POST/GET/PUT/DELETE http://localhost:3500/v1.0/actors/<actorType>/<actorId>/method/<method>
Provide data for the actor method in the request body. The response for the request, which is data from actor method call, is in the response body.
Refer to the Actors API spec for more details.
You can interact with Dapr via HTTP/gRPC endpoints to save state reliably using the Dapr actor state management capabaility.
To use actors, your state store must support multi-item transactions. This means your state store component must implement the TransactionalStore interface.
See the list of components that support transactions/actors. Only a single state store component can be used as the state store for all actors.
A core tenet of the virtual actor pattern is the single-threaded nature of actor execution. Without reentrancy, the Dapr runtime locks on all actor requests. A second request wouldn’t be able to start until the first had completed. This means an actor cannot call itself, or have another actor call into it, even if it’s part of the same call chain.
Reentrancy solves this by allowing requests from the same chain, or context, to re-enter into an already locked actor. This proves useful in scenarios where:
Examples of chains that reentrancy allows are shown below:
Actor A -> Actor A
ActorA -> Actor B -> Actor A
With reentrancy, you can perform more complex actor calls, without sacrificing the single-threaded behavior of virtual actors.
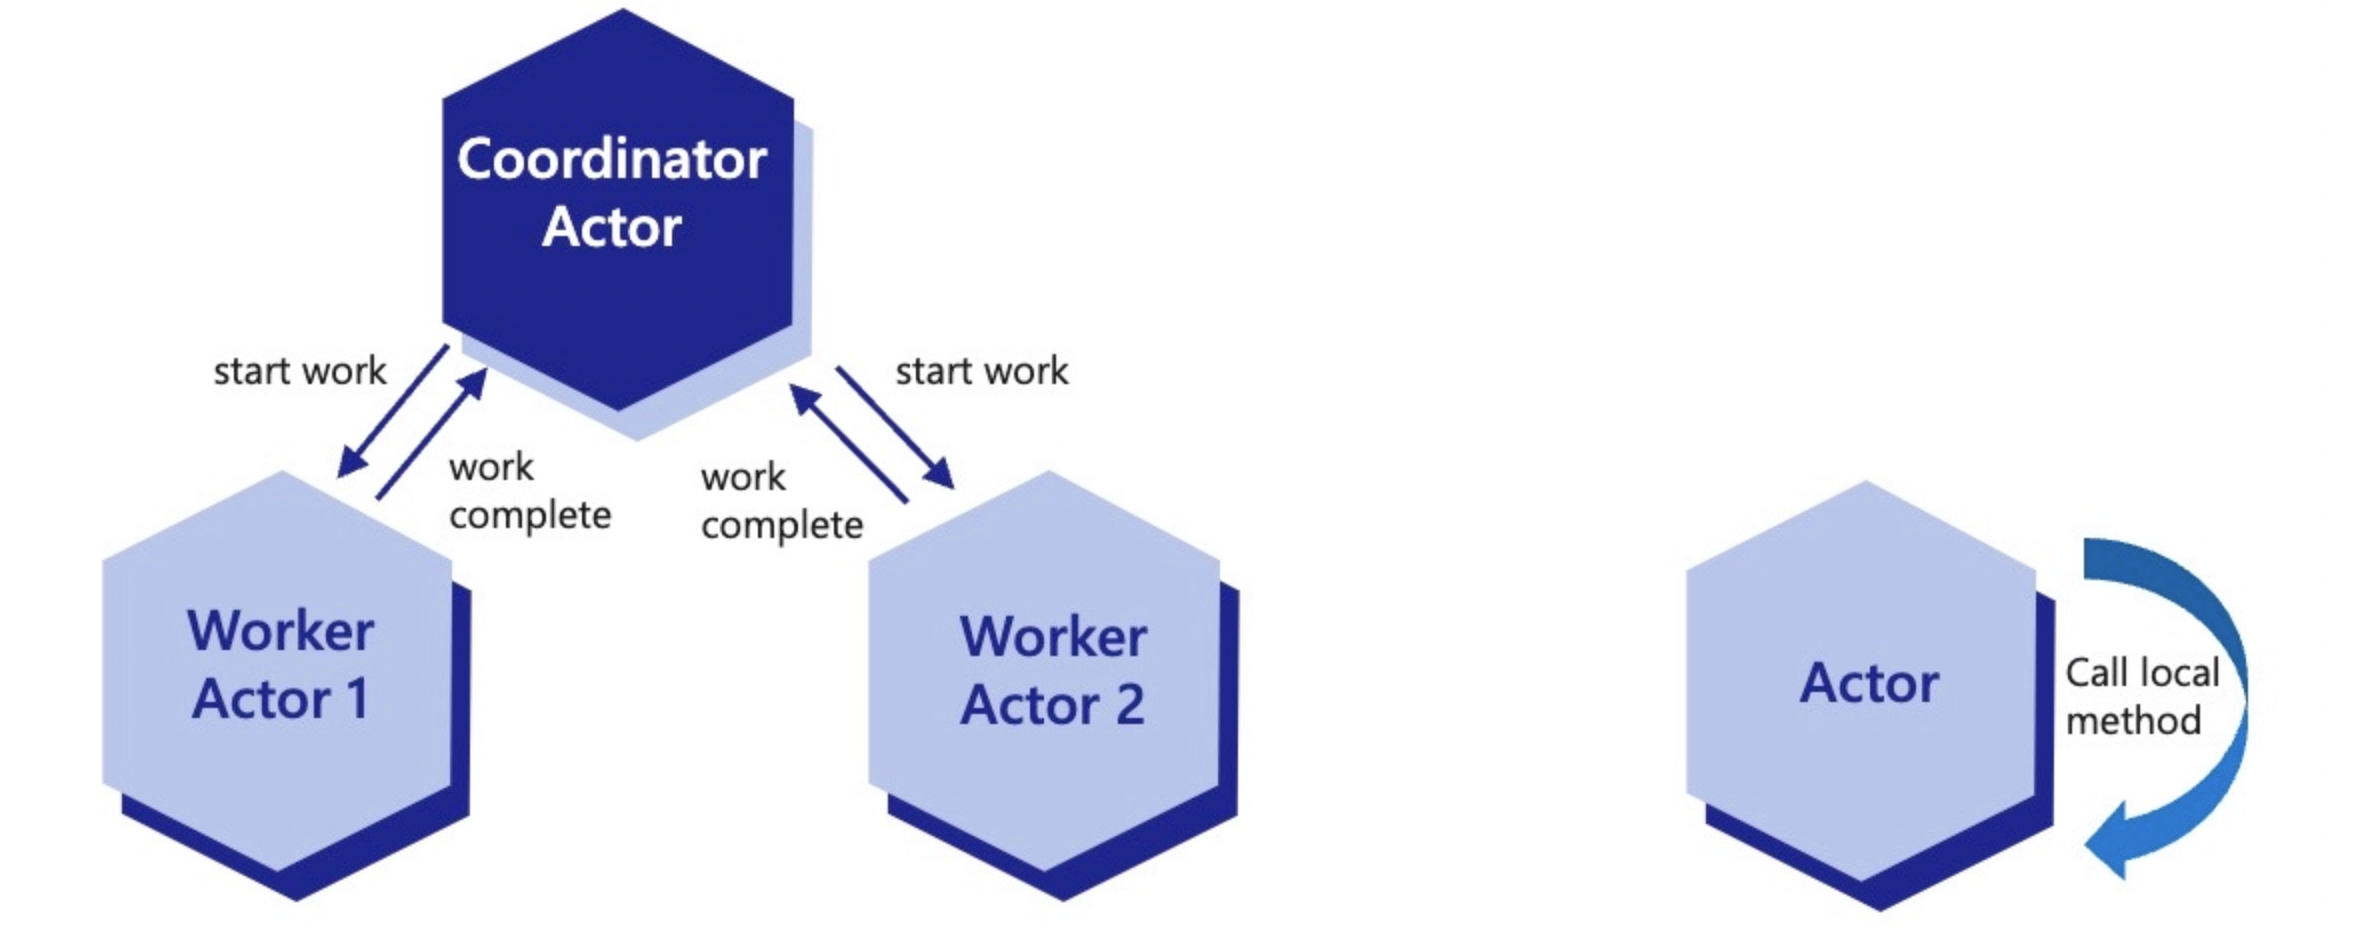
The maxStackDepth parameter sets a value that controls how many reentrant calls can be made to the same actor. By default, this is set to 32, which is more than sufficient in most cases.
The reentrant actor must provide the appropriate configuration. This is done by the actor’s endpoint for GET /dapr/config, similar to other actor configuration elements.
public class Startup
{
public void ConfigureServices(IServiceCollection services)
{
services.AddSingleton<BankService>();
services.AddActors(options =>
{
options.Actors.RegisterActor<DemoActor>();
options.ReentrancyConfig = new Dapr.Actors.ActorReentrancyConfig()
{
Enabled = true,
MaxStackDepth = 32,
};
});
}
}
import { CommunicationProtocolEnum, DaprClient, DaprServer } from "@dapr/dapr";
// Configure the actor runtime with the DaprClientOptions.
const clientOptions = {
actor: {
reentrancy: {
enabled: true,
maxStackDepth: 32,
},
},
};
from fastapi import FastAPI
from dapr.ext.fastapi import DaprActor
from dapr.actor.runtime.config import ActorRuntimeConfig, ActorReentrancyConfig
from dapr.actor.runtime.runtime import ActorRuntime
from demo_actor import DemoActor
reentrancyConfig = ActorReentrancyConfig(enabled=True)
config = ActorRuntimeConfig(reentrancy=reentrancyConfig)
ActorRuntime.set_actor_config(config)
app = FastAPI(title=f'{DemoActor.__name__}Service')
actor = DaprActor(app)
@app.on_event("startup")
async def startup_event():
# Register DemoActor
await actor.register_actor(DemoActor)
@app.get("/MakeExampleReentrantCall")
def do_something_reentrant():
# invoke another actor here, reentrancy will be handled automatically
return
Here is a snippet of an actor written in Golang providing the reentrancy configuration via the HTTP API. Reentrancy has not yet been included into the Go SDK.
type daprConfig struct {
Entities []string `json:"entities,omitempty"`
ActorIdleTimeout string `json:"actorIdleTimeout,omitempty"`
ActorScanInterval string `json:"actorScanInterval,omitempty"`
DrainOngoingCallTimeout string `json:"drainOngoingCallTimeout,omitempty"`
DrainRebalancedActors bool `json:"drainRebalancedActors,omitempty"`
Reentrancy config.ReentrancyConfig `json:"reentrancy,omitempty"`
}
var daprConfigResponse = daprConfig{
[]string{defaultActorType},
actorIdleTimeout,
actorScanInterval,
drainOngoingCallTimeout,
drainRebalancedActors,
config.ReentrancyConfig{Enabled: true, MaxStackDepth: &maxStackDepth},
}
func configHandler(w http.ResponseWriter, r *http.Request) {
w.Header().Set("Content-Type", "application/json")
w.WriteHeader(http.StatusOK)
json.NewEncoder(w).Encode(daprConfigResponse)
}
The key to a reentrant request is the Dapr-Reentrancy-Id header. The value of this header is used to match requests to their call chain and allow them to bypass the actor’s lock.
The header is generated by the Dapr runtime for any actor request that has a reentrant config specified. Once it is generated, it is used to lock the actor and must be passed to all future requests. Below is an example of an actor handling a reentrant request:
func reentrantCallHandler(w http.ResponseWriter, r *http.Request) {
/*
* Omitted.
*/
req, _ := http.NewRequest("PUT", url, bytes.NewReader(nextBody))
reentrancyID := r.Header.Get("Dapr-Reentrancy-Id")
req.Header.Add("Dapr-Reentrancy-Id", reentrancyID)
client := http.Client{}
resp, err := client.Do(req)
/*
* Omitted.
*/
}
Watch this video on how to use actor reentrancy.
Learn more about how to use Dapr Secrets:
Applications usually store sensitive information in secrets by using a dedicated secret store. For example, you authenticate databases, services, and external systems with connection strings, keys, tokens, and other application-level secrets stored in a secret store, such as AWS Secrets Manager, Azure Key Vault, Hashicorp Vault, etc.
To access these secret stores, the application imports the secret store SDK, often requiring a fair amount of unrelated boilerplate code. This poses an even greater challenge in multi-cloud scenarios, where different vendor-specific secret stores may be used.
Dapr’s dedicated secrets building block API makes it easier for developers to consume application secrets from a secret store. To use Dapr’s secret store building block, you:
The following overview video and demo demonstrates how Dapr secrets management works.
The secrets management API building block brings several features to your application.
You can call the secrets API in your application code to retrieve and use secrets from Dapr supported secret stores. Watch this video for an example of how the secrets management API can be used in your application.
For example, the diagram below shows an application requesting the secret called “mysecret” from a secret store called “vault” from a configured cloud secret store.
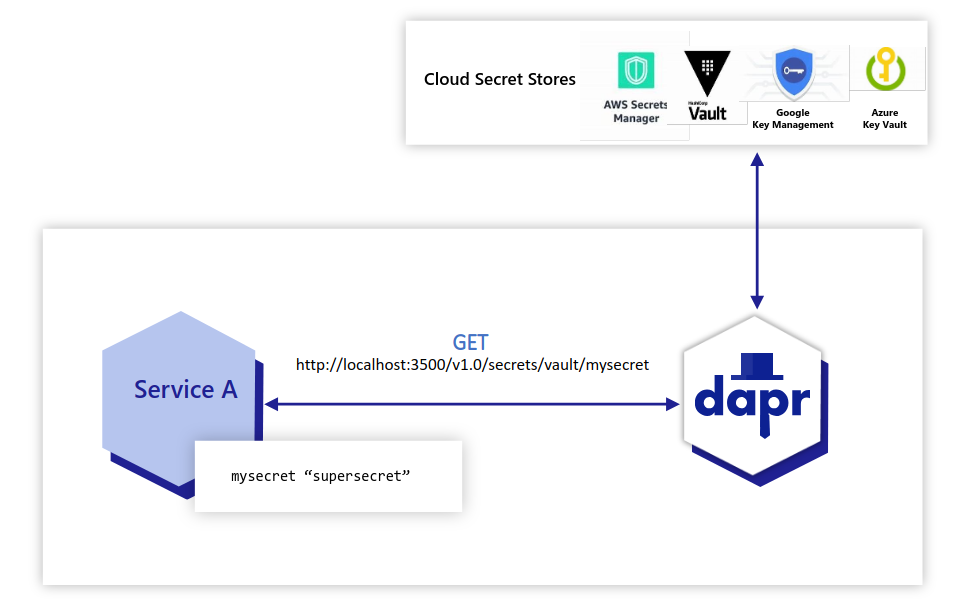
Applications can also use the secrets API to access secrets from a Kubernetes secret store. By default, Dapr enables a built-in Kubernetes secret store in Kubernetes mode, deployed via:
dapr init -kIf you are using another secret store, you can disable (not configure) the Dapr Kubernetes secret store by adding the annotation dapr.io/disable-builtin-k8s-secret-store: "true" to the deployment.yaml file. The default is false.
In the example below, the application retrieves the same secret “mysecret” from a Kubernetes secret store.
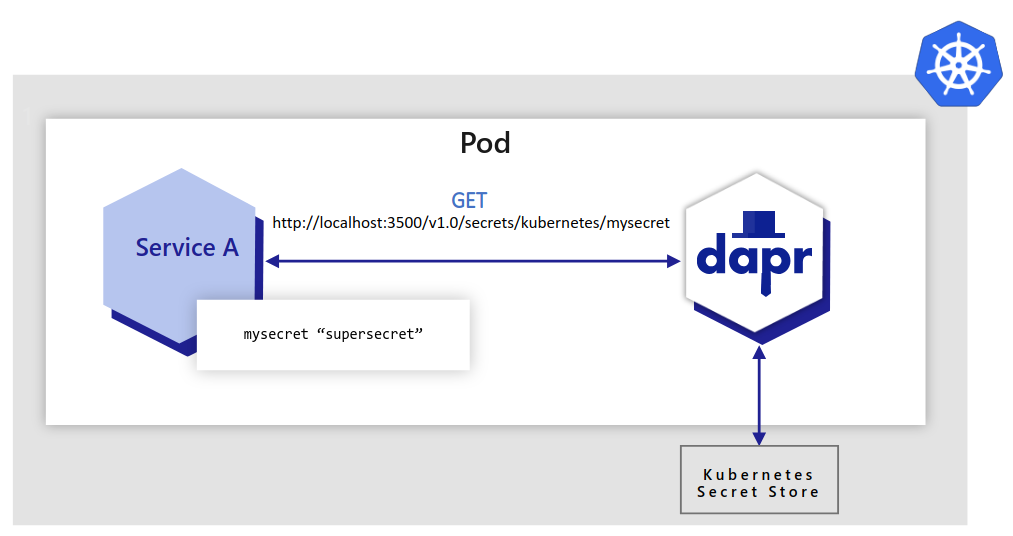
In Azure, you can configure Dapr to retrieve secrets using managed identities to authenticate with Azure Key Vault. In the example below:

In the examples above, the application code did not have to change to get the same secret. Dapr uses the secret management components via the secrets management building block API.
Try out the secrets API using one of our quickstarts or tutorials.
When configuring Dapr components such as state stores, you’re often required to include credentials in components files. Alternatively, you can place the credentials within a Dapr supported secret store and reference the secret within the Dapr component. This is the preferred approach and recommended best practice, especially in production environments.
For more information, read referencing secret stores in components.
To provide more granular control on access to secrets, Dapr provides the ability to define scopes and restricting access permissions. Learn more about using secret scoping
Want to put the Dapr secrets management API to the test? Walk through the following quickstart and tutorials to see Dapr secrets in action:
| Quickstart/tutorial | Description |
|---|---|
| Secrets management quickstart | Retrieve secrets in the application code from a configured secret store using the secrets management API. |
| Secret Store tutorial | Demonstrates the use of Dapr Secrets API to access secret stores. |
Want to skip the quickstarts? Not a problem. You can try out the secret management building block directly in your application to retrieve and manage secrets. After Dapr is installed, you can begin using the secrets management API starting with the secrets how-to guide.
Now that you’ve learned what the Dapr secrets building block provides, learn how it can work in your service. This guide demonstrates how to call the secrets API and retrieve secrets in your application code from a configured secret store.
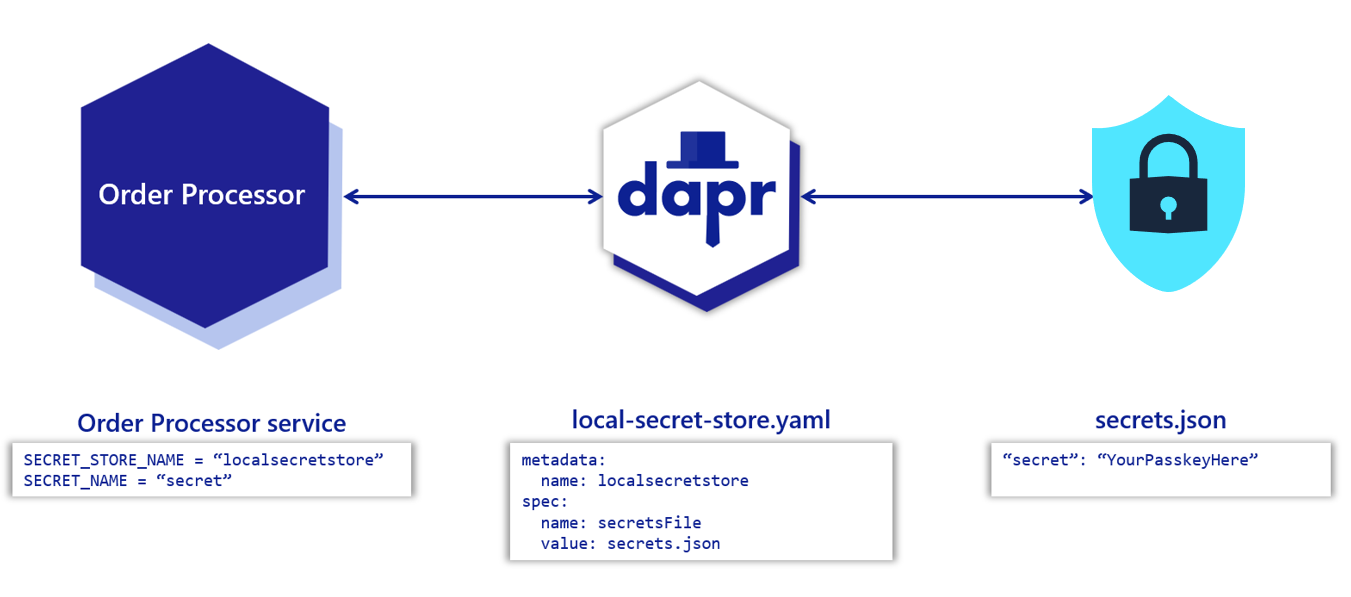
Before retrieving secrets in your application’s code, you must configure a secret store component. This example configures a secret store that uses a local JSON file to store secrets.
In your project directory, create a file named secrets.json with the following contents:
{
"secret": "Order Processing pass key"
}
Create a new directory named components. Navigate into that directory and create a component file named local-secret-store.yaml with the following contents:
apiVersion: dapr.io/v1alpha1
kind: Component
metadata:
name: localsecretstore
spec:
type: secretstores.local.file
version: v1
metadata:
- name: secretsFile
value: secrets.json #path to secrets file
- name: nestedSeparator
value: ":"
dapr run.
For more information:
Get the secret by calling the Dapr sidecar using the secrets API:
curl http://localhost:3601/v1.0/secrets/localsecretstore/secret
See a full API reference.
Now that you’ve set up the local secret store, call Dapr to get the secrets from your application code. Below are code examples that leverage Dapr SDKs for retrieving a secret.
using System;
using System.Threading.Tasks;
using Dapr.Client;
namespace EventService;
const string SECRET_STORE_NAME = "localsecretstore";
var builder = WebApplication.CreateBuilder(args);
builder.Services.AddDaprClient();
var app = builder.Build();
//Resolve a DaprClient from DI
var daprClient = app.Services.GetRequiredService<DaprClient>();
//Use the Dapr SDK to get a secret
var secret = await daprClient.GetSecretAsync(SECRET_STORE_NAME, "secret");
Console.WriteLine($"Result: {string.Join(", ", secret)}");
//dependencies
import com.fasterxml.jackson.core.JsonProcessingException;
import com.fasterxml.jackson.databind.ObjectMapper;
import io.dapr.client.DaprClient;
import io.dapr.client.DaprClientBuilder;
import org.springframework.boot.autoconfigure.SpringBootApplication;
import org.slf4j.Logger;
import org.slf4j.LoggerFactory;
import java.util.Map;
//code
@SpringBootApplication
public class OrderProcessingServiceApplication {
private static final Logger log = LoggerFactory.getLogger(OrderProcessingServiceApplication.class);
private static final ObjectMapper JSON_SERIALIZER = new ObjectMapper();
private static final String SECRET_STORE_NAME = "localsecretstore";
public static void main(String[] args) throws InterruptedException, JsonProcessingException {
DaprClient client = new DaprClientBuilder().build();
//Using Dapr SDK to get a secret
Map<String, String> secret = client.getSecret(SECRET_STORE_NAME, "secret").block();
log.info("Result: " + JSON_SERIALIZER.writeValueAsString(secret));
}
}
#dependencies
import random
from time import sleep
import requests
import logging
from dapr.clients import DaprClient
from dapr.clients.grpc._state import StateItem
from dapr.clients.grpc._request import TransactionalStateOperation, TransactionOperationType
#code
logging.basicConfig(level = logging.INFO)
DAPR_STORE_NAME = "localsecretstore"
key = 'secret'
with DaprClient() as client:
#Using Dapr SDK to get a secret
secret = client.get_secret(store_name=DAPR_STORE_NAME, key=key)
logging.info('Result: ')
logging.info(secret.secret)
#Using Dapr SDK to get bulk secrets
secret = client.get_bulk_secret(store_name=DAPR_STORE_NAME)
logging.info('Result for bulk secret: ')
logging.info(sorted(secret.secrets.items()))
//dependencies
import (
"context"
"log"
dapr "github.com/dapr/go-sdk/client"
)
//code
func main() {
client, err := dapr.NewClient()
SECRET_STORE_NAME := "localsecretstore"
if err != nil {
panic(err)
}
defer client.Close()
ctx := context.Background()
//Using Dapr SDK to get a secret
secret, err := client.GetSecret(ctx, SECRET_STORE_NAME, "secret", nil)
if secret != nil {
log.Println("Result : ")
log.Println(secret)
}
//Using Dapr SDK to get bulk secrets
secretBulk, err := client.GetBulkSecret(ctx, SECRET_STORE_NAME, nil)
if secret != nil {
log.Println("Result for bulk: ")
log.Println(secretBulk)
}
}
//dependencies
import { DaprClient, HttpMethod, CommunicationProtocolEnum } from '@dapr/dapr';
//code
const daprHost = "127.0.0.1";
async function main() {
const client = new DaprClient({
daprHost,
daprPort: process.env.DAPR_HTTP_PORT,
communicationProtocol: CommunicationProtocolEnum.HTTP,
});
const SECRET_STORE_NAME = "localsecretstore";
//Using Dapr SDK to get a secret
var secret = await client.secret.get(SECRET_STORE_NAME, "secret");
console.log("Result: " + secret);
//Using Dapr SDK to get bulk secrets
secret = await client.secret.getBulk(SECRET_STORE_NAME);
console.log("Result for bulk: " + secret);
}
main();
Once you configure a secret store for your application, any secret defined within that store is accessible by default from the Dapr application.
You can limit the Dapr application’s access to specific secrets by defining secret scopes. Simply add a secret scope policy to the application configuration with restrictive permissions.
The secret scoping policy applies to any secret store, including:
For details on how to set up a secret store, read How To: Retrieve a secret.
Watch this video for a demo on how to use secret scoping with your application.
In this example, all secret access is denied to an application running on a Kubernetes cluster, which has a configured Kubernetes secret store named mycustomsecretstore. Aside from the user-defined custom store, the example also configures the Kubernetes default store (named kubernetes) to ensure all secrets are denied access. Learn more about the Kubernetes default secret store.
Define the following appconfig.yaml configuration and apply it to the Kubernetes cluster using the command kubectl apply -f appconfig.yaml.
apiVersion: dapr.io/v1alpha1
kind: Configuration
metadata:
name: appconfig
spec:
secrets:
scopes:
- storeName: kubernetes
defaultAccess: deny
- storeName: mycustomsecreststore
defaultAccess: deny
For applications that need to be denied access to the Kubernetes secret store, follow these instructions, and add the following annotation to the application pod:
dapr.io/config: appconfig
With this defined, the application no longer has access to any secrets in the Kubernetes secret store.
This example uses a secret store named vault. This could be a Hashicorp secret store component set on your application. To allow a Dapr application to have access to only secret1 and secret2 in the vault secret store, define the following appconfig.yaml:
apiVersion: dapr.io/v1alpha1
kind: Configuration
metadata:
name: appconfig
spec:
secrets:
scopes:
- storeName: vault
defaultAccess: deny
allowedSecrets: ["secret1", "secret2"]
The default access to the vault secret store is deny, while some secrets are accessible by the application, based on the allowedSecrets list. Learn how to apply configuration to the sidecar.
Define the following config.yaml:
apiVersion: dapr.io/v1alpha1
kind: Configuration
metadata:
name: appconfig
spec:
secrets:
scopes:
- storeName: vault
defaultAccess: allow # this is the default value, line can be omitted
deniedSecrets: ["secret1", "secret2"]
This example configuration explicitly denies access to secret1 and secret2 from the secret store named vault while allowing access to all other secrets. Learn how to apply configuration to the sidecar.
The allowedSecrets and deniedSecrets list values take priority over the defaultAccess policy.
| Scenarios | defaultAccess | allowedSecrets | deniedSecrets | permission |
|---|---|---|---|---|
| 1 - Only default access | deny/allow | empty | empty | deny/allow |
| 2 - Default deny with allowed list | deny | [“s1”] | empty | only “s1” can be accessed |
| 3 - Default allow with deneied list | allow | empty | [“s1”] | only “s1” cannot be accessed |
| 4 - Default allow with allowed list | allow | [“s1”] | empty | only “s1” can be accessed |
| 5 - Default deny with denied list | deny | empty | [“s1”] | deny |
| 6 - Default deny/allow with both lists | deny/allow | [“s1”] | [“s2”] | only “s1” can be accessed |
Learn more about how to use Dapr Configuration:
Consuming application configuration is a common task when writing applications. Frequently, configuration stores are used to manage this configuration data. A configuration item is often dynamic in nature and tightly coupled to the needs of the application that consumes it.
For example, application configuration can include:
Usually, configuration items are stored as key/value items in a state store or database. Developers or operators can change application configuration at runtime in the configuration store. Once changes are made, a service is notified to load the new configuration.
Configuration data is read-only from the application API perspective, with updates to the configuration store made through operator tooling. With Dapr’s configuration API, you can:
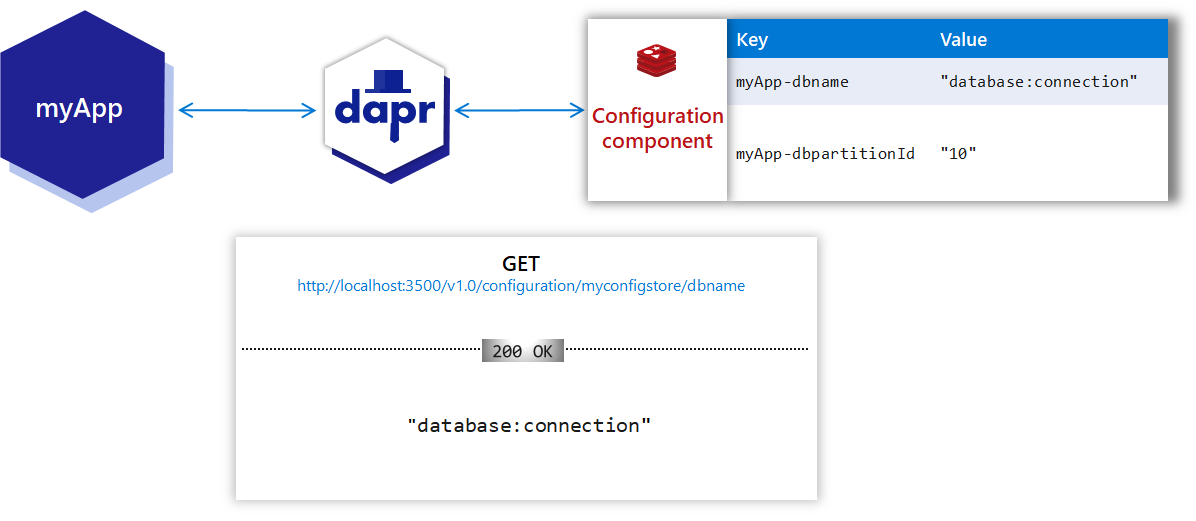
Want to put the Dapr configuration API to the test? Walk through the following quickstart to see the configuration API in action:
| Quickstart | Description |
|---|---|
| Configuration quickstart | Get configuration items or subscribe to configuration changes using the configuration API. |
Want to skip the quickstarts? Not a problem. You can try out the configuration building block directly in your application to read and manage configuration data. After Dapr is installed, you can begin using the configuration API starting with the configuration how-to guide.
Watch this demo of using the Dapr Configuration building block
Follow these guides on:
This example uses the Redis configuration store component to demonstrate how to retrieve a configuration item.
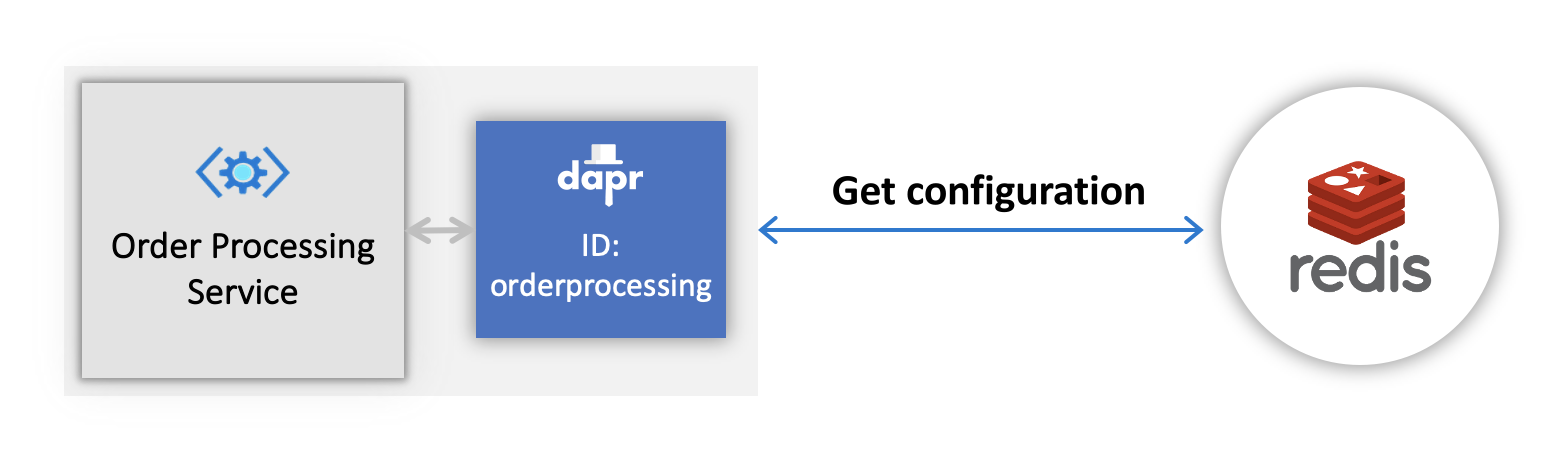
Create a configuration item in a supported configuration store. This can be a simple key-value item, with any key of your choice. As mentioned earlier, this example uses the Redis configuration store component.
docker run --name my-redis -p 6379:6379 -d redis:6
Using the Redis CLI, connect to the Redis instance:
redis-cli -p 6379
Save a configuration item:
MSET orderId1 "101||1" orderId2 "102||1"
Save the following component file to the default components folder on your machine. You can use this as the Dapr component YAML:
kubectl.statestore.yaml component, you can simply copy/change the Redis state store component type if you already have a Redis statestore.yaml.
apiVersion: dapr.io/v1alpha1
kind: Component
metadata:
name: configstore
spec:
type: configuration.redis
metadata:
- name: redisHost
value: localhost:6379
- name: redisPassword
value: <PASSWORD>
The following example shows how to get a saved configuration item using the Dapr Configuration API.
using System;
using System.Collections.Generic;
using System.Threading.Tasks;
using Dapr.Client;
const string CONFIG_STORE_NAME = "configstore";
var builder = WebApplication.CreateBuilder(args);
builder.Services.AddDaprClient();
var app = builder.Build();
using var client = app.Services.GetRequiredServices<DaprClient>();
var configuration = await client.GetConfiguration(CONFIG_STORE_NAME, [ "orderId1", "orderId2" ]);
Console.WriteLine($"Got key=\n{configuration[0].Key} -> {configuration[0].Value}\n{configuration[1].Key} -> {configuration[1].Value}");
//dependencies
import io.dapr.client.DaprClientBuilder;
import io.dapr.client.DaprClient;
import io.dapr.client.domain.ConfigurationItem;
import io.dapr.client.domain.GetConfigurationRequest;
import io.dapr.client.domain.SubscribeConfigurationRequest;
import reactor.core.publisher.Flux;
import reactor.core.publisher.Mono;
//code
private static final String CONFIG_STORE_NAME = "configstore";
public static void main(String[] args) throws Exception {
try (DaprClient client = (new DaprClientBuilder()).build()) {
List<String> keys = new ArrayList<>();
keys.add("orderId1");
keys.add("orderId2");
GetConfigurationRequest req = new GetConfigurationRequest(CONFIG_STORE_NAME, keys);
try {
Mono<List<ConfigurationItem>> items = client.getConfiguration(req);
items.block().forEach(ConfigurationClient::print);
} catch (Exception ex) {
System.out.println(ex.getMessage());
}
}
}
#dependencies
from dapr.clients import DaprClient
#code
with DaprClient() as d:
CONFIG_STORE_NAME = 'configstore'
keys = ['orderId1', 'orderId2']
#Startup time for dapr
d.wait(20)
configuration = d.get_configuration(store_name=CONFIG_STORE_NAME, keys=[keys], config_metadata={})
print(f"Got key={configuration.items[0].key} value={configuration.items[0].value} version={configuration.items[0].version}")
package main
import (
"context"
"fmt"
dapr "github.com/dapr/go-sdk/client"
)
func main() {
ctx := context.Background()
client, err := dapr.NewClient()
if err != nil {
panic(err)
}
items, err := client.GetConfigurationItems(ctx, "configstore", ["orderId1","orderId2"])
if err != nil {
panic(err)
}
for key, item := range items {
fmt.Printf("get config: key = %s value = %s version = %s",key,(*item).Value, (*item).Version)
}
}
import { CommunicationProtocolEnum, DaprClient } from "@dapr/dapr";
// JS SDK does not support Configuration API over HTTP protocol yet
const protocol = CommunicationProtocolEnum.GRPC;
const host = process.env.DAPR_HOST ?? "localhost";
const port = process.env.DAPR_GRPC_PORT ?? 3500;
const DAPR_CONFIGURATION_STORE = "configstore";
const CONFIGURATION_ITEMS = ["orderId1", "orderId2"];
async function main() {
const client = new DaprClient(host, port, protocol);
// Get config items from the config store
try {
const config = await client.configuration.get(DAPR_CONFIGURATION_STORE, CONFIGURATION_ITEMS);
Object.keys(config.items).forEach((key) => {
console.log("Configuration for " + key + ":", JSON.stringify(config.items[key]));
});
} catch (error) {
console.log("Could not get config item, err:" + error);
process.exit(1);
}
}
main().catch((e) => console.error(e));
Launch a dapr sidecar:
dapr run --app-id orderprocessing --dapr-http-port 3601
In a separate terminal, get the configuration item saved earlier:
curl http://localhost:3601/v1.0/configuration/configstore?key=orderId1
Launch a Dapr sidecar:
dapr run --app-id orderprocessing --dapr-http-port 3601
In a separate terminal, get the configuration item saved earlier:
Invoke-RestMethod -Uri 'http://localhost:3601/v1.0/configuration/configstore?key=orderId1'
Below are code examples that leverage SDKs to subscribe to keys [orderId1, orderId2] using configstore store component.
using System;
using System.Collections.Generic;
using System.Threading.Tasks;
using Dapr.Client;
using System.Text.Json;
const string DAPR_CONFIGURATION_STORE = "configstore";
var CONFIGURATION_ITEMS = new List<string> { "orderId1", "orderId2" };
var builder = WebApplication.CreateBuilder(args);
builder.Services.AddDaprClient();
var app = builder.Build();
var client = app.Services.GetRequiredService<DaprClient>();
// Subscribe for configuration changes
var subscribe = await client.SubscribeConfiguration(DAPR_CONFIGURATION_STORE, CONFIGURATION_ITEMS);
// Print configuration changes
await foreach (var items in subscribe.Source)
{
// First invocation when app subscribes to config changes only returns subscription id
if (items.Keys.Count == 0)
{
Console.WriteLine("App subscribed to config changes with subscription id: " + subscribe.Id);
subscriptionId = subscribe.Id;
continue;
}
var cfg = JsonSerializer.Serialize(items);
Console.WriteLine("Configuration update " + cfg);
}
Navigate to the directory containing the above code, then run the following command to launch both a Dapr sidecar and the subscriber application:
dapr run --app-id orderprocessing -- dotnet run
using System;
using Microsoft.AspNetCore.Hosting;
using Microsoft.Extensions.Hosting;
using Dapr.Client;
using Dapr.Extensions.Configuration;
using System.Collections.Generic;
using System.Threading;
Console.WriteLine("Starting application.");
var builder = WebApplication.CreateBuilder(args);
// Unlike most other situations, we build a `DaprClient` here using its factory because we cannot rely on `IConfiguration`
// or other injected services to configure it because we haven't yet built the DI container.
var client = new DaprClientBuilder().Build();
// In a real-world application, you'd also add the following line to register the `DaprClient` with the DI container so
// it can be injected into other services. In this demonstration, it's not necessary as we're not injecting it anywhere.
// builder.Services.AddDaprClient();
// Get the initial value and continue to watch it for changes
builder.Configuration.AddDaprConfigurationStore("configstore", new List<string>() { "orderId1","orderId2" }, client, TimeSpan.FromSeconds(20));
builder.Configuration.AddStreamingDaprConfigurationStore("configstore", new List<string>() { "orderId1","orderId2" }, client, TimeSpan.FromSeconds(20));
await builder.Build().RunAsync();
Console.WriteLine("Closing application.");
Navigate to the directory containing the above code, then run the following command to launch both a Dapr sidecar and the subscriber application:
dapr run --app-id orderprocessing -- dotnet run
import io.dapr.client.DaprClientBuilder;
import io.dapr.client.DaprClient;
import io.dapr.client.domain.ConfigurationItem;
import io.dapr.client.domain.GetConfigurationRequest;
import io.dapr.client.domain.SubscribeConfigurationRequest;
import reactor.core.publisher.Flux;
import reactor.core.publisher.Mono;
//code
private static final String CONFIG_STORE_NAME = "configstore";
private static String subscriptionId = null;
public static void main(String[] args) throws Exception {
try (DaprClient client = (new DaprClientBuilder()).build()) {
// Subscribe for config changes
List<String> keys = new ArrayList<>();
keys.add("orderId1");
keys.add("orderId2");
Flux<SubscribeConfigurationResponse> subscription = client.subscribeConfiguration(DAPR_CONFIGURATON_STORE,keys);
// Read config changes for 20 seconds
subscription.subscribe((response) -> {
// First ever response contains the subscription id
if (response.getItems() == null || response.getItems().isEmpty()) {
subscriptionId = response.getSubscriptionId();
System.out.println("App subscribed to config changes with subscription id: " + subscriptionId);
} else {
response.getItems().forEach((k, v) -> {
System.out.println("Configuration update for " + k + ": {'value':'" + v.getValue() + "'}");
});
}
});
Thread.sleep(20000);
}
}
Navigate to the directory containing the above code, then run the following command to launch both a Dapr sidecar and the subscriber application:
dapr run --app-id orderprocessing -- -- mvn spring-boot:run
#dependencies
from dapr.clients import DaprClient
#code
def handler(id: str, resp: ConfigurationResponse):
for key in resp.items:
print(f"Subscribed item received key={key} value={resp.items[key].value} "
f"version={resp.items[key].version} "
f"metadata={resp.items[key].metadata}", flush=True)
def executeConfiguration():
with DaprClient() as d:
storeName = 'configurationstore'
keys = ['orderId1', 'orderId2']
id = d.subscribe_configuration(store_name=storeName, keys=keys,
handler=handler, config_metadata={})
print("Subscription ID is", id, flush=True)
sleep(20)
executeConfiguration()
Navigate to the directory containing the above code, then run the following command to launch both a Dapr sidecar and the subscriber application:
dapr run --app-id orderprocessing -- python3 OrderProcessingService.py
package main
import (
"context"
"fmt"
"time"
dapr "github.com/dapr/go-sdk/client"
)
func main() {
ctx := context.Background()
client, err := dapr.NewClient()
if err != nil {
panic(err)
}
subscribeID, err := client.SubscribeConfigurationItems(ctx, "configstore", []string{"orderId1", "orderId2"}, func(id string, items map[string]*dapr.ConfigurationItem) {
for k, v := range items {
fmt.Printf("get updated config key = %s, value = %s version = %s \n", k, v.Value, v.Version)
}
})
if err != nil {
panic(err)
}
time.Sleep(20*time.Second)
}
Navigate to the directory containing the above code, then run the following command to launch both a Dapr sidecar and the subscriber application:
dapr run --app-id orderprocessing -- go run main.go
import { CommunicationProtocolEnum, DaprClient } from "@dapr/dapr";
// JS SDK does not support Configuration API over HTTP protocol yet
const protocol = CommunicationProtocolEnum.GRPC;
const host = process.env.DAPR_HOST ?? "localhost";
const port = process.env.DAPR_GRPC_PORT ?? 3500;
const DAPR_CONFIGURATION_STORE = "configstore";
const CONFIGURATION_ITEMS = ["orderId1", "orderId2"];
async function main() {
const client = new DaprClient(host, port, protocol);
// Subscribe to config updates
try {
const stream = await client.configuration.subscribeWithKeys(
DAPR_CONFIGURATION_STORE,
CONFIGURATION_ITEMS,
(config) => {
console.log("Configuration update", JSON.stringify(config.items));
}
);
// Unsubscribe to config updates and exit app after 20 seconds
setTimeout(() => {
stream.stop();
console.log("App unsubscribed to config changes");
process.exit(0);
}, 20000);
} catch (error) {
console.log("Error subscribing to config updates, err:" + error);
process.exit(1);
}
}
main().catch((e) => console.error(e));
Navigate to the directory containing the above code, then run the following command to launch both a Dapr sidecar and the subscriber application:
dapr run --app-id orderprocessing --app-protocol grpc --dapr-grpc-port 3500 -- node index.js
After you’ve subscribed to watch configuration items, you will receive updates for all of the subscribed keys. To stop receiving updates, you need to explicitly call the unsubscribe API.
Following are the code examples showing how you can unsubscribe to configuration updates using unsubscribe API.
using System;
using System.Collections.Generic;
using System.Threading.Tasks;
using Dapr.Client;
var builder = WebApplication.CreateBuilder();
builder.Services.AddDaprClient();
var app = builder.Build();
const string DAPR_CONFIGURATION_STORE = "configstore";
const string SubscriptionId = "abc123"; //Replace with the subscription identifier to unsubscribe from
var client = app.Services.GetRequiredService<DaprClient>();
await client.UnsubscribeConfiguration(DAPR_CONFIGURATION_STORE, SubscriptionId);
Console.WriteLine("App unsubscribed from config changes");
import io.dapr.client.DaprClientBuilder;
import io.dapr.client.DaprClient;
import io.dapr.client.domain.ConfigurationItem;
import io.dapr.client.domain.GetConfigurationRequest;
import io.dapr.client.domain.SubscribeConfigurationRequest;
import reactor.core.publisher.Flux;
import reactor.core.publisher.Mono;
//code
private static final String CONFIG_STORE_NAME = "configstore";
private static String subscriptionId = null;
public static void main(String[] args) throws Exception {
try (DaprClient client = (new DaprClientBuilder()).build()) {
// Unsubscribe from config changes
UnsubscribeConfigurationResponse unsubscribe = client
.unsubscribeConfiguration(subscriptionId, DAPR_CONFIGURATON_STORE).block();
if (unsubscribe.getIsUnsubscribed()) {
System.out.println("App unsubscribed to config changes");
} else {
System.out.println("Error unsubscribing to config updates, err:" + unsubscribe.getMessage());
}
} catch (Exception e) {
System.out.println("Error unsubscribing to config updates," + e.getMessage());
System.exit(1);
}
}
import asyncio
import time
import logging
from dapr.clients import DaprClient
subscriptionID = ""
with DaprClient() as d:
isSuccess = d.unsubscribe_configuration(store_name='configstore', id=subscriptionID)
print(f"Unsubscribed successfully? {isSuccess}", flush=True)
package main
import (
"context"
"encoding/json"
"fmt"
"log"
"os"
"time"
dapr "github.com/dapr/go-sdk/client"
)
var DAPR_CONFIGURATION_STORE = "configstore"
var subscriptionID = ""
func main() {
client, err := dapr.NewClient()
if err != nil {
log.Panic(err)
}
ctx, cancel := context.WithTimeout(context.Background(), 10*time.Second)
defer cancel()
if err := client.UnsubscribeConfigurationItems(ctx, DAPR_CONFIGURATION_STORE , subscriptionID); err != nil {
panic(err)
}
}
import { CommunicationProtocolEnum, DaprClient } from "@dapr/dapr";
// JS SDK does not support Configuration API over HTTP protocol yet
const protocol = CommunicationProtocolEnum.GRPC;
const host = process.env.DAPR_HOST ?? "localhost";
const port = process.env.DAPR_GRPC_PORT ?? 3500;
const DAPR_CONFIGURATION_STORE = "configstore";
const CONFIGURATION_ITEMS = ["orderId1", "orderId2"];
async function main() {
const client = new DaprClient(host, port, protocol);
try {
const stream = await client.configuration.subscribeWithKeys(
DAPR_CONFIGURATION_STORE,
CONFIGURATION_ITEMS,
(config) => {
console.log("Configuration update", JSON.stringify(config.items));
}
);
setTimeout(() => {
// Unsubscribe to config updates
stream.stop();
console.log("App unsubscribed to config changes");
process.exit(0);
}, 20000);
} catch (error) {
console.log("Error subscribing to config updates, err:" + error);
process.exit(1);
}
}
main().catch((e) => console.error(e));
curl 'http://localhost:<DAPR_HTTP_PORT>/v1.0/configuration/configstore/<subscription-id>/unsubscribe'
Invoke-RestMethod -Uri 'http://localhost:<DAPR_HTTP_PORT>/v1.0/configuration/configstore/<subscription-id>/unsubscribe'
Learn more about how to use Dapr Distributed Lock:
Locks are used to provide mutually exclusive access to a resource. For example, you can use a lock to:
Any resource that is shared where updates occur can be the target for a lock. Locks are usually used on operations that mutate state, not on reads.
Each lock has a name. The application determines the resources that the named lock accesses. Typically, multiple instances of the same application use this named lock to exclusively access the resource and perform updates.
For example, in the competing consumer pattern, multiple instances of an application access a queue. You can decide that you want to lock the queue while the application is running its business logic.
In the diagram below, two instances of the same application, App1, use the Redis lock component to take a lock on a shared resource.
*This API is currently in Alpha state.
At any given moment, only one instance of an application can hold a named lock. Locks are scoped to a Dapr app-id.
Dapr distributed locks use a lease-based locking mechanism. If an application acquires a lock, encounters an exception, and cannot free the lock, the lock is automatically released after a period of time using a lease. This prevents resource deadlocks in the event of application failures.
Watch this video for an overview of the distributed lock API:
Follow these guides on:
Now that you’ve learned what the Dapr distributed lock API building block provides, learn how it can work in your service. In this guide, an example application acquires a lock using the Redis lock component to demonstrate how to lock resources. For a list of supported lock stores, see this reference page.
In the diagram below, two instances of the same application acquire a lock, where one instance is successful and the other is denied.
The diagram below shows two instances of the same application, where one instance releases the lock and the other instance is then able to acquire the lock.

The diagram below shows two instances of different applications, acquiring different locks on the same resource.
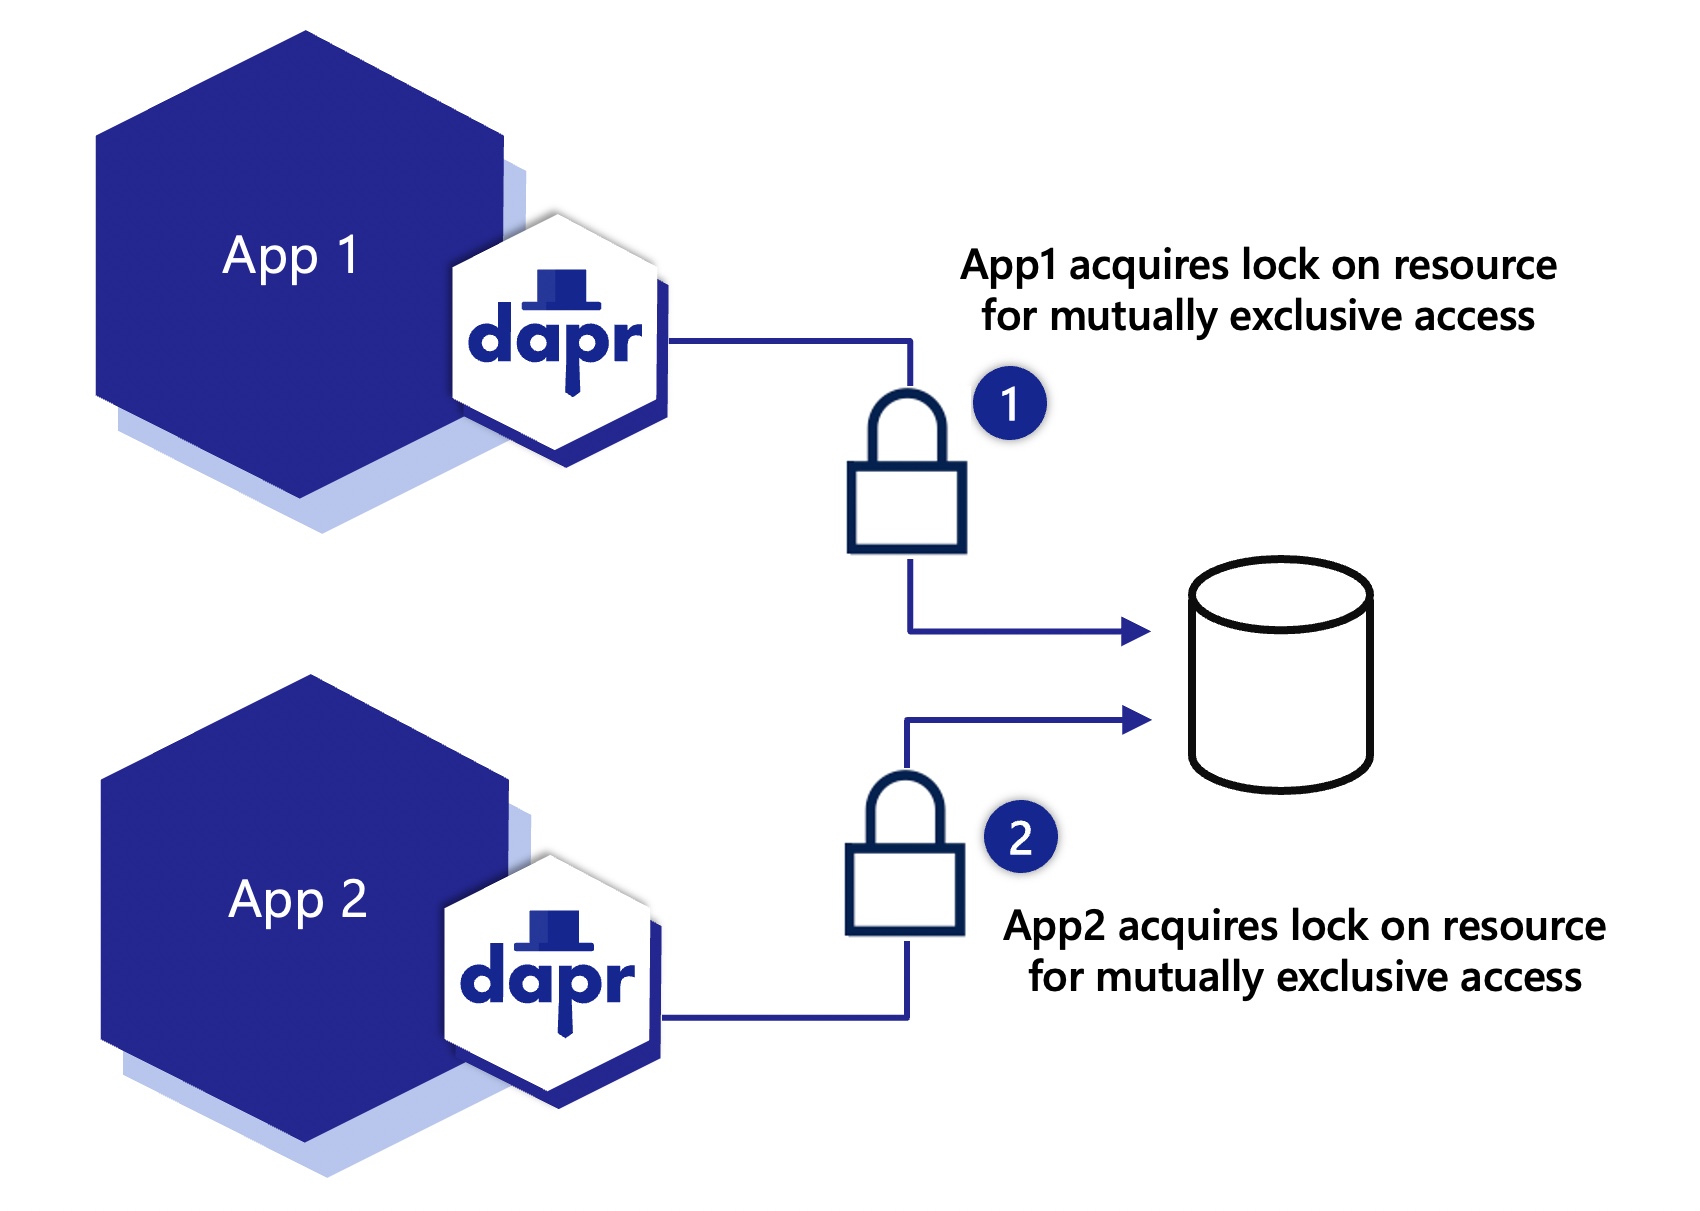
Save the following component file to the default components folder on your machine.
apiVersion: dapr.io/v1alpha1
kind: Component
metadata:
name: lockstore
spec:
type: lock.redis
version: v1
metadata:
- name: redisHost
value: localhost:6379
- name: redisPassword
value: <PASSWORD>
curl -X POST http://localhost:3500/v1.0-alpha1/lock/lockstore
-H 'Content-Type: application/json'
-d '{"resourceId":"my_file_name", "lockOwner":"random_id_abc123", "expiryInSeconds": 60}'
using System;
using Dapr.Client;
namespace LockService
{
class Program
{
[Obsolete("Distributed Lock API is in Alpha, this can be removed once it is stable.")]
static async Task Main(string[] args)
{
string DAPR_LOCK_NAME = "lockstore";
string fileName = "my_file_name";
var client = new DaprClientBuilder().Build();
await using (var fileLock = await client.Lock(DAPR_LOCK_NAME, fileName, "random_id_abc123", 60))
{
if (fileLock.Success)
{
Console.WriteLine("Success");
}
else
{
Console.WriteLine($"Failed to lock {fileName}.");
}
}
}
}
}
package main
import (
"fmt"
dapr "github.com/dapr/go-sdk/client"
)
func main() {
client, err := dapr.NewClient()
if err != nil {
panic(err)
}
defer client.Close()
resp, err := client.TryLockAlpha1(ctx, "lockstore", &dapr.LockRequest{
LockOwner: "random_id_abc123",
ResourceID: "my_file_name",
ExpiryInSeconds: 60,
})
fmt.Println(resp.Success)
}
curl -X POST http://localhost:3500/v1.0-alpha1/unlock/lockstore
-H 'Content-Type: application/json'
-d '{"resourceId":"my_file_name", "lockOwner":"random_id_abc123"}'
using System;
using Dapr.Client;
namespace LockService
{
class Program
{
static async Task Main(string[] args)
{
string DAPR_LOCK_NAME = "lockstore";
var client = new DaprClientBuilder().Build();
var response = await client.Unlock(DAPR_LOCK_NAME, "my_file_name", "random_id_abc123"));
Console.WriteLine(response.status);
}
}
}
package main
import (
"fmt"
dapr "github.com/dapr/go-sdk/client"
)
func main() {
client, err := dapr.NewClient()
if err != nil {
panic(err)
}
defer client.Close()
resp, err := client.UnlockAlpha1(ctx, "lockstore", &UnlockRequest{
LockOwner: "random_id_abc123",
ResourceID: "my_file_name",
})
fmt.Println(resp.Status)
}
Read the distributed lock API overview to learn more.
Learn more about how to use Dapr Cryptography:
With the cryptography building block, you can leverage cryptography in a safe and consistent way. Dapr exposes APIs that allow you to perform operations, such as encrypting and decrypting messages, within key vaults or the Dapr sidecar, without exposing cryptographic keys to your application.
Applications make extensive use of cryptography, which, when implemented correctly, can make solutions safer even when data is compromised. In certain cases, you may be required to use cryptography to comply with industry regulations (for example, in finance) or legal requirements (including privacy regulations such as GDPR).
However, leveraging cryptography correctly can be difficult. You need to:
One important requirement for security is limiting access to your cryptographic keys, what is often referred to as “raw key material”. Dapr can integrate with key vaults such as Azure Key Vault (with more components coming in the future) which store keys in secure enclaves and perform cryptographic operations in the vaults, without exposing keys to your application or Dapr.
Alternatively, you can configure Dapr to manage the cryptographic keys for you, performing operations within the sidecar, again without exposing raw key material to your application.
With Dapr, you can perform cryptographic operations without exposing cryptographic keys to your application.
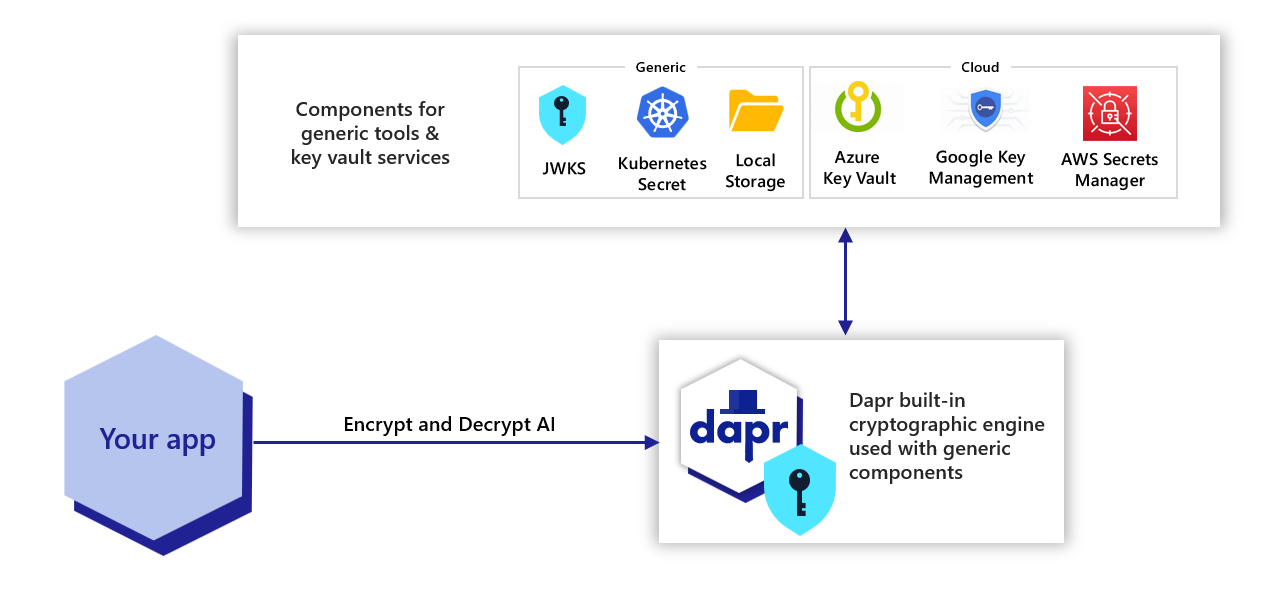
By using the cryptography building block, you can:
The Dapr cryptography building block includes two kinds of components:
Components that allow interacting with management services or vaults (“key vaults”).
Similar to how Dapr offers an “abstraction layer” on top of various secret stores or state stores, these components allow interacting with various key vaults such as Azure Key Vault (with more coming in future Dapr releases). With these components, cryptographic operations on the private keys are performed within the vaults and Dapr never sees your private keys.
Components based on Dapr’s own cryptographic engine.
When key vaults are not available, you can leverage components based on Dapr’s own cryptographic engine. These components, which have .dapr. in the name, perform cryptographic operations within the Dapr sidecar, with keys stored on files, Kubernetes secrets, or other sources. Although the private keys are known by Dapr, they are still not available to your applications.
Both kinds of components, either those leveraging key vaults or using the cryptopgrahic engine in Dapr, offer the same abstraction layer. This allows your solution to switch between various vaults and/or cryptography components as needed. For example, you can use a locally-stored key during development, and a cloud vault in production.
Cryptographic APIs allow encrypting and decrypting data using the Dapr Crypto Scheme v1. This is an opinionated encryption scheme designed to use modern, safe cryptographic standards, and processes data (even large files) efficiently as a stream.
Want to put the Dapr cryptography API to the test? Walk through the following quickstart and tutorials to see cryptography in action:
| Quickstart/tutorial | Description |
|---|---|
| Cryptography quickstart | Encrypt and decrypt messages and large files using RSA and AES keys with the cryptography API. |
Want to skip the quickstarts? Not a problem. You can try out the cryptography building block directly in your application to encrypt and decrypt your application. After Dapr is installed, you can begin using the cryptography API starting with the cryptography how-to guide.
Watch this demo video of the Cryptography API from the Dapr Community Call #83:
Now that you’ve read about Cryptography as a Dapr building block, let’s walk through using the cryptography APIs with the SDKs.
Using the Dapr SDK in your project, with the gRPC APIs, you can encrypt a stream of data, such as a file or a string:
# When passing data (a buffer or string), `encrypt` returns a Buffer with the encrypted message
def encrypt_decrypt_string(dapr: DaprClient):
message = 'The secret is "passw0rd"'
# Encrypt the message
resp = dapr.encrypt(
data=message.encode(),
options=EncryptOptions(
# Name of the cryptography component (required)
component_name=CRYPTO_COMPONENT_NAME,
# Key stored in the cryptography component (required)
key_name=RSA_KEY_NAME,
# Algorithm used for wrapping the key, which must be supported by the key named above.
# Options include: "RSA", "AES"
key_wrap_algorithm='RSA',
),
)
# The method returns a readable stream, which we read in full in memory
encrypt_bytes = resp.read()
print(f'Encrypted the message, got {len(encrypt_bytes)} bytes')
Using the Dapr SDK in your project, with the gRPC APIs, you can encrypt data in a buffer or a string:
// When passing data (a buffer or string), `encrypt` returns a Buffer with the encrypted message
const ciphertext = await client.crypto.encrypt(plaintext, {
// Name of the Dapr component (required)
componentName: "mycryptocomponent",
// Name of the key stored in the component (required)
keyName: "mykey",
// Algorithm used for wrapping the key, which must be supported by the key named above.
// Options include: "RSA", "AES"
keyWrapAlgorithm: "RSA",
});
The APIs can also be used with streams, to encrypt data more efficiently when it comes from a stream. The example below encrypts a file, writing to another file, using streams:
// `encrypt` can be used as a Duplex stream
await pipeline(
fs.createReadStream("plaintext.txt"),
await client.crypto.encrypt({
// Name of the Dapr component (required)
componentName: "mycryptocomponent",
// Name of the key stored in the component (required)
keyName: "mykey",
// Algorithm used for wrapping the key, which must be supported by the key named above.
// Options include: "RSA", "AES"
keyWrapAlgorithm: "RSA",
}),
fs.createWriteStream("ciphertext.out"),
);
Using the Dapr SDK in your project, with the gRPC APIs, you can encrypt data in a string or a byte array:
using var client = new DaprClientBuilder().Build();
const string componentName = "azurekeyvault"; //Change this to match your cryptography component
const string keyName = "myKey"; //Change this to match the name of the key in your cryptographic store
const string plainText = "This is the value we're going to encrypt today";
//Encode the string to a UTF-8 byte array and encrypt it
var plainTextBytes = Encoding.UTF8.GetBytes(plainText);
var encryptedBytesResult = await client.EncryptAsync(componentName, plaintextBytes, keyName, new EncryptionOptions(KeyWrapAlgorithm.Rsa));
Using the Dapr SDK in your project, you can encrypt a stream of data, such as a file.
out, err := sdkClient.Encrypt(context.Background(), rf, dapr.EncryptOptions{
// Name of the Dapr component (required)
ComponentName: "mycryptocomponent",
// Name of the key stored in the component (required)
KeyName: "mykey",
// Algorithm used for wrapping the key, which must be supported by the key named above.
// Options include: "RSA", "AES"
Algorithm: "RSA",
})
The following example puts the Encrypt API in context, with code that reads the file, encrypts it, then stores the result in another file.
// Input file, clear-text
rf, err := os.Open("input")
if err != nil {
panic(err)
}
defer rf.Close()
// Output file, encrypted
wf, err := os.Create("output.enc")
if err != nil {
panic(err)
}
defer wf.Close()
// Encrypt the data using Dapr
out, err := sdkClient.Encrypt(context.Background(), rf, dapr.EncryptOptions{
// These are the 3 required parameters
ComponentName: "mycryptocomponent",
KeyName: "mykey",
Algorithm: "RSA",
})
if err != nil {
panic(err)
}
// Read the stream and copy it to the out file
n, err := io.Copy(wf, out)
if err != nil {
panic(err)
}
fmt.Println("Written", n, "bytes")
The following example uses the Encrypt API to encrypt a string.
// Input string
rf := strings.NewReader("Amor, ch’a nullo amato amar perdona, mi prese del costui piacer sì forte, che, come vedi, ancor non m’abbandona")
// Encrypt the data using Dapr
enc, err := sdkClient.Encrypt(context.Background(), rf, dapr.EncryptOptions{
ComponentName: "mycryptocomponent",
KeyName: "mykey",
Algorithm: "RSA",
})
if err != nil {
panic(err)
}
// Read the encrypted data into a byte slice
enc, err := io.ReadAll(enc)
if err != nil {
panic(err)
}
To decrypt a stream of data, use decrypt.
def encrypt_decrypt_string(dapr: DaprClient):
message = 'The secret is "passw0rd"'
# ...
# Decrypt the encrypted data
resp = dapr.decrypt(
data=encrypt_bytes,
options=DecryptOptions(
# Name of the cryptography component (required)
component_name=CRYPTO_COMPONENT_NAME,
# Key stored in the cryptography component (required)
key_name=RSA_KEY_NAME,
),
)
# The method returns a readable stream, which we read in full in memory
decrypt_bytes = resp.read()
print(f'Decrypted the message, got {len(decrypt_bytes)} bytes')
print(decrypt_bytes.decode())
assert message == decrypt_bytes.decode()
Using the Dapr SDK, you can decrypt data in a buffer or using streams.
// When passing data as a buffer, `decrypt` returns a Buffer with the decrypted message
const plaintext = await client.crypto.decrypt(ciphertext, {
// Only required option is the component name
componentName: "mycryptocomponent",
});
// `decrypt` can also be used as a Duplex stream
await pipeline(
fs.createReadStream("ciphertext.out"),
await client.crypto.decrypt({
// Only required option is the component name
componentName: "mycryptocomponent",
}),
fs.createWriteStream("plaintext.out"),
);
To decrypt a string, use the ‘DecryptAsync’ gRPC API in your project.
In the following example, we’ll take a byte array (such as from the example above) and decrypt it to a UTF-8 encoded string.
public async Task<string> DecryptBytesAsync(byte[] encryptedBytes)
{
using var client = new DaprClientBuilder().Build();
const string componentName = "azurekeyvault"; //Change this to match your cryptography component
const string keyName = "myKey"; //Change this to match the name of the key in your cryptographic store
var decryptedBytes = await client.DecryptAsync(componentName, encryptedBytes, keyName);
var decryptedString = Encoding.UTF8.GetString(decryptedBytes.ToArray());
return decryptedString;
}
To decrypt a file, use the Decrypt gRPC API to your project.
In the following example, out is a stream that can be written to file or read in memory, as in the examples above.
out, err := sdkClient.Decrypt(context.Background(), rf, dapr.EncryptOptions{
// Only required option is the component name
ComponentName: "mycryptocomponent",
})
Many applications require job scheduling, or the need to take an action in the future. The jobs API is an orchestrator for scheduling these future jobs, either at a specific time or for a specific interval.
Not only does the jobs API help you with scheduling jobs, but internally, Dapr uses the Scheduler service to schedule actor reminders.
Jobs in Dapr consist of:
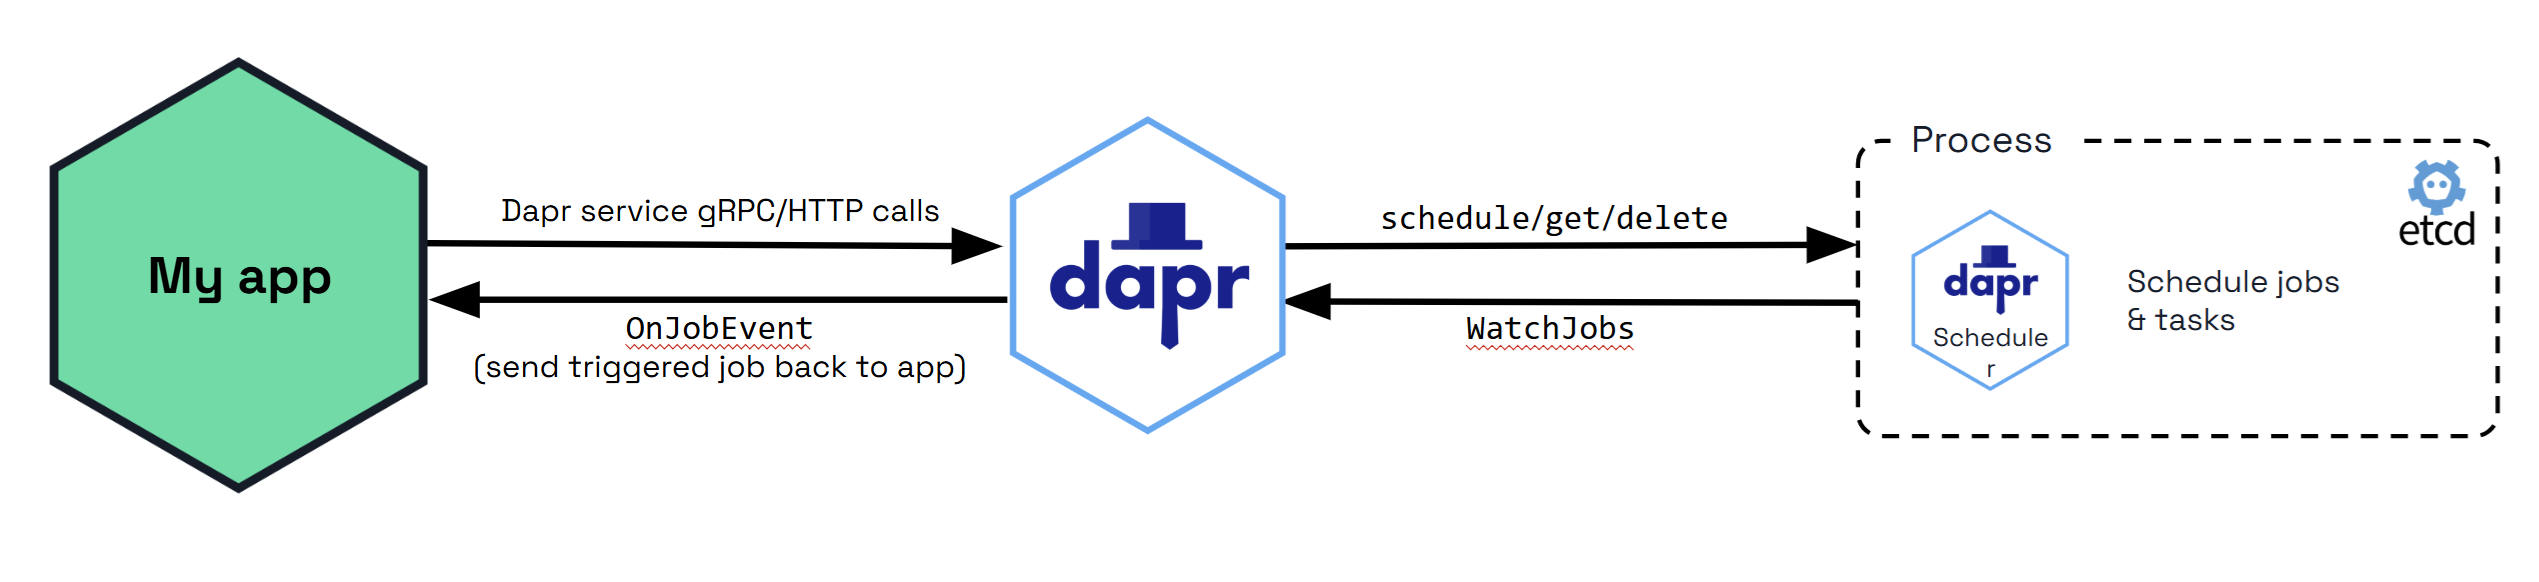
The jobs API is a job scheduler, not the executor which runs the job. The design guarantees at least once job execution with a bias towards durability and horizontal scaling over precision. This means:
All job details and user-associated data for scheduled jobs are stored in an embedded Etcd database in the Scheduler service. You can use jobs to:
Job scheduling can prove helpful in the following scenarios:
Automated Database Backups: Ensure a database is backed up daily to prevent data loss. Schedule a backup script to run every night at 2 AM, which will create a backup of the database and store it in a secure location.
Regular Data Processing and ETL (Extract, Transform, Load): Process and transform raw data from various sources and load it into a data warehouse. Schedule ETL jobs to run at specific times (for example: hourly, daily) to fetch new data, process it, and update the data warehouse with the latest information.
Email Notifications and Reports: Receive daily sales reports and weekly performance summaries via email. Schedule a job that generates the required reports and sends them via email at 6 a.m. every day for daily reports and 8 a.m. every Monday for weekly summaries.
Maintenance Tasks and System Updates: Perform regular maintenance tasks such as clearing temporary files, updating software, and checking system health. Schedule various maintenance scripts to run at off-peak hours, such as weekends or late nights, to minimize disruption to users.
Batch Processing for Financial Transactions: Processes a large number of transactions that need to be batched and settled at the end of each business day. Schedule batch processing jobs to run at 5 PM every business day, aggregating the day’s transactions and performing necessary settlements and reconciliations.
Dapr’s jobs API ensures the tasks represented in these scenarios are performed consistently and reliably without manual intervention, improving efficiency and reducing the risk of errors.
The main functionality of the Jobs API allows you to create, retrieve, and delete scheduled jobs. By default, when you create a job with a name that already exists, the operation fails unless you explicitly set the overwrite flag to true. This ensures that existing jobs are not accidentally modified or overwritten.
When you create a job, it does not replace an existing job with the same name, unless you explicitly set the overwrite flag. This means that every time a job is created, it resets the count and only keeps 1 record in the embedded etcd for that job. Therefore, you don’t need to worry about multiple jobs being created and firing off — only the most recent job is recorded and executed, even if all your apps schedule the same job on startup.
The Scheduler service enables the scheduling of jobs to scale across multiple replicas, while guaranteeing that a job is only triggered by 1 Scheduler service instance.
You can try out the jobs API in your application. After Dapr is installed, you can begin using the jobs API, starting with the How-to: Schedule jobs guide.
Now that you’ve learned about the jobs building block at a high level, let’s deep dive into the features and concepts included with Dapr Jobs and the various SDKs. Dapr Jobs:
All jobs are registered with a case-sensitive job name. These names are intended to be unique across all services interfacing with the Dapr runtime. The name is used as an identifier when creating and modifying the job as well as to indicate which job a triggered invocation is associated with.
Only one job can be associated with a name at any given time. By default, any attempt to create a new job using the same name as an existing job results in an error. However, if the overwrite flag is set to true, the new job overwrites the existing job with the same name.
A job can be scheduled using any of the following mechanisms:
For all time-based schedules, if a timestamp is provided with a time zone via the RFC3339 specification, that time zone is used. When not provided, the time zone used by the server running Dapr is used. In other words, do not assume that times run in UTC time zone, unless otherwise specified when scheduling the job.
When scheduling a job to execute on a specific interval using a Cron expression, the expression is written using 6 fields spanning the values specified in the table below:
| seconds | minutes | hours | day of month | month | day of week |
|---|---|---|---|---|---|
| 0-59 | 0-59 | 0-23 | 1-31 | 1-12/jan-dec | 0-6/sun-sat |
"0 30 * * * *" triggers every hour on the half-hour mark.
"0 15 3 * * *" triggers every day at 03:15.
You can schedule jobs using a Go duration string, in which
a string consists of a (possibly) signed sequence of decimal numbers, each with an optional fraction and a unit suffix.
Valid time units are "ns", "us", "ms", "s", "m", or "h".
"2h45m" triggers every 2 hours and 45 minutes.
"37m25s" triggers every 37 minutes and 25 seconds.
The following period expressions are supported. The “@every” expression also accepts a Go duration string.
| Entry | Description | Equivalent Cron expression |
|---|---|---|
| @every | Run every (e.g. “@every 1h30m”) | N/A |
| @yearly (or @annually) | Run once a year, midnight, January 1st | 0 0 0 1 1 * |
| @monthly | Run once a month, midnight, first of month | 0 0 0 1 * * |
| @weekly | Run once a week, midnight on Sunday | 0 0 0 * * 0 |
| @daily or @midnight | Run once a day at midnight | 0 0 0 * * * |
| @hourly | Run once an hour at the beginning of the hour | 0 0 * * * * |
A job can also be scheduled to run at a particular point in time by providing a date using the RFC3339 specification.
"2025-12-09T16:09:53+00:00" Indicates that the job should be run on December 9, 2025 at 4:09:53 PM UTC.
When a scheduled Dapr job is triggered, the runtime sends a message back to the service that scheduled the job using either the HTTP or gRPC approach, depending on which is registered with Dapr when the service starts.
When a job reaches its scheduled trigger time, the triggered job is sent back to the application via the following callback function:
Note: The following example is in Go, but applies to any programming language with gRPC support.
import rtv1 "github.com/dapr/dapr/pkg/proto/runtime/v1"
...
func (s *JobService) OnJobEventAlpha1(ctx context.Context, in *rtv1.JobEventRequest) (*rtv1.JobEventResponse, error) {
// Handle the triggered job
}
This function processes the triggered jobs within the context of your gRPC server. When you set up the server, ensure that you register the callback server, which invokes this function when a job is triggered:
...
js := &JobService{}
rtv1.RegisterAppCallbackAlphaServer(server, js)
In this setup, you have full control over how triggered jobs are received and processed, as they are routed directly through this gRPC method.
If a gRPC server isn’t registered with Dapr when the application starts up, Dapr instead triggers jobs by making a
POST request to the endpoint /job/<job-name>. The body includes the following information about the job:
Schedule: When the job triggers occurRepeatCount: An optional value indicating how often the job should repeatDueTime: An optional point in time representing either the one time when the job should execute (if not recurring)
or the not-before time from which the schedule should take effectTtl: An optional value indicating when the job should expirePayload: A collection of bytes containing data originally stored when the job was scheduledOverwrite: A flag to allow the requested job to overwrite an existing job with the same name, if it already exists.FailurePolicy: An optional failure policy for the job.The DueTime and Ttl fields will reflect an RC3339 timestamp value reflective of the time zone provided when the job was
originally scheduled. If no time zone was provided, these values indicate the time zone used by the server running
Dapr.
Now that you’ve learned what the jobs building block provides, let’s look at an example of how to use the API. The code example below describes an application that schedules jobs for a database backup application and handles them at trigger time, also known as the time the job was sent back to the application because it reached it’s dueTime.
When you run dapr init in either self-hosted mode or on Kubernetes, the Dapr Scheduler service is started.
In your code, set up and schedule jobs within your application.
The following .NET SDK code sample schedules the job named prod-db-backup. The job data contains information
about the database that you’ll be seeking to backup regularly. Over the course of this example, you’ll:
In the following example, you’ll create records that you’ll serialize and register alongside the job so the information is available when the job is triggered in the future:
db-backup)Metadata, including:
DBName)BackupLocation)Create an ASP.NET Core project and add the latest version of Dapr.Jobs from NuGet.
Note: While it’s not strictly necessary for your project to use the
Microsoft.NET.Sdk.WebSDK to create jobs, as of the time this documentation is authored, only the service that schedules a job receives trigger invocations for it. As those invocations expect an endpoint that can handle the job trigger and requires theMicrosoft.NET.Sdk.WebSDK, it’s recommended that you use an ASP.NET Core project for this purpose.
Start by defining types to persist our backup job data and apply our own JSON property name attributes to the properties so they’re consistent with other language examples.
//Define the types that we'll represent the job data with
internal sealed record BackupJobData([property: JsonPropertyName("task")] string Task, [property: JsonPropertyName("metadata")] BackupMetadata Metadata);
internal sealed record BackupMetadata([property: JsonPropertyName("DBName")]string DatabaseName, [property: JsonPropertyName("BackupLocation")] string BackupLocation);
Next, set up a handler as part of your application setup that will be called anytime a job is triggered on your application. It’s the responsibility of this handler to identify how jobs should be processed based on the job name provided.
This works by registering a handler with ASP.NET Core at /job/<job-name>, where <job-name> is parameterized and
passed into this handler delegate, meeting Dapr’s expectation that an endpoint is available to handle triggered named jobs.
Populate your Program.cs file with the following:
using System.Text;
using System.Text.Json;
using Dapr.Jobs;
using Dapr.Jobs.Extensions;
using Dapr.Jobs.Models;
using Dapr.Jobs.Models.Responses;
var builder = WebApplication.CreateBuilder(args);
builder.Services.AddDaprJobsClient();
var app = builder.Build();
//Registers an endpoint to receive and process triggered jobs
var cancellationTokenSource = new CancellationTokenSource(TimeSpan.FromSeconds(5));
app.MapDaprScheduledJobHandler((string jobName, ReadOnlyMemory<byte> jobPayload, ILogger logger, CancellationToken cancellationToken) => {
logger?.LogInformation("Received trigger invocation for job '{jobName}'", jobName);
switch (jobName)
{
case "prod-db-backup":
// Deserialize the job payload metadata
var jobData = JsonSerializer.Deserialize<BackupJobData>(jobPayload);
// Process the backup operation - we assume this is implemented elsewhere in your code
await BackupDatabaseAsync(jobData, cancellationToken);
break;
}
}, cancellationTokenSource.Token);
await app.RunAsync();
Finally, the job itself needs to be registered with Dapr so it can be triggered at a later point in time. You can do this
by injecting a DaprJobsClient into a class and executing as part of an inbound operation to your application, but for
this example’s purposes, it’ll go at the bottom of the Program.cs file you started above. Because you’ll be using the
DaprJobsClient you registered with dependency injection, start by creating a scope so you can access it.
//Create a scope so we can access the registered DaprJobsClient
await using scope = app.Services.CreateAsyncScope();
var daprJobsClient = scope.ServiceProvider.GetRequiredService<DaprJobsClient>();
//Create the payload we wish to present alongside our future job triggers
var jobData = new BackupJobData("db-backup", new BackupMetadata("my-prod-db", "/backup-dir"));
//Serialize our payload to UTF-8 bytes
var serializedJobData = JsonSerializer.SerializeToUtf8Bytes(jobData);
//Schedule our backup job to run every minute, but only repeat 10 times
await daprJobsClient.ScheduleJobAsync("prod-db-backup", DaprJobSchedule.FromDuration(TimeSpan.FromMinutes(1)),
serializedJobData, repeats: 10);
The following Go SDK code sample schedules the job named prod-db-backup. Job data is housed in a backup database ("my-prod-db") and is scheduled with ScheduleJobAlpha1. This provides the jobData, which includes:
Task nameMetadata, including:
DBName)BackupLocation)package main
import (
//...
daprc "github.com/dapr/go-sdk/client"
"github.com/dapr/go-sdk/examples/dist-scheduler/api"
"github.com/dapr/go-sdk/service/common"
daprs "github.com/dapr/go-sdk/service/grpc"
)
func main() {
// Initialize the server
server, err := daprs.NewService(":50070")
// ...
if err = server.AddJobEventHandler("prod-db-backup", prodDBBackupHandler); err != nil {
log.Fatalf("failed to register job event handler: %v", err)
}
log.Println("starting server")
go func() {
if err = server.Start(); err != nil {
log.Fatalf("failed to start server: %v", err)
}
}()
// ...
// Set up backup location
jobData, err := json.Marshal(&api.DBBackup{
Task: "db-backup",
Metadata: api.Metadata{
DBName: "my-prod-db",
BackupLocation: "/backup-dir",
},
},
)
// ...
}
The job is scheduled with a Schedule set and the amount of Repeats desired. These settings determine a max amount of times the job should be triggered and sent back to the app.
In this example, at trigger time, which is @every 1s according to the Schedule, this job is triggered and sent back to the application up to the max Repeats (10).
// ...
// Set up the job
job := daprc.Job{
Name: "prod-db-backup",
Schedule: "@every 1s",
Repeats: 10,
Data: &anypb.Any{
Value: jobData,
},
}
When a job is triggered, Dapr will automatically route the job to the event handler you set up during the server initialization. For example, in Go, you’d register the event handler like this:
...
if err = server.AddJobEventHandler("prod-db-backup", prodDBBackupHandler); err != nil {
log.Fatalf("failed to register job event handler: %v", err)
}
Dapr takes care of the underlying routing. When the job is triggered, your prodDBBackupHandler function is called with
the triggered job data. Here’s an example of handling the triggered job:
// ...
// At job trigger time this function is called
func prodDBBackupHandler(ctx context.Context, job *common.JobEvent) error {
var jobData common.Job
if err := json.Unmarshal(job.Data, &jobData); err != nil {
// ...
}
var jobPayload api.DBBackup
if err := json.Unmarshal(job.Data, &jobPayload); err != nil {
// ...
}
fmt.Printf("job %d received:\n type: %v \n typeurl: %v\n value: %v\n extracted payload: %v\n", jobCount, job.JobType, jobData.TypeURL, jobData.Value, jobPayload)
jobCount++
return nil
}
Once you’ve set up the Jobs API in your application, in a terminal window run the Dapr sidecar with the following command.
dapr run --app-id=distributed-scheduler \
--metrics-port=9091 \
--dapr-grpc-port 50001 \
--app-port 50070 \
--app-protocol grpc \
--log-level debug \
go run ./main.go
Dapr’s conversation API reduces the complexity of securely and reliably interacting with Large Language Models (LLM) at scale. Whether you’re a developer who doesn’t have the necessary native SDKs or a polyglot shop who just wants to focus on the prompt aspects of LLM interactions, the conversation API provides one consistent API entry point to talk to underlying LLM providers.
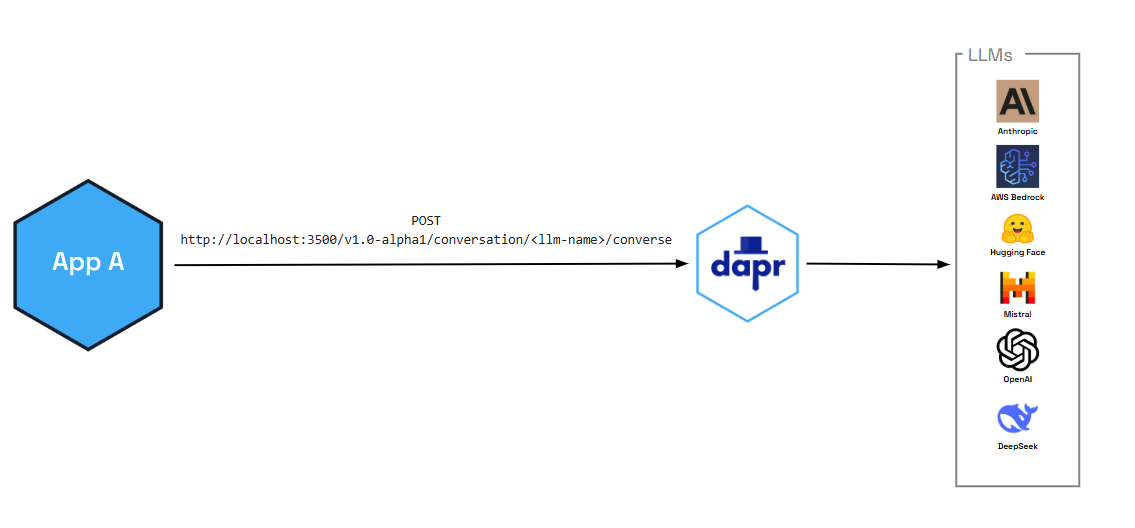
In additon to enabling critical performance and security functionality (like prompt caching and PII scrubbing), you can also pair the conversation API with Dapr functionalities, like:
Dapr provides observability by issuing metrics for your LLM interactions.
The following features are out-of-the-box for all the supported conversation components.
Prompt caching optimizes performance by storing and reusing prompts that are often repeated across multiple API calls. To significantly reduce latency and cost, Dapr stores frequent prompts in a local cache to be reused by your cluster, pod, or other, instead of reprocessing the information for every new request.
The PII obfuscation feature identifies and removes any form of sensitive user information from a conversation response. Simply enable PII obfuscation on input and output data to protect your privacy and scrub sensitive details that could be used to identify an individual.
The PII scrubber obfuscates the following user information:
Watch the demo presented during Diagrid’s Dapr v1.15 celebration to see how the conversation API works using the .NET SDK.
Want to put the Dapr conversation API to the test? Walk through the following quickstart and tutorials to see it in action:
| Quickstart/tutorial | Description |
|---|---|
| Conversation quickstart | Learn how to interact with Large Language Models (LLMs) using the conversation API. |
Want to skip the quickstarts? Not a problem. You can try out the conversation building block directly in your application. After Dapr is installed, you can begin using the conversation API starting with the how-to guide.
Let’s get started using the conversation API. In this guide, you’ll learn how to:
dapr run.Create a new configuration file called conversation.yaml and save to a components or config sub-folder in your application directory.
Select your preferred conversation component spec for your conversation.yaml file.
For this scenario, we use a simple echo component.
apiVersion: dapr.io/v1alpha1
kind: Component
metadata:
name: echo
spec:
type: conversation.echo
version: v1
To interface with a real LLM, use one of the other supported conversation components, including OpenAI, Hugging Face, Anthropic, DeepSeek, and more.
For example, to swap out the echo mock component with an OpenAI component, replace the conversation.yaml file with the following. You’ll need to copy your API key into the component file.
apiVersion: dapr.io/v1alpha1
kind: Component
metadata:
name: openai
spec:
type: conversation.openai
metadata:
- name: key
value: <REPLACE_WITH_YOUR_KEY>
- name: model
value: gpt-4-turbo
The following examples use an HTTP client to send a POST request to Dapr’s sidecar HTTP endpoint. You can also use the Dapr SDK client instead.
using Dapr.AI.Conversation;
using Dapr.AI.Conversation.Extensions;
var builder = WebApplication.CreateBuilder(args);
builder.Services.AddDaprConversationClient();
var app = builder.Build();
var conversationClient = app.Services.GetRequiredService<DaprConversationClient>();
var response = await conversationClient.ConverseAsync("conversation",
new List<DaprConversationInput>
{
new DaprConversationInput(
"Please write a witty haiku about the Dapr distributed programming framework at dapr.io",
DaprConversationRole.Generic)
});
Console.WriteLine("Received the following from the LLM:");
foreach (var resp in response.Outputs)
{
Console.WriteLine($"\t{resp.Result}");
}
package main
import (
"context"
"fmt"
dapr "github.com/dapr/go-sdk/client"
"log"
)
func main() {
client, err := dapr.NewClient()
if err != nil {
panic(err)
}
input := dapr.ConversationInput{
Content: "Please write a witty haiku about the Dapr distributed programming framework at dapr.io",
// Role: "", // Optional
// ScrubPII: false, // Optional
}
fmt.Printf("conversation input: %s\n", input.Content)
var conversationComponent = "echo"
request := dapr.NewConversationRequest(conversationComponent, []dapr.ConversationInput{input})
resp, err := client.ConverseAlpha1(context.Background(), request)
if err != nil {
log.Fatalf("err: %v", err)
}
fmt.Printf("conversation output: %s\n", resp.Outputs[0].Result)
}
use dapr::client::{ConversationInputBuilder, ConversationRequestBuilder};
use std::thread;
use std::time::Duration;
type DaprClient = dapr::Client<dapr::client::TonicClient>;
#[tokio::main]
async fn main() -> Result<(), Box<dyn std::error::Error>> {
// Sleep to allow for the server to become available
thread::sleep(Duration::from_secs(5));
// Set the Dapr address
let address = "https://127.0.0.1".to_string();
let mut client = DaprClient::connect(address).await?;
let input = ConversationInputBuilder::new("Please write a witty haiku about the Dapr distributed programming framework at dapr.io").build();
let conversation_component = "echo";
let request =
ConversationRequestBuilder::new(conversation_component, vec![input.clone()]).build();
println!("conversation input: {:?}", input.content);
let response = client.converse_alpha1(request).await?;
println!("conversation output: {:?}", response.outputs[0].result);
Ok(())
}
Start the connection using the dapr run command. For example, for this scenario, we’re running dapr run on an application with the app ID conversation and pointing to our conversation YAML file in the ./config directory.
dapr run --app-id conversation --dapr-grpc-port 50001 --log-level debug --resources-path ./config -- dotnet run
dapr run --app-id conversation --dapr-grpc-port 50001 --log-level debug --resources-path ./config -- go run ./main.go
Expected output
- '== APP == conversation output: Please write a witty haiku about the Dapr distributed programming framework at dapr.io'
dapr run --app-id=conversation --resources-path ./config --dapr-grpc-port 3500 -- cargo run --example conversation
Expected output
- 'conversation input: hello world'
- 'conversation output: hello world'
The conversation API supports the following features:
Prompt caching: Allows developers to cache prompts in Dapr, leading to much faster response times and reducing costs on egress and on inserting the prompt into the LLM provider’s cache.
PII scrubbing: Allows for the obfuscation of data going in and out of the LLM.
To learn how to enable these features, see the conversation API reference guide.
Try out the conversation API using the full examples provided in the supported SDK repos.